

Witch Hat Cookies Recipe
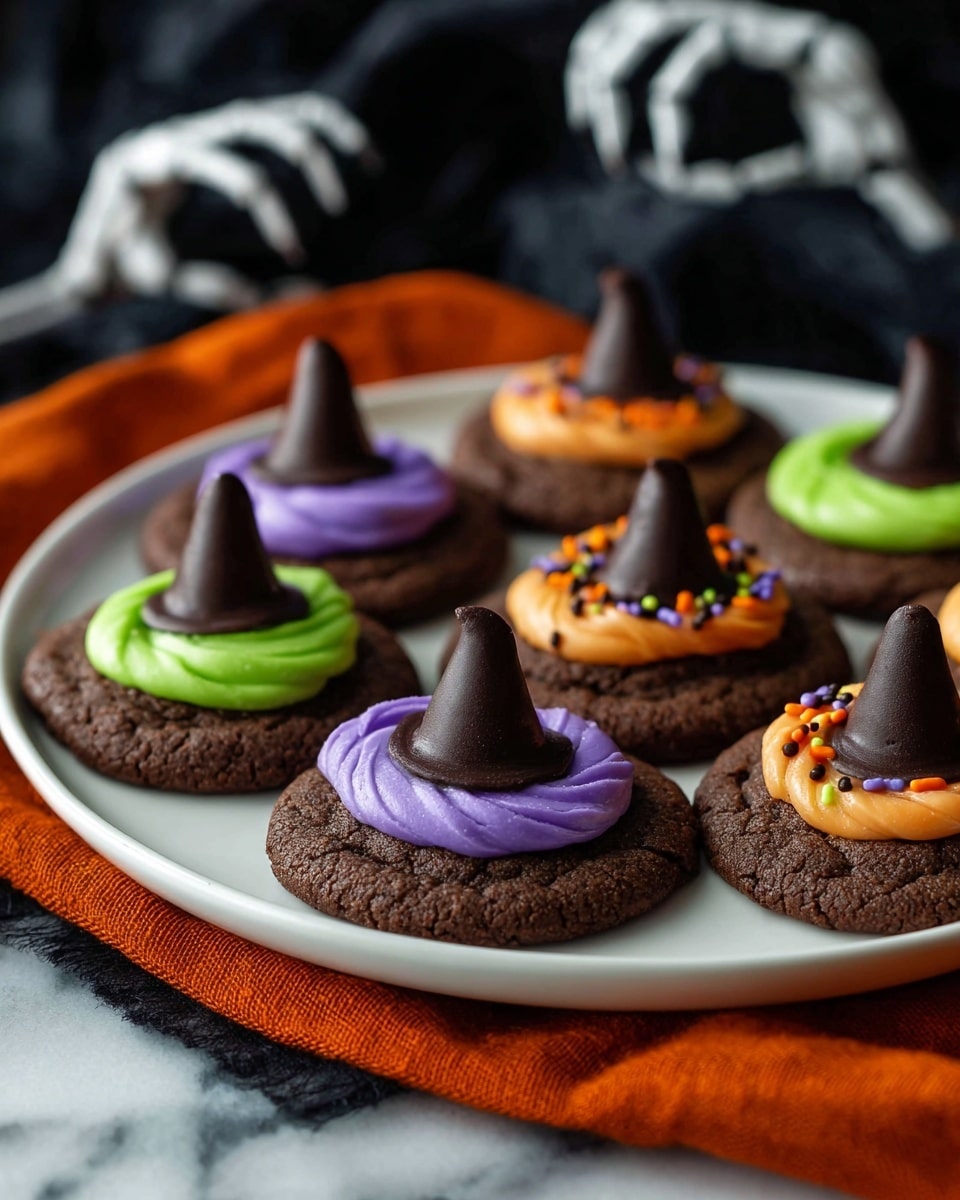
If you’re on the hunt for the perfect spooky treat that’ll impress at any Halloween gathering, I’ve got just the thing for you. This Witch Hat Cookies Recipe blends rich cocoa with sweet, buttery goodness and a fun, festive finish that’s as delightful to make as it is to eat. Trust me, once you try these witch hats you’ll be reaching for the recipe year after year – they’re that good!
Why This Recipe Works
- Perfect Balance of Flavors: The cocoa powder adds a rich chocolate base that’s not overpowering, pairing beautifully with both sugars for that magical sweetness.
- Simple Foolproof Technique: Minimal steps and common ingredients make this recipe beginner-friendly but still yields impressive results.
- Fun & Festive Presentation: The iconic Hershey’s Kisses and sprinkles turn these cookies into charming witch hats everyone will admire.
- Texture that’s Just Right: Soft and slightly chewy inside with a sugar-crusted exterior—these cookies satisfy every texture craving.

Ingredients & Why They Work
Each ingredient in this Witch Hat Cookies Recipe has a part to play—from providing structure and flavor to creating the cutest little witch hats you’ve ever seen. I like to use quality cocoa and real butter to really bring out that home-baked magic.
- All purpose flour: Builds the cookie’s base without being too dense or cakey.
- Natural unsweetened cocoa powder: Adds deep chocolate flavor without extra sweetness or heaviness.
- Baking soda: Helps the cookies rise just enough for a soft texture.
- Salt: Balances sweetness and enhances the chocolate notes.
- Unsalted butter: Gives rich flavor and a tender crumb when creamed properly.
- Granulated sugar: Creates that crunchy sugar coating on the outside for a contrasting texture.
- Brown sugar: Adds moisture and a subtle caramel undertone.
- Egg: Binds ingredients and contributes to the chewy texture.
- Vanilla extract: Lifts flavors and adds warmth.
- Powdered sugar (for frosting): Creates a smooth, fluffy frosting that’s easy to pipe.
- Gel food coloring: Perfect for vibrant frosting colors without watering down the texture.
- Hershey’s Kisses: The perfect hat peak—convenient and iconic.
- Halloween sprinkles: Optional, but adds festive flair and crunch.
Make It Your Way
One of the things I love most about this Witch Hat Cookies Recipe is how easy it is to customize. Whether you want to switch up the frosting colors or try a different type of chocolate kiss, there’s plenty of room to make it truly your own.
- Variation: I’ve tried swapping the cocoa powder for pumpkin spice mix during fall—it turns these cookies into a seasonal delight that your friends won’t stop asking about.
- Dietary Adjustment: Using vegan butter and flax egg works surprisingly well if you want to make a plant-based version, just be sure to chill the dough a bit longer.
- Difficulty Level: If you want a simpler treat, you can skip the frosting step and just roll the dough balls in sugar and bake, but I promise the frosting with Kisses is worth a little extra effort.
Step-by-Step: How I Make Witch Hat Cookies Recipe
Step 1: Mix the Dry Ingredients Like a Pro
Start by combining your all purpose flour, cocoa powder, baking soda, and salt in a bowl. Sifting the cocoa powder can help avoid clumps and ensures a smooth dough. This step is crucial because it helps distribute the leavening and salt evenly, giving you cookies that bake uniformly and taste just right.
Step 2: Cream Butter and Sugars until Fluffy
In another bowl, I use a mixer to cream unsalted butter with both granulated and brown sugars on low speed. This part takes a few minutes, but don’t rush it—it traps air that gives your cookies a tender, light texture. After it’s creamy and smooth, add the egg and vanilla, mixing gently so you don’t overwork the dough.
Step 3: Bring It All Together
Fold in the dry ingredients carefully, either with the mixer on low or by hand if you want to keep some chewiness. The dough should look uniform but not overmixed. I usually stop mixing just as I don’t see any more flour streaks, since overmixing can make cookies tough.
Step 4: Shape, Sugar Coat, and Bake
This part feels like magic—scoop out tablespoon-sized dough balls, roll them smooth in your hands, then coat each in granulated sugar. It’s this sugar coating that gives the Witch Hat Cookies their perfect sugar-crust exterior. Bake on a lined sheet at 350ºF for about 8-11 minutes; watch closely so they don’t overbake. I like to pull mine out when edges are set but centers still look a bit soft—they continue to firm up while cooling.
Step 5: Whip Up the Frosting & Assemble
Beat softened butter with powdered sugar and vanilla until fluffy. Divide into bowls and add gel food coloring if you want those signature Halloween hues. Pipe a dollop of frosting onto each cooled cookie and quickly press a Hershey’s Kiss in the center—the frosting will squish out charmingly around the base. Add Halloween sprinkles if you like for an extra festive touch.
Tips from My Kitchen
- Don’t Overbake: It’s tempting to leave the cookies in longer for crispness, but you want to catch them just as edges set so you get that perfect soft-chewy center.
- Use Gel Food Coloring: Liquid colors can thin frosting, so gel colors keep it thick and pipeable for neat hats.
- Roll Dough Evenly: Rolling uniform balls helps cookies bake consistently—plus it makes them look so much cuter!
- Let Frosting Set: After decorating, give your cookies about 15 minutes to allow frosting to hold its shape before moving or stacking.
How to Serve Witch Hat Cookies Recipe
Garnishes
I like to keep it simple with Halloween-themed sprinkles for extra crunch and color, but you could also dust with a little edible glitter or use mini chocolate chips around the base of the kiss for a fun twist. The key is to make them festive but not overwhelm the cookie’s rich chocolate flavor.
Side Dishes
These Witch Hat Cookies pair perfectly with a warm cup of spiced cider or hot chocolate. For Halloween parties, I recommend serving alongside fudge brownies or pumpkin muffins to keep the dessert table on theme and packed with variety.
Creative Ways to Present
For a fun party centerpiece, I’ve arranged these cookies standing up in a tall glass jar layered with candy corn. Another time, I placed them on a tiered cake stand with cobweb decorations woven around, which looked super cute and was a crowd favorite!
Make Ahead and Storage
Storing Leftovers
Leftover Witch Hat Cookies keep really well in an airtight container at room temperature for about 3-4 days. I usually layer parchment paper between to prevent the frosting and kisses from sticking together, keeping the hats looking sharp.
Freezing
If you want to make these in advance, you can freeze the plain baked cookies (without frosting) in a single layer on a baking sheet, then transfer to a zip-top bag for up to 2 months. When ready, thaw and then frost as directed. I’ve found this method preserves the texture perfectly.
Reheating
Because of the frosting and kisses, I don’t recommend reheating these cookies in the microwave. Instead, let them come to room temp naturally before serving. If you prefer warm cookies, bake up a fresh batch or heat unfrosted frozen dough balls and add frosting once cooled.
FAQs
-
Can I use dark cocoa powder instead of natural cocoa in the Witch Hat Cookies Recipe?
Absolutely! Dark cocoa powder will give a more intense chocolate flavor and a deeper color. Just know it can be slightly more bitter, so you might consider adjusting the sugar slightly if you prefer a sweeter cookie.
-
How do I prevent the frosting from melting when I place the Hershey’s Kiss on top?
The key is to let the cookies cool completely and use frosting that’s chilled or at least at room temperature. Pipe the frosting and immediately press the kiss down; the frosting’s texture should be thick enough to hold it without melting quickly.
-
Can I make these cookies gluten-free?
For a gluten-free version, substitute all-purpose flour with a cup-for-cup gluten-free blend that includes xanthan gum. Keep in mind the texture might differ slightly, but the result can still be delicious with some tweaking.
-
What’s the best way to transport these cookies without messing up the hats?
I recommend placing them in a single layer in a sturdy tin or box with parchment paper between layers. A shallow box minimizes shifting. If traveling a long distance, it helps to chill the cookies so the frosting firms up and stays put.
Final Thoughts
This Witch Hat Cookies Recipe has become my go-to during the spooky season, not just for how adorable they look but because they taste like just the right kind of brownie-cookie hybrid that everyone loves. Sharing them with friends and family, watching the smiles when they bite into that little chocolate peak, it’s pure joy. I can’t wait for you to try making these in your kitchen—you’ll probably find yourself baking a batch every Halloween!
Print
Witch Hat Cookies Recipe
- Prep Time: 15 minutes
- Cook Time: 11 minutes
- Total Time: 26 minutes
- Yield: 16 cookies
- Category: Dessert
- Method: Baking
- Cuisine: American
Description
Witch Hat Cookies are delightful chocolatey treats perfect for Halloween. These soft cocoa cookies are rolled in sugar, baked until just right, then topped with colorful frosting, a Hershey’s Kiss, and festive sprinkles to resemble witch hats. Easy to make and fun to decorate, they’re a spooky and sweet addition to your seasonal dessert table.
Ingredients
For the Cookies
- 1 ½ cups (180g) all purpose flour
- ¼ cup (21g) natural unsweetened cocoa powder
- ½ tsp baking soda
- ½ tsp salt
- ½ cup (113g) unsalted butter, softened
- ½ cup (99g) granulated sugar
- ½ cup (107g) brown sugar
- 1 large egg
- 1 tsp vanilla extract
- ⅓ cup (66g) granulated sugar, for rolling
For the Frosting
- 1 stick (½ cup) unsalted butter, room temperature
- 1 cup (113g) powdered sugar
- 1 tsp vanilla extract
- Gel food coloring
- Hershey’s Kisses
- Halloween sprinkles
Instructions
- Preheat and prepare dry ingredients: Preheat your oven to 350ºF. In a mixing bowl, whisk together all purpose flour, cocoa powder, baking soda, and salt until combined.
- Cream butter and sugars: In a separate bowl, use a mixer on low speed to cream together the softened unsalted butter, granulated sugar, and brown sugar until smooth and combined.
- Add egg and vanilla: Add the egg and vanilla extract to the butter and sugar mixture and mix again on low speed until incorporated.
- Combine dry and wet ingredients: Gently add the dry ingredient mixture to the wet ingredients, mixing on low speed or folding by hand just until everything is combined, taking care not to overmix.
- Shape and sugar coat dough balls: Use a small cookie scoop or tablespoon to form tablespoon-sized balls from the dough. Roll each ball between your hands to make it uniform, then roll in the ⅓ cup granulated sugar to coat.
- Arrange and bake cookies: Place the sugared dough balls 2-3 inches apart on a silicone-lined baking sheet. Bake for 11 minutes, or until the edges are set and the cookies appear slightly cracked.
- Cool cookies: Let the cookies cool on the baking sheet for 10 minutes before transferring them to a cooling rack to cool completely. Bake one sheet at a time for best results.
- Make frosting: In a mixing bowl, beat the unsalted butter, powdered sugar, and vanilla extract on medium speed with an electric mixer until fluffy and smooth. Divide the frosting into bowls and tint with gel food coloring as desired.
- Assemble witch hats: Transfer the colored frosting to a piping bag or sandwich bag with a corner snipped off. Pipe a dollop of frosting onto the center of each cooled cookie. Press a Hershey’s Kiss gently into the frosting so that it spreads slightly out the sides, forming the hat shape.
- Decorate: Add Halloween sprinkles onto the frosting around the Hershey’s Kiss for a festive look. Repeat for all cookies and let the frosting set before serving.
Notes
- Ensure butter is softened but not melted for proper creaming with sugars.
- Rolling the dough balls in granulated sugar gives the cookies a subtle crunchy texture and sparkle.
- Use gel food coloring for vibrant frosting without thinning the icing.
- For a more festive touch, try different colored Hershey’s Kisses or themed sprinkles.
- Store cookies in an airtight container at room temperature for up to 3 days to maintain freshness.
Nutrition
- Serving Size: 1 cookie
- Calories: 150 kcal
- Sugar: 15 g
- Sodium: 110 mg
- Fat: 7 g
- Saturated Fat: 4 g
- Unsaturated Fat: 2 g
- Trans Fat: 0 g
- Carbohydrates: 20 g
- Fiber: 1 g
- Protein: 2 g
- Cholesterol: 25 mg


