

Vegan Matcha Swirl Cheesecake Recipe
If you’re a fan of creamy, dreamy desserts with a hint of earthy elegance, you’re going to love this Vegan Matcha Swirl Cheesecake Recipe. I can’t even count the number of times I’ve made this for friends and family – it’s always a showstopper. The beautiful green swirls of matcha combined with a luscious cashew-based filling make it feel like a fancy treat, yet it’s surprisingly simple to whip up. Trust me, stick around because I’ll share all my tips so you nail it on your first try!
Why This Recipe Works
- Rich Creaminess: Soaked cashews blend into a silky smooth filling that feels indulgent but plant-based.
- Natural Sweetness: Maple syrup and medjool dates provide gentle sweetness without overpowering the matcha flavor.
- Matcha Magic: The green tea powder adds that stunning color and subtle earthy note, giving the cheesecake an unmatched look and taste.
- No-Bake Ease: Skip the oven and enjoy a dessert that sets in the freezer, perfect for warm days or last-minute celebrations.

Ingredients & Why They Work
Every ingredient in this Vegan Matcha Swirl Cheesecake Recipe plays a role in creating balance — creaminess, sweetness, tang, and that unmistakable matcha hit. Fresh cashews give you body and richness, while coconut milk and oil keep things smooth. Dates and maple syrup make sure it’s sweet, but not cloying, and the crust is packed with texture and a natural hint of caramel from the dates.

- Raw cashews: Soak them well to get a super creamy texture; the key to a smooth filling.
- Vanilla extract: Just a splash adds warmth and depth but you can skip it if you prefer pure matcha flavor.
- Lemon juice: Brightens the filling and adds that subtle tang you want in a cheesecake.
- Light coconut milk: For creaminess without heaviness; full-fat works too if you want ultra richness.
- Melted coconut oil: Helps the cheesecake set firmly but feel luscious—if you go oil-free, it’ll be softer.
- Maple syrup: Gentle, natural sweetness that complements the matcha’s earthiness.
- Coconut yogurt: Adds a slight tang and extra creaminess—makes the filling taste fresh and balanced.
- Sea salt: Enhances all the flavors, don’t skip it!
- Matcha powder: The star ingredient for that signature color and flavor; start with less and taste before adding more.
- Medjool dates: Natural sweetener for the crust with a chewy, caramel-like taste.
- Raw walnuts: They give the crust a buttery texture that holds together perfectly.
Make It Your Way
I love how forgiving this Vegan Matcha Swirl Cheesecake Recipe is — it invites you to get creative! Whether you want it more tart, slightly sweeter, or with a crust swap, there’s room to play. I’ve made it with different nuts and yogurts, all turning out delicious in their own way.
- Variation: For a nut-free crust, I’ve swapped walnuts with sunflower seeds and added a pinch of cinnamon for extra flavor — it was just as great!
- Dietary Modification: If you want it oil-free, swap the coconut oil for extra coconut milk or yogurt, but expect a softer texture that’s still creamy and delicious.
- Seasonal Twist: Adding a teaspoon of freshly grated ginger into the filling gives it a warming spice note that works especially well in colder months.
- Difficulty Level: If you’re new to vegan cheesecakes, try breaking down the steps over two days — soak cashews overnight, make crust and filling the next day to ease the process.
Step-by-Step: How I Make Vegan Matcha Swirl Cheesecake Recipe
Step 1: Soak Your Cashews (The Creaminess Secret!)
Start by soaking your raw cashews. I usually cover them with very hot water and soak for an hour, which speeds things up if I’m short on time. But overnight in cool water works even better if you have time. This soaking step is what gives your cheesecake that ultra-smooth, creamy texture — if you skip it, you’ll notice bits or grittiness, and nobody wants that!
Step 2: Prepare the Crust (Date & Walnut Magic)
Throw the pitted dates into your food processor first. I pulse them until they break up and start sticking together like doughy little balls. Then add your raw walnuts and a pinch of sea salt. Blend until you get a meal-like texture, then mix in the dates again to make a sticky dough. If the mix feels too dry, give it a few more dates; too wet, toss in more nuts. Press this mixture firmly into your lined pan, making sure to push it slightly up the sides — I use a flat glass lined with parchment to get an even crust every time. Then pop it into the freezer to firm up while you make the filling.
Step 3: Blend the Filling Base
Drain the soaked cashews and toss them into a high-speed blender with coconut milk, coconut oil, maple syrup, lemon juice, sea salt, vanilla extract, and coconut yogurt. Blend until silky smooth, pausing to scrape down the sides to ensure everything is perfectly incorporated. The filling should be creamy and pourable, not thick or grainy. Taste it here — adjust maple syrup if you want sweeter, or a squeeze more lemon juice for brightness.
Step 4: Create the Matcha Swirl
Pour about two-thirds of the vanilla filling into your chilled crust and gently tap the pan on your countertop to release any air bubbles. To the remaining filling, add your matcha powder — I start with 1 ½ teaspoons and blend until smooth. Take a moment to taste; too much matcha can get bitter, so add gradually. Pour this green goodness over the vanilla part in a swirling motion. Then, grab a spoon or chopstick and create beautiful swirls by dragging through the mixture a few times. Tap again to settle any bubbles.
Step 5: Freeze and Set
Cover your cheesecake loosely with plastic wrap and place it in the freezer for at least 3-4 hours until solid. When you’re ready to serve, let it thaw on the counter for 15-20 minutes so it softens just enough to slice beautifully with a hot knife. Your slices will look stunning with the green and creamy white swirls showing—pure magic.
Tips from My Kitchen
- Soak Cashews Thoroughly: I’ve found overnight soaking makes the smoothest filling, but hot-water soaking is great if you’re pressed for time.
- Taste Before You Swirl: Always sample your filling before adding matcha – adjust sweetness & tartness to perfection.
- Use a Hot Knife for Slicing: Run your knife under hot water, wipe dry, then slice for clean, pretty pieces without cracking.
- Don’t Skip the Freezer Tab: Gently tapping the pan after pouring filling removes air bubbles and avoids holes in your cheesecake texture.
How to Serve Vegan Matcha Swirl Cheesecake Recipe

Garnishes
I usually keep garnishes simple to let the cheesecake shine. A dollop of coconut whipped cream adds a light, airy complement, and a few fresh berries like raspberries or blueberries inject pops of tartness and color. Sometimes I sprinkle a little toasted coconut or matcha powder right on top — it’s subtle but so pretty! If you want to get fancy, edible flowers or a drizzle of vegan white chocolate sauce work beautifully too.
Side Dishes
This cheesecake pairs wonderfully with lighter sides. A cup of hot jasmine or green tea is my personal go-to, helping to balance the sweetness and matcha’s grassy notes. For brunch or afternoon gatherings, fresh fruit salad or a crisp citrus sorbet also play nicely alongside the creamy texture.
Creative Ways to Present
For special occasions, I’ve turned this Vegan Matcha Swirl Cheesecake Recipe into mini individual servings by using a muffin tin lined with parchment cups—perfect for parties! You can swirl more matcha on top for dramatic patterns or serve slices with a sprinkle of toasted sesame seeds and a drizzle of dark chocolate for an upscale look. Presentation really amps up the wow factor and makes guests feel extra special.
Make Ahead and Storage
Storing Leftovers
I like to store leftovers in the freezer wrapped tightly in plastic wrap and a container to prevent freezer burn. When I want to enjoy more later, I let the cheesecake sit out at room temperature for about 15-20 minutes before serving. The texture softens up beautifully, almost like freshly made. Storing it in the fridge is okay if you plan to eat it quickly within 2-3 days, but it gets pretty soft and harder to slice.
Freezing
This recipe freezes incredibly well! Freezing right after it’s set locks in the flavors and texture, so I often make it ahead for gatherings. Just make sure it’s well covered to avoid any freezer odors sneaking in. When ready to serve, thaw on the counter for 15-20 minutes, and you’ll be amazed how fresh it tastes.
Reheating
This cheesecake is best served chilled or slightly softened, so I don’t recommend reheating it unless you want to try a completely different mousse-like dessert. Instead, bring it to room temp before slicing and serving for the perfect mouthfeel.
FAQs
-
Can I make this Vegan Matcha Swirl Cheesecake Recipe nut-free?
While cashews and walnuts are key for texture and creaminess, you can experiment with soaked sunflower seeds or pumpkin seeds to replace nuts, especially in the crust. However, the texture might differ a bit – opting for a bit more coconut yogurt or milk helps maintain creaminess.
-
How strong should the matcha flavor be?
Matcha powder varies in strength and bitterness, so I recommend starting with 1 ½ teaspoons when swirling into the filling. You can always add more lightly for a stronger taste, but too much can overwhelm the delicate balance and add bitterness.
-
What type of pan works best for this cheesecake?
Using a 7-inch springform pan makes removing the cheesecake super easy and ensures your swirl pattern stays intact. If you don’t have one, any round cake pan lined well with parchment paper works too; just be gentle when unmolding.
-
Can I substitute the coconut yogurt?
Yes! If you don’t have coconut yogurt, you can use an extra 1/4 cup of coconut milk plus a bit more lemon juice to keep the tangy balance. Just keep in mind the final texture might be slightly less creamy.
-
Do I have to freeze the cheesecake, or can I refrigerate it?
Freezing helps the cheesecake set firmly and develop that perfect sliceable texture. Refrigeration alone will yield a softer, more mousse-like dessert which can be enjoyed but may not cut as neatly. I recommend freezing unless you want a very soft, spoonable treat.
Final Thoughts
This Vegan Matcha Swirl Cheesecake Recipe has become one of my absolute favorites for sharing with guests or just treating myself on a quiet weekend. It’s effortless to customize, stunning to look at, and genuinely delicious with every bite. If you’re at all curious about matcha desserts or want a plant-based cheesecake that impresses without stress, you should definitely give this a whirl. I can’t wait to hear how your cheesecake turns out — I’m rooting for you!
Print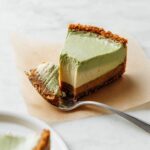
Vegan Matcha Swirl Cheesecake Recipe
- Prep Time: 1 hour 30 minutes
- Cook Time: 0 minutes
- Total Time: 4 hours 30 minutes
- Yield: 10 slices
- Category: Dessert
- Method: No-Cook
- Cuisine: Vegan
- Diet: Vegan
Description
A creamy and vibrant Vegan Matcha Swirl Cheesecake featuring a rich cashew and coconut filling with a date and walnut crust. This no-bake dessert balances sweet maple syrup with tangy lemon and earthy matcha, perfect for a refreshing plant-based treat.
Ingredients
Filling
- 1 1/2 cups raw cashews (soaked overnight in cool water or in very hot water for 1 hour)
- 1 tsp vanilla extract (optional)
- 1 medium lemon, juiced (~3 Tbsp or 45 ml)
- 1/4 cup canned light coconut milk (or sub full-fat coconut milk)
- 1/4 scant cup melted coconut oil
- 1/2 cup maple syrup
- 1/4 cup coconut yogurt (DIY or store-bought vegan yogurt)
- 1/4 tsp sea salt
- 1 1/2 – 2 tsp matcha green tea powder
Crust
- 1 cup packed medjool dates (pitted, about 22 dates or 275 g pitted before measuring)
- 1 1/2 cups raw walnuts (or sub raw almonds)
- 1 pinch sea salt
Instructions
- Soak cashews: Add cashews to a bowl, cover with very hot water, and let soak 1 hour or cover with cool water and let soak for 6-8 hours or overnight. Drain well and set aside.
- Make crust base: Add dates to a food processor and blend until small bits remain and it forms into a ball. Remove and set aside.
- Prepare crust dough: Add nuts and sea salt to the food processor and process into a meal. Then add dates back and blend until a loose dough forms that sticks together when pressed. Adjust by adding more dates if too dry or more walnuts if too wet.
- Form crust: Line a 7-inch springform pan or standard pie dish with parchment paper. Press the crust mixture evenly into the pan, pushing some up the sides using a flat-edged glass lined with parchment paper. Freeze to firm up.
- Blend filling: Add all filling ingredients except matcha to a high-speed blender and blend until creamy and smooth, scraping down sides as needed. Adjust sweetness or tang with more maple syrup, coconut yogurt, or lemon juice.
- Assemble base layer: Pour 2/3 of the filling into the crust and tap to release air bubbles. Set aside.
- Prepare matcha swirl: Add matcha powder to remaining filling, blend until smooth and creamy. Taste to check bitterness, use 1 1/2 tsp for balance.
- Create swirl: Add the matcha filling over the base layer in a swirling motion. Swirl further with a spoon or chopstick and tap the pan to release air bubbles.
- Freeze cheesecake: Loosely cover with plastic wrap and freeze for 3-4 hours until firm to the touch.
- Serve: Remove from freezer 15-20 minutes before serving to soften slightly. Slice with a hot knife. Optionally top with coconut whipped cream and fresh berries.
- Storage: Store leftovers in the freezer up to 1 month or in the refrigerator up to 3 days (will be softer). For best texture, thaw before slicing.
Notes
- If you don’t have coconut yogurt, substitute with 1/4 cup more coconut milk and a bit more lemon juice for tang.
- Nutrition info is an estimate using light coconut milk without toppings.
- Adapted from 7-Ingredient Vegan Cheesecakes recipe.
- Try other matcha recipes like Matcha Green Smoothie Bowls, Mint Matcha Shamrock Shake, and Vegan Matcha Latte.
Nutrition
- Serving Size: 1 slice
- Calories: 320 kcal
- Sugar: 18 g
- Sodium: 50 mg
- Fat: 22 g
- Saturated Fat: 15 g
- Unsaturated Fat: 6 g
- Trans Fat: 0 g
- Carbohydrates: 27 g
- Fiber: 4 g
- Protein: 6 g
- Cholesterol: 0 mg


