

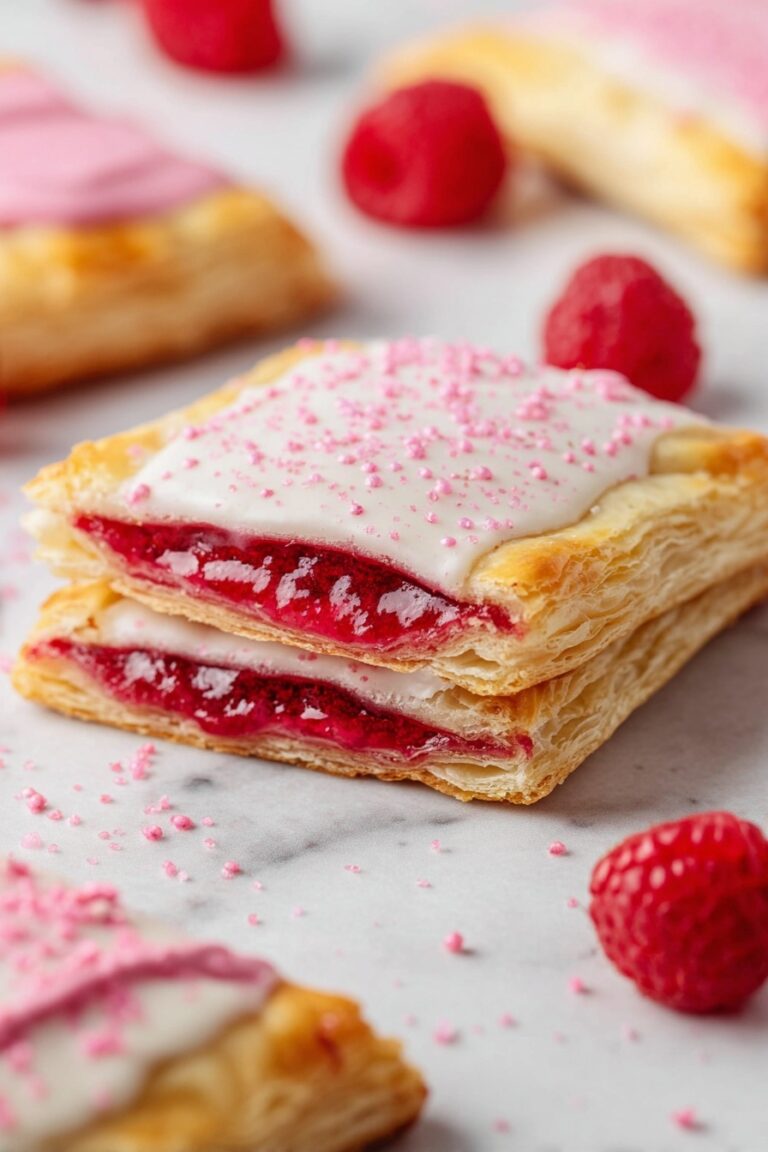
Strawberry Cookie Bars with Glaze Recipe
I’m so excited to share this fan-freaking-tastic Strawberry Cookie Bars with Glaze Recipe with you! These bars are the ultimate cozy treat — think poptart vibes in a soft, chewy cookie form with a glossy, sweet glaze on top. Whether you’re baking for a crowd or just craving something special, this recipe hits all the right notes. Stick around because I have some handy tips and tricks that will help you nail it every single time!
Why This Recipe Works
- Perfect Balance of Flavors: The strawberry preserves add a bright, fruity sweetness that contrasts beautifully with the buttery sugar cookie base.
- Easy Layered Technique: Pressing half the dough, spreading jam, then topping with more dough creates a handheld treat that’s chewy and satisfying.
- Buttery Texture: Room temperature butter creamed with sugar gives a tender, fluffy cookie bar that stays soft for days.
- Show-Stopping Glaze: The vanilla glaze poured on top adds sweetness and a splash of color with rainbow sprinkles—perfect for celebrations or just brightening a regular day.

Ingredients & Why They Work
What I love about the ingredients here is how straightforward yet thoughtful they are. The combination of simple pantry staples with luscious strawberry preserves creates something that feels homemade and special without extra fuss. Here are some of my favorite things about each key player in this Strawberry Cookie Bars with Glaze Recipe.

- Unsalted Butter: Softened to room temp so it creams perfectly with sugar, creating the tender texture of the cookie layers.
- Granulated Sugar: Provides sweetness and helps with the slight crisp edges after baking.
- Eggs: They add moisture and bind everything together, plus a bit of richness.
- Vanilla Extract or Bean Paste: Just a splash elevates the flavors, making the cookie bars taste warm and inviting.
- All-Purpose Flour: The sturdy backbone of the cookie bars—remember to measure this carefully for perfect texture.
- Sea Salt: The salt cuts through the sweetness and balances the flavors beautifully.
- Baking Soda: Helps the dough rise just enough for a soft, tender crumb.
- Strawberry Preserves: This is the star filling—sweet, fruity, and sticky, it keeps the bars moist and bursting with flavor.
- Powdered Sugar: For the glaze, making it smooth and sweet.
- Whole Milk: Just enough to get the glaze to a perfect pourable consistency.
- Rainbow Sprinkles: Because who doesn’t love that festive, colorful touch on top?
Make It Your Way
One of my favorite things about this Strawberry Cookie Bars with Glaze Recipe is how easy it is to tweak to your own taste or dietary needs. I often mix things up depending on what I have on hand or the season. You’ll find it forgiving and fun to personalize!
- Variation: Once, I swapped the strawberry preserves for raspberry jam, and the bars were still insanely good—fruity and tart with the same lovely texture.
- Dairy-Free: You can use a plant-based butter and almond milk in the glaze to make these bars dairy-free without losing any flavor.
- Decorating: If sprinkles aren’t your thing, try crushed freeze-dried strawberries or a dusting of powdered sugar instead for a different vibe.
Step-by-Step: How I Make Strawberry Cookie Bars with Glaze Recipe
Step 1: Prep and Cream the Butter and Sugar
Start by lining an 8×8 square metal pan with parchment, letting the edges hang over for an easy lift-out later—that parchment is your best friend here. Preheat your oven to 375°F (190°C). Now, in your mixer bowl, cream the room temperature butter and granulated sugar for about 3 minutes. You want it light and fluffy, so don’t rush this part. I usually stop once or twice to scrape down the bowl, making sure everything blends evenly.
Step 2: Mix in Eggs and Vanilla
Next, add the eggs and vanilla extract or bean paste to the creamed mixture. Beat them just until combined—overmixing here can make the dough tough. A quick scrape down of the bowl after mixing helps avoid streaks of unmixed egg or flour later on.
Step 3: Combine Dry Ingredients and Chill Dough
Whisk together the flour, fine sea salt, and baking soda separately, then add them gradually to your wet mixture. Mix just until the dough starts forming—not too much! I can’t stress enough how important it is to measure your flour carefully here. Using the spoon and level method prevents a dry, crumbly dough. Once your dough is ready, pop it in the fridge for about 20 minutes to firm up—this makes it way easier to spread.
Step 4: Press Dough and Add Strawberry Preserves
Take half the dough and press it firmly into your lined baking pan in an even layer. To keep your hands from getting sticky, work with clean, warm hands and wet them slightly if you need to. Then, lift the first half out with the hanging parchment strips and place it on a baking sheet—this will get frozen while you prep the second half.
Replace the parchment in your pan, then press the remaining dough evenly into this pan. Now spread a generous 2/3 cup of strawberry preserves over the dough in the pan. This layer is what makes these bars truly pop with flavor.
Step 5: Add Top Layer and Bake
Unwrap the frozen first layer from the baking sheet (peel off the parchment) and place it with care over the preserves in the pan. Press it gently but firmly to seal and secure that jam in between the cookie layers. Bake at 375°F for 25-28 minutes or until the top is golden brown. The kitchen will smell amazing!
Step 6: Cool and Glaze
Let the bars cool completely on a wire rack. Once cooled, lift out the bars by pulling the overhanging parchment. Flip the whole slab upside down so the bottom becomes the top (this keeps the surface smooth for glazing). Whisk up the powdered sugar, milk, and vanilla extract until smooth, then pour the glaze over the bars. Top with your favorite rainbow sprinkles for that classic poptart vibe.
Patience is key here—let the glaze set at room temperature for 1-2 hours before slicing into 15 bars. If you rush it, the glaze can get smudged or sticky, especially in humid weather.
Tips from My Kitchen
- Flour Measurement Matters: I learned the hard way that scooping flour leads to dense dough—fluff and spoon into your cup or use a scale for perfect results.
- Keep It Cool: Chilling the dough wasn’t just a suggestion; it made handling and layering so much easier without the dough sticking everywhere.
- Don’t Rush the Glaze Set: Resist the urge to speed up drying by refrigerating or freezing—it wrinkles the glaze and messes with texture.
- Use a Metal Pan: Tried glass once, but the bake time threw me off—metal pans give you that golden crust and perfect texture every time.
How to Serve Strawberry Cookie Bars with Glaze Recipe

Garnishes
I usually stick with classic rainbow sprinkles because they brighten the bars and add a fun crunch. But if I’m feeling fancy or baking for a party, I love dusting a little powdered sugar or chopped freeze-dried strawberries on top — it elevates the look without overpowering that perfect glaze.
Side Dishes
These bars are a sweet treat most days, but if I’m serving brunch or afternoon tea, I pair them with fresh fruit salad or a dollop of lightly whipped cream. A cup of coffee or herbal tea alongside really rounds out this simple yet special dessert experience.
Creative Ways to Present
For birthdays or holidays, I like to stack these bars on a pretty cake stand, drizzle a little extra glaze over the edges, and scatter edible flowers or mint leaves around the plate. It instantly makes these bars feel more festive and exciting — perfect for impressing guests without fuss.
Make Ahead and Storage
Storing Leftovers
I store any leftovers in an airtight container at room temperature — they keep soft and tasty for about 3-4 days. If your kitchen is warm, just pop the container in the fridge and let the bars come back to room temp before enjoying.
Freezing
Freezing these bars works surprisingly well! I slice them into individual bars before freezing, wrap each in plastic wrap, and store them in a freezer-safe bag. When I want a treat, I thaw at room temp or microwave gently for about 15 seconds for that fresh-baked feel.
Reheating
If you ever want to warm these bars a bit, I recommend a quick zap in the microwave or a brief stint in a 300°F oven for 5-7 minutes. Just watch the glaze—it can melt or soften quickly, but a little warmth brings out that buttery flavor beautifully.
FAQs
-
Can I use a different type of jam instead of strawberry preserves in this recipe?
Absolutely! While strawberry works beautifully, you can swap in raspberry, blueberry, blackberry, or even apricot preserves. Just make sure the jam isn’t too runny, or your bars might get soggy.
-
Why is chilling the cookie dough necessary before baking?
Chilling the dough firms it up, making it easier to press into the pan and layer without sticking or becoming messy. It also helps prevent spreading during baking, which keeps the bars thick and chewy.
-
Can I make this recipe gluten-free?
You can try swapping the all-purpose flour with a 1-to-1 gluten-free baking flour blend. Just check the blend contains xanthan gum or another binder for the best structure. Expect texture to be a bit different but still delicious!
-
What if I don’t have an 8×8 metal pan? Can I use glass or ceramic?
Metal pans are recommended because they conduct heat evenly and help get that perfect baked texture. Glass or ceramic pans bake differently and may require longer baking times, which can change the texture of your bars. If you only have glass or ceramic, monitor the bars closely and adjust baking time as needed.
-
How long do I need to let the glaze set before cutting the bars?
Plan for 1-2 hours at room temperature so the glaze can harden properly. Avoid rushing this by refrigerating or freezing, as it can cause the glaze to wrinkle or become sticky.
Final Thoughts
This Strawberry Cookie Bars with Glaze Recipe holds a special place in my heart because it’s one of those nostalgic, feel-good treats that always brings smiles. It’s easy enough to whip up without much fuss but looks and tastes like you spent hours making something truly special. I hope you enjoy making and sharing these as much as I do—it’s like popping a little celebration into every bite. Give it a try next time you want a sweeter day!
Print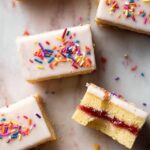
Strawberry Cookie Bars with Glaze Recipe
- Prep Time: 2 hours
- Cook Time: 28 minutes
- Total Time: 2 hours 28 minutes
- Yield: 15 servings
- Category: Dessert
- Method: Baking
- Cuisine: American
Description
Delight in these homemade Poptart Cookie Bars featuring a tender sugar cookie dough layered with strawberry preserves and topped with a sweet vanilla glaze and rainbow sprinkles. Perfect for a nostalgic treat or fun dessert!
Ingredients
For the Sugar Cookie Dough
- ½ cup unsalted butter, room temperature
- 1 cup granulated sugar
- 2 large eggs, room temperature
- 1 teaspoon vanilla extract or vanilla bean paste
- 2 ½ cups + 2 tbsp all-purpose flour
- ½ teaspoon fine sea salt
- ½ teaspoon baking soda
- ⅔ cup strawberry preserves
For the Glaze
- 1 cup powdered sugar
- 1 ½-2 tablespoons whole milk
- ½ teaspoon vanilla extract
- Rainbow sprinkles, for decorating
Instructions
- Prepare the Pan and Oven: Line an 8×8 inch square metal baking pan with parchment paper, ensuring the paper hangs over all sides for easy removal. Preheat your oven to 375°F (190°C).
- Cream Butter and Sugar: In a stand mixer, cream together the room temperature unsalted butter and granulated sugar for 3 minutes until the mixture is light and fluffy. Scrape down the sides of the bowl.
- Mix in Eggs and Vanilla: Add the eggs and vanilla extract to the creamed mixture and mix until just combined, scraping the bowl again as needed.
- Add Dry Ingredients: Incorporate the all-purpose flour, fine sea salt, and baking soda until the dough starts to come together.
- Chill the Dough: Refrigerate the dough for 20 minutes to firm up, which will make it easier to spread in the pan.
- Form the Bottom Layer: Press half of the chilled dough evenly into the prepared pan. Carefully lift this layer out using the parchment paper overhang and transfer it to a baking sheet. Place it in the freezer to keep firm.
- Add the Top Layer in Pan: Replace the parchment paper strips in the pan. Press the remaining dough evenly into the pan to form the base layer.
- Spread the Strawberry Preserves: Evenly spread the strawberry preserves over the dough now in the pan.
- Add Second Cookie Layer: Remove the frozen bottom layer from the freezer and gently peel off the parchment. Place it on top of the jam layer, pressing firmly to secure the layers together.
- Bake the Bars: Bake the assembled cookie bars in the preheated oven for 28 minutes or until the top is golden brown.
- Cool and Flip: Let the bars cool completely on a wire rack. Then use the parchment overhang to lift the bars from the pan and flip them upside down so the bottom is now the top.
- Prepare the Glaze: Whisk together powdered sugar, whole milk (start with 1 ½ tablespoons and add more if needed), and vanilla extract until smooth.
- Glaze and Decorate: Pour the glaze over the bars and sprinkle generously with rainbow sprinkles.
- Set the Icing and Serve: Allow the glaze to set at room temperature for 2 hours before cutting into 15 bars for serving.
Notes
- Properly measure flour using the spoon-level method or a kitchen scale to avoid dense bars.
- Use a square metal 8×8 inch baking pan with square edges, not glass or ceramic, for accurate baking times and texture.
- Let the glaze fully set before cutting to prevent wrinkling; avoid refrigeration which can cause moisture issues.
- Try different fruit preserves such as grape, blackberry, or blueberry as alternatives to strawberry.
- Keep your hands clean and slightly wet when pressing the sticky dough into the pan to avoid sticking.
- Step-by-step photos can help visualize the process for best results.
Nutrition
- Serving Size: 1 bar
- Calories: 280 kcal
- Sugar: 18 g
- Sodium: 110 mg
- Fat: 12 g
- Saturated Fat: 7 g
- Unsaturated Fat: 4 g
- Trans Fat: 0 g
- Carbohydrates: 38 g
- Fiber: 1 g
- Protein: 3 g
- Cholesterol: 55 mg
