

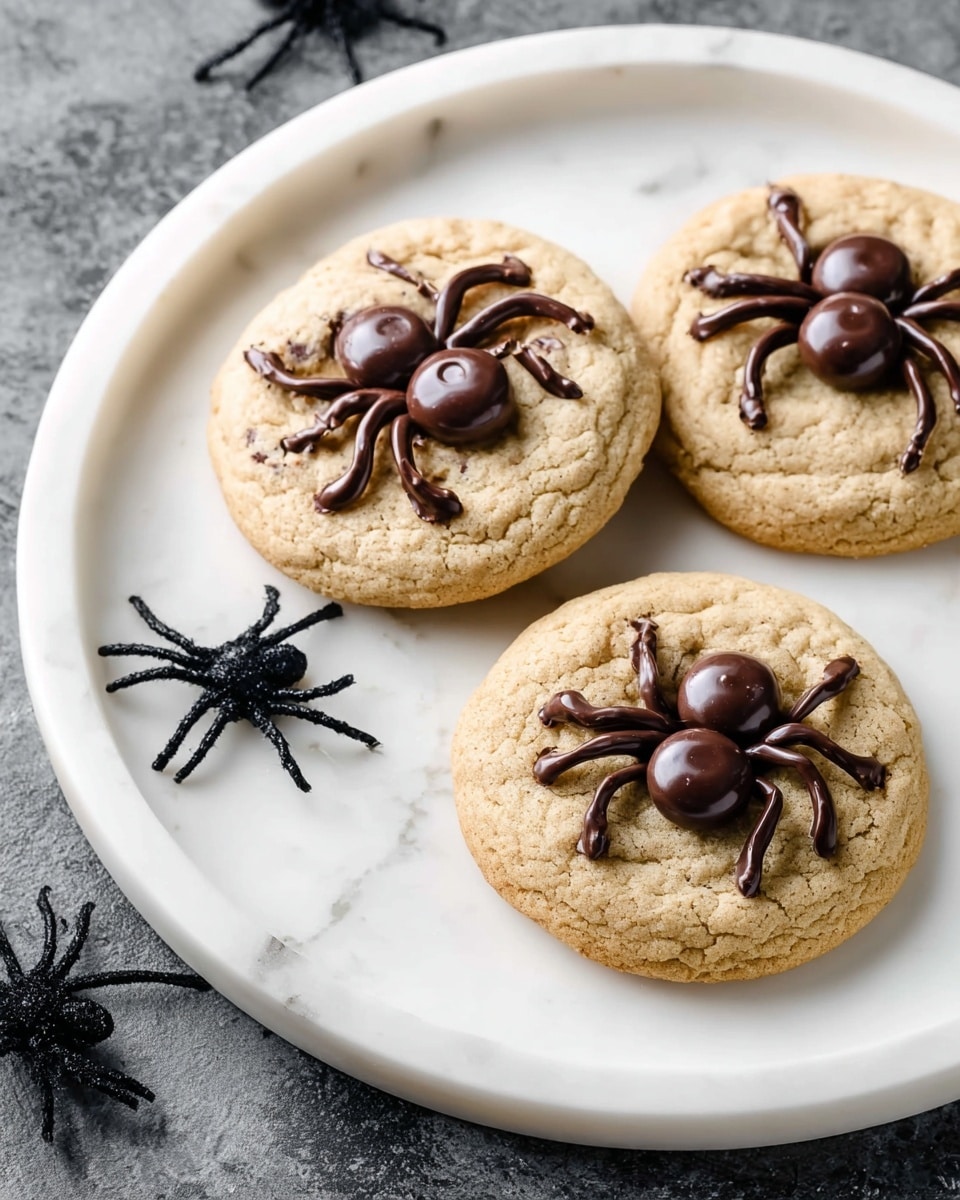
Spider Cookies Recipe
Alright, friend, if you’re looking for a fun, festive treat that’s sure to bring smiles (and maybe a little spookiness) to your kitchen, you’re going to love this Spider Cookies Recipe. These are not your average chocolate chip cookies—think soft, buttery goodness crowned with perfectly placed chocolate spider legs that make every bite playful and irresistible. Whether you’re baking for a Halloween party or just want a cute twist on your cookie game, stick with me and I’ll show you how to nail these every single time!
Why This Recipe Works
- Soft, Chewy Texture: Thanks to the mix of brown sugar and egg yolk, these cookies stay tender and chewy—exactly what you want in a chocolate chip cookie.
- Simple Yet Impressive: The chocolate chip spider legs look elaborate but are surprisingly easy to make with a ziplock bag and some patience.
- Melted Chocolate Drizzle: Melting extra chips for the spider legs adds a rich, glossy finish that really elevates these cookies from basic to show-stopping.
- Perfect for All Skill Levels: Even if you haven’t decorated cookies before, this Spider Cookies Recipe is forgiving, fun, and a great confidence booster with kids or guests.

Ingredients & Why They Work
These Spider Cookies use simple pantry staples that come together beautifully. I always grab good-quality butter and semi-sweet chocolate chips because they really make a difference in taste and texture. Here’s a quick rundown of why each ingredient plays its part.
- All-purpose flour: Gives structure to the cookie dough without making them dense.
- Baking soda: Helps cookies spread evenly and get a light, tender crumb.
- Salt: Balances sweetness and enhances the chocolate flavor.
- Butter (melted and cooled): Provides richness and helps create that chewy texture I adore.
- Light brown sugar: Keeps cookies moist and adds a subtle caramel note.
- Granulated sugar: For a slightly crisp exterior to contrast with the soft inside.
- Egg & egg yolk: Give moisture and help bind ingredients, while the yolk adds richness.
- Vanilla extract: Essential for deep, warm flavors that merge everything together.
- Semi-sweet chocolate chips: The star attraction—half go into the dough, the rest melt for the spider legs.
Make It Your Way
Sure, the classic Spider Cookies are magical on their own, but my favorite thing about this recipe is how easily it adapts. You can personalize the look or flavor depending on your mood or occasion. Don’t be shy—make it yours!
- Variation: I once added a pinch of cinnamon to the dough, which gave the spiders a cozy warmth perfect for fall. You might want to try that.
- Dietary Modifications: Using vegan butter and egg replacer works pretty well if you need a dairy-free or egg-free version.
- Seasonal Changes: Swap out the semi-sweet chips for white chocolate or peanut butter chips for a unique twist.
Step-by-Step: How I Make Spider Cookies Recipe
Step 1: Prep Your Oven & Dry Ingredients
First things first, preheat your oven to 350°F (175°C). In a medium bowl, whisk together your all-purpose flour, baking soda, and salt. This ensures even distribution so your cookies bake perfectly every time. Trust me, mixing the dry ingredients first saves you from those frustrating uneven bites.
Step 2: Cream Butter & Sugars
In a large mixing bowl, beat the melted (but still warm) butter with your brown and granulated sugars until everything is blended smoothly. Using melted butter gives the cookies that unbeatable chewy texture, but make sure it’s not hot or it’ll cook the eggs later on. I like to let mine cool on the counter for about 10 minutes before mixing.
Step 3: Add Eggs & Vanilla
Next, beat in the large egg, the egg yolk, and vanilla extract. The extra yolk adds richness and keeps the cookies soft. Make sure everything is combined well before moving on.
Step 4: Combine Wet & Dry, Add Chocolate Chips
Gently stir the flour mixture into the wet ingredients until just combined—don’t overmix, or your cookies could get dense. Then fold in ¾ cup of the semi-sweet chocolate chips so you get little bursts of melty chocolate in every bite.
Step 5: Shape & Bake
Scoop your dough into balls (I use about a tablespoon-size for each cookie) and place them on a parchment-lined baking sheet with some space in between. Bake for 10-12 minutes until the edges are just starting to brown but the centers still look a little soft. That’s your cue for soft, chewy perfection.
Step 6: Add Spider Legs
Right after taking the cookies out of the oven, press 3-4 chocolate chips onto each cookie’s top with the pointy side facing up—these are the spider bodies. Then melt the remaining chocolate chips in a microwave-safe bowl on low power, stirring every 30 seconds until silky smooth. Spoon the melted chocolate into a ziplock bag and snip a tiny corner off for a piping bag.
Step 7: Draw the Spider Legs
Squeeze the melted chocolate through the tiny hole to create 8 spider legs around each cluster of chocolate chips. Take your time here; it doesn’t have to be perfect. The uneven little legs add character and charm! Let the cookies sit until the chocolate firms up.
Tips from My Kitchen
- Butter Temperature Matters: Let melted butter cool so it’s warm but not hot—too hot and it’ll cook your eggs, ruining the texture.
- Small Ziplock Slit: Cut the tiniest hole you can in the ziplock bag for precise spider legs—practice on parchment paper first if needed.
- Don’t Overbake: Cookies should look slightly underdone when you pull them out—this keeps them chewy once cooled.
- Cool Before Leg Drawing: Adding the melted chocolate while the cookie’s too warm can cause it to melt too much, so wait a minute or two.
How to Serve Spider Cookies Recipe
Garnishes
When serving, I love adding a light dusting of powdered sugar to mimic a bit of cobweb powdery effect around the edges. It’s subtle but adds an extra layer of festive fun. You could also scatter a few candy eyes on or near the cookies to make your spiders extra spooky and eye-catching!
Side Dishes
These Spider Cookies pair beautifully with a glass of cold milk, hot chocolate for chilly nights, or even a warming cup of chai tea. If you’re serving at a party, set up a “creepy crawlies” dessert table with gummy worms and pumpkin-spiced treats.
Creative Ways to Present
I’ve taken these cookies to Halloween get-togethers on a bed of green-tinted shredded coconut to resemble “grass,” with little plastic spiders scattered on top for effect. Another fun way is to serve them on black or orange plates with Halloween-themed napkins for a spooky vibe—it gets everyone talking and snapping pics!
Make Ahead and Storage
Storing Leftovers
I keep leftover Spider Cookies in an airtight container at room temperature. They stay fresh and chewy for about 1-2 days, which is usually just enough time before everyone sneaks them all. If you want to keep them longer, make sure your container has a good seal to avoid drying out.
Freezing
Freezing these cookies is a fantastic option. I place them in a single layer on a baking sheet first, freeze until firm, then transfer them to a freezer-safe bag or container. They keep beautifully up to 3 months. When you’re ready, just thaw at room temp and they’re ready to enjoy—with the spider legs intact if you’re gentle!
Reheating
To warm up leftover cookies, I pop them in the microwave for about 10-15 seconds on low power. This softens the chocolate and revives the chewy texture without melting the spider legs too much. If you have an oven nearby, 5 minutes at 300°F wrapped in foil also works great.
FAQs
-
Can I make the Spider Cookies Recipe gluten-free?
Absolutely! You can substitute the all-purpose flour with a good quality gluten-free blend that’s meant for baking. Just be sure the blend contains xanthan gum or another binder to help keep the cookies together and soft.
-
What’s the best way to melt chocolate for the spider legs?
I prefer melting chocolate chips in the microwave at 30% power, stirring every 30 seconds to avoid scorching. Low and slow preserves the smooth consistency and helps you pipe perfect spider legs.
-
Can I prepare the dough ahead of time?
Yes! You can make the dough and refrigerate it for up to 24 hours before baking. Chilling actually helps intensify the flavor and controls spreading in the oven, so you might find your spiders look even better.
-
What if I don’t have a ziplock bag for the chocolate piping?
No worries. You can use a plastic sandwich bag or even a piping bag if you have one. Alternatively, you can use a toothpick to draw spider legs if you’re feeling artistic!
-
Are these cookies good for kids to help decorate?
Definitely! Kids love piping the chocolate legs and placing the chips. It’s a fun, hands-on activity that’s simple enough to keep them engaged while teaching a bit about baking.
Final Thoughts
This Spider Cookies Recipe has become one of my go-to seasonal treats because it combines nostalgia with a fun twist—plus, who can resist those adorable chocolatey spiders? I love how approachable it feels, even if you’ve never decorated cookies before, and how it brings smiles to both kids and adults. So go ahead, dive in and bake up some spooky sweetness. Trust me, your kitchen (and taste buds) will thank you for it!
Print
Spider Cookies Recipe
- Prep Time: 20 minutes
- Cook Time: 12 minutes
- Total Time: 32 minutes
- Yield: 15 cookies
- Category: Dessert
- Method: Baking
- Cuisine: American
Description
Spider Cookies are festive chocolate chip cookies decorated with melted chocolate to resemble spider legs, perfect for Halloween or themed parties. These soft, buttery cookies are easy to make, baked to a golden perfection, and creatively decorated for a fun, spooky touch.
Ingredients
Dry Ingredients
- 2 cups + 2 tablespoons all-purpose flour
- ½ teaspoon baking soda
- ½ teaspoon salt
Wet Ingredients
- 12 tablespoons butter, melted and cooled until warm
- 1 cup light brown sugar
- ½ cup granulated sugar
- 1 large egg
- 1 large egg yolk
- 2 teaspoons vanilla extract
Chocolate
- 2 cups semi-sweet chocolate chips, divided
Instructions
- Preheat Oven: Preheat your oven to 350 degrees Fahrenheit to get it ready for baking the cookies.
- Make Cookie Dough: In a medium bowl, mix together the all-purpose flour, baking soda, and salt. In a separate large bowl, beat the melted butter with the light brown sugar and granulated sugar using an electric mixer until well blended. Add the egg, egg yolk, and vanilla extract to the butter mixture and mix well. Stir in the dry ingredients just until combined, then gently fold in ¾ cup of the semi-sweet chocolate chips. The dough will be soft at this stage.
- Shape and Bake Cookies: Scoop the dough into balls and place them evenly spaced on a parchment-lined cookie sheet. Bake the cookies in the preheated oven for 12 minutes until they are set and lightly golden.
- Add Chocolate Chip Eyes: Immediately after removing the cookies from the oven, place 3 to 4 chocolate chips on top of each cookie, point side up, to resemble spider eyes.
- Melt Remaining Chocolate: Place the remaining chocolate chips in a microwave-safe bowl. Microwave on low power, stirring every 30 seconds until the chocolate is fully melted and smooth.
- Draw Spider Legs: Spoon the melted chocolate into a ziplock bag and cut a very small slit in one corner. Carefully squeeze the melted chocolate out next to the chocolate chip eyes, drawing 8 spider legs to decorate each cookie.
Notes
- Store leftover spider cookies in an airtight container at room temperature for 1-2 days to keep them fresh.
- You can freeze baked spider cookies in a freezer-safe bag or container for up to 3 months.
- For easier chocolate leg drawing, use a piping bag or take care to cut a very small hole in the ziplock bag corner.
- Allow cookies to cool completely before serving to let the decorations set.
- You can substitute semi-sweet chocolate chips with dark or milk chocolate chips depending on preference.
Nutrition
- Serving Size: 1 cookie
- Calories: 180 kcal
- Sugar: 14 g
- Sodium: 90 mg
- Fat: 9 g
- Saturated Fat: 5 g
- Unsaturated Fat: 3 g
- Trans Fat: 0 g
- Carbohydrates: 24 g
- Fiber: 1 g
- Protein: 2 g
- Cholesterol: 35 mg


