

Soft Sugar Cookies Recipe
If you’re after the perfect melt-in-your-mouth treat, this Soft Sugar Cookies Recipe is your new best friend. I’ve tested and tweaked countless batches over the years, and trust me — these cookies are irresistibly tender, subtly sweet, and just begging to be decorated with your favorite icing and sprinkles. Whether you’re making shapes for a holiday party or just craving a cozy afternoon treat with a cup of tea, you’re going to love how these soft sugar cookies come together so easily and bake up with such a dreamy texture. Stick with me and I’ll guide you through every step so your cookies come out just right — every time.
Why This Recipe Works
- Perfectly Soft Texture: The careful balance of butter and flour creates soft, tender cookies that don’t dry out.
- Simple Ingredients: Using pantry staples with a touch of optional almond extract for a flavor boost keeps it easy but delicious.
- Versatility in Decorating: These cookies pair beautifully with royal icing, buttercream, or just a sprinkle of sugar.
- Chilling Method: Chilling the dough between rolled layers helps cut crisp, clean shapes while keeping them super soft.

Ingredients & Why They Work
Every ingredient in this Soft Sugar Cookies Recipe plays a starring role — nothing fancy, just well-chosen basics that result in the softest, most flavorful cookies. Here’s what you’ll need and why each one counts.
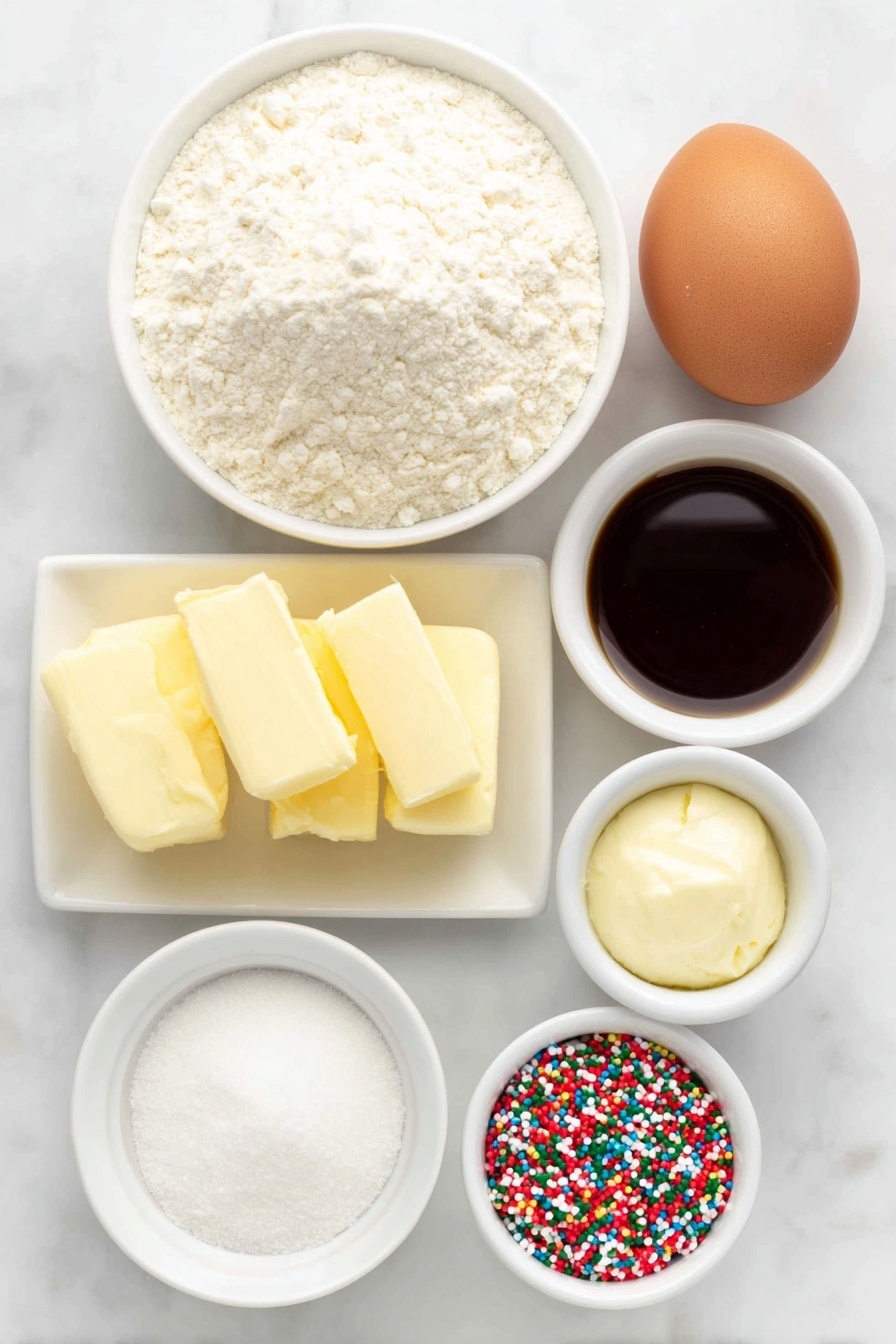
- All-purpose flour: The backbone of your cookie, it gives structure but we keep it just enough to ensure softness.
- Baking powder: Adds a gentle lift so the cookies aren’t too dense or flat.
- Salt: Balances sweetness and enhances flavor — a must even in sugary cookies!
- Unsalted butter: Soft and creamy, thanks to using room temperature butter, it delivers richness and tenderness.
- Granulated sugar: Sweetens and helps with that classic sugar cookie crisp on the edges.
- Egg: Binds everything and adds moisture — use room temperature for best mixing results.
- Vanilla extract: Classic warm note that blends everything beautifully.
- Optional almond extract: Just a quarter teaspoon brings an extra layer of flavor that I absolutely adore!
Make It Your Way
I love making these soft sugar cookies my own by switching up the extracts or playing with different decorating styles. You can keep it classic or make it festive — it’s all about what makes you excited to bake and share.
- Variation: I sometimes swap almond extract for lemon zest and a touch of lemon extract for a fresh twist that brightens the cookie.
- Gluten-Free Option: Try a 1:1 gluten-free flour blend — the texture changes slightly but still delicious.
- Decorations: Royal icing is my go-to, but buttercream works beautifully if you want a richer, softer finish.
- Flavor Twists: Add a teaspoon of pumpkin pie spice or cinnamon in fall for cozy vibes.
Step-by-Step: How I Make Soft Sugar Cookies Recipe
Step 1: Whisk the Dry Ingredients and Prep Your Dough Base
I start by whisking the flour, baking powder, and salt in a medium bowl — this little step makes sure everything’s evenly distributed so there are no surprising bites of salt or clumps. Meanwhile, I pull my butter out ahead of time, so it’s nice and soft but not melting. Soft butter is key for that tender texture.
Step 2: Cream Butter and Sugar like a Pro
Here’s where the magic begins: beat your softened butter and sugar at high speed for about 3 minutes until the mixture is fluffy and light in color. This aeration is what gives your cookies their delicate crumb, so don’t rush it. After that, add the egg, vanilla, and optional almond extract, mixing again until fully combined.
Step 3: Bring It All Together Gently
Slowly add your dry ingredients to the wet, mixing on low speed just until combined. Remember, overmixing can make your cookies tough, so stop when the dough looks uniform and soft. If it’s feeling sticky, toss in a tiny bit more flour — about a tablespoon — but be careful not to add too much or you’ll lose that softness we’re after.
Step 4: Roll, Layer, and Chill for Perfect Shapes
Divide your dough in two and roll each portion out on lightly floured parchment paper to about 1/4-inch thick. I love layering one rolled dough on top of the other with a dusting of flour in between — then wrap tightly and chill for at least 2 hours (up to 2 days if you want to prep ahead). This chilling step firms the dough so when you cut your cookie shapes, the edges will be crisp and clean without losing softness.
Step 5: Cut, Bake, and Cool
Preheat your oven to 350°F (177°C). Carefully peel off the top dough layer and start cutting shapes with your favorite cookie cutters, rerolling scraps as needed. Space cookies about 3 inches apart on parchment-lined baking sheets so they bake evenly. Bake for 11-12 minutes — you want the edges just starting to turn golden but not browned. Let them cool on the sheet for 5 minutes before moving them to a rack. Cooling before decorating helps icing set perfectly.
Step 6: Decorate and Enjoy
This is the fun part! I usually go with royal icing because it dries smooth and hard, perfect for stacking or gifting. But easy glaze or buttercream are fantastic for a softer finish. You can color your icing with gel food coloring and add any sprinkles you want. I like to decorate my cookies right on a baking sheet and pop them in the fridge so the icing sets faster without smudging.
Tips from My Kitchen
- Don’t Skip the Chill: Chilling prevents spreading and helps your cookies keep their perfect shapes.
- Use Room-Temperature Butter: If your butter’s too soft or melted, the dough will be sticky, and your cookies might flatten too much.
- Lightly Flour Your Surface: Keep things from sticking but avoid adding too much flour or your cookies’ll turn out dry.
- Rotate Your Baking Sheets: Ovens can have hot spots — flipping your sheets halfway ensures even baking and consistent color.
How to Serve Soft Sugar Cookies Recipe

Garnishes
My favorite garnishes include colorful sprinkles, edible glitter, or a simple dusting of sanding sugar before baking for a touch of sparkle. When decorating with icing, piping delicate details or marbled patterns takes these cookies from everyday to extra special.
Side Dishes
I love pairing these Soft Sugar Cookies with a hot cup of chai tea or rich hot chocolate for cozy, comforting vibes. Fresh fruit or a scoop of vanilla ice cream complements them wonderfully if you want a little extra indulgence.
Creative Ways to Present
For special occasions, I like arranging these cookies on tiered cake stands or wrapping stacks tied with twine and fresh herbs like rosemary for a rustic touch. Personalized cookie gift boxes or cellophane bags decorated with custom tags make perfect gifts that people cherish.
Make Ahead and Storage
Storing Leftovers
I store leftover cookies in an airtight container at room temperature for up to 5 days if plain or iced with royal icing. For iced cookies with buttercream, I keep them covered but refrigerated and try to eat within a few days for the best taste and texture.
Freezing
I’m a big fan of freezing both the dough and the baked cookies. After my dough is mixed, I divide it into discs, wrap tightly in plastic, and freeze for up to 3 months. When you’re ready, thaw overnight and roll out as usual. You can also freeze decorated cookies (with fully set icing) layered between parchment paper in freezer containers for up to 3 months. Just thaw gently at room temperature to avoid condensation.
Reheating
For leftover cookies that have gone a bit firm, a quick 10-second zap in the microwave revives that fresh-baked softness wonderfully. If they’re decorated, just be cautious not to heat too long or you risk melting the icing.
FAQs
-
Can I use salted butter instead of unsalted?
Yes, you can—just reduce the added salt slightly or omit it altogether. Unsalted butter lets you control the exact salt level, but salted butter is a convenient swap if that’s what you have on hand.
-
How do I keep my soft sugar cookies from spreading too much?
Chilling the dough between layers for at least 2 hours is key. Also, use room-temperature butter—not softened or melted—and avoid over-mixing. These steps help maintain shape and softness.
-
Can I double this Soft Sugar Cookies Recipe?
Absolutely! Just double all the ingredients and divide the dough into three or four portions before chilling to make rolling and cutting easier.
-
What’s the best icing to use on these cookies?
Royal icing is my favorite for crisp, smooth finishes that hold up well, especially if you’re gifting or stacking. But easy glaze icing or cookie buttercream are excellent for softer, creamy textures.
-
Why is almond extract recommended but optional?
The almond extract adds a lovely, distinctive note that elevates the flavor beyond basic sugar cookies. If you don’t have it, vanilla alone works perfectly fine, so it’s there to give you an extra flavor boost if you want.
Final Thoughts
Soft sugar cookies are one of those timeless treats that never fail to bring comfort and joy, whether you’re baking with family or just rewarding yourself for a busy day. This Soft Sugar Cookies Recipe has become my go-to because it’s easy, dependable, and turns out the softest, most satisfying cookies every time. I’m excited for you to try it and maybe even personalize it with your own twists — it’s baking made simple and joyful. So grab your rolling pin and cookie cutters, and let’s make some memories with these sweet, soft delights!
Print
Soft Sugar Cookies Recipe
- Prep Time: 40 minutes
- Cook Time: 12 minutes
- Total Time: 3 hours
- Yield: 24 cookies
- Category: Dessert
- Method: Baking
- Cuisine: American
- Diet: Vegetarian
Description
These Soft Cut-Out Sugar Cookies are tender, flavorful, and perfect for decorating with royal icing, buttercream, or sprinkles. With a simple dough that includes optional almond extract for outstanding flavor, these cookies are easy to roll, cut, chill, bake, and decorate for any occasion.
Ingredients
Cookie Dough
- 2 and 1/4 cups (281g) all-purpose flour (spooned & leveled), plus more as needed for rolling and work surface
- 1/2 teaspoon baking powder
- 1/4 teaspoon salt
- 3/4 cup (12 Tbsp; 170g) unsalted butter, softened to room temperature
- 3/4 cup (150g) granulated sugar
- 1 large egg, at room temperature
- 2 teaspoons pure vanilla extract
- 1/4 teaspoon almond extract (optional, but makes the flavor outstanding)
For Decorating
- Royal Icing, Easy Glaze Icing, or Cookie Buttercream
- Assorted sprinkles
Instructions
- Prepare Dry Ingredients: In a medium bowl, whisk together the all-purpose flour, baking powder, and salt. Set this mixture aside.
- Make the Dough: In a large bowl, use a handheld or stand mixer fitted with a paddle attachment to beat the softened butter and granulated sugar on high speed until light and creamy, about 3 minutes. Add the egg, vanilla extract, and almond extract if using, and beat on high speed until fully combined, about 1 minute. Scrape down the sides and bottom of the bowl and mix again as needed.
- Combine Wet and Dry Ingredients: Reduce the mixer speed to low and gradually add the dry ingredients. Mix until just combined and the dough is soft. If the dough feels too sticky for rolling, incorporate 1 more tablespoon of flour.
- Divide and Roll Dough: Divide the dough into two equal portions. Place each portion on lightly floured parchment paper or a silicone baking mat. Using a floured rolling pin, roll each dough portion to about 1/4-inch thickness, adding flour as needed to prevent sticking.
- Layer and Chill: Lightly dust one rolled-out dough portion with flour to prevent sticking. Place the second dough piece, still on its parchment, on top of the first. Wrap tightly and refrigerate for at least 2 hours up to 2 days.
- Preheat Oven and Prepare Baking Sheets: Preheat the oven to 350°F (177°C). Line large baking sheets with parchment paper or silicone baking mats.
- Cut Out Cookies: Remove the top dough layer gently. Using cookie cutters, cut shapes and place them about 3 inches apart on the prepared baking sheets. Reroll scraps to cut additional cookies until all dough is used.
- Bake Cookies: Bake the cookies for 12 minutes or until the edges are lightly browned and set. Rotate baking sheets halfway through if your oven has hot spots. Allow cookies to cool on the baking sheet for 5 minutes.
- Cool Completely: Transfer the cookies to a wire rack to cool completely before decorating.
- Decorate: Use royal icing, easy glaze icing, or cookie buttercream to decorate cooled cookies. Tint icings with gel food coloring as desired. For faster setting, decorate directly on a baking sheet and refrigerate the entire sheet.
- Store: Store plain or iced cookies tightly covered at room temperature for up to 5 days, or refrigerated for up to 10 days. If decorated with buttercream, store at room temperature up to 1 day or refrigerated up to 5 days.
Notes
- Freezing Instructions: Plain or decorated cookies freeze well up to 3 months after icing has set. Freeze cookie dough portions before rolling for up to 3 months; thaw overnight in refrigerator before use.
- Room Temperature Butter: Use butter that is cool to the touch to prevent overly sticky dough.
- Flavor Variations: Substitute almond extract with maple, coconut, lemon, or peppermint extract or add spices like pumpkin pie spice or cinnamon. Lemon zest can be added with lemon extract for more flavor.
- Icing Options: Choose royal icing, easy glaze, or cookie buttercream depending on desired finish.
- Doubling Recipe: Ingredients can be doubled and dough divided into 3 or 4 portions for easier handling.
- Decorating Tips: Use piping bags, tips, and gel colors for professional decoration results.
Nutrition
- Serving Size: 1 cookie
- Calories: 120 kcal
- Sugar: 8 g
- Sodium: 70 mg
- Fat: 6 g
- Saturated Fat: 3.5 g
- Unsaturated Fat: 2 g
- Trans Fat: 0 g
- Carbohydrates: 15 g
- Fiber: 0.5 g
- Protein: 1 g
- Cholesterol: 25 mg


