

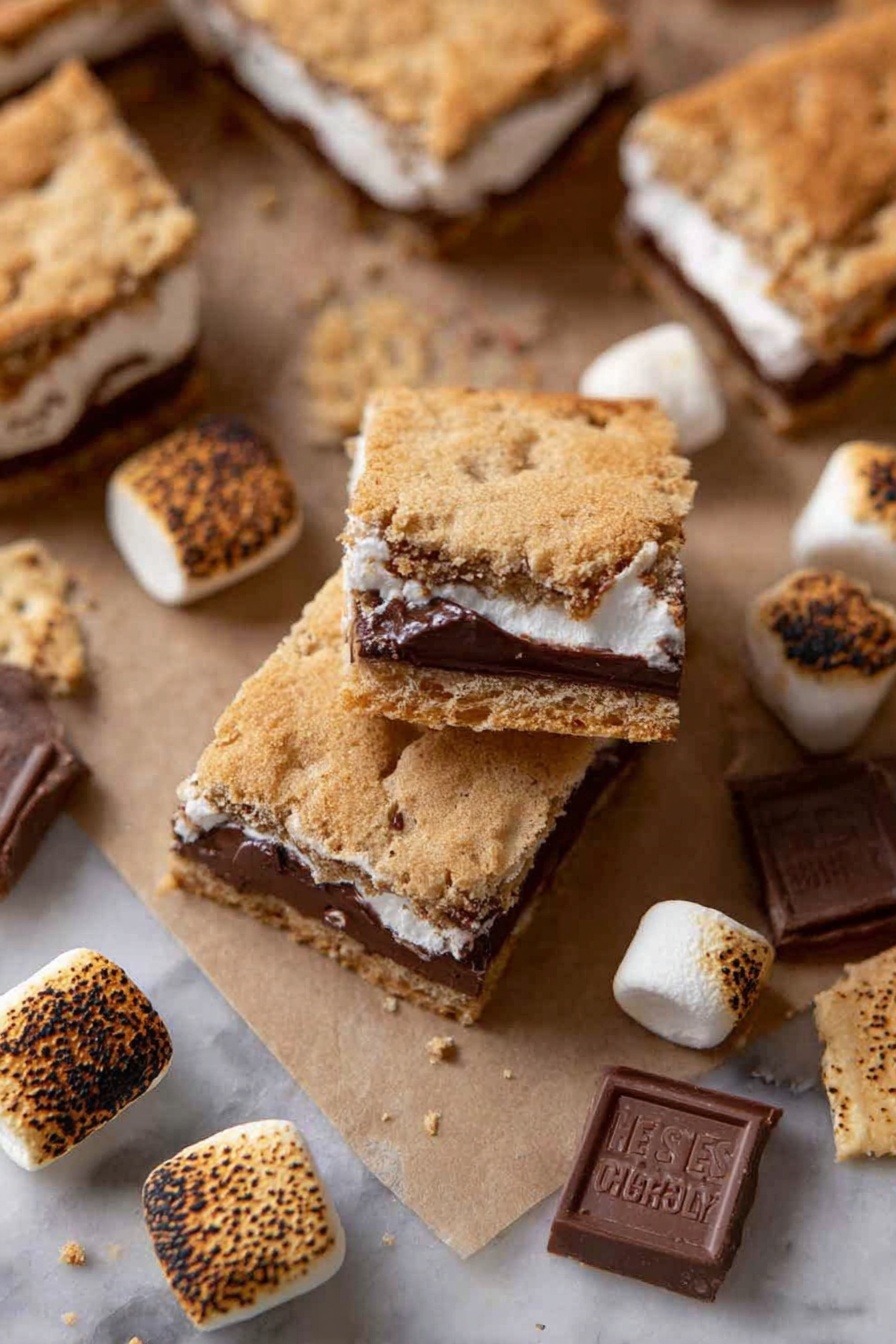
S’mores Cookie Bars Recipe
If you’re anything like me and love that nostalgic campfire treat, you’re going to fall head over heels for this S’mores Cookie Bars Recipe. It takes all the familiar flavors of gooey marshmallows, melty chocolate, and crispy graham crackers, then bakes them into a chewy, portable bar that’s perfect for any time of year. Trust me, once you try these bars, they’ll become your go-to dessert for everything from casual hangouts to special family nights. Stick around, because I’m about to share all my secrets to getting these bars perfectly gooey and irresistible every single time.
Why This Recipe Works
- Layered Texture: The cookie dough base combined with a marshmallow fluff and melted chocolate layer gives you the perfect chewy yet gooey bite every time.
- Easy to Make: You won’t need fancy equipment or complicated steps — just simple mixing, layering, and baking, which makes it approachable even for beginner bakers.
- Balanced Sweetness: Using both brown and granulated sugars provides depth to the cookie flavor, and the graham cracker crumbs add just the right subtle crunch and classic s’mores taste.
- No Campfire Needed: Enjoy that nostalgic flavor indoors, regardless of the season or weather!

Ingredients & Why They Work
This S’mores Cookie Bars Recipe is all about harmony between classic flavors and textures. The ingredients come together so nicely — crunchy but soft, sweet but balanced. Grab quality chocolate and fresh marshmallow fluff when you can; it makes a difference in how those layers meld and melt.
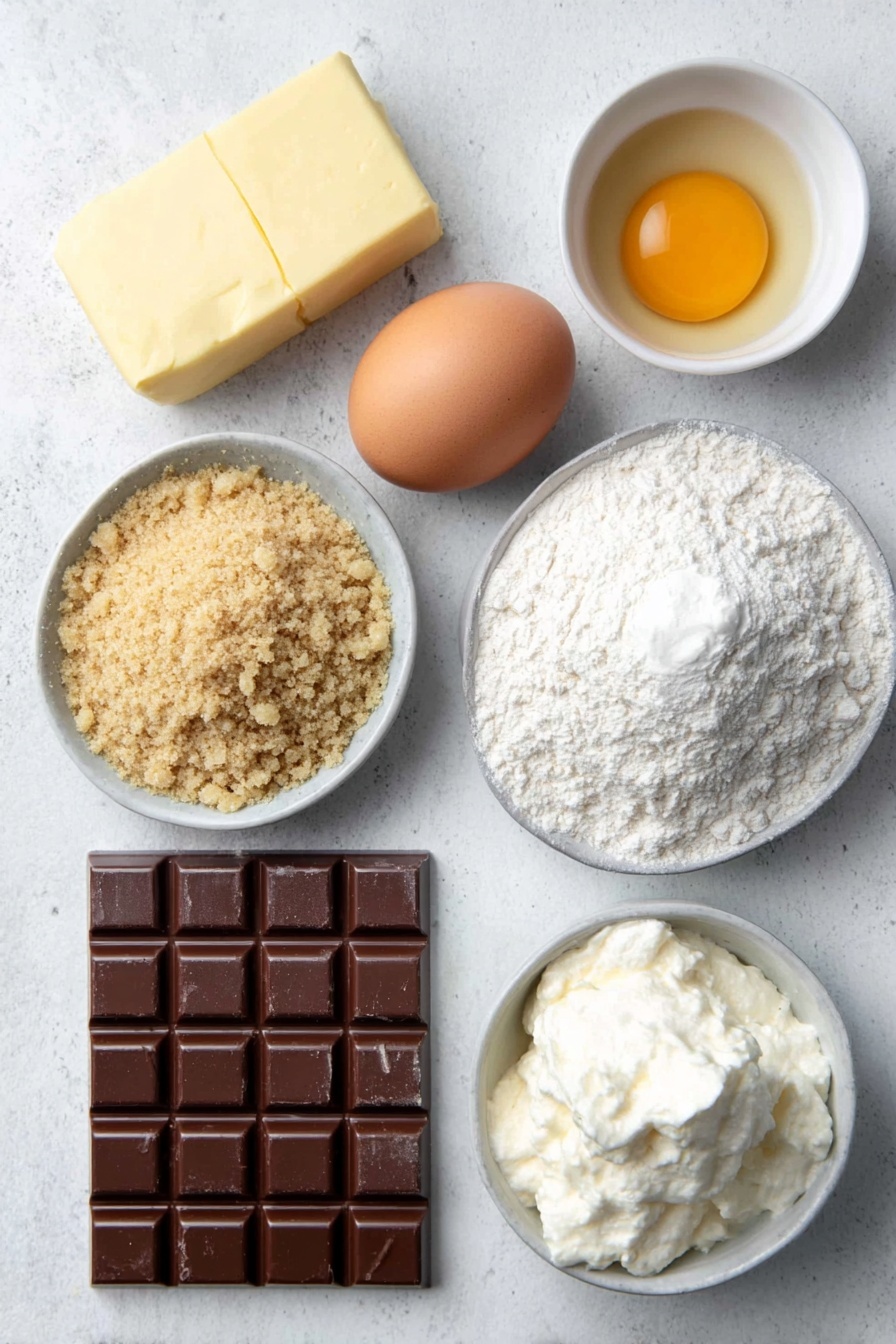
- Butter: Softened butter adds richness and moisture, helping the cookie layer stay tender.
- Brown sugar: Provides chewiness and that deep molasses flavor we all crave in baked treats.
- Granulated sugar: Helps with structure so the bars aren’t too soft and delicate.
- Egg: Binds everything together, giving the dough body and cohesion.
- Vanilla extract: Just a splash lifts the entire flavor, making the bars more complex and inviting.
- All-purpose flour: The foundation of the cookie dough — makes it sturdy enough to hold the layers above.
- Graham crackers (finely crushed): These add authentic, subtle crunch and that unmistakable s’mores signature taste.
- Salt: Balances the sweetness, making every flavor pop.
- Baking soda: Gives the cookie dough a subtle lift and helps with a tender crumb.
- Hershey chocolate bars: Classic milk chocolate works fabulously melted — breaking the bars into pieces lets you cover every inch.
- Marshmallow fluff: The gooey creamy layer that makes these bars feel like a campfire treat without any charcoal or smoke.
Make It Your Way
I love that this S’mores Cookie Bars Recipe is basically a blank canvas — you can easily tweak it to suit your tastes or the occasion. Feel free to get creative and make it truly yours; I’ve played around with a few variations that turned out delicious.
- Variation: I sometimes swap Hershey bars for chunks of dark chocolate or even peanut butter cups, adding a bit of richness and a salty-sweet twist. If you love peanut butter as much as I do, this combo is next-level.
- Dietary Modifications: For those avoiding gluten, I’ve substituted the all-purpose flour with a gluten-free blend and it still holds up beautifully, just be sure to double-check your marshmallow fluff for allergens.
- Seasonal Twist: Around the holidays, adding a sprinkle of cinnamon or swapping regular chocolate for peppermint bark makes these bars feel festive and fun.
Step-by-Step: How I Make S’mores Cookie Bars Recipe
Step 1: Get Your Oven and Pan Ready
Preheat your oven to 350°F. Line an 8×8 inch baking pan with parchment paper, letting some overhang on the sides to easily lift out the bars later. This simple prep step saves you from scrabbling to remove sticky bars later on, and ensures even baking.
Step 2: Cream the Butter and Sugars
Using a stand mixer or hand mixer, cream together the softened butter with both the brown and granulated sugars until fluffy and combined, about 2–3 minutes. This aeration gives a lightness to your cookie dough that makes every bite tender and chewy.
Step 3: Add the Egg and Vanilla
Next, mix in the egg and vanilla extract until just combined. Don’t overmix here — you want a cohesive but soft dough that will hold itself without getting tough.
Step 4: Mix in the Dry Ingredients
Whisk together the all-purpose flour, finely crushed graham crackers, salt, and baking soda in a separate bowl. Add this dry mix gradually to your wet mixture, stirring just until you can’t see any flour — be careful not to overdo it or you’ll lose that delicate texture.
Step 5: Press and Chill the Cookie Dough Layers
Divide the cookie dough in half. Press half the dough firmly and evenly into the bottom of your prepared pan. Then, carefully remove the parchment with the dough and pop it in the freezer. Meanwhile, line the pan again with fresh parchment paper and press the other half of the dough directly in the pan — this will become the top layer.
Step 6: Layer the Chocolate and Marshmallow Fluff
Break your Hershey bars into pieces and evenly layer them over the chilled cookie dough layer on parchment. Spread the marshmallow fluff generously over the chocolate—this is the magic gooey core. Then, gently flip the second chilled dough layer on top. Try to do this carefully so it stays intact and doesn’t crack.
Step 7: Bake and Cool
Pop the whole pan in your preheated oven and bake for about 25 minutes. You want the edges lightly golden but still soft in the center. Once baked, resist the urge to slice immediately! Let the bars cool fully in the pan to set the layers — that’s the secret to those gorgeous cross sections you see on Instagram.
Tips from My Kitchen
- Don’t Skip Chilling: Freezing the bottom layer helps support the marshmallow weight and prevents the bars from becoming one gooey mess.
- Use Parchment Paper Overhang: This makes removing your cookie bars easy-peasy without any crumbling or breaking.
- Be Gentle When Flipping: I’ve broken my top layer more than once, but with a little patience and a wide spatula, you’ll get a perfect intact top crust.
- Wait to Slice: Cooling fully helps everything set—cutting too soon leads to marshmallow spills, and nobody wants that mess.
How to Serve S’mores Cookie Bars Recipe
Garnishes
I usually keep it simple — a light dusting of powdered sugar or a tiny drizzle of melted chocolate on top looks elegant and adds a touch of extra sweetness. Sometimes I throw a few mini marshmallows on top after baking and briefly broil the bars just to get that toasty, melty finish.
Side Dishes
These bars are pretty indulgent on their own, but you could pair them with fresh berries or some tangy vanilla ice cream to cut through the sweetness. For a cozy night, pairing with a hot cup of coffee or rich cocoa is my personal favorite.
Creative Ways to Present
For parties, I like cutting the bars into little bite-sized squares and serving them on a tiered tray for a playful dessert platter. Wrapping individual bars in wax paper tied with twine makes for fun party favors or sweet gifts that guests rave about.
Make Ahead and Storage
Storing Leftovers
I store leftover S’mores Cookie Bars in an airtight container at room temperature for up to 3 days. The marshmallow and chocolate stay delightfully soft, and the bars hold their chewy texture. Just make sure you keep them away from heat sources to avoid melting.
Freezing
Freezing works great if you want to save extras. I wrap individual bars tightly in plastic wrap, then place them in a freezer-safe container or bag. They keep well for up to a month. To thaw, leave them in the fridge overnight, which prevents condensation and sogginess.
Reheating
If you want to enjoy them warm, pop a bar in the microwave for about 10-15 seconds or heat in a 300°F oven for 5 minutes. This melts the chocolate and softens the marshmallow just perfectly without drying out the cookie layers.
FAQs
-
Can I use regular marshmallows instead of marshmallow fluff in this S’mores Cookie Bars Recipe?
Great question! You can technically substitute mini marshmallows by layering them over the chocolate and allowing them to melt, but marshmallow fluff gives a smoother, creamier texture that spreads evenly and doesn’t create a lumpy surface. If using marshmallows, keep an eye while baking to make sure they don’t brown too much or burn.
-
Is it possible to make these bars gluten-free?
Absolutely! Replace the all-purpose flour with a gluten-free flour blend that’s suitable for baking. Make sure the graham crackers you use are gluten-free as well. This swap doesn’t affect the texture much, so you’ll still get those chewy, gooey bars you love.
-
Why do I have trouble flipping the top cookie dough layer without it breaking?
Flipping the chilled dough layer can be fiddly. My best advice is to press it firmly and evenly before chilling and to use the parchment paper to help lift it carefully. If cracks appear, don’t worry — patch them gently with leftover dough before baking. Also, chilling long enough is key for stability.
-
Can I add nuts to this S’mores Cookie Bars Recipe?
Definitely! Chopped toasted pecans or walnuts add a nice crunch that pairs beautifully with the sweet layers. Just fold them into the cookie dough before pressing it into the pan to evenly distribute.
Final Thoughts
This S’mores Cookie Bars Recipe is one of those sweet treats I keep coming back to because it’s not only super delicious but also brings that warm, nostalgic feeling of sitting around a campfire—even in the middle of winter. Whether you’re sharing it with family or sneaking a piece when nobody’s looking, these bars hit the spot every time. I genuinely hope you try making these bars at home—you’ll love how easy they are and how much joy they bring, guaranteed.
Print
S’mores Cookie Bars Recipe
- Prep Time: 15 minutes
- Cook Time: 25 minutes
- Total Time: 40 minutes
- Yield: 16 servings
- Category: Dessert
- Method: Baking
- Cuisine: American
Description
Delicious S’mores cookie bars featuring a graham cracker-infused cookie dough layered with Hershey chocolate bars and marshmallow fluff, baked to golden perfection for a gooey, unforgettable treat.
Ingredients
Cookie Dough
- 1/2 cup butter, softened, salted or unsalted
- 1/3 cup brown sugar
- 1/4 cup granulated sugar
- 1 egg
- 1 tsp vanilla extract
- 1 1/2 cup all-purpose flour
- 1/2 cup graham crackers, finely crushed (about 3.5 sheets)
- 1/4 tsp salt
- 3/4 tsp baking soda
Layers
- 5 standard Hershey bars
- 1 1/2 cup marshmallow fluff
Instructions
- Preheat Oven and Prepare Pan: Preheat your oven to 350°F. Line an 8×8 inch baking pan with parchment paper and set it aside for easy removal of the cookie bars later.
- Cream Butter and Sugars: In a mixing bowl, cream together the softened butter, granulated sugar, and brown sugar until fully combined and creamy.
- Add Egg and Vanilla: Mix in the egg and vanilla extract until the batter is smooth and uniform.
- Combine Dry Ingredients: Add the all-purpose flour, finely crushed graham crackers, salt, and baking soda to the wet ingredients. Mix gently until the flour mixture just disappears to avoid overmixing.
- Form the Bottom Layer: Press half of the cookie dough evenly onto the prepared baking pan. Carefully remove the parchment paper with the dough layer and place it in the freezer while you re-line the pan with fresh parchment paper.
- Layer Chocolate and Marshmallow: Place the chocolate bars evenly over the dough in the pan. Spread the marshmallow fluff over the chocolate layer to create the gooey center.
- Add Top Cookie Layer: Remove the bottom dough layer from the freezer and gently flip it over onto the marshmallow-covered chocolate layer, working carefully to keep it intact.
- Bake: Bake the assembled cookie bars in the preheated oven for 25 minutes until golden and cooked through.
- Cool and Slice: Allow the bars to cool completely before slicing to ensure clean cuts and to reveal the layered cross section.
Notes
- Freezing the first dough layer helps maintain structure and makes it easier to flip without breaking.
- You can substitute Hershey bars with any milk chocolate or semi-sweet chocolate bars of your choice.
- Use parchment paper for easy removal and cleanup.
- Letting the bars cool completely before slicing prevents the marshmallow layer from oozing out.
- If you prefer, use mini marshmallows melted on top instead of marshmallow fluff.
Nutrition
- Serving Size: 1 bar
- Calories: 280 kcal
- Sugar: 22 g
- Sodium: 110 mg
- Fat: 14 g
- Saturated Fat: 8 g
- Unsaturated Fat: 5 g
- Trans Fat: 0 g
- Carbohydrates: 33 g
- Fiber: 1 g
- Protein: 3 g
- Cholesterol: 45 mg


