

S’mores Bars Recipe
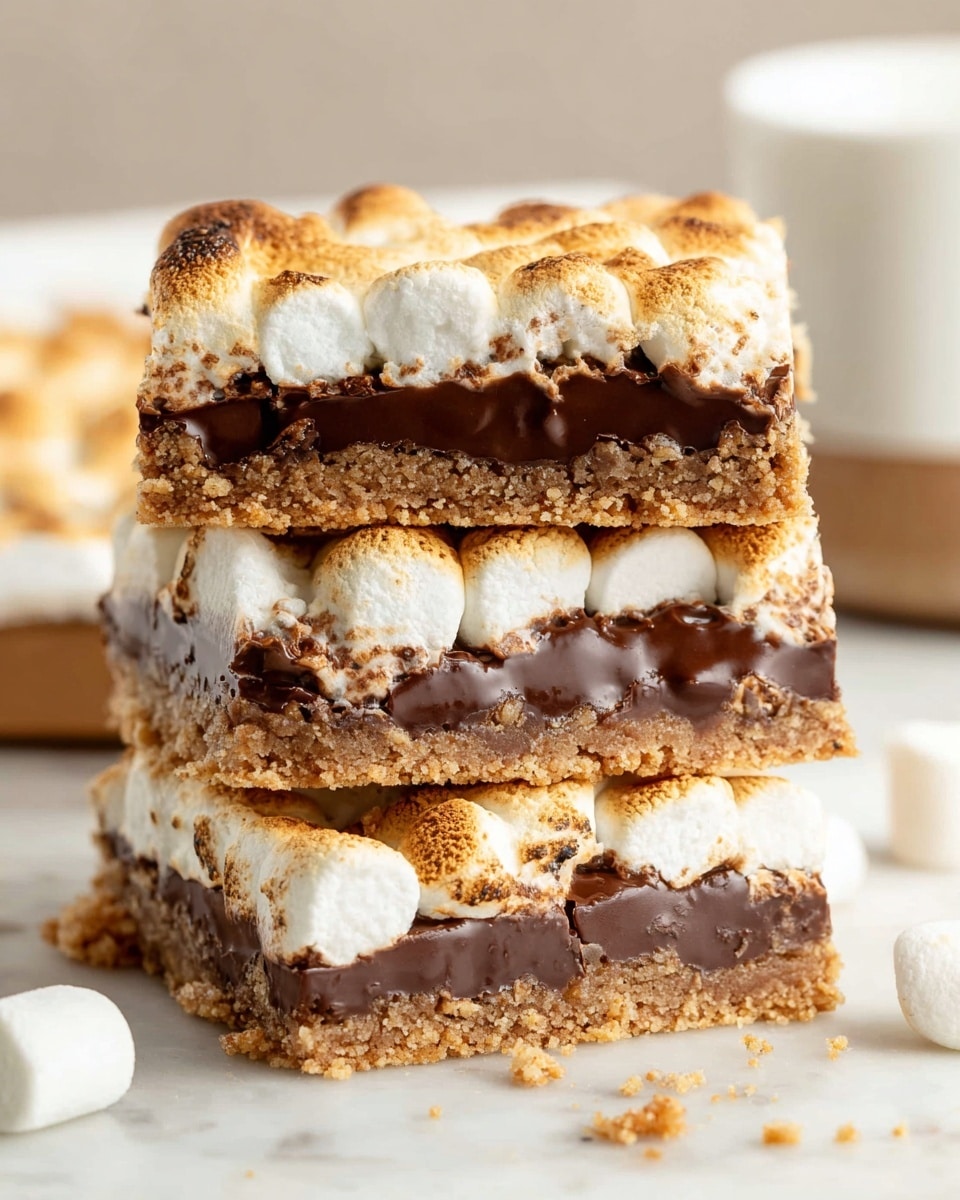
Oh, I just can’t get enough of this S’mores Bars Recipe! It’s like summer campfires and childhood memories wrapped up in a convenient, sliceable treat you can whip up anytime. The combination of crunchy graham cracker crust, melty chocolate, and those perfectly toasted marshmallows on top? Honestly, it’s pure magic that works great for a casual dessert, a cozy night in, or even a party where you want something a little nostalgic yet fuss-free.
One of the best things about this S’mores Bars Recipe is how easy it is to make but still feels special, like a sweet little celebration in every bite. Whether you’re craving that gooey, chocolate-marshmallow goodness or looking for a fun twist to share with friends, these bars have got you covered. Plus, they bake up quickly, which means less time waiting and more time enjoying!
Why This Recipe Works
- Simple Ingredients: You only need a handful of pantry staples that come together seamlessly.
- Quick Prep and Bake: This recipe takes less than 30 minutes from start to finish, perfect for last-minute cravings.
- Perfect Texture Contrast: Crunchy graham crust meets melty chocolate and toasted marshmallows for that irresistible bite.
- Customizable Toasting: Broiling gives you control to get those marshmallows golden without burning, so you get perfection every time.

Ingredients & Why They Work
The ingredients in this S’mores Bars Recipe complement each other beautifully, creating that classic campfire flavor right in your oven. Each component plays a critical role, and I’ve included some tips so you can shop smart and make it exactly how I do.
- Graham cracker crumbs: Choose finely crushed crumbs for an even crust that holds together well when pressed.
- Butter: Melted butter binds the crumbs to form a sturdy, flavorful base—don’t skip melting, it helps pack the crust tightly.
- Powdered sugar: Adds a subtle sweetness while helping the crust set up nicely without any grittiness.
- Hershey Chocolate Bars: Using classic 4.4-ounce bars works best for melting evenly; milk chocolate gives that familiar s’mores taste.
- Mini marshmallows: The smaller size lets you get an even layer that toasts perfectly under the broiler.
Make It Your Way
I love adding my own twists to this S’mores Bars Recipe to keep things fresh! Sometimes I swap the classic milk chocolate for dark chocolate chips for a richer flavor, or sprinkle a little sea salt on top after broiling for a lovely sweet-salty contrast. You should definitely feel free to experiment too—it’s all about making this treat your own.
- Variation: Adding chopped nuts like pecans or walnuts to the crust adds a delightful crunch. I tried this once at a family gathering, and everyone was begging for the recipe!
- Dietary option: You can easily make these gluten-free by using gluten-free graham crackers—I prefer to crush them fresh for a better texture.
- Seasonal change: Around holidays, I like to toss in some festive sprinkles on top of the marshmallows before broiling for extra fun.
Step-by-Step: How I Make S’mores Bars Recipe
Step 1: Prep the Graham Cracker Crust
First things first, preheat your oven to 350°F (175°C) and grease a 9×13-inch baking pan with non-stick spray—this helps the bars release easily after baking. Then, mix the graham cracker crumbs, powdered sugar, and melted butter in a bowl. Use your fingers or the back of a spoon to press the mixture firmly and evenly into the pan’s bottom and up the sides to form a compact crust. Baking it for 5-8 minutes until it just starts to turn golden helps it hold its shape when cooled—don’t skip this step!
Step 2: Add the Chocolate Layer
Once your crust has cooled slightly, place the Hershey bars side by side right on top so they cover the whole surface. Pop the pan back into the oven for about 3 minutes until you can see the chocolate starting to melt and glisten—that’s the perfect time to take it out. Let it cool for a minute or two to avoid melting the marshmallows too fast in the next step.
Step 3: Toast the Marshmallows to Perfection
Now the fun part—sprinkle the mini marshmallows evenly over the melted chocolate, packing them close together to get that even toasty top. Switch your oven setting to broil and slide the pan in. Watch closely because this only takes about 2 minutes. You’re looking for a lovely golden brown with little toasty spots. Stay near the oven because marshmallows can go from perfect to burnt in seconds—I learned this the hard way and trust me, it’s worth the watch!
Step 4: Cool and Cut
After pulling the pan out, let it cool completely on the counter, then pop it in the fridge for extra firmness—this makes cutting so much easier. When it’s time to slice, dip a sharp knife in hot water, wipe it dry, and cut through the bars. If the knife starts sticking to the marshmallow goo, just warm and dry it again between cuts. This little trick saved me more than once, and I’m sure you’ll appreciate it too!
Tips from My Kitchen
- Watch the Broiler Closely: Marshmallows brown super fast, so keep your eyes peeled to avoid burnt spots.
- Pack the Crust Firmly: Pressing the graham cracker crust well ensures it stays crisp and holds together when you cut the bars.
- Use a Warm Knife to Cut: It prevents the marshmallows from sticking and keeps your slices clean.
- Chill Before Serving: Cooling in the fridge helps everything set perfectly and avoids messy melting.
How to Serve S’mores Bars Recipe
Garnishes
I like to add a tiny sprinkle of flaky sea salt right after broiling to balance the sweetness—it’s such a simple hack that takes the flavor up a notch. Sometimes, I also drizzle a bit of caramel or chocolate sauce on top for extra indulgence, especially when serving to guests. Fresh berries on the side can add a refreshing touch if you want a little fruity contrast.
Side Dishes
Since these bars are rich and sweet, I usually pair them with a light beverage like cold milk or an iced coffee to balance things out. For a party, they’re fantastic alongside a fresh fruit platter or a simple vanilla ice cream scoop—which I highly recommend if you want to keep the summer vibes going strong.
Creative Ways to Present
For special occasions, I’ve arranged the S’mores Bars Recipe in mason jars layered with whipped cream and crushed graham crackers for a fun, deconstructed s’mores dessert. Another time, I cut the bars into mini squares and served them on a wooden board with skewers for a fancy appetizer feel. You can get as creative as you want—this recipe really plays well with presentation!
Make Ahead and Storage
Storing Leftovers
After cooling completely, I store leftover bars in an airtight container in the fridge. They hold up well for 3 to 4 days—just be sure to separate layers with parchment paper to avoid sticky messes. I’ve found chilling really keeps the marshmallows from becoming too gooey over time.
Freezing
If you want to save some for later, freezing works great! I wrap individual bars tightly in plastic wrap and place them in a freezer-safe bag. When I’m ready to enjoy, I thaw them in the fridge overnight then briefly warm in the microwave for that fresh-out-of-the-oven gooeyness.
Reheating
To reheat, I pop the bars in the microwave for 15-20 seconds or oven at low heat—watch closely so the marshmallows soften but don’t burn. This little warm-up brings back that perfect melty texture that makes these bars so irresistible.
FAQs
-
Can I make these S’mores bars without graham crackers?
Absolutely! While graham crackers are traditional and provide that characteristic flavor, you can swap them for digestive biscuits or even crushed vanilla wafers if you prefer. Just make sure to use the same amount and press the crust firmly so it holds together well.
-
How do I prevent the marshmallows from burning under the broiler?
Broiling marshmallows can be a bit tricky because they brown quickly. My best advice is to keep a very close eye on them—don’t walk away! Also, placing the oven rack a little farther from the broiler element helps slow down the toasting, giving you more control.
-
Can I use jumbo marshmallows instead of mini marshmallows?
You can, but I recommend cutting them into smaller pieces so they cover the chocolate evenly and toast nicely without melting into one big blob. Mini marshmallows are easier to spread out and get that signature s’mores look.
-
Is it okay to substitute the Hershey bars with chocolate chips?
Yes! Chocolate chips melt just fine, but I usually sprinkle them evenly over the crust rather than using bars. Keep the oven time similar, and watch for that melt and shine to know when to add marshmallows.
Final Thoughts
I hope you enjoy making and eating this S’mores Bars Recipe as much as I do. There’s something so comforting and joyful about this dessert that reminds me of summers spent around campfires with friends and family. It’s simple, satisfying, and perfect for sharing. Give it a try—you might find it becoming your new favorite go-to treat when you want a little sweet nostalgia in every bite!
Print
S’mores Bars Recipe
- Prep Time: 10 minutes
- Cook Time: 15 minutes
- Total Time: 25 minutes
- Yield: 16 servings
- Category: Dessert
- Method: Baking
- Cuisine: American
Description
Delicious and easy-to-make S’mores Bars featuring a crunchy graham cracker crust, melted Hershey chocolate, and toasted mini marshmallows. Perfect for a sweet treat or party dessert.
Ingredients
Crust
- 2 cups graham cracker crumbs
- 8-12 tablespoons butter, melted
- 1/2 cup powdered sugar
Topping
- 4 Hershey Chocolate Bars (4.4 ounce each)
- 1 package mini marshmallows
Instructions
- Preheat Oven: Preheat your oven to 350 degrees Fahrenheit to prepare for baking the crust and melting the chocolate.
- Grease Pan: Lightly grease a 9×13-inch baking pan with non-stick butter spray to prevent sticking.
- Make Crust Mixture: In a medium bowl, mix graham cracker crumbs, powdered sugar, and melted butter together using a spoon until combined, ensuring the butter is well incorporated for a firm crust.
- Form Crust: Press the crust mixture evenly and firmly with your fingers along the bottom and sides of the pan to pack it tightly.
- Bake Crust: Bake the crust in the oven for 8 minutes until the edges turn a light golden brown. Remove from oven and allow to cool; the crust will harden as it cools.
- Add Chocolate: Lay the Hershey chocolate bars evenly over the cooled crust, covering it completely as much as possible.
- Melt Chocolate: Return the pan to the oven for 3 minutes, just until the chocolate begins to melt and looks shiny. Then remove from the oven and let it cool for 1-2 minutes.
- Top with Marshmallows: Spread mini marshmallows closely packed on top of the melted chocolate layer.
- Broil Marshmallows: Set the oven to broil, then place the pan in the oven. Watch closely and broil the marshmallows for about 2 minutes until golden brown; be cautious as marshmallows can burn quickly.
- Cool Completely: Let the bars cool completely, then place them in the refrigerator to set further for easier slicing.
- Cut and Serve: Use a sharp knife warmed under hot water and dried to cut through the sticky bars cleanly. Repeat warming the knife as needed between cuts, then serve.
Notes
- Use melted butter within a minute or two to ensure it doesn’t harden before mixing into the crust.
- Pressing the crust firmly helps it hold together better after baking.
- When broiling marshmallows, stay very close to the oven as they can burn or even catch fire quickly.
- Warming the knife under hot water before slicing helps prevent the marshmallows from sticking and makes cleaner cuts.
- Refrigerating the bars after baking improves cutting and gives a nice texture.
Nutrition
- Serving Size: 1 bar
- Calories: 250 kcal
- Sugar: 18 g
- Sodium: 150 mg
- Fat: 13 g
- Saturated Fat: 8 g
- Unsaturated Fat: 4 g
- Trans Fat: 0 g
- Carbohydrates: 30 g
- Fiber: 1 g
- Protein: 3 g
- Cholesterol: 30 mg


