
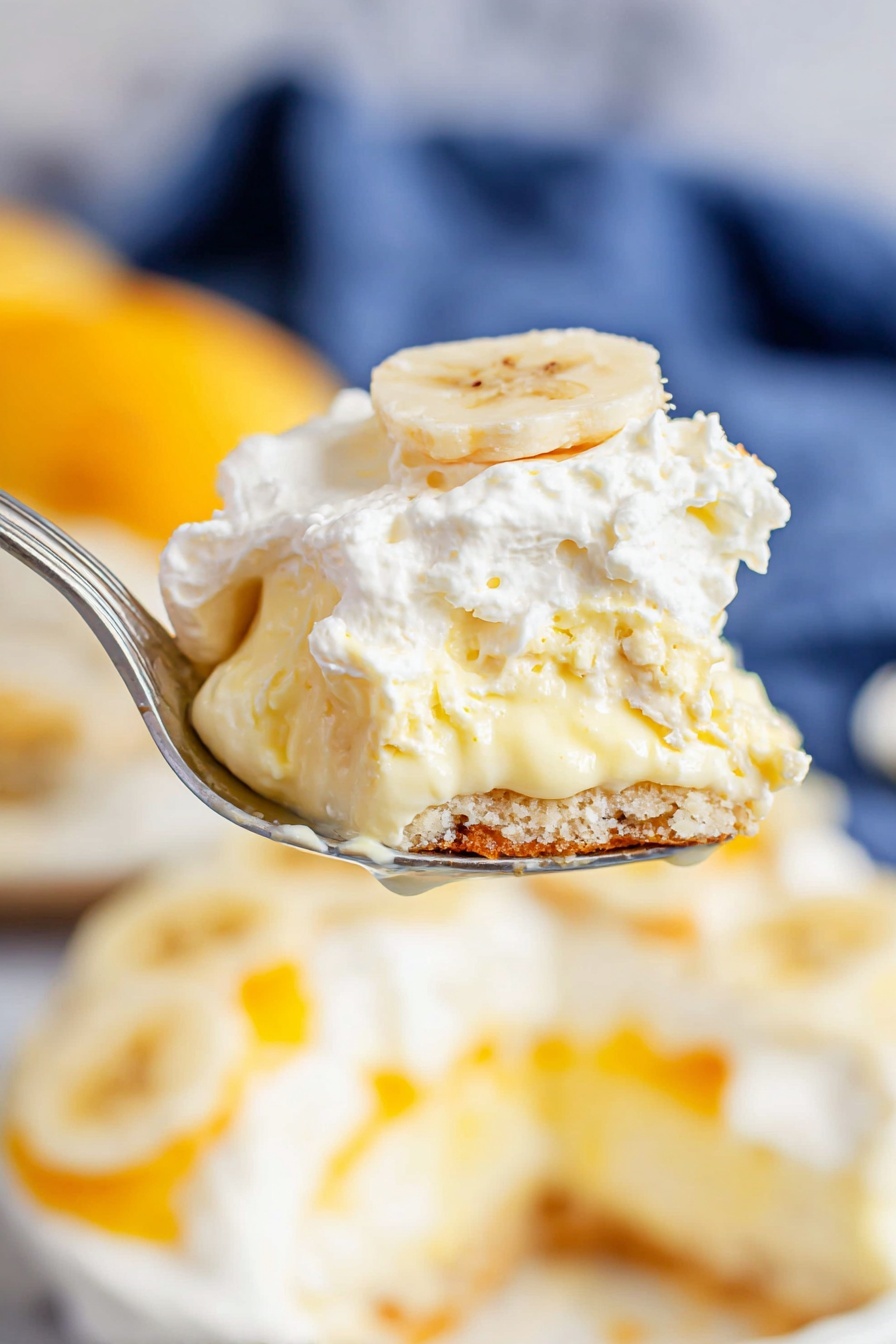
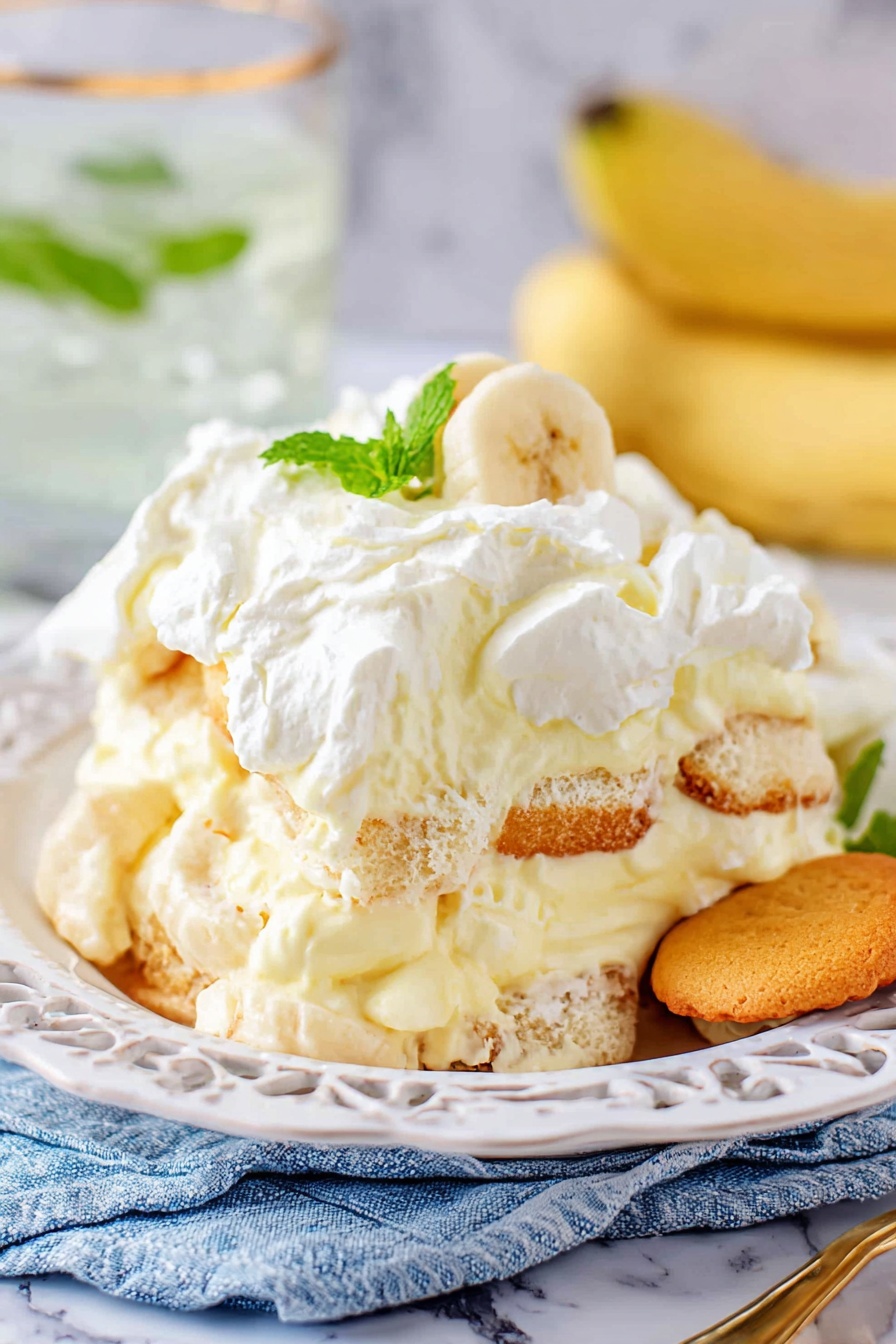
Rich Banana Pudding Dessert Recipe
Alright, friends, I’m about to share my absolute favorite Rich Banana Pudding Dessert Recipe that’s been a hit every single time I bring it to family gatherings or just whip it up for a weeknight treat. It’s creamy, dreamy, and packed with layers of fresh bananas and buttery Nilla wafers that melt perfectly into the pudding. Trust me, once you try this, you’ll want to make it again and again — it’s that good!
Why This Recipe Works
- Creamy Dreaminess: The combination of cream cheese and whipped topping makes the pudding ultra-smooth and rich without feeling heavy.
- Perfect Balance of Flavors: Sweetened condensed milk and instant pudding bring sweetness while fresh bananas add natural freshness.
- Textural Harmony: Layers of Nilla wafers soften just enough without getting mushy, giving a melt-in-your-mouth feel.
- No-Bake Ease: This recipe comes together quickly without any oven time, making it perfect for busy days or last-minute dessert plans.

Ingredients & Why They Work
Every ingredient in this Rich Banana Pudding Dessert Recipe plays a special role. From the tangy cream cheese that adds depth, to the instant pudding mix that guarantees creamy texture, these ingredients come together to create something truly irresistible. Here’s what I look for when shopping:
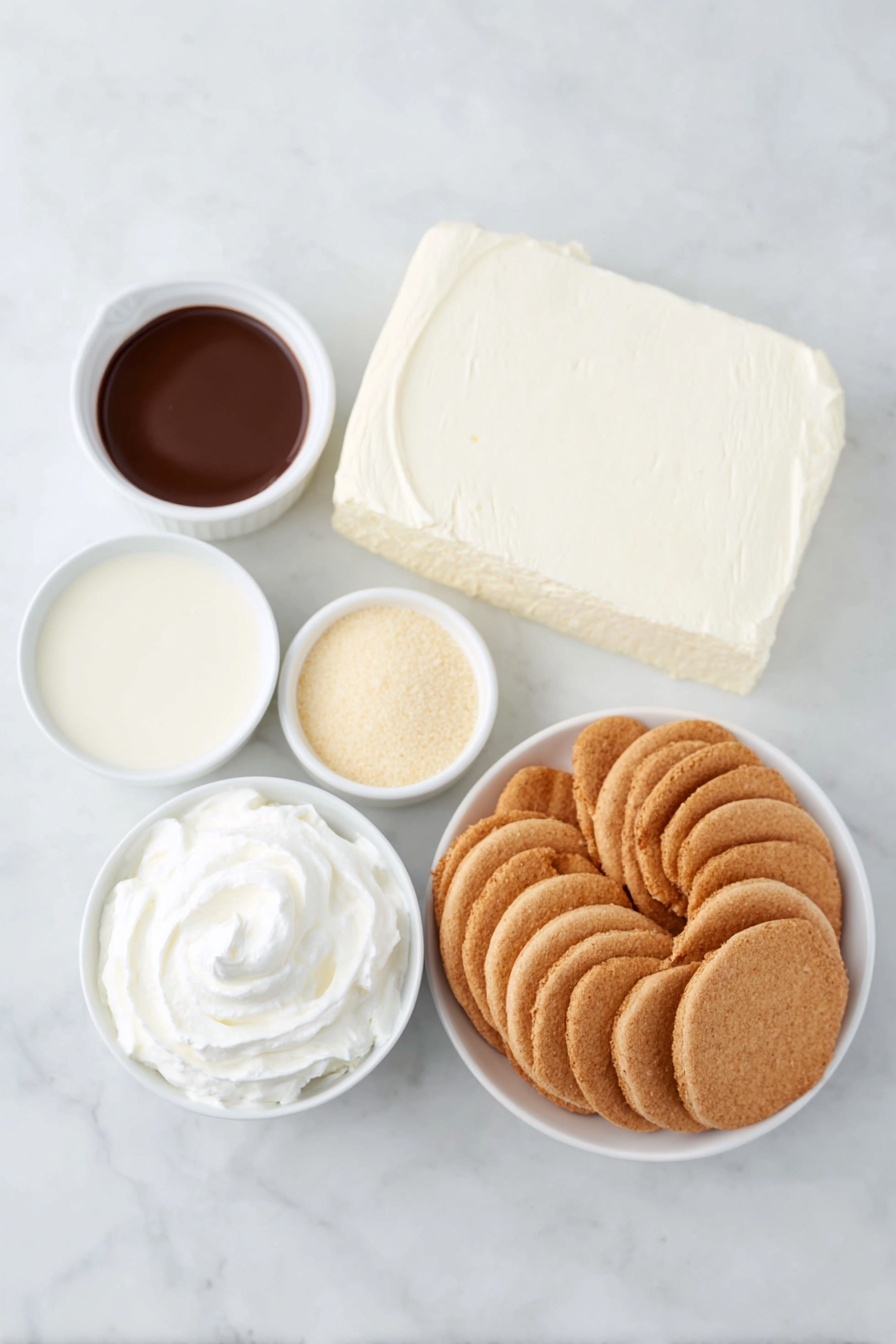
- Cream Cheese: The key to a velvety texture — make sure it’s softened to room temperature for the smoothest results.
- Sweetened Condensed Milk: Provides sweetness and adds richness; be sure you grab sweetened, not evaporated milk.
- Instant Vanilla Pudding Mix: Important to use INSTANT, not cook-and-serve; it sets properly and blends beautifully.
- Milk: Full or 2% milk works great; it helps create that classic pudding consistency.
- Vanilla Extract: Enhances the flavor — pure vanilla extract makes the pudding taste homemade and warm.
- Whipped Topping (Cool Whip): Adds lightness and fluffiness, balancing the denser cream cheese mixture.
- Nilla Wafers: They soak up the pudding just right, adding a buttery crunch that softens in the fridge.
- Bananas: Choose ripe but firm bananas for flavor without mushiness; I love adding plenty for that fresh, fruity burst.
Make It Your Way
I love how versatile this Rich Banana Pudding Dessert Recipe is—it’s my go-to building block for all sorts of fun tweaks. Feel free to adjust the layers, swap flavors, or even pick toppings that suit your mood. That’s the beauty of this recipe: it’s simple, but totally customizable.
- Banana Cream Upgrade: I once swapped the vanilla pudding mix for banana cream flavor and added banana extract—it made it even fruitier and wildly popular with my kids!
- Gluten-Free: Use gluten-free vanilla wafers or cookies if you need to keep it gluten-free—it doesn’t compromise on taste or texture.
- Less Sweet Option: Cutting back on the sweetened condensed milk slightly or choosing sugar-free pudding mix helps if you prefer a less sweet dessert.
- Mini servings: Try making individual parfaits in small glasses for parties — everyone loves a personal-sized treat!
Step-by-Step: How I Make Rich Banana Pudding Dessert Recipe
Step 1: Cream it Up Perfectly
Start by beating your softened cream cheese with an electric mixer on medium speed until it’s super smooth and fluffy. This is the secret to a lump-free pudding, so don’t rush it! If your cream cheese isn’t quite room temp, pop it in the microwave for 10-15 seconds (just don’t melt it) — that little trick saved me once when I was in a pinch.
Step 2: Mix in the Sweetness and Flavor
To your fluffy cream cheese, add the sweetened condensed milk, instant vanilla pudding mix, milk, and vanilla extract. Mix on medium until everything is well combined and smooth. No lumps here! This rich combo makes your pudding thick enough to hold together while staying creamy and scoopable.
Step 3: Fold in the Fluff
Gently fold in half of the whipped topping. This lightens up the rich pudding base and adds that classic pillow-y texture banana pudding is famous for. Be gentle here to keep that fluffiness.
Step 4: Start Layering Magic
Grab your serving dish—whether it’s a trifle bowl, large glass bowl, or a 9×13-inch pan—and start layering. First, lay down about a third of your Nilla wafers to give yourself a crunchy base. Next, add a single layer of freshly sliced bananas, then pour enough pudding mixture to cover completely. Repeat these layers two more times to build that perfect stack of flavor and texture.
Step 5: Top It and Chill
Finish with the rest of the whipped topping spread evenly over the top. Cover your masterpiece with plastic wrap and pop it in the fridge for at least 1–2 hours. This chilling time lets everything thicken up and the wafers soften just enough to soak up that luscious pudding flavor without turning mushy. Patience here pays off big time!
Tips from My Kitchen
- Use Room Temperature Cream Cheese: I learned early on that beating cold cream cheese ruins the texture — warming it slightly makes mixing smooth and lump-free.
- Bananas Matter: I always pick firm, ripe bananas to avoid mushy spots, which is life-changing for the texture.
- Instant Pudding Only: Don’t get ‘Cook and Serve’ pudding by mistake like I did once — it just won’t set right.
- Chill Time is Key: If you serve it too soon, the wafers are crunchy and hard; after chilling, they soak up just enough of the pudding, creating that iconic soft bite.
How to Serve Rich Banana Pudding Dessert Recipe
Garnishes
I usually keep garnishes simple — a few extra Nilla wafers crumbled on top and a little sprinkle of cinnamon or nutmeg if I’m feeling fancy. Sometimes I add a few banana slices for a fresh look right before serving. These touches add a lovely visual contrast and little bursts of flavor.
Side Dishes
Because this pudding is quite rich, I like pairing it with light side dishes like a crisp green salad or fresh fruit salad. It’s a perfect dessert after something light and fresh, so the pudding really shines without feeling too heavy.
Creative Ways to Present
For special occasions, I love assembling this pudding in clear glass trifle bowls or individual mason jars to show off those beautiful layers. I once made a picnic-friendly version in small, covered cups with lids — huge hit! You could also add crushed pecans or toasted coconut for a tropical twist.
Make Ahead and Storage
Storing Leftovers
Leftovers store beautifully covered in the fridge for up to 3 days. I usually keep it tightly wrapped with plastic wrap to prevent the bananas from browning too fast. It actually tastes even better the next day once the flavors have melded!
Freezing
I’ve tried freezing this pudding, and while the texture changes a bit (the bananas soften more), it’s still tasty if you’re in a pinch. If you want to freeze, store it in an airtight container and thaw overnight in the fridge before serving.
Reheating
This pudding is best served cold, so I don’t recommend reheating. If you find it too firm from the fridge, just let it sit at room temperature for 15 minutes before digging in—it’ll soften nicely without losing that ooh-so-creamy texture.
FAQs
-
Can I use regular pudding instead of instant pudding?
You really want to stick with instant pudding mix here. Regular or cook-and-serve puddings won’t set properly in this no-bake recipe and will result in a runny, unsatisfying texture.
-
How ripe should bananas be for this pudding?
Choose ripe but firm bananas — they’ll be sweet but not mushy, maintaining good texture in your layers without turning brown too quickly.
- Can I make this recipe dairy-free or vegan?
This classic recipe relies on dairy for its signature creaminess, but you can experiment with dairy-free cream cheese and pudding mixes. Just know the texture and flavor will be different.
- How long should I let the pudding chill before serving?
I recommend chilling for at least 1-2 hours so the flavors meld and wafers soften; overnight chilling is also great and often improves texture even more.
Final Thoughts
Honestly, this Rich Banana Pudding Dessert Recipe holds a very special place in my heart. It’s one of those comforting desserts that makes you feel cozy and cared for every time you dig in. Whether you’re making it for a crowd or just for yourself (hey, no judgment!), it’s incredibly quick to throw together and the payoff is huge. Give it a go—I promise you’ll be hooked, just like me!
Print
Rich Banana Pudding Dessert Recipe
- Prep Time: 25 minutes
- Cook Time: 0 minutes
- Total Time: 2 hours 25 minutes
- Yield: 12 servings
- Category: Dessert
- Method: No-Cook
- Cuisine: Southern American
- Diet: Vegetarian
Description
This creamy and delicious Banana Pudding recipe layers a smooth mixture of cream cheese, sweetened condensed milk, instant vanilla pudding, and whipped topping with slices of fresh banana and crunchy Nilla wafers. It is a classic Southern dessert that is easy to assemble and perfect for serving a crowd. Refrigerate it for a few hours for the flavors to meld and the wafers to soften, resulting in an irresistibly rich and comforting treat.
Ingredients
Pudding Mixture
- 8 ounce block cream cheese, softened to room temperature
- 14 ounce can sweetened condensed milk
- 5 ounce package INSTANT vanilla pudding mix
- 3 cups milk (2% or higher)
- 2 teaspoons vanilla extract
- 8 ounce tub whipped topping (COOL WHIP), thawed (divided use)
Layers
- 11 ounce box Nilla wafers (divided use)
- 5-7 bananas, peeled and sliced (divided use)
Instructions
- Prepare Cream Cheese Mixture: In a large bowl, beat the softened cream cheese with an electric mixer on medium speed until smooth and fluffy, ensuring there are no lumps.
- Add Sweetened Condensed Milk and Pudding Mix: Add the sweetened condensed milk, instant vanilla pudding mix, milk, and vanilla extract to the cream cheese. Mix thoroughly until well combined and smooth.
- Incorporate Whipped Topping: Gently fold in half of the thawed whipped topping into the pudding mixture until evenly blended.
- Layer Nilla Wafers: Place one-third of the Nilla wafers in a single layer at the bottom of a trifle dish, large bowl, or 9×13-inch baking dish to form the first layer.
- Add Banana Slices: Arrange a layer of sliced bananas over the Nilla wafers evenly.
- Pour Pudding Mixture: Spoon one-third of the pudding mixture over the bananas, spreading to cover all pieces.
- Repeat Layers: Continue layering two more times following the order: Nilla wafers, bananas, and pudding mixture to create three complete layers.
- Top with Whipped Topping: Spread the remaining whipped topping evenly over the top layer of pudding.
- Chill: Cover the assembled pudding with plastic wrap and refrigerate for at least one to two hours to allow the pudding to thicken and the wafers to soften perfectly before serving.
Notes
- Ensure you use INSTANT pudding mix, not Cook and Serve, as the latter will not set properly.
- Always use sweetened condensed milk, not evaporated milk, for the correct sweetness and texture.
- You can substitute Banana Cream pudding flavor for vanilla pudding or use banana extract instead of vanilla extract for enhanced banana flavor.
- Be sure the cream cheese is at room temperature to avoid lumps and achieve a smooth mixture.
- Adjust the number of bananas (5-7) based on their size and your preference for banana quantity in the pudding.
Nutrition
- Serving Size: 1 serving
- Calories: 320 kcal
- Sugar: 28 g
- Sodium: 210 mg
- Fat: 15 g
- Saturated Fat: 9 g
- Unsaturated Fat: 5 g
- Trans Fat: 0 g
- Carbohydrates: 40 g
- Fiber: 2 g
- Protein: 4 g
- Cholesterol: 40 mg


