

Red Velvet Poke Cake with Cheesecake Pudding Recipe
If you’ve been hunting for a show-stopping dessert that’s both super easy and crowd-pleasing, then you’re in for a treat. This Red Velvet Poke Cake with Cheesecake Pudding Recipe is one of those magical desserts that combines the lusciousness of red velvet cake with the creamy richness of cheesecake pudding, all topped off with fluffy whipped topping and crunchy Oreos. Trust me, once you make this, you’ll want to keep this recipe on repeat for birthdays, holidays, or just when you want to impress without the stress.
Why This Recipe Works
- Perfect Flavor Combo: The classic red velvet tang meets creamy cheesecake pudding for a thoughtfully balanced dessert.
- Simple Poke Technique: Poking holes lets the pudding soak beautifully into the cake, making every bite moist and scrumptious.
- Easy Yet Elegant: Uses a box cake mix and instant pudding to save time without sacrificing flavor or presentation.
- Fun Texture Play: Whipped topping with crushed Oreos gives a perfect light crunch finishing touch.

Ingredients & Why They Work
Each ingredient in this Red Velvet Poke Cake with Cheesecake Pudding Recipe is chosen to create layers of rich flavor and texture without unnecessary fuss. Using a box mix keeps things easy, while the instant cheesecake pudding adds luxurious creaminess that seeps into every bite.
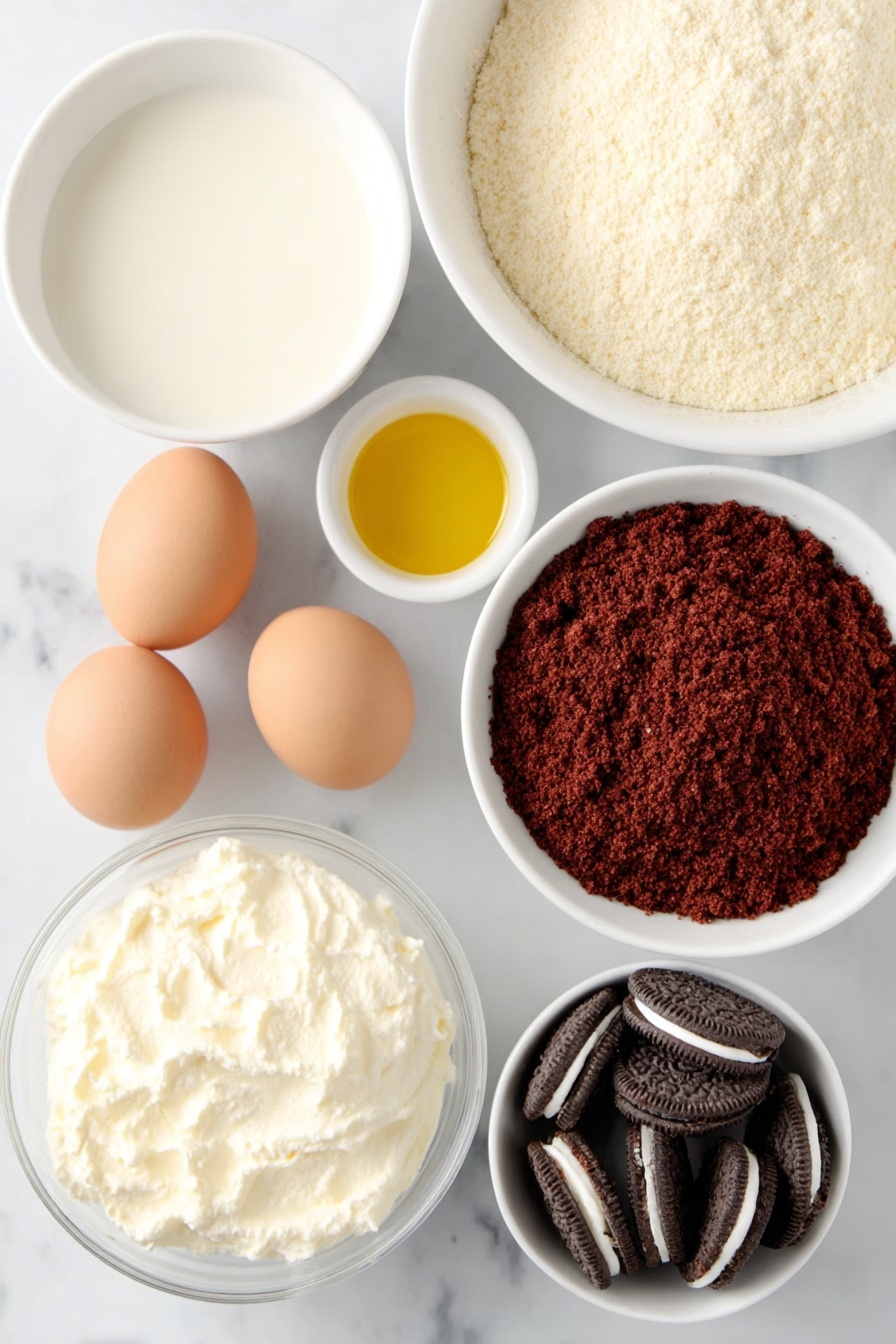
- Red velvet cake mix: Provides that signature flavor and color with a tender crumb, plus it’s a huge time saver.
- Eggs, oil & water: Follow the box instructions here for moisture and structure—don’t skimp!
- Instant cheesecake pudding mix: This brings in that dreamy, creamy cheesecake touch without baking another crust.
- Milk: Needed to whisk pudding to silky smoothness—whole milk gives the best richness, but 2% works fine too.
- Whipped topping (Cool Whip): Adds fluffy sweetness and lightness on top of the pudding layer.
- Oreo cookies (optional): Crushed Oreos create a crunchy contrast that’s irresistible and adds a nostalgic fun element.
Make It Your Way
One of the best things about this Red Velvet Poke Cake with Cheesecake Pudding Recipe is how flexible it is. I often tweak it depending on the occasion or mood, and you definitely can too! Feel free to swap ingredients or add your own flair to make it feel like your very own kitchen superstar creation.
- Variation: I love adding a handful of fresh raspberries between the pudding and whipped topping for a tart pop that cuts through the sweetness—it’s a game changer.
- Dietary modification: You can use dairy-free pudding and whipped topping options if you’re avoiding dairy; just keep an eye on textures as some brands vary.
- Make it festive: Swap the Oreo topping for crushed peppermint candies or red-and-white sprinkles during the holidays for a festive wow factor.
Step-by-Step: How I Make Red Velvet Poke Cake with Cheesecake Pudding Recipe
Step 1: Bake Your Red Velvet Cake
Start by making the red velvet cake according to the instructions on the box. I usually pour the batter into a greased 9×13-inch pan for even baking. Once it’s golden and a toothpick comes out clean, take it out and let it cool for just a few minutes—don’t wait too long, because warm cake is easier to poke and absorb the pudding later on.
Step 2: Poke Those Holes!
Using the handle of a wooden spoon or any similarly sized round object, gently poke holes all over the warm cake. Make sure the holes are evenly spaced and deep enough to reach the bottom. This step is so important because it lets that cheesecake pudding fill the cake’s interior, saturating it with creamy goodness.
Step 3: Whisk and Pour the Pudding
In a medium bowl, whisk together the instant cheesecake pudding mix with milk until smooth and lump-free. Then, carefully pour the pudding over the cake, focusing on filling those holes first so the liquid sinks right in. Spread whatever’s left over evenly across the surface. You can use the back of a spoon to gently press the pudding down, making sure every poke spot is soaked.
Step 4: Chill and Top
Pop the cake into the fridge for around 2 hours until the pudding sets nicely. It’s tempting to dive in earlier, I know! When it’s ready, spread an even layer of the thawed whipped topping over the pudding layer. This adds a light sweetness and beautiful finish.
Step 5: Oreo Finale
Finally, sprinkle crushed Oreo cookies over the whipped topping. This adds a delightful crunch and a chocolatey twist that ties the whole dessert together. Then you’re ready to slice and share—if you can wait that long!
Tips from My Kitchen
- Don’t Overcool Before Poking: I’ve found poking the cake while it’s still warm yields the best pudding absorption—waiting too long means the holes won’t soak through.
- Even Pudding Distribution: Pour the pudding slowly, focusing on each hole first, so you don’t waste any flavorful goodness pooling only on the surface.
- Chill Time Matters: Give at least two hours in the fridge so everything sets perfectly and flavors meld—the difference is noticeable!
- Whipped Topping Texture: Make sure your Cool Whip is completely thawed and spread gently to keep its fluffy texture; it’s worth the patience.
How to Serve Red Velvet Poke Cake with Cheesecake Pudding Recipe
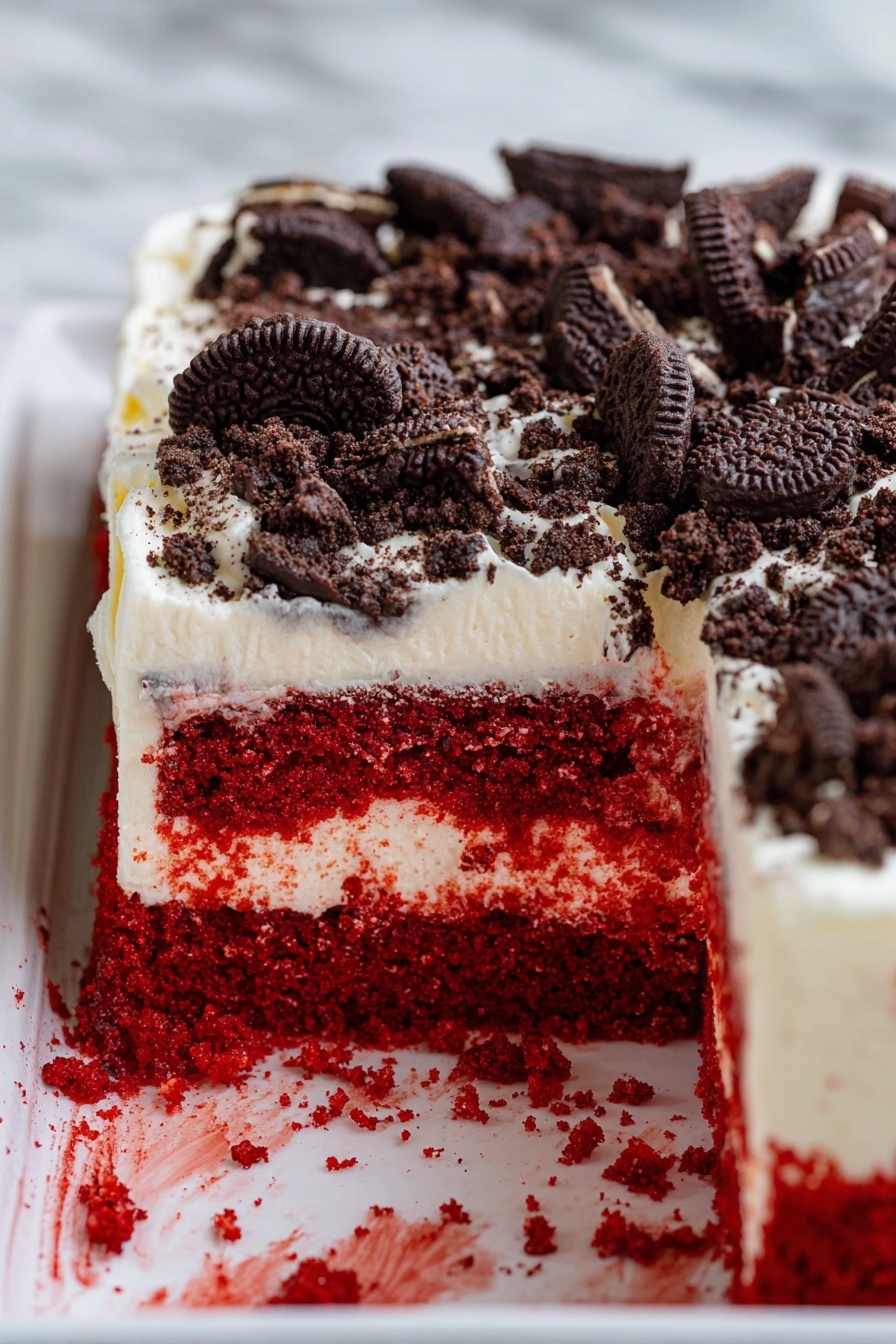
Garnishes
I usually stick with the classic crushed Oreos on top because they add that perfect contrast in texture and a touch of chocolate flavor that complements red velvet beautifully. But sometimes I like to sprinkle mini chocolate chips or even a dusting of cocoa powder for a bit of drama. Fresh strawberries or raspberries sprinkled on top can add a pop of color and a bright, fresh note that balances the richness.
Side Dishes
If you’re serving this dessert at a party or family dinner, I recommend pairing it with a light side like fresh fruit salad or a simple cup of coffee or milk. The cake is rich enough on its own, so keep sides minimal to let it shine. For a fun twist, a scoop of vanilla or cream cheese ice cream on the side only makes it better!
Creative Ways to Present
For birthdays or Valentine’s Day, I’ve piped whipped cream rosettes around the edges and added edible glitter for sparkle. Another favorite is serving this poke cake in individual glass parfait cups layered with extra crushed Oreos and a drizzle of cream cheese glaze—super cute and perfect for entertaining!
Make Ahead and Storage
Storing Leftovers
I usually cover the cake tightly with plastic wrap or an airtight lid to keep the whipped topping fresh and store it in the fridge. It holds up beautifully for 3-4 days. Just remember to slice it with a sharp knife so the whipped topping stays intact and looks as good as the first serving.
Freezing
If you want to freeze your Red Velvet Poke Cake with Cheesecake Pudding Recipe, I recommend freezing it before you add the whipped topping. Wrap the cake tightly in plastic wrap and then foil. When ready to serve, thaw overnight in the fridge, then add freshly whipped topping and toppings for the best texture and flavor.
Reheating
This cake is best served cold or at room temperature due to the pudding and whipped topping. If you must warm any leftovers, keep it brief—just let it sit out for about 15-20 minutes so the pudding softens slightly rather than microwaving, which can mess with texture.
FAQs
-
Can I make the Red Velvet Poke Cake with Cheesecake Pudding Recipe ahead of time?
Absolutely! This cake actually benefits from some resting time in the fridge to let the pudding set and flavors combine. I suggest chilling it for at least 2 hours before serving, but you can prep it up to a day ahead to save time on the day of your event.
-
What can I substitute for cheesecake pudding?
If you can’t find instant cheesecake pudding, vanilla pudding works fine as a substitute. It won’t have quite the tangy cheesecake flavor but will still be creamy and delicious. Some people also mix cream cheese with vanilla pudding to mimic cheesecake taste.
-
Can this recipe be made dairy-free?
Yes! You can opt for a dairy-free red velvet cake mix or make your cake from scratch using dairy-free ingredients. For the pudding, look for dairy-free instant pudding mixes or homemade versions using coconut milk. Whipped topping alternatives made from coconut cream work well as a topping.
-
Why do I have to poke holes in the cake?
Poking holes allows the pudding to seep deep into the cake rather than just sitting on top, making every bite super moist and flavorful. Without poking, the cake can be dry and the pudding layer feels separate. It’s a simple trick that transforms the whole dessert.
-
How do I avoid the whipped topping from melting?
Make sure the cake and pudding are fully chilled before you spread on the whipped topping. Also, spreading it gently without warming the topping in your hands helps maintain its fluffy texture. Keep the finished cake refrigerated until just before serving.
Final Thoughts
This Red Velvet Poke Cake with Cheesecake Pudding Recipe has been a delightful go-to in my kitchen whenever I want to wow guests without hours in the oven or complicated steps. It’s rich, moist, and just fun enough for any celebration or an indulgent treat. I hope you enjoy making it as much as I do—and hey, if you sneak a slice before it’s fully chilled, no judgment from me! Give it a try and let me know how it turns out; I’m betting it’ll become your new favorite dessert too.
Print
Red Velvet Poke Cake with Cheesecake Pudding Recipe
- Prep Time: 10 minutes
- Cook Time: 30 minutes
- Total Time: 40 minutes
- Yield: 12 servings
- Category: Dessert
- Method: Baking
- Cuisine: American
Description
This Red Velvet Poke Cake is a delightful American dessert featuring a moist red velvet cake with instant cheesecake pudding poured into poke holes, topped with whipped topping and crushed Oreos for added texture and flavor.
Ingredients
Cake Ingredients
- 1 box red velvet cake mix
- Ingredients needed to make cake: eggs, oil, and water (use amounts on back of box)
Pudding Layer
- 2 (3.4 ounce) boxes instant cheesecake pudding mix
- 4 cups milk
Topping
- 8 ounce tub whipped topping, thawed (Cool Whip)
- 10 Oreo cookies, crushed (optional)
Instructions
- Prepare Cake: Prepare the red velvet cake mix according to the package instructions, using the specified amounts of eggs, oil, and water for a 9×13-inch cake pan. Bake the cake and allow it to cool for a few minutes once it’s out of the oven.
- Poke Holes: Using the handle of a wooden spoon or similar round object, poke holes all over the warm cake, making sure the holes reach down to the bottom and are large enough to let pudding seep in.
- Make Pudding: In a medium bowl, whisk together the instant cheesecake pudding mixes with 4 cups of milk until smooth and lump-free.
- Pour Pudding: Pour the prepared pudding evenly over the cake, focusing on filling the holes as much as possible. Use the back of a spoon to gently push the pudding down into the holes.
- Chill Cake: Place the cake in the refrigerator for about 2 hours to set and cool completely.
- Add Topping: Once the cake has fully chilled, spread the thawed whipped topping evenly over the pudding layer.
- Add Oreos and Serve: Sprinkle the crushed Oreo cookies evenly over the whipped topping, then slice the cake and serve.
Notes
- You can substitute instant vanilla pudding for cheesecake pudding if preferred.
- Allow the cake to cool slightly before poking holes to avoid breaking the cake apart.
- The crushed Oreos on top are optional but add a nice texture and flavor contrast.
- For a dairy-free version, use non-dairy whipped topping and pudding mixes.
- Ensure pudding is fully mixed with milk to avoid lumps for best texture.
Nutrition
- Serving Size: 1 slice
- Calories: 360 kcal
- Sugar: 32 g
- Sodium: 350 mg
- Fat: 15 g
- Saturated Fat: 7 g
- Unsaturated Fat: 6 g
- Trans Fat: 0 g
- Carbohydrates: 50 g
- Fiber: 1 g
- Protein: 4 g
- Cholesterol: 40 mg


