

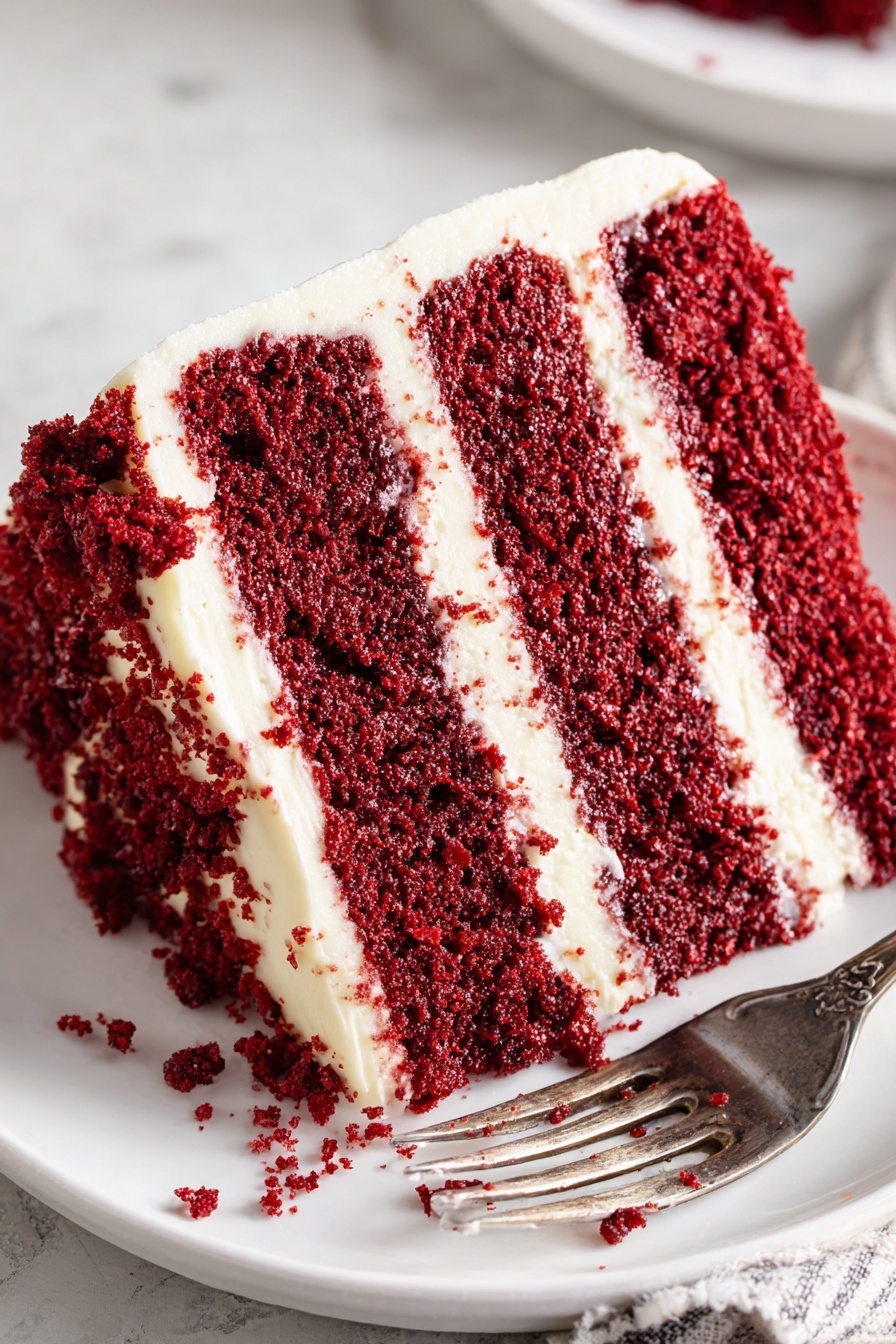
Red Velvet Cake with Cream Cheese Frosting Recipe
If you’re on the hunt for a show-stopping dessert that’ll disappear fast at any gathering, look no further than my Red Velvet Cake with Cream Cheese Frosting Recipe. This is more than just a pretty cake with its signature red hue—it’s tender, moist, and paired with a tangy, silky cream cheese frosting that’ll have you licking the spatula. Trust me, once you try this, you’ll want to bake it again and again.
Why This Recipe Works
- Perfect Moisture Balance: Combining both vegetable oil and melted butter gives the cake a tender crumb that’s never dry.
- Rich Cocoa Flavor Without Overpowering: Using hot coffee to bloom the cocoa powder intensifies the chocolate taste subtly.
- Classic Tangy Cream Cheese Frosting: The frosting’s smooth texture and vanilla boost the cake’s flavor wonderfully.
- Vibrant Red Color: A good quality gel food coloring guarantees that iconic red velvet look that wows every time.

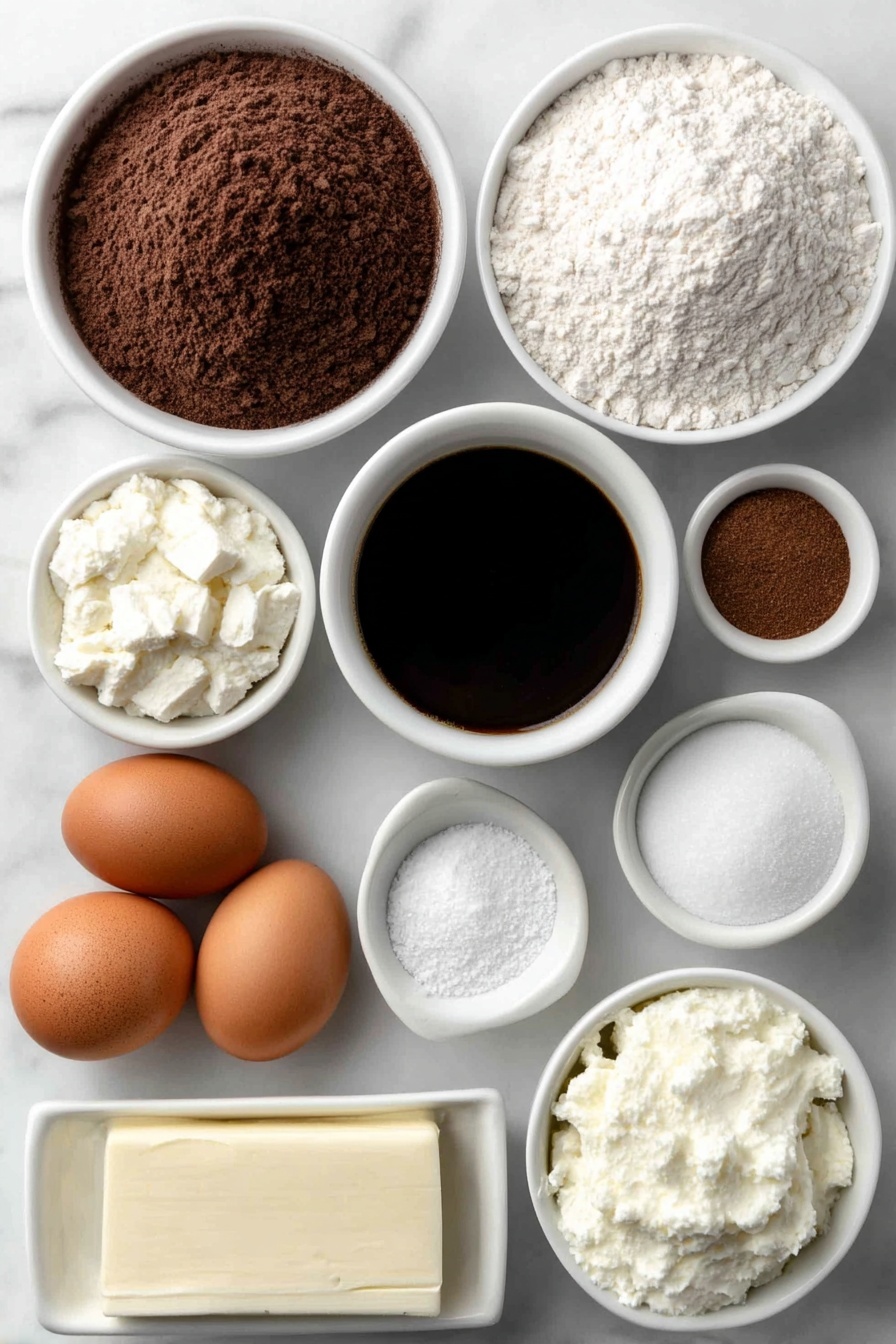
Ingredients & Why They Work
Every ingredient here plays a special role, and I love using classic pantry staples enhanced by a couple of secret tricks. Make sure you get fresh buttermilk for that slight tang and dependable unsweetened cocoa powder—don’t reach for the sweetened stuff, or it won’t taste right.
- Hot coffee or boiling water: It’s the secret weapon for unlocking intense cocoa flavor in the cake without making it bitter.
- Unsweetened natural cocoa powder: Use natural, not Dutch-processed, for the classic red velvet chemistry with baking soda.
- All-purpose flour: Balanced texture—too much protein from bread flour would make the cake tough.
- Baking powder & baking soda: They give just the right lift, keeping the crumb light but stable.
- Sea salt & cinnamon (optional): Salt balances sweetness and cinnamon adds unexpected warmth.
- Granulated sugar: Sweetness and structure in the batter.
- Vegetable oil & unsalted butter: Oil keeps it moist, while butter adds rich flavor.
- Eggs & egg yolk: Provide structure, emulsify fats, and keep the cake tender.
- Buttermilk: Delivers moisture and reacts with baking soda for lift plus adds a tang I adore.
- Vanilla extract: Enhances all the flavors without overpowering.
- Red gel food coloring: Use quality gel for vibrant color without watering down batter.
- Distilled white vinegar: Helps brighten the cocoa flavor and balance acidity.
- Cream cheese, unsalted butter, powdered sugar (for frosting): These create a classic, luscious cream cheese frosting that’s silky smooth and tangy.
Make It Your Way
I love that you can easily personalize this Red Velvet Cake with Cream Cheese Frosting Recipe to suit your tastes or occasion. Whether you’re all about the classic or want to experiment a little, this cake invites creativity.
- Reduce the Sugar: I sometimes cut back the sugar slightly when I want it less sweet, and it works fine without losing moisture.
- Food Coloring Alternative: If you prefer natural colors, beet powder works but expect a milder red and subtle earthiness.
- Alternative Frosting: Tried swapping cream cheese frosting for mascarpone mixed with a touch of whipped cream—deliciously light and tangy if you want less sweetness.
- Seasonal Twists: Adding a teaspoon of orange zest to the frosting is a fresh twist that everyone raves about during holidays.
Step-by-Step: How I Make Red Velvet Cake with Cream Cheese Frosting Recipe
Step 1: Prep Your Pans and Bloom the Cocoa
First things first—preheat your oven to 325°F (160°C). I line my three 8-inch cake pans with parchment rounds, then spray the paper and sides with nonstick spray to make sure nothing sticks. Next, grab a glass measuring cup and whisk together your hot coffee and cocoa powder. Let it sit for 5 minutes so that rich chocolate flavor develops—this little step is a game changer.
Step 2: Mix Dry Ingredients Separately
While the cocoa is blooming, whisk together your flour, baking powder, baking soda, salt, and if you’re feeling adventurous, a pinch of cinnamon. Setting this aside keeps your baking powder and soda evenly distributed, preventing lumps.
Step 3: Combine Wet Ingredients and Build That Batter
In a large bowl, whisk sugar, vegetable oil, and melted butter until they’re blended together smoothly. Adding melted butter gives this cake such a delicious depth of flavor. Then crack in your eggs and egg yolk (room temperature is key here for even mixing), whisking for about 20 seconds until fully combined. Next, stir in the buttermilk, vanilla extract, and red gel food coloring—don’t be shy with the color! Finish by whisking in the vinegar and cocoa-coffee mixture.
Step 4: Sift in Dry Ingredients and Divide Batter
Using a fine mesh sieve, sift your dry ingredient mix into the wet batter in three stages, whisking just until you can’t see any more flour. I find that overmixing can toughen the cake, so keep it gentle here. Once your batter is smooth and even, divide it equally between the three pans. Tap them on the counter a few times to pop air bubbles—you’ll want an even crumb and no holes.
Step 5: Bake, Cool, and Prepare for Frosting
Bake for 25 to 30 minutes, or until a toothpick inserted comes out clean. Your cake might look a bit spongey on top, and that’s perfectly fine. Let the pans cool on racks until you can comfortably touch them. Run a knife around the edges to loosen the layers, then invert the cakes onto wire racks to cool completely. Patience here ensures the frosting won’t melt or slip.
Step 6: Whip Up the Cream Cheese Frosting
Using a stand mixer fitted with a paddle attachment makes this easy: beat room temperature cream cheese and butter on medium-high until light, fluffy, and smooth. Scrape down the bowl so everything blends evenly—no lumpy frosting here! Add vanilla, then slowly incorporate powdered sugar on low speed until fluffy, about 3 minutes. If your frosting feels too dense, a splash of milk or cream can loosen it up, and if too runny, sift in more powdered sugar.
Step 7: Layer and Frost Your Cake
Place the first cake layer on a cake stand or plate, flat side up. I tuck strips of parchment around the edges to keep my plate clean while icing—trust me, it helps! Spread about a third of the frosting evenly over that layer. Add the second cake on top, repeat with frosting, then finish with the third layer. Use the remaining frosting to cover the outside smoothly. Voila—your stunning red velvet cake is ready to impress!
Tips from My Kitchen
- Don’t Rush Cooling: I’ve learned that frosting warm cake causes melting and sliding—so patience is your friend here.
- Gel Food Coloring Perks: I use Americolor because it delivers vivid red without the bitter aftertaste some liquid dyes have.
- Mixing Order Matters: Adding dry ingredients in parts keeps batter smooth and helps prevent overmixing.
- Keep Your Frosting Thick but Spreadable: Adjust powdered sugar and milk carefully to get that perfect frosting texture.
How to Serve Red Velvet Cake with Cream Cheese Frosting Recipe
Garnishes
When I serve this cake, I like to garnish with a few simple yet impactful touches: a dusting of cocoa powder or finely grated white chocolate. Sometimes, I top it with sprigs of fresh mint or a handful of fresh raspberries—that pop of color and tartness balances the richness beautifully.
Side Dishes
My go-to pairing? A cup of freshly brewed coffee or a creamy chai latte complements the cake’s cocoa and cream cheese flavors perfectly. For something lighter, a simple mixed green salad with a citrus vinaigrette is a surprising but refreshing match for a richer dessert like this.
Creative Ways to Present
For special occasions, I love cutting this cake into individual mini layers and serving them in pretty glass jars or clear cups—layers of cake, frosting, and a few berries are always a hit and look charming. Another favorite is piping rosettes of cream cheese frosting on top and decorating with edible gold leaf for a touch of glam.
Make Ahead and Storage
Storing Leftovers
Once frosted, I tightly wrap the cake with plastic wrap and keep it in the fridge. This cake stays moist and fresh for up to 3 days. In my experience, letting it come to room temperature before serving really brings back the softness of the crumb and enhances the frosting’s flavor.
Freezing
I often freeze leftover unfrosted cake layers wrapped in foil and plastic wrap to lock in moisture. When ready to serve, I thaw them overnight in the fridge then frost fresh. You can also freeze a fully assembled cake—just flash freeze uncovered for an hour, then wrap tightly to prevent freezer burn.
Reheating
To revive leftover cake slices, I recommend warming them gently in the microwave for 15-20 seconds. This softens the cream cheese frosting and cake without drying it out. It feels just like fresh-baked, I promise!
FAQs
-
Can I make this Red Velvet Cake with Cream Cheese Frosting Recipe without food coloring?
Absolutely! While the red color is iconic, if you skip the food coloring, you’ll get a subtle chocolate cake with the same great flavors. For a natural tint, you can use beetroot powder, but keep in mind it’ll be less vibrant and may add an earthy taste.
-
What’s the best way to avoid a dense or dry red velvet cake?
Use fresh leavening agents (baking soda and powder) and don’t overmix your batter. Also, make sure your ingredients like buttermilk, eggs, and coffee are at room temperature so everything blends well. Baking at 325°F and checking doneness early helps maintain moisture.
-
Can I make the frosting ahead of time?
Yes! Cream cheese frosting can be made up to 2 days in advance. Keep it covered tightly in the fridge, then give it a quick whisk or beat before spreading to refresh its smooth texture.
-
How do I prevent the cream cheese frosting from being too soft?
Ensure your cream cheese and butter are fully softened but not melted. If your kitchen is warm, refrigerate the frosting briefly before icing. Also, adding more powdered sugar will thicken it if it’s too loose.
-
Can I double this recipe for a larger cake?
You can! Just be mindful to bake in batches or use larger pans, adjusting bake time accordingly. Larger cakes need longer and lower temperature baking sometimes, so keep an eye on doneness with toothpick tests.
Final Thoughts
This Red Velvet Cake with Cream Cheese Frosting Recipe holds a special place in my heart—not just because it’s stunning to look at but because it’s reliably delicious every single time. When I bring this cake to family get-togethers or celebrations, it always sparks joy and compliments. I hope you love making and sharing it as much as I do. Give it a try—you might just create your new favorite cake!
Print
Red Velvet Cake with Cream Cheese Frosting Recipe
- Prep Time: 15 minutes
- Cook Time: 40 minutes
- Total Time: 55 minutes
- Yield: 12 servings
- Category: Dessert
- Method: Baking
- Cuisine: American
Description
This classic Red Velvet Cake features a moist, tender crumb with a hint of cocoa, enhanced by a vibrant red color. Topped with a rich and creamy cream cheese frosting, this cake is perfect for special occasions or anytime you crave a luscious, memorable dessert.
Ingredients
For the cake:
- 1/2 cup plain hot coffee or boiling water
- 1/4 cup (21 grams) unsweetened natural cocoa powder
- 2 1/4 cups (279 grams) all-purpose flour
- 1/2 teaspoon baking powder
- 1 teaspoon baking soda
- 1 teaspoon fine sea salt
- 1/4 teaspoon ground cinnamon (optional)
- 2 cups (400 grams) granulated sugar
- 1/2 cup (109 grams) fresh vegetable oil
- 1 stick (113 grams) unsalted butter, melted
- 2 large eggs, at room temperature
- 1 large egg yolk, at room temperature
- 1 cup buttermilk, at room temperature
- 2 teaspoons vanilla extract
- 3 teaspoons red gel food coloring, plus more if needed
- 1 teaspoon distilled white vinegar
For the cream cheese frosting:
- 16 ounces (454 grams) cream cheese, at room temperature
- 2 sticks (227 grams) unsalted butter, at room temperature
- 2 teaspoons vanilla extract
- 4 cups (500 grams) powdered sugar, sifted
Instructions
- Preheat and prepare pans: Preheat the oven to 325°F. Line three 8-inch cake pans with parchment rounds and generously spray the parchment and sides with nonstick cooking spray.
- Make cocoa mixture: In a glass measuring cup, whisk together the hot coffee and cocoa powder. Cover and let it stand for 5 minutes to bloom.
- Mix dry ingredients: In a medium bowl, whisk together the flour, baking powder, baking soda, salt, and cinnamon if using.
- Mix wet ingredients: In a large bowl, whisk granulated sugar, vegetable oil, and melted butter until combined. Add the eggs and yolk and whisk vigorously for about 20 seconds until very well combined. Then add the buttermilk, vanilla extract, and red gel food coloring, whisking to combine thoroughly.
- Add vinegar and cocoa mixture: Whisk in the distilled white vinegar and coffee-cocoa mixture until evenly distributed in the batter.
- Incorporate dry ingredients: Using a fine mesh sieve, sift the flour mixture into the batter in three additions, whisking after each until just combined and smooth.
- Fill pans and bake: Divide the batter evenly among the prepared pans. Tap the bottoms of the pans on the counter several times to release air bubbles. Bake for 30 minutes or until a toothpick inserted in the centers comes out clean. The cakes may look slightly spongy on top.
- Cool cakes: Place the cake pans on wire racks to cool. When cool enough to handle, run a thin knife around the edges, invert cakes onto racks, and let cool completely.
- Prepare frosting: In a stand mixer with paddle attachment, beat cream cheese and butter on medium-high speed until very light, creamy, and smooth. Scrape the bowl to remove clumps. Add vanilla and mix to combine. On low speed, gradually add powdered sugar and beat until fluffy, about 3 minutes. Adjust consistency with a splash of milk or more powdered sugar as needed.
- Assemble cake: Place the first cake layer flat-side up on a cake plate. Use strips of baking paper under edges to keep plate clean. Spread about a third of the frosting evenly over the layer. Repeat with second layer and frosting. Add last cake layer flat-side up. Use remaining frosting to coat the entire cake evenly.
- Serve and store: Serve immediately or cover and refrigerate for up to 3 days. Bring to room temperature before serving for best texture and flavor.
Notes
- Use a high-quality gel red food coloring like Americolor or Chefmaster for vibrant color; you may need more than one bottle if container sizes are small.
- Ensure all ingredients are at room temperature for optimal mixing and consistency.
- If frosting is too thick, add a small amount of milk or cream to loosen it; if too thin, add additional sifted powdered sugar.
- Do not overmix the batter once the flour is added to prevent tough cake texture.
- Line cake pans with parchment rounds and spray to ensure cakes release easily after baking.
- Store cake in refrigerator covered for up to 3 days; bring to room temperature before serving for best taste.
Nutrition
- Serving Size: 1 slice
- Calories: 450 kcal
- Sugar: 38 g
- Sodium: 320 mg
- Fat: 26 g
- Saturated Fat: 12 g
- Unsaturated Fat: 12 g
- Trans Fat: 0 g
- Carbohydrates: 48 g
- Fiber: 2 g
- Protein: 5 g
- Cholesterol: 80 mg


