

Pumpkin Pie Rice Krispie Treats Recipe
I can’t wait to tell you about these Pumpkin Pie Rice Krispie Treats Recipe that have quickly become a fall favorite in my house. They combine that classic crispy, chewy texture you love in Rice Krispie treats with the warm, cozy flavors of pumpkin pie spice — it’s like autumn wrapped up in every bite. If you’re looking for a fun, no-fuss dessert that’s both nostalgic and seasonally festive, this recipe is a total winner.
What I absolutely adore about this Pumpkin Pie Rice Krispie Treats Recipe is how versatile it is. They’re perfect for parties, a quick sweet treat after school, or even a casual dessert for Thanksgiving. Plus, the lightly browned butter in the crust adds a nutty depth that complements the pumpkin-spiced filling beautifully — trust me, once you try it, you’ll want to make these all season long.
Why This Recipe Works
- Layered Texture: The two-layer method gives you a buttery, slightly crisped crust with a soft, spiced top layer that balances flavor and texture perfectly.
- Browned Butter Flavor: Browning your butter for the crust adds a rich, nutty depth you won’t get from plain melted butter.
- Pumpkin Pie Spice Magic: Adding pumpkin pie spice and a hint of orange coloring makes these treats taste like pumpkin pie without the fuss of baking one.
- Simple, No-Bake Convenience: From start to finish, it’s a quick recipe with minimal cleanup — perfect for last-minute gatherings or a cozy weekend project.

Ingredients & Why They Work
Every ingredient in this Pumpkin Pie Rice Krispie Treats Recipe plays a key role. From the browned butter that brings warmth to the crust layer to the extra marshmallows that ensure these treats are perfectly gooey. Here’s a quick guide to each star ingredient before you dive in:
- Salted butter: Browning it for the crust lets the nutty flavors shine and balances the sweetness.
- Mini marshmallows: They melt quickly and evenly, helping create that signature chewy texture.
- Rice Krispies cereal: For a light, crunchy base that won’t get soggy.
- Pumpkin pie spice: The warming blend of cinnamon, nutmeg, and clove that delivers those cozy fall vibes.
- Orange food coloring (optional): Just a few drops give the filling the perfect pumpkin-colored hue for fun presentation.
- Whipped cream: A dollop on top adds a cool creamy contrast and looks festive with a sprinkle of spice.
Make It Your Way
I like to play around with this Pumpkin Pie Rice Krispie Treats Recipe depending on the season and who I’m serving. It’s super forgiving, so feel free to swap a few things and make it your own.
- Variation: When I want a little extra indulgence, I mix in some white chocolate chips into the filling layer — it adds a lovely creamy sweetness that pairs beautifully with the spices.
- Dietary swaps: Using vegan butter and vegan marshmallows works great for guests with dietary restrictions without losing that classic texture.
- Seasonal twist: If you’d rather go for a maple flavor, swap pumpkin pie spice with pure maple extract and a sprinkle of chopped pecans on top.
Step-by-Step: How I Make Pumpkin Pie Rice Krispie Treats Recipe
Step 1: Brown the Butter for the Crust
Start by greasing your 9×9 baking dish so everything sticks nicely. Place the salted butter in a medium saucepan over medium heat. Stir occasionally as it melts and starts turning golden brown — you’ll notice a nutty aroma and small browned bits forming. That’s when you add the mini marshmallows, stirring until they melt completely. Quick tip: Keep a close eye so it doesn’t burn. Once smooth, fold in the Rice Krispies cereal and press this mixture firmly into your baking dish to create that delicious crust base. Let it cool while you prepare the filling.
Step 2: Make the Pumpkin Pie Filling
Using the same saucepan (no need to dirty another pot!), melt the butter again over medium heat, then stir in the pumpkin pie spice and a few drops of orange food coloring if you’re using it. Add the mini marshmallows and stir continuously until they’re fully melted and combined. Fold in the remaining Rice Krispies cereal until coated, then carefully spread this over the cooled crust layer, gently pressing down to form an even topping. This double-layer effect is what makes the treat so special!
Step 3: Chill, Cut & Serve with Flair
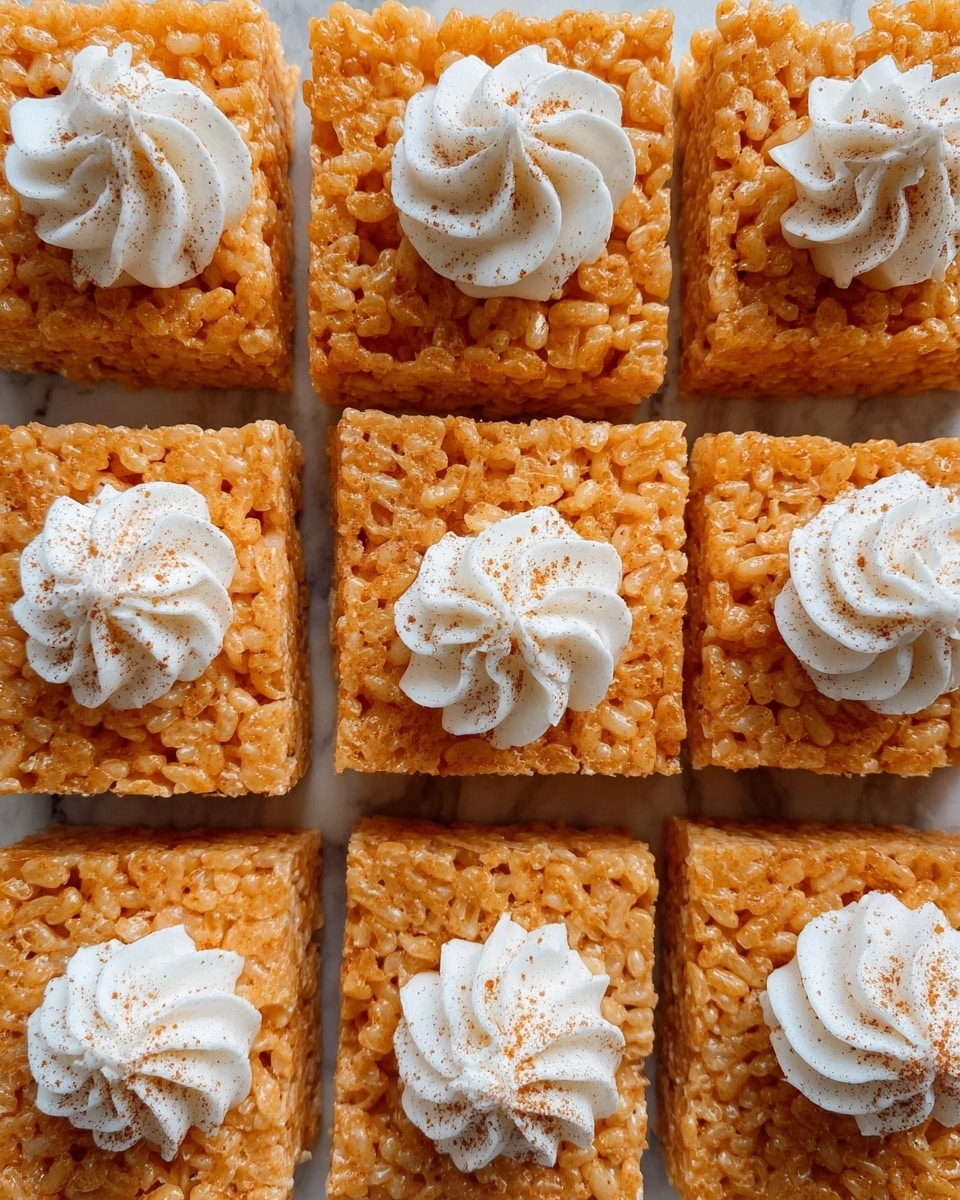
Let the treats set at room temperature or pop them in the fridge to speed things up — about an hour gives you the perfect firmness for cutting. Use a sharp knife, warmed under hot water and dried, to slice into 16 squares without crumbling. For the finishing touch, I love to add a small dollop of whipped cream to each square, then sprinkle just a hint of pumpkin pie spice or cinnamon on top. It’s those little details that make these treats stand out at any gathering.
Tips from My Kitchen
- Butter Browning Patience: Let the butter brown slowly over medium heat for richer flavor — rushing it can lead to burnt, bitter notes.
- Marshmallow Melt Magic: Stir marshmallows continuously during melting to avoid lumps and ensure a smooth, creamy coating.
- Press Gently but Firmly: Use a spatula or wax paper to press the layers evenly without compacting too much, keeping that perfect crispy-chewy balance.
- Clean Knife for Cutting: Warm your knife under hot water before slicing to get clean edges without pulling or cracking the treats.
How to Serve Pumpkin Pie Rice Krispie Treats Recipe
Garnishes
I always top mine with a swirl of whipped cream and a light dusting of pumpkin pie spice or cinnamon. It adds a fresh contrast to the sweet, spiced treats and makes them look extra festive — perfect for that cozy autumn vibe. Sometimes, I swap whipped cream for a drizzle of caramel sauce for a decadent twist that everyone raves about.
Side Dishes
These treats pair great with a hot cup of apple cider or a warm pumpkin spice latte to really bring out those fall flavors. They’re also a fun, unexpected dessert alongside a hearty chili or soup dinner when you want something sweet but not overly heavy.
Creative Ways to Present
For a party, I like to cut them into smaller bite-sized squares and serve them stacked on a rustic wooden board with little cinnamon sticks tucked around for a beautiful fall-themed centerpiece. Another fun idea is to use mini cupcake liners and create individual one-bite treats topped with whipped cream and a sprinkle of nutmeg — super cute for kids!
Make Ahead and Storage
Storing Leftovers
Once cut, I keep leftover Pumpkin Pie Rice Krispie Treats in an airtight container at room temperature. They stay soft and chewy for about 2-3 days, which is perfect if you want to make these ahead for a gathering or just snack on throughout the week.
Freezing
These treats freeze beautifully! Wrap each square tightly in plastic wrap, then place them in a zip-top bag or container. When properly frozen, they keep well for up to 2 months. It’s such a time-saver if you’re prepping for holiday get-togethers.
Reheating
To bring frozen treats back to life, thaw at room temperature for 30 minutes. If you want them warm and extra gooey, pop a treat in the microwave for about 15 seconds. Just be careful not to overheat or they’ll get tough — a brief warm-up is ideal.
FAQs
-
Can I make these Pumpkin Pie Rice Krispie Treats Recipe gluten-free?
Yes! Rice Krispies cereal itself contains malt flavoring that sometimes contains gluten, so be sure to choose a certified gluten-free rice cereal to keep this recipe safe for gluten-sensitive diets.
-
What’s the best way to brown butter without burning it?
Use medium heat and keep stirring the butter constantly. Watch for the color to change from pale yellow to golden brown, and you’ll smell a nutty aroma. Remove from heat immediately once browned to prevent burning.
-
Can I add actual pumpkin puree to these treats?
I don’t recommend it because the moisture from pumpkin puree would affect the texture, making the treats soggy. Instead, the pumpkin pie spice and coloring provide plenty of pumpkin flavor without altering the crunch.
-
How do I keep my Pumpkin Pie Rice Krispie Treats fresh longer?
Store them in an airtight container at room temperature away from heat and humidity. Avoid putting them in the fridge, which can dry them out quickly.
Final Thoughts
This Pumpkin Pie Rice Krispie Treats Recipe has become one of those go-to feel-good desserts for me that never fails to bring smiles. Its warm spices paired with crispy, marshmallowy goodness make it a perfect little bite of fall comfort. I hope you give it a try soon — I promise once you make them, you’ll want to keep this recipe handy for every cozy occasion or sweet craving that comes up!
Print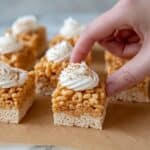
Pumpkin Pie Rice Krispie Treats Recipe
- Prep Time: 15 minutes
- Cook Time: 15 minutes
- Total Time: 1 hour 30 minutes
- Yield: 16 squares
- Category: Dessert
- Method: Stovetop
- Cuisine: American
Description
Delight in these festive Pumpkin Pie Rice Krispie Treats, featuring a browned butter crust layered with a spiced pumpkin pie filling made from marshmallows and Rice Krispies cereal. Perfectly topped with a dollop of whipped cream and a sprinkle of pumpkin pie spice, this treat combines classic flavors with a fun, crispy texture to celebrate the season.
Ingredients
Crust
- 1/4 cup salted butter, browned
- 2 cups mini marshmallows
- 2 cups Rice Krispies cereal
Filling
- 1/3 cup salted butter
- 3 cups mini marshmallows
- Orange food coloring, a few drops (optional)
- 1 teaspoon pumpkin pie spice, plus extra for garnish
- 4 cups Rice Krispies cereal
- Whipped cream can, for serving
Instructions
- Prepare the pan: Grease a 9×9 inch baking dish thoroughly and set it aside to be ready for the crust layer.
- Make the crust layer: In a medium pan over medium heat, melt the 1/4 cup salted butter and cook until it starts to turn golden brown, enhancing the flavor. Add 2 cups mini marshmallows and stir until completely melted. Remove from heat and fold in 2 cups Rice Krispies cereal until evenly coated.
- Set the crust: Transfer the crust mixture into the prepared baking dish and use a spatula or your hands to evenly flatten it. Allow it to cool and set while you make the filling layer.
- Make the filling layer: In the same or a clean pot, melt 1/3 cup salted butter over medium heat. Once melted, stir in 1 teaspoon pumpkin pie spice and a few drops of orange food coloring, if using, to give the filling a festive hue. Add 3 cups mini marshmallows and stir until melted and smooth.
- Add the cereal to filling: Remove from heat and fold in 4 cups of Rice Krispies cereal, mixing well to coat all the pieces evenly.
- Assemble the treat: Carefully spread the filling mixture evenly over the crust layer in the baking dish, then gently pat down to compress the layers together.
- Chill and set: Allow the layered treats to cool and set completely, about 1 hour, for best slicing results.
- Serve: Cut the treats into 16 squares. Top each square with a small dollop of whipped cream and a light sprinkle of pumpkin pie spice or cinnamon for garnish before serving.
Notes
- Browned butter adds a rich, nutty flavor—don’t rush this step for best taste.
- Use mini marshmallows for easier melting and smoother texture in both layers.
- Orange food coloring is optional; it enhances the festive look but doesn’t affect flavor.
- Store treats in an airtight container at room temperature for up to 3 days to maintain freshness.
- For a vegan version, substitute butter and marshmallows with plant-based alternatives.
- Press the layers firmly to help hold the treats together and make cutting easier.
Nutrition
- Serving Size: 1 square
- Calories: 180 kcal
- Sugar: 15 g
- Sodium: 110 mg
- Fat: 8 g
- Saturated Fat: 5 g
- Unsaturated Fat: 3 g
- Trans Fat: 0 g
- Carbohydrates: 25 g
- Fiber: 1 g
- Protein: 1 g
- Cholesterol: 15 mg


