

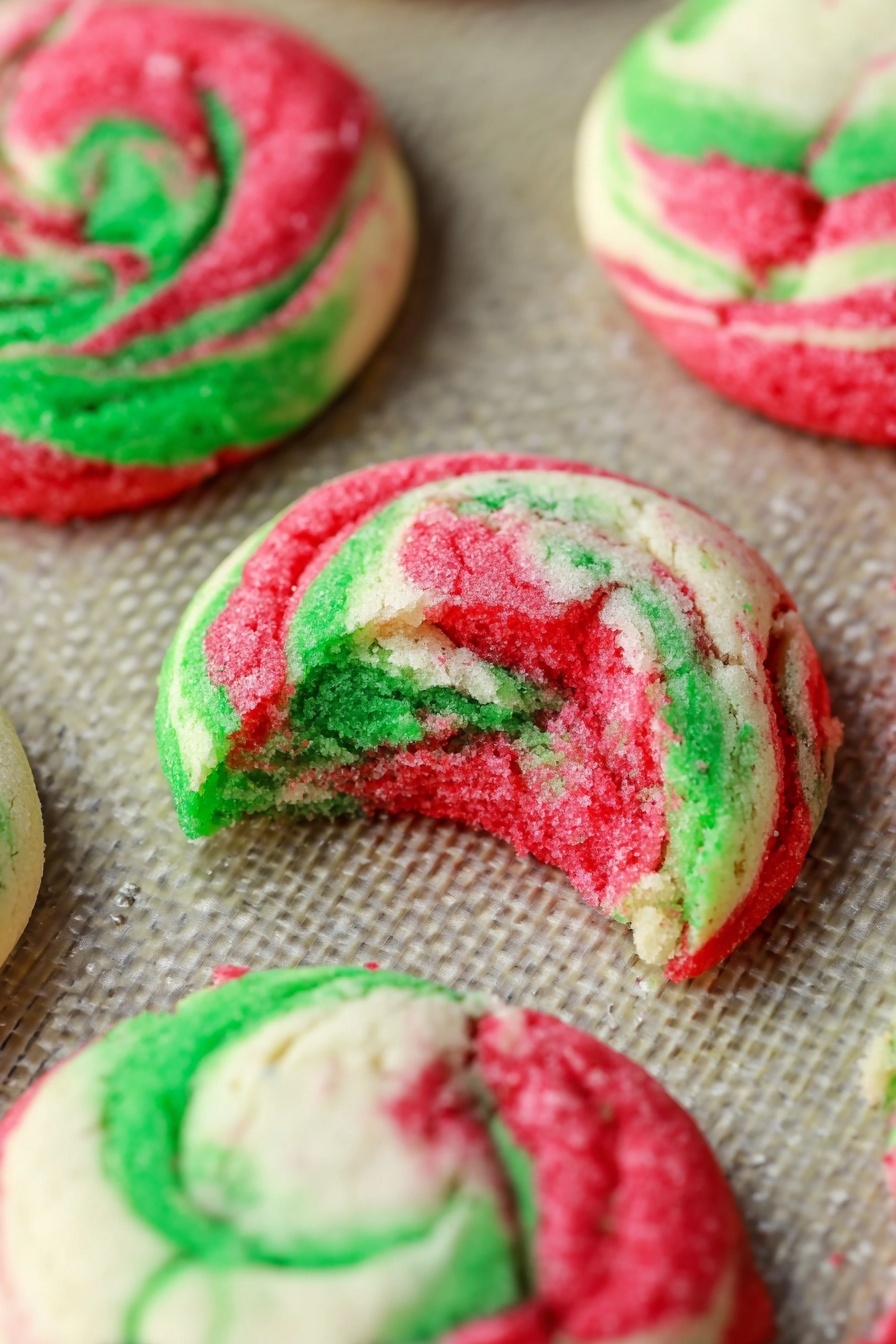
Peppermint Cheesecake Cookies Recipe
If you’re hunting for a festive treat that tastes as amazing as it looks, you have to try my Peppermint Cheesecake Cookies Recipe. These cookies are the perfect mix of rich cream cheese, refreshing peppermint, and those gorgeous red and green swirls that scream holiday cheer. They come together quicker than you’d expect, and every bite melts in your mouth with that dreamy cheesecake softness. Trust me, once you make these, they’ll be on repeat every Christmas!
Why This Recipe Works
- Cream Cheese Creates Softness: It gives these cookies their signature pillowy, cheesecake-like texture that your taste buds will adore.
- Peppermint Extract Adds Holiday Flair: A subtle peppermint flavor keeps the cookies fresh and festive without overpowering the sweetness.
- Marbling Technique is Fun & Visual: Mixing red and green dough in your hands lets you customize the swirls and make each cookie uniquely beautiful.
- No Overbaking Means Tender Results: Baking just until the edges set ensures cookies stay soft, not overdone or crumbly.

Ingredients & Why They Work
The magic behind this Peppermint Cheesecake Cookies Recipe lies in its simple but thoughtfully paired ingredients. Each one plays a role in creating that soft, flavorful cookie you want. Plus, it’s easy to find these ingredients in any grocery store, making this your go-to holiday delight.
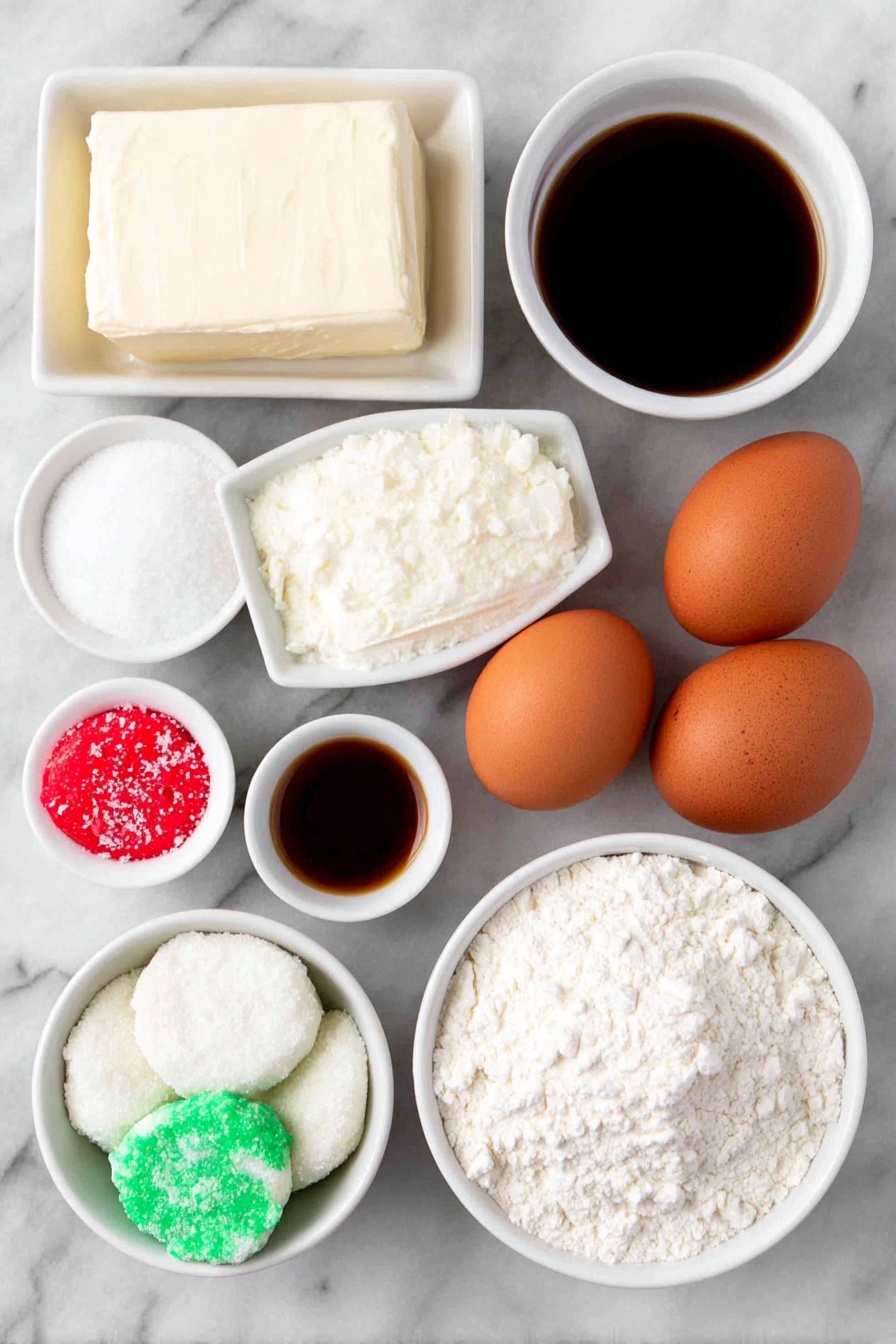
- Cream cheese: Provides moisture, tenderness, and that classic cheesecake flavor, so make sure it’s fully softened to blend smoothly.
- Butter: Adds richness and helps create that melt-in-your-mouth texture.
- Granulated sugar: Sweetens and helps with cookie structure; beating well with cream cheese and butter is key for fluffiness.
- Eggs: Bind everything together and add a slight richness.
- Vanilla extract: Smooths out flavors, giving warmth and depth to the cookie.
- Flour: The foundation that gives the cookie its form; don’t overdo mixing to keep the cookies tender.
- Baking powder: Gently lifts the dough without making cookies cakey.
- Salt: Balances sweetness and enhances all other flavors.
- Red and green food coloring: For that festive marbled look—choose gel colors for vibrant hues without affecting dough texture.
- Peppermint extract: Adds that cool, minty hit, especially combined in the green dough for a fun surprise.
Make It Your Way
One of my favorite things about this Peppermint Cheesecake Cookies Recipe is how easy it is to tweak to your taste. You can play around with colors, flavors, or even toss in some festive extras to make these cookies truly your own. Be playful with it — holiday baking is about spreading joy, after all!
- Variation: I like adding a teaspoon of lemon juice to the dough sometimes for a tangier cheesecake flavor—it brightens things up beautifully.
- Dairy-Free Option: Swap out cream cheese and butter with plant-based versions if you prefer, just make sure they’re room temperature and soft.
- Color Play: Try different festive colors beyond red and green, or even swirl in some white for a snowy effect.
- Texture Boost: For a little crunch, fold in crushed candy canes or mini chocolate chips, but I usually save that for a separate batch to keep the classic soft texture intact.
Step-by-Step: How I Make Peppermint Cheesecake Cookies Recipe
Step 1: Get Creamy with Cream Cheese and Butter
Start by beating the softened cream cheese and butter together on high speed until the mixture is super fluffy and smooth—this usually takes me about 1 to 2 minutes. This step is so important! If the butter or cream cheese is too cold, it won’t blend right, and you could end up with lumpy dough. Once fluffy, add in the sugar and beat it again until it looks light and creamy, about another 1 to 2 minutes. Your arms will thank you when you use an electric mixer for this one.
Step 2: Add Eggs and Vanilla for Depth
Next, you add the eggs and vanilla extract, mixing for about a minute to fully incorporate. This step creates a nice, rich base that keeps the cookies tender but sturdy enough to hold their shape during baking.
Step 3: Combine Dry Ingredients Without Overdoing It
In a separate bowl, whisk together the flour, baking powder, and salt. Gradually add this dry mix to your wet ingredients, carefully stirring just until everything is blended—don’t over-mix here! Overworking the dough will make the cookies tough, and that’s the last thing you want in a cheesecake cookie.
Step 4: Chill, Color, and Pep Up Your Dough
Divide your dough evenly into three small bowls and pop them in the fridge for about 15 minutes; this makes handling so much easier. When chilled, add red food coloring to one bowl, green with peppermint extract to another, and leave the last one plain or lightly colored if you prefer. Stir until the colors and flavors are evenly distributed. The dough might be sticky — if it’s tough to handle, just back to the fridge it goes for a few more minutes.
Step 5: Roll, Marble, and Shape Your Cookies
Here’s where the fun begins. Take half a tablespoon from each color bowl and roll them together gently in your palms to create beautiful marbled swirls. Be careful not to overmix, or you’ll lose that pretty pattern! Place each marbled ball onto your parchment-lined sheet, spacing them so they have room to spread just a bit.
Step 6: Bake Just Right and Cool
Bake the cookies at 350°F (175°C) for around 10 to 11 minutes. You want them to look light and not browned on top, with only a hint of golden on the bottom. This ensures they stay soft and tender rather than dry or crispy. After baking, let the cookies cool on the baking sheet for a few minutes before transferring them to a wire rack to cool completely.
Step 7: Optional Dusting to Finish
If you want a bit of extra holiday magic, dust the cooled cookies lightly with powdered sugar. It adds a lovely snowy effect and a little more sweetness without overpowering the peppermint or cheesecake.
Tips from My Kitchen
- Room Temperature is Key: Always start with room-temp cream cheese and butter for silky-smooth dough.
- Gentle Mixing: Resist the urge to overmix flour—you want soft cookies, not dense ones.
- Peppermint Placement: Adding peppermint only to the green dough gives a fresh burst without overwhelming the whole cookie.
- Watch the Bake Time: Taking cookies out just before they start to brown keeps them tender, not crunchy.
How to Serve Peppermint Cheesecake Cookies Recipe
Garnishes
I love adding a delicate sprinkle of powdered sugar right before serving—it looks like fresh snow and keeps things festive. Sometimes I’ll toss a few crushed candy canes on top for that extra crunch and peppermint punch, but fresh sprigs of mint also bring a cool visual and flavor contrast.
Side Dishes
These cookies pair wonderfully with a warm cup of hot cocoa or peppermint-spiced latte. If you’re hosting a holiday brunch, setting them alongside fresh fruit or a cheese board balances the sweetness perfectly.
Creative Ways to Present
For parties, I like arranging these cookies on a festive platter in the shape of a Christmas tree or wreath—super cute and totally Instagram-worthy. You can also package them in clear cellophane bags tied with ribbon to give as homemade gifts that people actually want to eat!
Make Ahead and Storage
Storing Leftovers
I store leftover Peppermint Cheesecake Cookies in an airtight container at room temperature for up to a week. They keep their softness beautifully if you avoid stacking them too tightly. Putting a small piece of bread in the container can help maintain moisture—trust me, it works wonders!
Freezing
These cookies freeze really well. I lay them in a single layer on a baking sheet first to freeze solid, then transfer to a freezer-safe container or zip bag for up to 3 months. When you’re ready, thaw at room temperature for about an hour, and they’ll be just as delightful as fresh-baked.
Reheating
If you want that just-baked warmth, pop the cookies in a 300°F oven for 5 minutes, or microwave one for about 10 seconds. Be careful not to overheat, or you’ll lose that creamy texture that makes these cookies so special.
FAQs
-
Can I use milk chocolate instead of peppermint extract?
Absolutely! You can skip the peppermint extract and fold in mini milk chocolate chips for a sweeter, more chocolate-forward twist. Just mix them into the dough before chilling for best results.
-
How do I prevent the marbled colors from blending too much?
When rolling the different dough colors together, gently combine them without overworking. Use just enough pressure to create swirls and stop before the colors mix too evenly. If the dough warms up, chill it again before shaping.
-
Can I make this recipe ahead of a holiday party?
Yes! You can prepare and shape the dough up to 2 days in advance, keeping it wrapped in plastic wrap in the fridge. Alternatively, bake the cookies and freeze them for up to 3 months—defrost right before serving.
-
What if I don’t have red or green food coloring?
No worries! You can skip the food coloring completely or use natural alternatives like beet powder for red or matcha for green. The cookies will still taste amazing, just with a more subtle festive look.
Final Thoughts
I genuinely love this Peppermint Cheesecake Cookies Recipe because it combines everything I want in a holiday treat: softness, flavor, and that wow factor from the peppermint marbling. It’s an approachable recipe that feels pretty special, and I know you’ll have fun making it as much as eating it. Next time you’re dreaming of a cookie that’s festive, flavorful, and totally delicious, give this one a whirl—you’ll thank me later!
Print
Peppermint Cheesecake Cookies Recipe
- Prep Time: 25 minutes
- Cook Time: 11 minutes
- Total Time: 36 minutes
- Yield: 44 cookies
- Category: Dessert
- Method: Baking
- Cuisine: American
- Diet: Vegetarian
Description
Festive Christmas Cheesecake Cookies that combine a creamy cream cheese base with vibrant red and green marbled dough, flavored with peppermint and vanilla. These soft, light-colored cookies are perfect for holiday celebrations and easy to make with simple ingredients.
Ingredients
Base Dough
- 8 oz cream cheese room temperature
- 1/2 cup butter room temperature
- 1 1/4 cup granulated sugar
- 2 eggs
- 1 teaspoon vanilla extract
Dry Ingredients
- 2 1/2 cups flour
- 2 teaspoons baking powder
- 1/2 teaspoon salt
Flavoring and Coloring
- Red food coloring
- Green food coloring
- 1/2 teaspoon peppermint extract
- Optional: powdered sugar for dusting
Instructions
- Preheat Oven: Preheat your oven to 350 degrees Fahrenheit and prepare two baking sheets by lining them with parchment paper or silicone mats.
- Make Cream Cheese Mixture: Beat the cream cheese and butter together at high speed until fluffy and smooth, about 1-2 minutes. Add granulated sugar and beat until fully incorporated and fluffy, another 1-2 minutes. Next, beat in the eggs and vanilla extract until combined, about 1 minute.
- Combine Dry Ingredients: In a separate medium bowl, whisk together flour, baking powder, and salt. Gradually add this to the cream cheese mixture, stirring just until incorporated. Avoid over-mixing to keep the dough tender.
- Divide and Chill Dough: Separate the dough evenly into three small bowls. Refrigerate the dough in each bowl for 15 minutes to firm up.
- Add Color and Peppermint: After chilling, add red food coloring to one bowl and green food coloring plus peppermint extract to another. Mix until the colors are evenly distributed. The dough may remain sticky; refrigerate briefly if needed to make handling easier.
- Form Cookies: Take 1/2 tablespoon of each colored dough and gently roll them together between your palms to create a marbled effect without overmixing. Place the formed balls on the prepared baking sheets. Repeat with remaining dough.
- Bake: Bake the cookies at 350 degrees Fahrenheit for 11 minutes. The cookies should be light in color, not browned on top, with slight browning at the bottom. Baking times may vary depending on your oven.
- Cool and Serve: Allow the cookies to cool on the baking sheet for a few minutes before transferring them to a wire rack to cool completely. Optionally, dust with powdered sugar before serving.
Notes
- Store cookies in an airtight container for up to one week or freeze for up to three months.
- For a tangier cheesecake flavor, add one teaspoon of lemon juice or omit the extracts entirely. The peppermint extract can also be replaced or omitted based on preference.
- Avoid overbaking to prevent the cookies from becoming dry and biscuit-like; aim for light coloring.
Nutrition
- Serving Size: 1 cookie
- Calories: 120 kcal
- Sugar: 8 g
- Sodium: 75 mg
- Fat: 6 g
- Saturated Fat: 3.5 g
- Unsaturated Fat: 2 g
- Trans Fat: 0 g
- Carbohydrates: 14 g
- Fiber: 0.5 g
- Protein: 2 g
- Cholesterol: 30 mg

