

Peanut Butter Oreo Bars Recipe
If you’re looking for an irresistible treat that’s equal parts creamy, crunchy, and chocolaty, my Peanut Butter Oreo Bars Recipe is going to become your new favorite. Trust me, these bars are fan-freaking-tastic — they combine the nostalgic crunch of Oreos with luscious peanut butter and a decadent chocolate topping. I can’t wait to show you exactly how to make this crowd-pleaser so you can impress everyone at your next gathering (or just spoil yourself at home!).
Why This Recipe Works
- Perfect Layer Balance: The crunchy Oreo base, smooth peanut butter middle, and silky chocolate top come together to create unforgettable texture and flavor harmony.
- Simple, Honest Ingredients: No weird fillers here—just classic pantry staples you likely already have at home.
- Easy to Make and Customize: The no-bake method (well, except the chocolate melting!) means less fuss with big rewards, and you can tweak it easily.
- Great for Any Occasion: Whether it’s a last-minute dessert or a crowd-pleasing party snack, these bars shine every time.

Ingredients & Why They Work
The magic of this Peanut Butter Oreo Bars Recipe lies in how these simple ingredients blend — crunchy Oreos form the base, a rich peanut butter layer gives it body and sweetness, and the chocolate topping seals it all in with a luscious finish. When shopping, choose Oreos with classic filling (not double-stuffed) for the perfect crumb-to-flavor ratio, and smooth peanut butter for that creamy texture without any oil separation.

- Oreo cookies: Provides the perfect crunchy, slightly chocolatey crust that holds everything together beautifully.
- Unsalted butter (for Oreo base): Helps bind the crushed Oreos into a firm and tasty crust.
- Unsalted butter (for peanut butter layer): Adds creaminess and richness, balancing the sweetness.
- Brown sugar: Gives a subtle molasses flavor and soft sweetness that pairs perfectly with peanut butter.
- Salt: Enhances all the flavors—if you’re using salted butter, you can skip this.
- Smooth peanut butter: The star of the show; creamy and rich, it melds everything together without any graininess.
- Powdered sugar: Sweetens and thickens the peanut butter layer to a spreadable consistency.
- Semi-sweet chocolate: Melts perfectly to form a glossy, smooth topping that hardens beautifully.
- Shortening or vegetable oil: Keeps the melted chocolate shiny and softens the final texture just enough.
Make It Your Way
I love keeping this recipe flexible because sometimes you want that classic Peanut Butter Oreo Bars Recipe, and other times it’s fun to experiment. Feel free to add chopped nuts, swap smooth peanut butter with crunchy if you love extra texture, or try drizzling with white chocolate to up your presentation game.
- Nutty Variation: I once threw in chopped roasted peanuts into the peanut butter layer for added crunch—it was a delightful surprise for my guests!
- Dietary Modification: For a dairy-free version, use vegan butter and dairy-free chocolate; it still works wonderfully.
- Seasonal Twist: Around the holidays, I swap semi-sweet chocolate for peppermint-flavored bark for a festive touch.
Step-by-Step: How I Make Peanut Butter Oreo Bars Recipe
Step 1: Create the Oreo Crust
Start by lining an 8×8 inch pan with parchment paper, making sure you leave some overhang for easy removal later. Crush your Oreos until they become fine crumbs—I like using a food processor for speed, but if you don’t have one, toss them in a freezer bag and use a rolling pin. Mix the crumbs with melted butter until evenly combined, then press firmly into the bottom of your pan. I press down with the bottom of a flat glass to get an even, compact layer. This crust is the foundation, so don’t rush!
Step 2: Whip Up the Peanut Butter Layer
Beat the softened butter and brown sugar until smooth and creamy—I love how the sugar adds that subtle caramel note here. Then, add your peanut butter and salt (if using) and beat until everything melds into a fluffy, lump-free mixture. Gradually mix in sifted powdered sugar, about half a cup at a time, until the dough becomes thick and doesn’t stick when you pinch it between your fingers. Spread or press this mixture evenly over the Oreo crust, using a spatula or even some wax paper to smooth the top beautifully.
Step 3: Melt and Pour the Chocolate Topping
Finely chop your chocolate for gentle, even melting. I prefer microwaving in medium power bursts—45 seconds at a time with stirring in between—to avoid scorching. If you’re team stovetop, a double boiler works great too! Stir in the shortening or vegetable oil for that extra silky sheen. Pour the melted chocolate over the peanut butter layer, smoothing it out with an offset spatula. The glossy finish is so satisfying to look at!
Step 4: Chill and Slice
Let the bars set at room temperature or chill in the fridge until the chocolate is firm—if you use the fridge, watch for slight discoloration on the chocolate, but it doesn’t impact flavor. When the chocolate is mostly hardened (about 90%), lightly score the top where you plan to cut; this helps prevent cracking. Once fully set, lift the bars from the pan using the parchment overhang and slice with a sharp knife. I like warming my knife slightly under hot water and wiping it clean between cuts for the cleanest edges.
Tips from My Kitchen
- Smooth Peanut Butter is Key: Always use commercial smooth peanut butter to avoid oily texture that can separate your layer.
- Careful Chocolate Melting: Melting chocolate slowly prevents it from seizing—stir gently and avoid high heat.
- Use Parchment Overhang: This simple trick makes lifting the bars out so much easier and prevents breakage.
- Score Before Cutting: Scoring the chocolate lightly before cutting ensures neat bars without cracking the top layer.
How to Serve Peanut Butter Oreo Bars Recipe

Garnishes
I enjoy sprinkling a few crushed Oreo crumbles or chopped peanuts over the chocolate layer right after pouring it, adding a bit of extra texture and visual appeal. Sometimes, I drizzle a little melted white chocolate or caramel for a fancy swirl effect—totally optional but oh so pretty!
Side Dishes
These bars are a perfect sweet finish after a simple meal — I love pairing them with a glass of cold milk or a cup of rich coffee to balance the richness. They also work great alongside fresh fruit or a light sorbet if you want to mix textures and temperatures.
Creative Ways to Present
For birthday parties or special brunches, I’ve cut these bars into small bite-sized squares and arranged them beautifully on a tiered dessert stand. Wrapping individual pieces in parchment paper and tying with a ribbon also makes for adorable edible gifts that friends rave about.
Make Ahead and Storage
Storing Leftovers
I usually store leftover bars in an airtight container at room temperature for up to 3 days—just keep them safe from heat to avoid the chocolate melting. If your kitchen gets warm, the fridge works fine too, though chilly storage can sometimes dull the chocolate shine.
Freezing
Freezing these bars is a lifesaver if you want to prep ahead! Wrap individual bars tightly in plastic wrap and place them in a freezer-safe container or bag. When ready to enjoy, just thaw in the fridge overnight—texture and flavor stay spot-on.
Reheating
Since these are no-bake bars, reheating isn’t really needed, but if the bars have been chilled or frozen, I like to bring them to room temperature before serving so the peanut butter and chocolate soften perfectly for that melt-in-your-mouth experience.
FAQs
-
Can I use crunchy peanut butter instead of smooth in the Peanut Butter Oreo Bars Recipe?
Yes, you can! Using crunchy peanut butter will add extra texture to the peanut butter layer, which some people really enjoy. Just keep in mind it may make spreading the layer a bit more challenging, so proceed gently when smoothing it out.
-
Are these bars gluten-free?
Traditional Oreos contain wheat, so these bars are not gluten-free unless you substitute with gluten-free chocolate sandwich cookies. There are many great gluten-free cookie brands now that work well as a crust alternative.
-
How long do Peanut Butter Oreo Bars last?
Stored in an airtight container at room temperature, they’ll last about 3 days. Refrigerating can extend their shelf-life to about a week, but the texture of the chocolate may slightly change over time.
-
Can I double this recipe?
Absolutely! If you’re doubling, use a larger pan (like 9×13 inches) and adjust the pressing and spreading steps accordingly. Just keep an eye on the thickness so your layers stay balanced and delicious.
Final Thoughts
This Peanut Butter Oreo Bars Recipe is one of those recipes I return to time and again whenever I want something quick, indulgent, and guaranteed to please a crowd. It’s simple to pull together but feels so special with its layers of flavor and texture. Give it a try—you’ll love having these bars in your dessert rotation as much as I do. Seriously, once you taste that silky peanut butter against the crunchy Oreo crust and rich chocolate, there’s no going back!
Print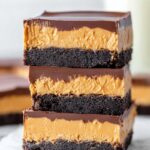
Peanut Butter Oreo Bars Recipe
- Prep Time: 20 minutes
- Cook Time: 0 minutes
- Total Time: 1 hour 20 minutes
- Yield: 16 squares
- Category: Dessert
- Method: No-Cook
- Cuisine: American
Description
Peanut Butter Oreo Bars combine a crunchy Oreo cookie crust, a creamy peanut butter layer, and a rich chocolate topping for an irresistible no-bake dessert that’s easy to prepare and perfect for sharing.
Ingredients
Oreo Base
- 15 Oreo cookies, not double stuffed
- 3 tablespoons unsalted butter (42 grams), melted
Peanut Butter Layer
- 1/4 cup unsalted butter (56 grams), softened
- 3 tablespoons light or dark brown sugar
- 1/4 teaspoon salt (omit if using salted butter)
- 1 cup smooth peanut butter
- 1 2/3 cup powdered sugar (183 grams), sifted
Chocolate Topping
- 6 ounces semi-sweet chocolate (170 grams), or your favorite variety
- 2 teaspoons shortening, or 1/2 teaspoon vegetable oil
Instructions
- Prepare the pan: Line an 8×8 inch (20×20 cm) pan with parchment paper or aluminum foil, leaving an overhang on the sides for easy removal.
- Make the Oreo crust: Crush the Oreo cookies with a food processor until fine crumbs form, or place them in a freezer bag and crush with a rolling pin. Mix crumbs with melted butter and press evenly into the bottom of the prepared pan.
- Prepare peanut butter layer: Beat softened butter and brown sugar together until smooth. Add peanut butter and salt, mixing until no lumps remain. Gradually add powdered sugar about 1/2 cup at a time, mixing until the mixture is firm and not sticky to the touch.
- Assemble peanut butter layer: Spread the peanut butter mixture evenly over the Oreo crust, pressing gently. Using wax paper can help smooth the surface.
- Melt chocolate topping: Chop chocolate finely and place in a heatproof bowl. Microwave at medium power for 45 seconds at a time, stirring between intervals until melted. Alternatively, melt in a double boiler over low heat. Stir in shortening or vegetable oil to smooth the chocolate.
- Top and chill: Pour melted chocolate over the peanut butter layer and smooth the top. Allow chocolate to harden at room temperature or refrigerate (note that refrigeration may cause discoloration).
- Score and slice: When the chocolate is about 90% hardened, lightly score the surface with a sharp thin knife where you plan to cut. Once fully hardened, lift the bars out using the parchment paper overhang and cut into 16 squares with a sharp knife.
Notes
- Use smooth, commercially prepared peanut butter to ensure the right texture; avoid natural peanut butters where the oil separates on top.
- Nutrition information is based on dividing the pan into 16 equal squares, estimating one square as a serving.
- Store bars in an airtight container at room temperature or in the refrigerator to keep them fresh.
Nutrition
- Serving Size: 1 square
- Calories: 250 kcal
- Sugar: 18 g
- Sodium: 120 mg
- Fat: 16 g
- Saturated Fat: 7 g
- Unsaturated Fat: 7 g
- Trans Fat: 0 g
- Carbohydrates: 24 g
- Fiber: 1 g
- Protein: 5 g
- Cholesterol: 20 mg


