

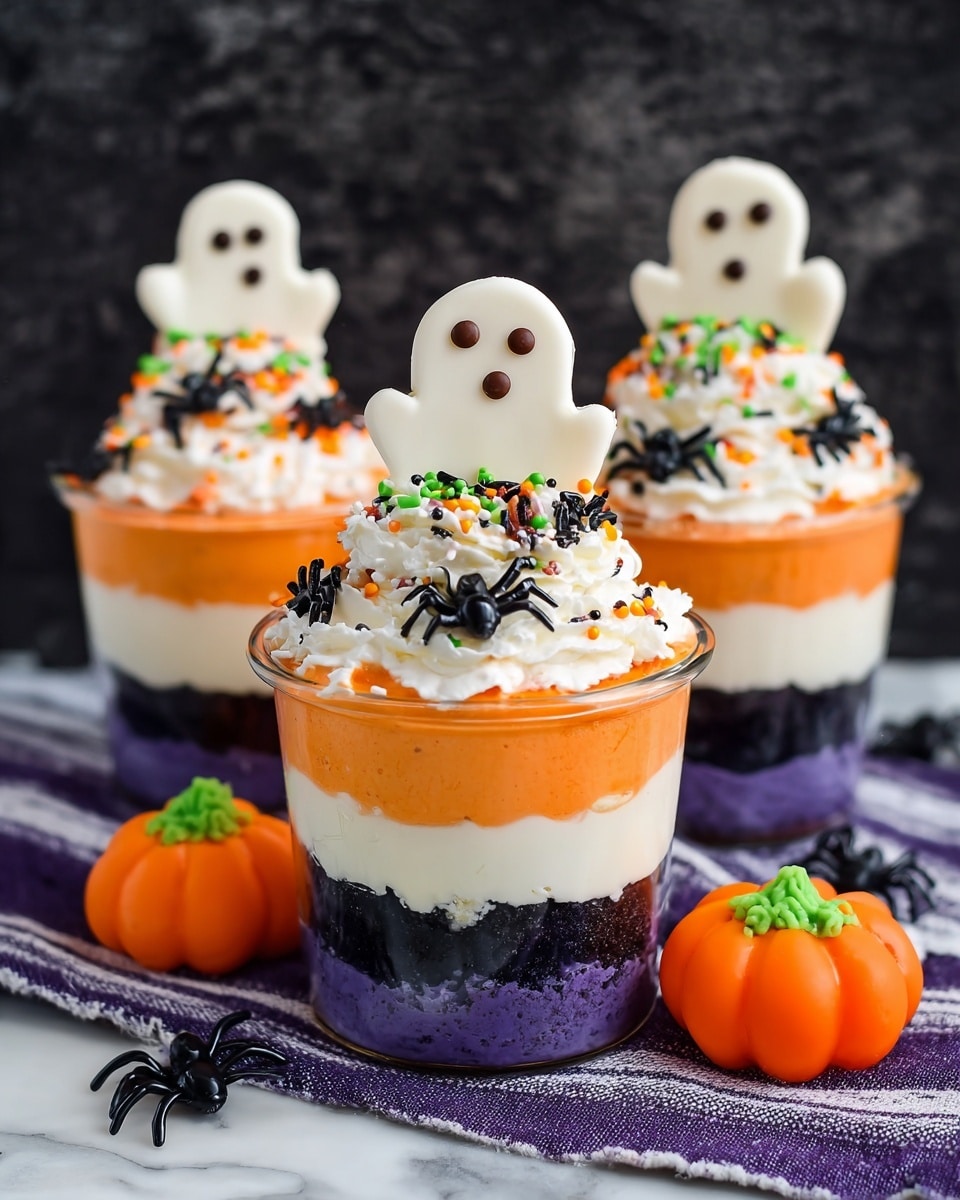
No Bake Halloween Cheesecake Cups Recipe
Alright, if you’re on the hunt for a show-stopping Halloween treat that’s as easy as pie (well, no baking involved!), I’ve got just the thing for you. This No Bake Halloween Cheesecake Cups Recipe is everything you want for a spooky season dessert — creamy, fun, and perfectly festive. Trust me, once you make these, you’ll want to whip them up every October. They’re quick to assemble, look adorably creepy, and taste utterly divine.
Why This Recipe Works
- No-Bake Simplicity: You don’t need an oven, making this a breeze for any skill level or a last-minute party treat.
- Layered Texture: Oreo crumbs and creamy cheesecake create a perfect balance of crunch and smoothness.
- Customizable Colors & Toppings: Adding fun Halloween touches like orange layers and spooky candy makes these cups festive and fun to make with kids.
- Travel Friendly: Made in cups, these are easy to store, transport, and serve without fuss.

Ingredients & Why They Work
Each ingredient in this No Bake Halloween Cheesecake Cups Recipe plays a starring role, coming together to create a creamy, sweet, and delightfully textured treat. Plus, the ingredients are easy to find and pretty forgiving, which makes this recipe perfect for party prep or an easy dessert fix.
- Oreo cookies: These give a rich chocolate crunch that pairs beautifully with creamy cheesecake — and who doesn’t love Oreos for Halloween?
- Cream cheese: The base for that silky cheesecake flavor and texture — use full-fat and soften it to make mixing easier.
- Powdered sugar: Sweetens the filling without any graininess, so your cheesecake stays smooth.
- Vanilla extract: This little splash boosts flavor depth, balancing sweetness.
- Cool Whip (or whipped topping): It lightens the filling, giving it that fluffy, airy finish that’s so dreamy in cheesecake cups.
- Orange gel coloring: Adds just the right pop of Halloween color without altering taste or texture.
- Toppings — Ghost Peeps, Halloween sprinkles, candy pumpkins: These add charm and festive flair that make the cups party-ready.
Make It Your Way
This No Bake Halloween Cheesecake Cups Recipe is like an open canvas! I love how easy it is to switch up colors or toppings to suit whatever spooky vibe you want. Feel free to get creative — because desserts are more fun when you make them yours.
- Variation: I sometimes swap the orange color for a bright green gel, which creates a creepy Frankenstein effect that kids find hilarious.
- Dietary Swaps: For a dairy-free option, try vegan cream cheese and coconut whipped topping — it still sets beautifully!
- Crumb Base: If Oreos aren’t your thing, crushed graham crackers or Biscoff cookies add a lovely alternative flavor and crunch.
- Toppings Galore: Add crushed candy corn or mini chocolate chips to make these even more eye-catching and tasty.
Step-by-Step: How I Make No Bake Halloween Cheesecake Cups Recipe
Step 1: Create the Base with Oreo Magic
I start by crushing 7 Oreo cookies into fine crumbs – here’s a tip: toss them into a food processor and pulse until they’re perfectly fine crumbs. No food processor? A ziplock bag and rolling pin work too, just crush carefully so crumbs aren’t too chunky. Then, divide those crumbs evenly into 7 cute 5-ounce cups for a crunchy, chocolatey base. This foundation brings that signature Oreo flavor right into every bite.
Step 2: Whip Up the Creamy Cheesecake Filling
Now, soften that cream cheese until it feels like butter — room temperature is key here. Beat together the cream cheese, powdered sugar, and vanilla extract until silky smooth and creamy. Then fold in 2 cups of thawed Cool Whip gently to keep that light texture. I love using a hand mixer for this part because it blends everything perfectly without making the filling dense. Divide this fluffy mixture into two bowls — one stays plain white, and the other gets drenched in some orange gel coloring for a festive pop.
Step 3: Layer It Like a Pro
Spoon or pipe the white cheesecake filling evenly on top of the Oreo crumbs in each cup. I find piping with a round tip or even a simple ziplock bag with a small corner cut off helps keep things neat and pretty. Next, crush the other 7 Oreo cookies and sprinkle those crumbs on top to add an extra crunch layer. Finally, spoon or pipe the bright orange cheesecake layer right on top. These layers not only taste amazing but also look like mini Halloween parfaits.
Step 4: Top with Spooky Swirls & Toppings
The finishing touch is a swirl of the remaining Cool Whip on top, piped with a 1M icing tip for a soft, cloud-like effect. Don’t forget those adorable Halloween touches — Ghost Peeps, sprinkles, and candy pumpkins are my absolute favorites for that final wow factor. If you’re prepping to take these cups somewhere, keep the toppings aside and add them just before serving to keep everything neat and fresh.
Tips from My Kitchen
- Room Temperature Matters: Don’t rush softening cream cheese — it makes your filling so much smoother and easier to work with.
- Piping for Precision: Using a piping bag keeps your layers neat and your cups Instagram-ready.
- Travel Tip: Keep toppings separate if you’re taking these on the go to avoid sogginess or smudged decorations.
- Double Crust Layer: The two layers of Oreo crumbs add so much extra texture—and make each bite a surprise crunch.
How to Serve No Bake Halloween Cheesecake Cups Recipe
Garnishes
I can’t resist topping these cheesecake cups with Ghost Peeps because they’re just so darn cute and festive. Halloween sprinkles add a playful crunch and color pop, while candy pumpkins bring that classic fall candy vibe. Honestly, these decorations make serving so fun because they turn simple cupcakes into little Halloween art pieces!
Side Dishes
Pair these tasty cups with spiced apple cider or a simple fruit platter to balance out the sweetness. For parties, I love setting out some salty snacks like popcorn or roasted nuts alongside for a little sweet-salty mix. It keeps the snack table interesting and everyone happy.
Creative Ways to Present
For a Halloween party, I’ve tried serving these in mini mason jars tied with orange and black twine — it adds a rustic, charming feel. Another favorite is stacking layers in clear cups so that each layer shows off those beautiful orange and white swirls. Kids especially love helping add layers and toppings during preparation too!
Make Ahead and Storage
Storing Leftovers
Leftovers? Lucky you! I store any extras covered tightly with plastic wrap or in an airtight container in the fridge. Because these cups are layered and delicate, they keep fresh for up to 3 days. Just remember to add any fresh toppings right before serving again so they stay crisp.
Freezing
I’ve frozen these cups once or twice for a party, but be gentle: freezing can change the texture of the whipped topping a bit. If you do freeze them, wrap tightly and thaw overnight in the fridge. Then freshen with whipped cream or toppings before serving.
Reheating
No reheating needed here — these creamy gems are best served chilled. Just pull them from the fridge about 10 minutes before digging in to take the chill off slightly and let the flavors shine.
FAQs
-
Can I use a different type of cookie instead of Oreos?
Absolutely! Graham crackers, Biscoff cookies, or even crushed ginger snaps can be delicious alternatives. Just make sure to crush them finely for that perfect cheesecake cup base.
-
Do I have to use Cool Whip?
Cool Whip or any whipped topping is key for that light, airy texture, but you can also whip your own heavy cream. Just fold it in gently so the cheesecake filling stays fluffy.
-
How long can I prepare these No Bake Halloween Cheesecake Cups in advance?
You can assemble them a day ahead and store in the fridge without toppings. Add decorations just before serving for the best look and taste.
-
What’s the best way to get the cheesecake filling smooth and lump-free?
Make sure your cream cheese and Cool Whip are fully softened and room temperature. Beat cream cheese alone first until smooth before adding sugar and vanilla, then fold in Cool Whip gently but thoroughly.
Final Thoughts
This No Bake Halloween Cheesecake Cups Recipe has become a staple for my Halloween gatherings because it’s as easy as it is fun — and my friends and family always ask for more. I love that even the kids get involved with layering and decorating, which makes it a festive activity, not just a dessert. Give it a try this season, and I promise you’ll be hooked on these creamy, crunchy, and oh-so-spooky treats. Happy Halloween baking (or should I say no-baking)!
Print
No Bake Halloween Cheesecake Cups Recipe
- Prep Time: 15 minutes
- Cook Time: 0 minutes
- Total Time: 15 minutes
- Yield: 7 parfaits
- Category: Dessert
- Method: No-Cook
- Cuisine: American
- Diet: Vegetarian
Description
Delightfully festive and easy to make, these No Bake Halloween Cheesecake Cups combine creamy cheesecake layers with Oreo cookie crumbs and colorful Halloween-themed decorations for a fun and spooky treat perfect for parties and celebrations.
Ingredients
Crust
- 14 Oreo cookies
Cheesecake Filling
- 2 – 8 ounce packages cream cheese, softened
- ½ cup powdered sugar
- 2 teaspoons vanilla extract
- 1 – 8 ounce container Cool Whip, thawed and divided
- Orange gel coloring
Toppings
- Ghost Peeps
- Halloween sprinkles
- Candy pumpkins
Instructions
- Prepare the crust: Crush 7 Oreo cookies into fine crumbs using a food processor or by pulsing in a sealed bag. Divide the crumbs evenly into 7 – 5 ounce cups to form the base layer.
- Make the cheesecake filling: Beat the softened cream cheese, powdered sugar, and vanilla extract together until smooth and creamy. Gently fold in 2 cups of the thawed Cool Whip until combined.
- Divide and color the filling: Separate the cheesecake mixture evenly into two bowls. Add orange gel coloring to one bowl and mix until the color is vibrant and even.
- Layer the white cheesecake: Spoon or pipe the white cheesecake mixture evenly over the Oreo crumb base in each cup.
- Add the second crust layer: Crush the remaining 7 Oreo cookies into fine crumbs and sprinkle evenly over the white cheesecake layer in the cups.
- Layer the orange cheesecake: Spoon or pipe the orange cheesecake filling evenly on top of the Oreo crumb layer in the cups.
- Top with whipped cream: Using a piping bag fitted with a 1M icing tip, swirl the remaining Cool Whip over the top layer to create a decorative finish.
- Decorate: Add ghost Peeps, Halloween sprinkles, and candy pumpkins on top just before serving to keep decorations fresh and vibrant.
Notes
- Ensure cream cheese is at room temperature for smoother mixing and a creamier filling.
- Using a food processor makes crushing Oreos quick and achieves fine crumbs for even layers.
- Feel free to experiment with other crusts like graham crackers or Biscoff cookies for different flavors.
- Change the cheesecake colors with different food coloring to suit any theme.
- Use a piping bag or a ziplock bag with a corner cut off for neater layering of cheesecake filling.
- For portability, wait to add toppings until just before serving and cover the parfaits during transport.
Nutrition
- Serving Size: 1 parfait
- Calories: 350 kcal
- Sugar: 25 g
- Sodium: 200 mg
- Fat: 25 g
- Saturated Fat: 15 g
- Unsaturated Fat: 8 g
- Trans Fat: 0 g
- Carbohydrates: 30 g
- Fiber: 1 g
- Protein: 4 g
- Cholesterol: 50 mg


