

No-Bake Cookie Butter Icebox Cake Recipe
If you’re looking for a dessert that’s ridiculously easy but feels like something special, you’ve got to try this No-Bake Cookie Butter Icebox Cake Recipe. It’s perfect when you want wow-factor with hardly any fuss — layers of Biscoff cookies and a creamy cookie butter filling that come together in the fridge. Trust me, after making this for friends, it’s always the first thing to disappear at the table. Keep reading and I’ll walk you through everything so your icebox cake turns out perfect.
Why This Recipe Works
- No Baking Required: Perfect for hot days or when your oven’s already busy; just assemble and chill.
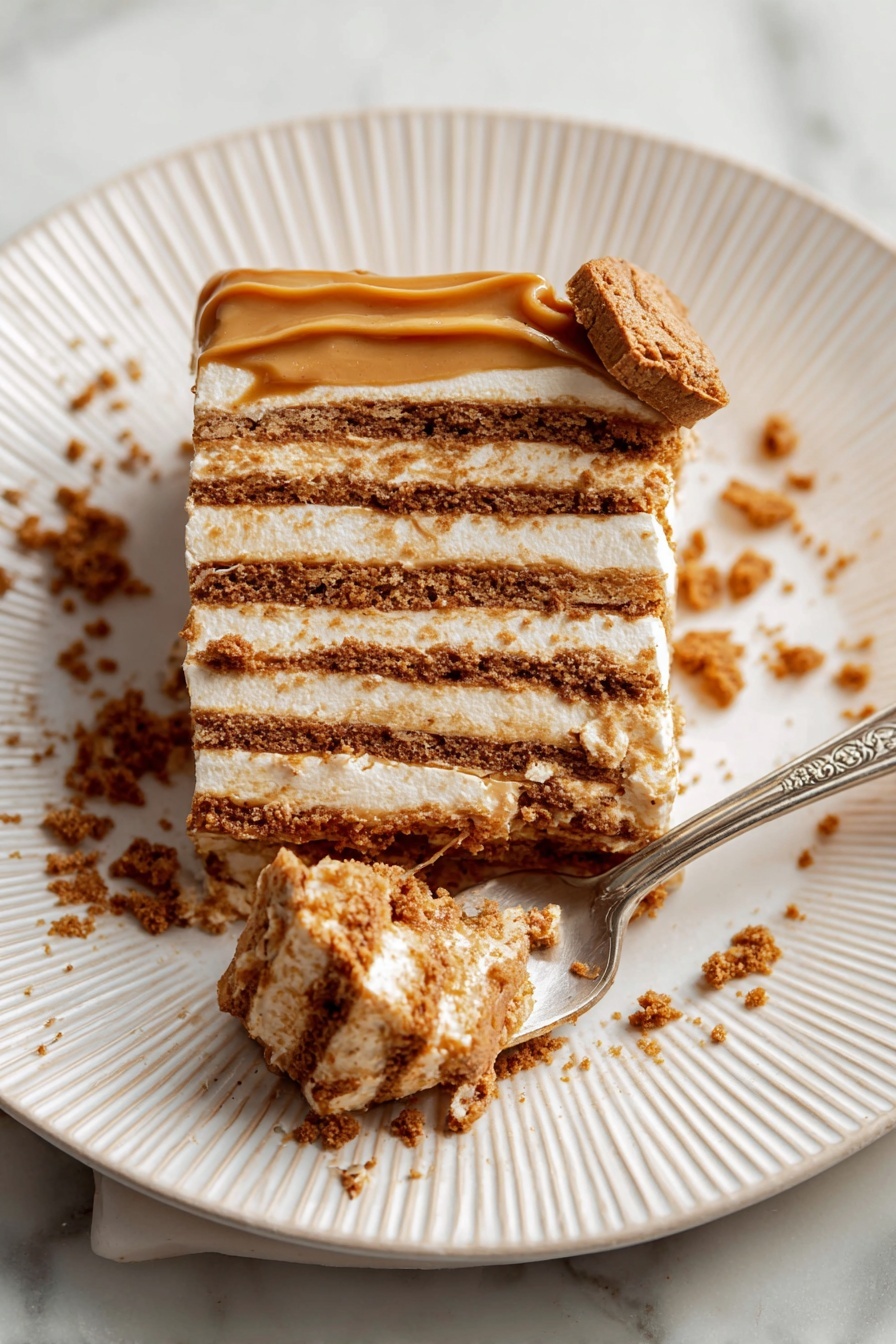
- Layered Texture: Crispy Biscoff cookies soften just enough overnight for a melt-in-your-mouth treat.
- Balanced Sweetness: Creamy mascarpone and cookie butter blend create rich flavor without being overwhelmingly sweet.
- Make-Ahead Friendly: You can prepare it up to 3 days ahead, which means less stress before guests arrive.

Ingredients & Why They Work
This No-Bake Cookie Butter Icebox Cake Recipe nails the perfect combo of creamy and crunchy with just a few ingredients – all familiar but taken to the next level when combined. I always pick good quality Lotus Biscoff spread and cookies since that warm spiced flavor is the star here.
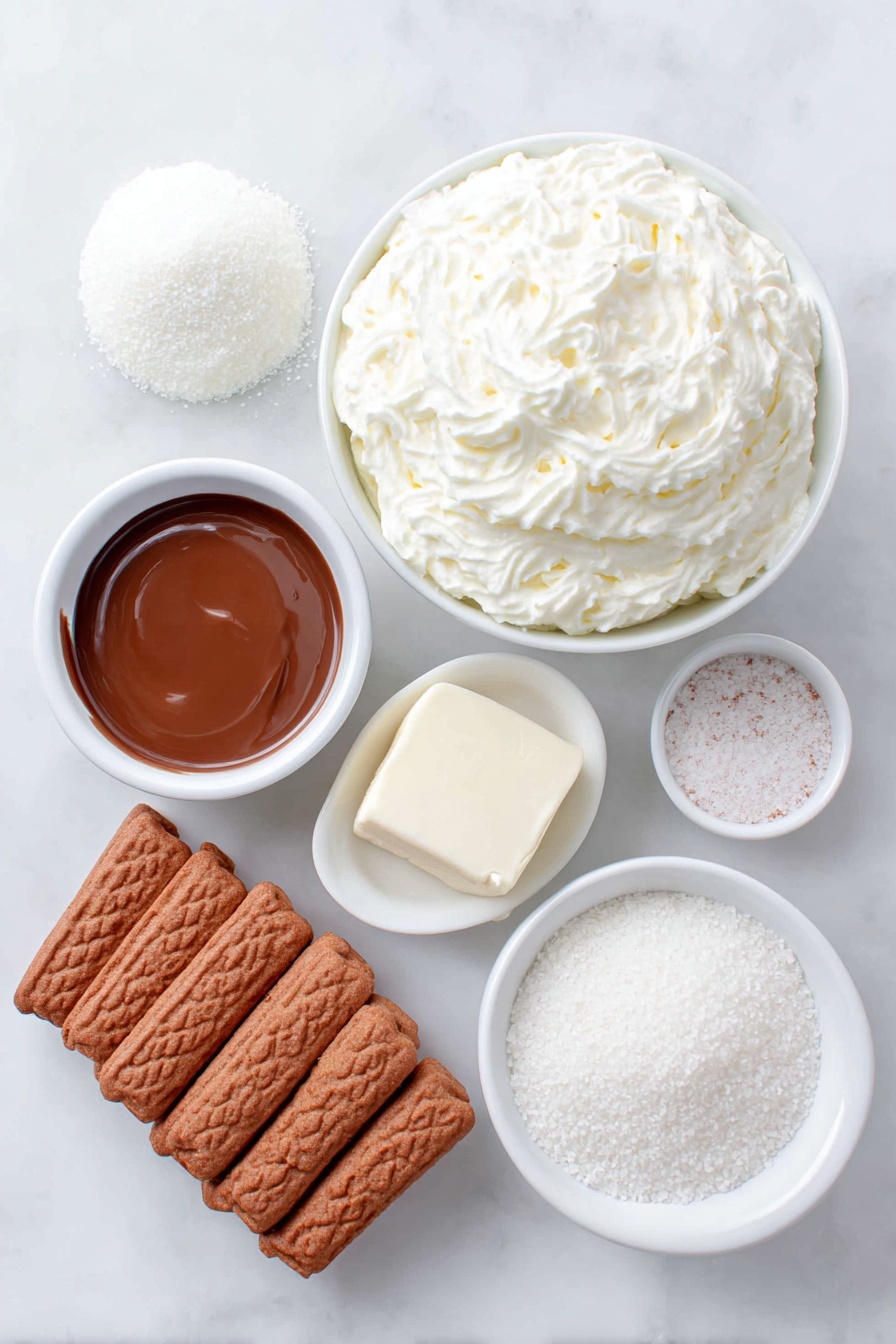
- Heavy Cream: Whipped to medium peaks for that essential light but stable base that holds the cake together.
- Lotus Biscoff Spread: Cookie butter’s warm caramelized spice flavor is irreplaceable — I never skip it.
- Mascarpone Cheese: Adds subtle richness and melts smoothly into the cream without overpowering.
- Pure Vanilla Extract: Enhances overall flavor depth, making every bite taste more rounded.
- Pinch of Kosher Salt: Balances the sweetness and lifts the other flavors beautifully.
- Confectioner’s Sugar: Sweetens gently while blending perfectly into the whipped cream.
- Lotus Biscoff Cookies: The crunchy, spiced layers soak up moisture and layer each bite with texture and flavor.
Make It Your Way
I love how adaptable this No-Bake Cookie Butter Icebox Cake Recipe is. You can easily tweak it to match your cravings or what’s in your pantry, and the results are always delicious. Don’t hesitate to get creative!
- Nut-Free Variation: I’ve swapped mascarpone for vegan cream cheese and it’s just as dreamy for those avoiding nuts.
- Chocolate Twist: Sometimes I add a drizzle of melted dark chocolate between layers for extra decadence — highly recommended!
- Seasonal Fruit Boost: Fresh sliced bananas or strawberries on top add a nice fresh counterpoint if you want something lighter.
- Mini Version: For parties, I’ve made this in little mason jars — perfect for individual servings and super cute.
Step-by-Step: How I Make No-Bake Cookie Butter Icebox Cake Recipe
Step 1: Whip It Up
Start by pouring 2 cups of cold heavy cream into your mixer bowl fitted with the whisk attachment. Whip it on medium-high speed until you get medium peaks — you’ll know when the cream holds shape but still feels soft and pillowy. Avoid overwhipping or you’ll end up with butter, trust me, I’ve been there!
Step 2: Mix the Cookie Butter Cream
Next, add ½ cup of Lotus Biscoff spread, ⅓ cup mascarpone, 1 teaspoon vanilla extract, a pinch of kosher salt, and 2 tablespoons powdered sugar to the whipped cream. Gently fold the ingredients together with a spatula or mix on low speed until everything’s well combined and silky smooth. This creates the dreamy filling that’s absolutely irresistible.
Step 3: Build Your Layers
Line your loaf pan with plastic wrap — this step makes unmolding a breeze. Begin by placing a single layer of Lotus Biscoff cookies along the bottom. Spread the cookie butter cream evenly over the cookies, making sure the thickness matches roughly the cookie layer’s. Repeat this process, alternating cookies and cream until you reach the top. End with a final cookie layer to keep it neat.
Step 4: Let It Chill
Cover the loaf pan loosely with plastic wrap and refrigerate for at least 24 hours. This step is key — it gives the cookies time to soften and the flavors to marry beautifully. When you’re ready to serve, gently lift it out using that plastic wrap and transfer onto a serving platter.
Tips from My Kitchen
- Warm Your Cookie Butter: I like to heat a little bit of the Biscoff spread briefly in the microwave until just melted; it’s perfect drizzled on top for serving and adds extra wow-factor.
- Use Fresh Cookies: Stale cookies just won’t soften nicely, so grab fresh packages — it makes a difference.
- Don’t Rush the Chill Time: That 24-hour rest is non-negotiable. I’ve tried serving it sooner, but the textures don’t blend right.
- Plastic Wrap Magic: Wrapping your pan well avoids fridge odors and keeps your cake moist and fresh.
How to Serve No-Bake Cookie Butter Icebox Cake Recipe
Garnishes
I like to keep garnishes simple yet indulgent: a drizzle of warmed cookie butter spread (heated just until pourable) and a sprinkle of crushed Biscoff cookies on top. It adds a little extra crunch and a beautiful presentation every time. Sometimes I toss a few toasted pecans or a light dusting of cocoa powder for a fancy twist.
Side Dishes
This icebox cake really shines as a stand-alone dessert, but paired with a fresh cup of espresso or chai tea, it turns into a cozy afternoon indulgence. If you want to be fancy, serve alongside fresh berries or a citrusy sorbet to cut through the richness.
Creative Ways to Present
For special occasions, I’ve layered this dessert in clear glass trifle dishes so you see all those gorgeous layers. It turns any party into something memorable! Another favorite trick: individual glasses or jars topped with whipped cream and cookie crumbs for easy portioning and adorable presentation.
Make Ahead and Storage
Storing Leftovers
After serving, just cover the remaining icebox cake tightly with plastic wrap or transfer it to an airtight container. I’ve kept leftovers fresh in the fridge for up to 3 days without any loss in texture or flavor.
Freezing
If you want to prep in advance or save leftovers longer, wrap the cake tightly in plastic wrap and place it inside a freezer-safe container. I’ve frozen it successfully for up to a month. When you’re ready, thaw overnight in the fridge to maintain that perfect texture.
Reheating
This dessert is best enjoyed chilled, so I don’t reheat it. Instead, I let any frozen slices thaw completely in the fridge before serving. If you want it slightly softer, just let it sit at room temperature for 15 minutes – easy!
FAQs
-
Can I use other cookies besides Lotus Biscoff?
Absolutely! While the classic Biscoff cookie has a unique caramelized spiced flavor essential to this recipe, you can experiment with graham crackers or ginger snaps for a different, yet tasty outcome. Just keep in mind the flavor will vary.
-
How long does the No-Bake Cookie Butter Icebox Cake last in the fridge?
This icebox cake keeps well for up to 3 days when stored in an airtight container or wrapped tightly in plastic wrap. Beyond that, the cookies may become too soft or soggy.
-
Can I make the cream ahead of time?
You can prepare the cookie butter cream up to a day in advance, but I recommend whipping the cream fresh if possible for the best texture and flavor. Just keep it chilled until assembly.
-
Is this recipe gluten-free?
The traditional recipe uses Lotus Biscoff cookies which contain gluten. To make it gluten-free, you’d need to substitute gluten-free caramelized spiced cookies or another suitable gluten-free cookie.
-
How do I unmold the icebox cake without it falling apart?
Line your loaf pan with plastic wrap before assembling. When ready to serve, gently lift the cake out by the edges of the wrap, peeling it away from the sides. This helps keep the layers intact and ensures a neat presentation.
Final Thoughts
Honestly, this No-Bake Cookie Butter Icebox Cake Recipe has quickly become one of my go-to desserts for any occasion. It’s easy enough to make on a busy day but impressive enough to serve when company comes over. Every time I pull it from the fridge, that first slice delivers just the right balance of creamy, spiced, and crunchy, and it always brings smiles around the table. I hope you enjoy making and sharing it as much as I do!
Print
No-Bake Cookie Butter Icebox Cake Recipe
- Prep Time: 15 minutes
- Cook Time: 0 minutes
- Total Time: 1 day 15 minutes
- Yield: 8 servings
- Category: Dessert
- Method: No-Cook
- Cuisine: American
Description
This no-bake Cookie Butter Icebox Cake is a luscious layered dessert featuring creamy Biscoff spread and crunchy Lotus Biscoff cookies. Whipped heavy cream and mascarpone create a smooth, rich filling that perfectly complements the spiced cookies. Easy to assemble and requiring 24 hours of chilling, it’s a delightful, make-ahead treat ideal for sharing.
Ingredients
Filling
- 2 cups heavy cream
- ½ cup (150g) Lotus Biscoff spread
- ⅓ cup (80g) mascarpone cheese
- 1 tsp pure vanilla extract
- Pinch of Kosher salt
- 2 Tbsp confectioner’s sugar
Assembly
- 2 packages Lotus Biscoff cookies (32 cookies per package)
- ⅓ cup (80g) Lotus Biscoff spread, warmed (for serving)
Instructions
- Whip the cream: Pour 2 cups of heavy cream into the bowl of a stand mixer fitted with a whisk attachment. Whisk on medium-high speed until medium peaks form, creating a light and airy texture.
- Incorporate cookie butter mixture: Add ½ cup (150g) Lotus Biscoff spread, ⅓ cup (80g) mascarpone cheese, 1 tsp pure vanilla extract, a pinch of Kosher salt, and 2 Tbsp confectioner’s sugar to the whipped cream. Mix gently until all ingredients are well combined and smooth.
- Prepare the pan: Line a loaf pan with plastic wrap to facilitate easy removal of the icebox cake later.
- Layer the cake: Place a single layer of Lotus Biscoff cookies along the bottom of the lined loaf pan. Spread a layer of the Biscoff cream mixture on top of the cookies, matching the thickness of the cookie layer. Repeat the layering, alternating cookies and cream, until you reach the top of the pan, ending with a cookie layer.
- Refrigerate: Loosely wrap the loaf pan with plastic wrap and refrigerate for 24 hours to allow the cake to set and flavors to meld.
- Serve: When ready, unmold the icebox cake onto a plate or tray. Drizzle the warmed ⅓ cup (80g) Biscoff spread over the top and sprinkle with crushed Biscoff cookies for added texture and flavor.
Notes
- Nutrition facts are estimated based on using 45 cookies.
- Loaf pan sizes vary; a straight-sided pan uses about 9 cookies per layer. Adjust cookie quantity accordingly if your pan tapers.
- To melt Biscoff spread, heat ⅓ cup in a microwave-safe bowl in 30-second intervals, stirring between each until warm.
- Icebox cakes are perfect for advance prep; chill at least 24 hours or up to 3 days ahead.
- Store leftovers in an airtight container or tightly wrapped in the loaf pan for up to 3 days.
- For freezing, wrap tightly in plastic, place in a freezer-safe container, and thaw overnight in the fridge before serving.
Nutrition
- Serving Size: 1 slice
- Calories: 350 kcal
- Sugar: 28 g
- Sodium: 100 mg
- Fat: 24 g
- Saturated Fat: 14 g
- Unsaturated Fat: 8 g
- Trans Fat: 0 g
- Carbohydrates: 28 g
- Fiber: 1 g
- Protein: 4 g
- Cholesterol: 80 mg

