

No-Bake Cheesecake with Condensed Milk Recipe
If you’re craving a creamy, dreamy dessert that doesn’t require you to heat up your oven or fuss with complicated techniques, this No-Bake Cheesecake with Condensed Milk Recipe is absolutely perfect. I’ve made this cheesecake countless times—whether for last-minute guests or a sweet treat to enjoy on a lazy weekend—and it always gets rave reviews. The best part? It’s ridiculously simple, uses just a handful of ingredients, and delivers that luscious cheesecake flavor everyone loves. Stick with me here because I’m about to share everything you need to nail this no-fail classic!
Why This Recipe Works
- Simplicity: Only a few pantry staples come together for a straightforward, fuss-free dessert.
- Creamy texture: The magic combo of condensed milk and cream cheese creates that perfectly silky filling without baking.
- No oven required: It’s ideal for hot summer days or if you just want to keep things easy in the kitchen.
- Customizable: From the crust to the toppings, you can easily switch things up to suit your taste or diet.

Ingredients & Why They Work
The harmony of ingredients here is what makes this No-Bake Cheesecake with Condensed Milk Recipe a total winner. The crust brings a buttery, sweet crunch while the filling is beautifully creamy and just lightly tangy thanks to the lemon juice. I always recommend using full-fat cream cheese—it makes a huge difference in texture—and yes, the sweetened condensed milk is your secret weapon for sweetness and richness.
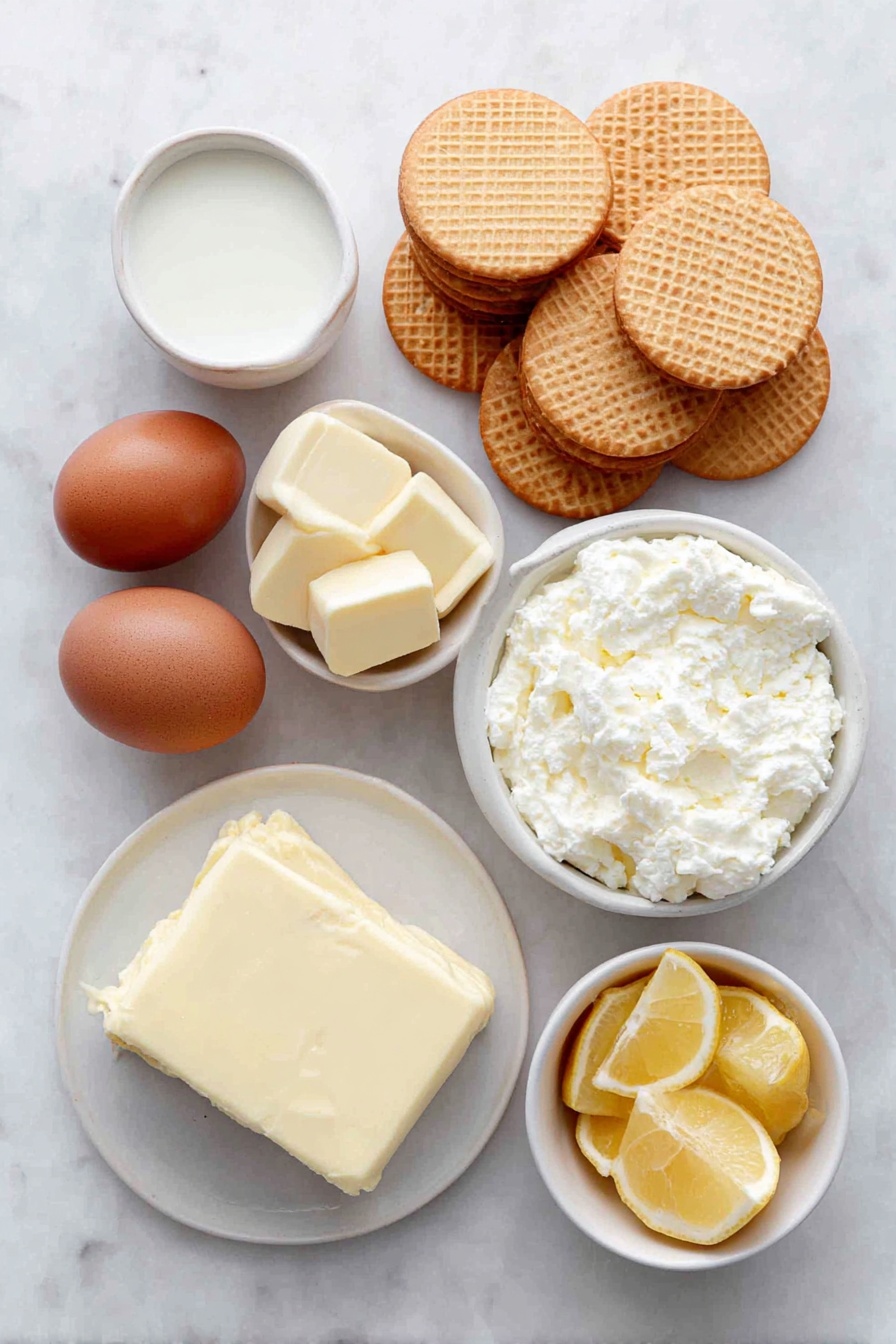
- Vanilla wafers crumbs: Provide a sweet, crunchy base that’s easy to pack down; vanilla wafers add a subtle flavor that pairs perfectly with cheesecake.
- Salted butter: Melts to bind the crust together and balances the sweetness while adding richness.
- Cream cheese: Use dense, block-style cream cheese for that signature thick and creamy texture; avoid spreadable varieties.
- Sweetened condensed milk: Adds sweetness and creaminess without needing extra sugar or heavy cream.
- Lemon juice: Provides acidity to balance the sweet richness, helping the filling set nicely.
Make It Your Way
One of the things I love about this No-Bake Cheesecake with Condensed Milk Recipe is how easy it is to tweak depending on what you have on hand or your mood. Over time I’ve played with different crusts, added mix-ins, and switched up toppings to keep it exciting. Don’t be afraid to make it your own—you’ll find the basic method is so forgiving!
- Variation: For a chocolaty twist, swap vanilla wafers for crushed Oreos in the crust—you get a robust chocolatey base that pairs perfectly with the creamy filling.
- Dairy-free option: Try a vegan cream cheese and coconut condensed milk alternative, but keep in mind the texture might be slightly different.
- Fruit flavor boost: Stir in a handful of mashed berries or a swirl of fruit preserves before chilling for a colorful, fresh touch.
- Texture tweak: For a firmer cheesecake, add a teaspoon of gelatin dissolved in warm water before folding into the filling.
Step-by-Step: How I Make No-Bake Cheesecake with Condensed Milk Recipe
Step 1: Crushing the Crust Cookies
I like using vanilla wafers for the crust because they’re sweet and crumbly, but you can use graham crackers or digestive biscuits too. Just place your cookies in a large resealable bag, fold a kitchen towel over it to avoid the mess, and bash gently with a rolling pin until you have fine crumbs. If you have a food processor, even better—just pulse a few times. This step is quick but makes a big difference in texture, so try to get uniform crumbs for an even crust.
Step 2: Melting Butter and Making the Crust
To melt the butter, I cover it in a microwave-safe bowl with plastic wrap and zap it on medium power in short bursts—about 20 seconds—stirring in between. This helps avoid overheating or burning. Once melted, mix the cookie crumbs into the butter until everything is fully combined and looks like wet sand. Press this mixture firmly into the bottom and sides of a 9-inch springform pan—use a measuring cup’s flat bottom or a glass for compacting the crust tightly. Pop it in the fridge to chill while you prepare the filling.
Step 3: Mixing Up the Creamy Filling
Before anything, make sure your cream cheese is soft—take it out of the fridge an hour ahead or give it a few quick zaps in the microwave (10 seconds at a time). Using an electric mixer, beat the cream cheese on medium speed until smooth with no lumps. Slowly pour in the sweetened condensed milk while mixing, scraping down the bowl sides as you go so everything combines evenly. Finally, add the lemon juice. You’ll notice the mixture start to thicken—this is the clue that it’s ready to pour onto your crust!
Step 4: Assembling and Chilling Your Cheesecake
Pour your luscious filling over the chilled crust and smooth the top with an offset spatula or the back of a spoon. Cover tightly with plastic wrap—this prevents any fridge smells from sneaking in—and refrigerate for at least 5 to 6 hours. I usually leave mine overnight for the best texture; the next day, it slices beautifully and holds its shape perfectly.
Tips from My Kitchen
- Cream Cheese Soften Hack: If you forget to soften it ahead, cut cream cheese into cubes and microwave in 10-second bursts to soften gently without melting.
- Press the Crust Firmly: I learned the hard way that a loose crust leads to crumbling slices—use a flat-bottomed glass to press firmly and evenly for sturdy results.
- Lemon Juice Magic: Adding lemon isn’t optional for me—it brightens the flavor and helps the filling thicken without gelatin.
- Avoid Overmixing: Mix until just combined to keep the filling from getting too airy or soft.
How to Serve No-Bake Cheesecake with Condensed Milk Recipe

Garnishes
I’m a sucker for topping this cheesecake with fresh berries—strawberries, raspberries, or blueberries add a pop of color and a tart contrast to the sweet filling. Sometimes I drizzle melted dark chocolate for a little indulgence or pipe on some softly whipped cream swirls for an elegant touch. Sprinkles or chopped nuts can add a fun crunch if you want to get creative!
Side Dishes
This cheesecake stands beautifully on its own but if you want to build a spread, pairing it with a simple coffee or fresh fruit salad elevates the dessert experience. I’ve also enjoyed it alongside light sorbets for summer gatherings—refreshing and indulgent all at once.
Creative Ways to Present
For parties, I like to serve this cheesecake in individual mini jars or transparent cups layered with crumbled crust, filling, and fruit for a charming parfait style. Another fun idea is to make mini no-bake cheesecakes in cupcake liners with a small cookie base—super cute and perfect for kids’ parties or potlucks!
Make Ahead and Storage
Storing Leftovers
Leftovers keep nicely covered in the fridge for up to 4 days. I find using the springform pan’s lid or wrapping tightly with plastic wrap prevents it from drying out or absorbing other smells. Always slice with a sharp knife dipped in hot water for clean cuts when serving.
Freezing
If you want to freeze it, I recommend slicing the cheesecake first into individual servings, wrapping each slice tightly in plastic wrap and then foil. Freeze for up to 1 month. Thaw overnight in the fridge before serving. The texture remains lovely, though slightly less firm than fresh.
Reheating
This cheesecake is best enjoyed chilled and doesn’t require reheating. If frozen slices feel too firm, leaving them at room temperature for 20-30 minutes softens them perfectly without losing that creamy texture.
FAQs
-
Can I use whipped cream cheese instead of block cream cheese?
I don’t recommend it because whipped or spreadable cream cheese contains more liquid and won’t set properly, resulting in a runny filling. Stick with firm, block-style cream cheese for the best texture.
-
Is this No-Bake Cheesecake with Condensed Milk Recipe vegetarian?
Yes, it’s vegetarian as it doesn’t use any gelatin or animal-based ingredients outside of dairy. However, it’s not vegan due to the cream cheese and condensed milk.
-
How long should I chill the cheesecake before serving?
The cheesecake needs about 5-6 hours to firm up, but chilling it overnight gives the best texture and makes slicing easier and cleaner.
-
Can I use other cookies for the crust?
Absolutely! Vanilla wafers, graham crackers, digestive biscuits, or even Oreos work well. Just adjust sweetness if using less sweet cookies by adding a tablespoon or two of sugar.
-
What if I don’t have lemon juice?
Lemon juice is important for cutting through the sweetness and thickening the filling, but you can substitute with a little white vinegar or lime juice if needed, though the flavor will change slightly.
Final Thoughts
This No-Bake Cheesecake with Condensed Milk Recipe has become one of my all-time favorite go-to desserts because it’s easy, requires minimal ingredients, and tastes like a treat you’d order at a fancy restaurant. It’s perfect for those days when you want to impress without stress or to satisfy your sweet tooth fast. Give it a try—I promise once you taste it, you’ll want to make it again and again, just like I do!
Print
No-Bake Cheesecake with Condensed Milk Recipe
- Prep Time: 45 minutes
- Cook Time: 0 minutes
- Total Time: 6 hours 45 minutes
- Yield: 8 servings
- Category: Dessert
- Method: No-Cook
- Cuisine: American
Description
This no-bake cheesecake recipe uses a simple vanilla wafer crust and a creamy filling made from full-fat cream cheese and sweetened condensed milk. It’s quick to prepare and requires no oven, making it perfect for a delicious, creamy dessert chilled to firm up.
Ingredients
Crust
- 2 1/4 cups vanilla wafers crumbs (300 g / 10.6 oz)
- 10 tbsp salted butter, melted (140 g / 4.9 oz) or unsalted butter + 1/4 tsp salt
Filling
- 16 oz full-fat cream cheese, softened (450 g; 2 x 8-oz packs)
- 1 can sweetened condensed milk (14 oz / 400 g)
- 2 tbsp lemon juice
Instructions
- Crush cookies: Place the vanilla wafers (or preferred substitute) in a large resealable plastic bag, set on a folded kitchen towel, and crush with a rolling pin until finely ground. Alternatively, use a food processor or blender to crush.
- Melt butter: Put the butter into a large mixing bowl, cover with plastic wrap, and melt in the microwave at medium power in 20-second bursts, stirring each time until fully melted.
- Make the crust: Add the crushed cookie crumbs to the melted butter and mix thoroughly to combine. Press this mixture evenly into the bottom and sides of a 9-inch (23 cm) springform pan, compacting tightly using a measuring cup or your hands. Refrigerate to chill and set the crust.
- Mix cheesecake filling: Wipe the bowl clean, add the softened cream cheese, and beat on medium speed with an electric mixer until smooth. Gradually add the sweetened condensed milk, scraping the bowl sides as needed. Beat in the lemon juice last; the mixture will thicken as you continue mixing.
- Assemble cheesecake: Pour the cheesecake filling into the chilled crust in the springform pan. Smooth the top with an offset spatula if desired.
- Refrigerate: Cover the pan loosely with plastic wrap and refrigerate for 5 to 6 hours or overnight until firm.
- Decorate (optional): Garnish the chilled cheesecake with toppings like chocolate drizzle, sprinkles, whipped cream swirls, or fresh fruit and berries as desired.
- Serve: When ready to eat, remove the springform ring, slice the cheesecake, and enjoy. Keep refrigerated until serving.
Notes
- For the crust, alternatives include using Graham crackers, digestive biscuits, shortbread cookies, or Oreos.
- If using Graham crackers or digestive biscuits, add 3 tablespoons of granulated sugar to the crumbs for added sweetness.
- Use dense block-style cream cheese, not spreadable or whipped types, for proper firmness.
- If block-style cream cheese is unavailable, drain excess liquid from full-fat cream cheese wrapped in cheesecloth or a kitchen towel to achieve the desired firmness.
Nutrition
- Serving Size: 1 slice
- Calories: 420 kcal
- Sugar: 30 g
- Sodium: 300 mg
- Fat: 30 g
- Saturated Fat: 18 g
- Unsaturated Fat: 10 g
- Trans Fat: 0.5 g
- Carbohydrates: 28 g
- Fiber: 1 g
- Protein: 6 g
- Cholesterol: 90 mg


