

No-Bake Biscoff Cheesecake Bites Recipe
If you’re anything like me and love little indulgent bites of dessert that pack a big punch of flavor without all the fuss, this No-Bake Biscoff Cheesecake Bites Recipe is going to be your new best friend. Seriously, these mini cheesecakes combine the rich, creamy texture of classic cheesecake with that unmistakable caramelized cookie butter flavor that Biscoff brings. Plus, no baking required—making it perfect for a quick yet impressive dessert. Stick around, because I’ll walk you through exactly how to make these delightful treats and share tips to get them perfect every single time.
Why This Recipe Works
- No Baking Needed: Skip the oven and still get a rich, creamy texture that feels indulgent, perfect for hot days or last-minute plans.
- Simple Ingredients, Big Flavor: Biscoff cookies and cookie butter add a caramelized warmth that takes the flavor beyond your average cheesecake.
- Mini Portions, Maximum Enjoyment: These bite-sized treats are perfect for parties or when you just want a little something sweet without overdoing it.
- Customizable Toppings: Easily dress them up with whipped cream or crushed cookies for a personal touch that makes these cheesecake bites extra special.

Ingredients & Why They Work
This No-Bake Biscoff Cheesecake Bites Recipe comes together beautifully because each ingredient plays a key role in texture and flavor. The crust thanks to crumbly Biscoff cookies and melted butter sets a buttery, spiced base, while the filling balances creaminess with just the right amount of sweetness from the cookie butter and powdered sugar. Here’s the lowdown on the essentials you’ll want to keep an eye on when shopping:

- Biscoff Cookies: These iconic caramelized cookies form the crust and a garnish, providing flavor and crunch with a warm spice undertone.
- Melted Butter: Binds the cookie crumbs for a sturdy but tender crust.
- Heavy Cream: Whipped into stiff peaks, this adds airiness to the filling for that light, melt-in-your-mouth texture.
- Cream Cheese: Provides the rich, classic cheesecake base—make sure it’s softened for smooth mixing.
- Powdered Sugar: Sweetens without graininess, ensuring a smooth filling.
- Biscoff Cookie Butter: The star ingredient, adding that signature creamy caramel-spiced sweetness.
- Sour Cream: Adds a subtle tang and silkiness that balances the richness of cream cheese and butter.
- Vanilla Extract: Elevates all the flavors with a fragrant warmth.
- Salt: Just a pinch enhances the sweetness and balances flavors perfectly.
- Whipped Cream (optional topping): Adds an extra cloud of decadence and the perfect finishing touch.
Make It Your Way
One of my favorite things about this No-Bake Biscoff Cheesecake Bites Recipe is how easy it is to customize. Whether you want to dial up the cookie butter flavor, reduce the sweetness, or make it perfectly kid-friendly, you’ve got options. Here’s some ideas from my kitchen experiments that you might want to try too:
- Extra Crunch: I sometimes fold in finely crushed nuts or even some toasted coconut flakes into the crust for a little texture contrast—it gives it a nice surprise when you bite in.
- Dairy-Free Version: Use vegan cream cheese and whipped coconut cream to get a similar texture without dairy. It’s surprisingly good and still screams Biscoff!
- Less Sweet: Cut back the powdered sugar by about a quarter cup and add a bit more sour cream for an elegantly tangy cheesecake that isn’t too sugary.
- Seasonal Spin: Add a teaspoon of cinnamon or cardamom to the crumb crust or mix it into the filling for a cozy holiday vibe.
Step-by-Step: How I Make No-Bake Biscoff Cheesecake Bites Recipe
Step 1: Crafting the Perfect Crust
Start by blitzing your Biscoff cookies in a food processor until you have fine crumbs—you want them sandy but not powdery. Slowly pour in the melted butter while pulsing until the crumbs stick together when you pinch them. This tells you the crust will hold firm without being rock hard. Press about a tablespoon of this mix into your mini cheesecake pans or lined muffin tins. I like to use a flat-bottomed glass or measuring cup to get the crust layer nice and even. Then pop them in the fridge or freezer to firm up while you make the filling. Trust me, a chilled crust holds its shape under that creamy filling better than you think.
Step 2: Whipping the Cream to Fluffy Perfection
Grab a clean, chilled bowl and whip the cold heavy cream with a hand mixer or stand mixer fitted with a whisk until stiff peaks form. Around two minutes should do it, but keep a close eye—overwhipped cream turns grainy and buttery, which you don’t want here. The cream will lighten the filling beautifully and help give those cheesecake bites that airy, melt-in-your-mouth feel. Stick the whipped cream in the fridge until you’re ready to fold it in with the cream cheese mix.
Step 3: Mixing the Filling
In another large bowl, beat together the softened cream cheese, powdered sugar, Biscoff cookie butter, sour cream, vanilla extract, and a pinch of salt until everything is luxuriously smooth. This mix is where your cheesecake gets its signature Biscoff flavor, so don’t rush it. Then gently fold in the whipped cream with a rubber spatula, using slow, deliberate strokes until the filling looks uniformly creamy with no white streaks. This gentle folding prevents deflating the whipped cream, so your filling stays light and fluffy.
Step 4: Filling and Chilling the Cheesecake Bites
Spoon your filling into a piping bag fitted with a round tip (I use a 1A tip) and pipe the batter onto your chilled crusts. I love using piping bags here because it’s cleaner and easier than spooning, especially when you want those smooth, even tops. If you don’t have a piping bag, just spoon and gently smooth out with a spatula. Refrigerate the filled bites for at least 6 hours or overnight. This chilling time is crucial—it lets the filling set perfectly so your cheesecake bites hold their shape and slice easily.
Step 5: The Finishing Touch – Topping and Garnish
Once your cheesecake bites are firm and ready, microwave the remaining Biscoff cookie butter for about 20–30 seconds to get it melty and spreadable. Slather it on top of each cheesecake bite; don’t worry if it drips down the sides—that look is part of the charm! Pop them back in the fridge for 15–20 minutes so the topping sets nicely. I like sticking a whole or crushed Biscoff cookie on top along with a little whipped cream for that extra wow factor when serving. This simple garnish really amps up the presentation and makes everyone smile.
Tips from My Kitchen
- Room Temperature Cream Cheese: Softening to room temp is key to avoiding lumps and getting a silky smooth filling.
- Chill Bowls & Whisk: Cold tools help your cream whip up faster and fluffier, saving you time and effort.
- Don’t Overmix the Filling: Fold whipped cream gently to keep the airy texture intact.
- Freeze the Bites for Easy Serving: If pressed for time, freeze cheesecakes for up to 3 months—just thaw in the fridge before serving.
How to Serve No-Bake Biscoff Cheesecake Bites Recipe

Garnishes
I keep things simple yet elegant when garnishing these cheesecake bites. A dollop of freshly whipped cream gives a lovely lightness, while a whole or crumbled Biscoff cookie adds crunch and a beautiful caramel color contrast on top. Sometimes, I sprinkle a little crushed toasted hazelnut for texture. It’s those little touches that make these bite-sized desserts feel extra special when guests come over.
Side Dishes
Since these cheesecake bites are rich and flavorful, I like pairing them with something bright and refreshing like fresh berries or a citrus fruit salad. The tartness beautifully balances the sweetness and richness of the Biscoff cheesecake. A light tea or coffee also complements them perfectly for a cozy afternoon treat.
Creative Ways to Present
For parties, I’ve arranged these cheesecake bites on tiered dessert trays for an eye-catching display. Another fun idea is serving them in mini cupcake liners with a small decorative flag or toothpick—cute and easy to grab! Around holidays, I’ve added a dusting of edible gold glitter or cinnamon for a festive feel. Presentation is your playground with these, so have fun with it.
Make Ahead and Storage
Storing Leftovers
I always store leftover cheesecake bites in an airtight container in the fridge, where they stay fresh and delicious for up to four days. Keeping them chilled is crucial to maintaining that perfect creamy texture without drying out the crust.
Freezing
These cheesecake bites freeze wonderfully. I wrap them individually in plastic wrap and place them in a sealed container or freezer bag. They can last up to three months frozen! When I want to enjoy one, I just move a few from the freezer to the fridge the night before to thaw slowly. The texture holds up really well, which is a big win if you want to prep ahead of time for a party or event.
Reheating
These cheesecake bites are best enjoyed cold or at room temperature, so reheating isn’t really needed. If you want to soften the Biscoff topping a little, a quick 5-10 second zap in the microwave works, but be careful not to melt them too much. Otherwise, just let them sit out for 10-15 minutes before serving for the perfect texture.
FAQs
-
Can I make this No-Bake Biscoff Cheesecake Bites Recipe gluten-free?
Absolutely! You can substitute the Biscoff cookies with your favorite gluten-free spiced cookie or graham cracker crumbs. Just make sure the gluten-free alternative has a similar texture so the crust holds together well.
-
How long do the cheesecake bites need to chill?
For the best results, chill them in the fridge for at least 6 hours, but overnight is ideal. This resting time lets the filling fully set and the flavors meld so your bites slice cleanly and taste amazing.
-
Can I make these cheesecake bites without a piping bag?
Yes! While a piping bag helps with cleaner, even layers, you can use a spoon or small ice cream scoop to fill your tins and then smooth the tops with a spatula or the back of a spoon.
-
Is it possible to make these bites vegan?
Yes. Swap the cream cheese for a vegan cream cheese alternative, the heavy cream for coconut cream whipped, and butter for a plant-based substitute. The texture will differ slightly but they’re still delicious and capture that Biscoff essence.
Final Thoughts
This No-Bake Biscoff Cheesecake Bites Recipe holds a special place in my heart because it’s proof that making something impressive doesn’t have to be complicated or time-intensive. Every time I whip up a batch, I get the same joyful reactions from friends and family—little bites of happiness that practically melt away. If you love Biscoff like I do, you’re going to adore these mini cheesecakes. So grab your ingredients, give this recipe a whirl, and trust me, you’ll find yourself coming back for seconds (and thirds) – no baking required!
Print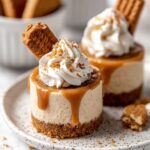
No-Bake Biscoff Cheesecake Bites Recipe
- Prep Time: 30 minutes
- Cook Time: 0 minutes
- Total Time: 6 hours 30 minutes
- Yield: 24 mini cheesecakes
- Category: Dessert
- Method: No-Cook
- Cuisine: American
Description
Delicious no-bake mini Biscoff cheesecakes featuring a crunchy cookie crust, creamy Biscoff-infused filling, and a luscious cookie butter topping. Perfect for parties or a sweet treat without turning on the oven.
Ingredients
Crust
- 1 (8.8 oz, 250g) package Biscoff cookies
- 1/2 cup melted unsalted butter
Filling
- 1 cup cold heavy cream
- 3 (8 oz) blocks full-fat cream cheese, softened to room temperature
- 1 cup powdered sugar
- 1 cup creamy Biscoff cookie butter
- 1/3 cup sour cream, room temperature
- 2 tsp pure vanilla extract
- Pinch of salt
Topping
- 1/2 cup creamy Biscoff cookie butter
- Additional Biscoff cookies for garnish (whole or crushed)
- Whipped cream
Instructions
- Prepare crust: Blitz the Biscoff cookies in a food processor until finely ground. Gradually stream in the melted butter and mix until combined. The mixture will be sandy but should hold together when pressed.
- Form crust base: Spray 2 mini cheesecake pans with non-stick spray or line two 12-count muffin pans with cupcake liners. Press about 1 tablespoon of the crumb mixture into each pan to form the crust. Freeze or refrigerate while preparing the filling.
- Whip cream: Beat the cold heavy cream in a chilled bowl with a hand mixer or stand mixer with whisk attachment until stiff peaks form, about 2 minutes. Avoid overbeating. Refrigerate until needed.
- Mix filling: In a separate bowl, beat the softened cream cheese, powdered sugar, Biscoff cookie butter, sour cream, vanilla extract, and pinch of salt together until smooth and fully combined.
- Combine whipped cream and filling: Gently fold the whipped cream into the cream cheese mixture using a rubber spatula until no white streaks remain.
- Assemble cheesecakes: Spoon the filling into a piping bag fitted with a round 1A tip and pipe onto the chilled crusts. Smooth the tops evenly.
- Chill: Refrigerate the cheesecakes for 6 hours or overnight, loosely covered.
- Add topping: Melt the 1/2 cup Biscoff cookie butter in the microwave for 20-30 seconds until smooth. Spread it on top of each cheesecake allowing some to drip down the sides. Return to fridge for 15-20 minutes to set.
- Garnish and serve: Decorate with additional Biscoff cookies (whole or crushed) and whipped cream as desired. Serve and enjoy!
Notes
- Store cheesecakes in the refrigerator for up to 4 days or freeze for up to 3 months.
- Be careful not to overbeat the heavy cream to avoid turning it into butter.
- Softening the cream cheese to room temperature ensures a smooth filling without lumps.
- Use a piping bag to neatly fill the crusts, but you can also spoon if preferred.
- If you lack mini cheesecake pans, standard muffin pans with liners work well too.
Nutrition
- Serving Size: 1 mini cheesecake
- Calories: 180 kcal
- Sugar: 12 g
- Sodium: 100 mg
- Fat: 14 g
- Saturated Fat: 8 g
- Unsaturated Fat: 5 g
- Trans Fat: 0 g
- Carbohydrates: 12 g
- Fiber: 0.5 g
- Protein: 3 g
- Cholesterol: 45 mg
