

Mint Chocolate Brownie Recipe
If you’re a fan of rich, fudgy brownies with a twist of refreshing mint, then let me introduce you to my all-time favorite Mint Chocolate Brownie Recipe. This recipe layers a decadently moist chocolate brownie base with a smooth mint frosting and finishes with a glossy chocolate topping — it’s just the perfect combo that I’m sure you’ll fall in love with. Stick with me through this post, and I’ll share all my little kitchen tricks to help you nail this fan-freaking-tastic treat every single time.
Why This Recipe Works
- Perfect Texture Fusion: The brownie base is fudgy and moist, while the mint frosting adds creaminess and the chocolate topping provides a satisfying snap.
- Balanced Mint Flavor: Using peppermint extract creates a true mint taste without the harshness that can come from mint oils or other extracts.
- Layering Technique: Chilling between layers ensures each section sets beautifully, preventing mixing and keeping clean, enticing layers.
- Simple Yet Impressive: Despite looking like a bakery masterpiece, the steps are straightforward enough for even a casual home baker to pull off with confidence.

Ingredients & Why They Work
This Mint Chocolate Brownie Recipe relies on simple, classic ingredients that each play a vital role in creating that perfect fudgy base, luscious mint frosting, and glossy chocolate topping. Choosing quality chocolate and the right peppermint extract will really make a difference in your final result.

- Unsalted butter: Provides richness and moisture; unsalted lets you control the salt level better.
- Semi-sweet chocolate: Creates deep chocolate flavor and melts smoothly into the batter for fudgy brownies.
- Granulated sugar & Light brown sugar: Brown sugar adds extra moisture and subtle caramel notes alongside the sweetness.
- Large eggs at room temperature: Help bind ingredients and add structure — room temp eggs mix better.
- Pure vanilla extract: Enhances flavors and adds warmth to the chocolate batter.
- Salt: Balances sweetness and intensifies chocolate flavor.
- All-purpose flour: Provides structure without making brownies cakey.
- Natural unsweetened cocoa powder: Concentrates chocolate flavor while keeping the batter fudgy.
- Confectioners’ sugar: Ensures a silky smooth mint frosting.
- Milk: Adds creaminess and helps achieve perfect frosting spreadability.
- Peppermint extract: Gives the authentic, fresh mint flavor I love over any other mint option.
- Semi-sweet chocolate chips: Melts into the final topping for that glossy, shiny chocolate finish.
Make It Your Way
I like to play around with this Mint Chocolate Brownie Recipe just a bit depending on the season or occasion — you absolutely can put your own spin on it and make it shine your way. Don’t be shy to tweak the peppermint intensity or toss in some chopped mint chocolate for extra texture.
- Variation: Once, I added a handful of crushed peppermint candies on top of the chocolate layer before chilling, and it gave a delightful crunch and festive vibe that my family adored.
- Dairy-Free Option: Swap butter with coconut oil or dairy-free margarine and use dairy-free chocolate chips — it works surprisingly well.
- Spicy Mint Twist: Adding a pinch of cinnamon or a dash of chili powder into the brownie batter can make for a fun, grown-up version I’ve enjoyed on cold winter nights.
Step-by-Step: How I Make Mint Chocolate Brownie Recipe
Step 1: Melt the butter and chocolate just right
This step sets the foundation, so I melt the butter and chopped semi-sweet chocolate slowly over medium heat while stirring constantly to avoid burning or seizing. If you’re short on time, the microwave works well too — just heat in 20-second bursts, stirring each time until totally smooth. Cooling this mixture for about 10 minutes is key before moving on; hot mixture can scramble your eggs if added too soon.
Step 2: Mix sugars, eggs, and dry ingredients gently
Once the chocolate mixture is just warm, I whisk in the granulated and brown sugars thoroughly, then add eggs one at a time, whisking after each to make the batter silky smooth. After a quick splash of vanilla, I gently fold in salt, flour, and cocoa to keep that fudgy texture intact — folding, not vigorous stirring, avoids tough brownies. Then, pour the batter into a parchment-lined 9×13 pan and bake at 350°F (177°C) until the edges pull away and a toothpick comes out with moist crumbs. Timing can vary, so check after 30 minutes and keep an eye.
Step 3: Cool brownies completely before frosting
Patience here really pays off — I always let my brownies cool completely on a wire rack, then use the parchment overhang to transfer the whole slab to a baking sheet for frosting. Cutting too soon is tempting but will mess up your layers, so resist!
Step 4: Whip up the mint frosting and set
Using softened butter, confectioners’ sugar, and milk, I beat the frosting nice and fluffy before adding peppermint extract and green food coloring if you’re feeling festive. Spreading this on the cooled brownies and chilling in the fridge for at least an hour sets the frosting firm enough to hold the last chocolate layer perfectly.
Step 5: Melt and spread the chocolate topping
Finally, the melted butter and chocolate chips come together to create a shiny, thick chocolate layer you spread gently on top of the chilled mint frosting. Pop these back in the fridge to chill and set for at least an hour—overnight if you have the time. When it’s time to serve, use a sharp knife wiped clean between cuts so each brownie square looks as stunning as it tastes.
Tips from My Kitchen
- Room-Temperature Eggs: I always make sure my eggs are at room temperature to avoid curdling the chocolate mixture and to get a smooth batter.
- Peppermint Extract Over Mint Extract: Peppermint extract tastes far more natural and less “toothpaste-y” than regular mint extract — this little swap transformed my brownies.
- Use Parchment Paper Overhang: This trick makes lifting the whole brownie slab out for frosting and cutting a breeze — trust me, it saves so much hassle.
- Sharp Knife for Cutting: Clean your knife between cuts to keep layers neat and prevent dragging the chocolate topping around.
How to Serve Mint Chocolate Brownie Recipe

Garnishes
I often top the brownies with a few fresh mint leaves or even a light dusting of cocoa powder for extra flair. Around the holidays, crushed candy canes sprinkled just before the chocolate sets look and taste amazing. These little accents take your mint chocolate brownie from great to unforgettable.
Side Dishes
Pair these brownies with a scoop of vanilla bean ice cream or a dollop of whipped cream for the ultimate indulgence. A warm cup of coffee or peppermint tea alongside complements the mint and chocolate beautifully — I personally love this for cozy weekend afternoons.
Creative Ways to Present
If you’re serving these at a party, try cutting them into small bite-sized squares and arranging them on a tiered dessert stand with sprigs of mint and chocolates around. Or, for a festive twist, drizzle melted white chocolate over the top for a pretty contrast that impresses every time.
Make Ahead and Storage
Storing Leftovers
Leftover brownies store beautifully in an airtight container in the fridge for up to 5 days. I’ve found keeping them chilled preserves the freshness and the integrity of each layer, so every bite stays that perfect mint-chocolate balance you love.
Freezing
I like to freeze the baked brownie base separately, then thaw overnight before frosting and adding the chocolate topping, which keeps the toppings fresh and textures perfect. Alternatively, you can freeze the fully finished brownies and thaw them in the fridge overnight — just slice after thawing for clean cuts.
Reheating
These are perfect served slightly chilled or at room temperature, but if you want to warm them up, I recommend microwaving a single brownie for 10-15 seconds — just enough to take the chill off without melting the frosting or chocolate topping.
FAQs
-
Can I use regular mint extract instead of peppermint extract in this Mint Chocolate Brownie Recipe?
Technically, yes — but I strongly recommend peppermint extract for this recipe because it has a fresher and more authentic mint flavor. Regular mint extract can sometimes taste artificial or overpowering, which might overshadow the chocolate.
-
How do I know when the brownies are done baking?
Watch for the edges to pull away slightly from the sides of the pan, and use the toothpick test — insert a toothpick into the center, and it should come out with a few moist crumbs, but not wet batter. Since ovens vary, I start checking around 30 minutes and keep an eye from there.
-
Can I make this Mint Chocolate Brownie Recipe gluten-free?
You can try swapping the all-purpose flour for a gluten-free blend, but results might vary. I recommend a blend that’s designed for baking so it maintains the fudgy texture. Adding a bit of xanthan gum might also help with structure. Always test a small batch first!
-
Why does the frosting need to chill before adding the chocolate layer?
Chilling lets the mint frosting firm up so when you pour and spread the melted chocolate topping, the layers stay distinct and don’t mix or melt together. This helps keep the beautiful layered look and makes cutting neat squares much easier.
-
Can I make the brownies ahead for a party?
Absolutely! The brownies keep well and even taste better after a day as the flavors meld. You can bake and freeze the base ahead of time, then frost and top on the day of your event, or prepare the entire layered treat a day before and store it in the fridge.
Final Thoughts
This Mint Chocolate Brownie Recipe is a special one I love making when I want to impress friends or treat my own sweet tooth. The way the mint and rich chocolate come together — with layers that look as good as they taste — makes it feel fancy but without any of the fuss. I hope you’ll give it a whirl and enjoy every fudgy, minty bite as much as I do!
Print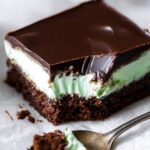
Mint Chocolate Brownie Recipe
- Prep Time: 1 hour
- Cook Time: 35 minutes
- Total Time: 6 hours
- Yield: 24 brownies
- Category: Dessert
- Method: Baking
- Cuisine: American
- Diet: Vegetarian
Description
Classic Mint Chocolate Brownies combine rich, fudgy chocolate brownies with a smooth, creamy mint frosting and a glossy chocolate layer on top. Perfectly balanced and decadently layered, these brownies offer a refreshing twist on a traditional favorite, ideal for dessert lovers who enjoy a hint of mint with their chocolate.
Ingredients
Brownies
- 1 cup (16 Tbsp; 226g) unsalted butter
- 8 ounces semi-sweet chocolate, coarsely chopped
- 1 and 1/2 cups (300g) granulated sugar
- 1/2 cup (100g) packed light brown sugar
- 4 large eggs, at room temperature
- 2 teaspoons pure vanilla extract
- 1/2 teaspoon salt
- 1/2 cup + 3 Tablespoons (86g) all-purpose flour (spooned & leveled)
- 1/4 cup (21g) natural unsweetened cocoa powder
Mint Frosting Layer
- 1/2 cup (8 Tbsp; 113g) unsalted butter, softened to room temperature
- 2 cups (240g) confectioners’ sugar
- 2 Tablespoons (30ml) milk
- 1 and 1/4 teaspoons peppermint extract
- optional: 1 drop liquid or gel green food coloring
Chocolate Layer
- 1/2 cup (8 Tbsp; 113g) unsalted butter
- 1 heaping cup (around 200g) semi-sweet chocolate chips
Instructions
- Melt Chocolate and Butter: In a medium saucepan over medium heat, melt the butter and coarsely chopped semi-sweet chocolate together while stirring constantly for about 5 minutes. Alternatively, melt them in a microwave-safe bowl in 20 second increments, stirring after each. Remove from heat and pour into a large mixing bowl, then let cool for 10 minutes.
- Prepare Oven and Pan: Adjust the oven rack to the lower third position and preheat the oven to 350°F (177°C). Line a 9×13-inch baking pan with parchment paper, leaving an overhang on all sides. Set aside.
- Make Brownie Batter: Whisk the granulated sugar and light brown sugar into the cooled chocolate mixture. Add the eggs one at a time, whisking after each until smooth. Stir in the vanilla extract. Gently fold in the salt, all-purpose flour, and cocoa powder until just combined.
- Bake Brownies: Pour the batter into the prepared pan and bake for 36 minutes, or until the edges begin to pull away and a toothpick inserted in the center comes out with a few moist crumbs. Cool completely in the pan on a wire rack. Once cooled, lift the brownies out using the parchment overhang and place on a baking sheet for frosting.
- Prepare Mint Frosting: Using a mixer with paddle attachment, beat softened butter on medium speed for 2 minutes until creamy. Add confectioners’ sugar and milk, beat on low for 2 minutes, then increase to high speed and beat 1 more minute. Mix in peppermint extract and optional green food coloring, then beat on high for 1 minute. Adjust peppermint flavor as desired.
- Frost Brownies: Spread the mint frosting evenly over the cooled brownies on the baking sheet. Refrigerate for at least 1 hour to set the frosting.
- Make Chocolate Layer: Melt butter and semi-sweet chocolate chips over medium heat in a saucepan, stirring constantly for about 5 minutes, or melt in microwave in 20 second increments stirring after each. Pour over the mint layer and gently spread with a knife or offset spatula.
- Chill to Set Chocolate: Return the brownies on the baking sheet to the refrigerator and chill for 1 hour to set the chocolate layer firmly. They can be chilled up to 4 hours or overnight.
- Cut and Serve: Remove brownies from refrigerator, cut into squares using a sharp large knife with quick cuts, wiping the blade clean between cuts for neatness. Serve at room temperature or chilled. Store leftovers covered in refrigerator up to 5 days.
Notes
- Make Ahead & Freezing: Freeze unfrosted baked brownies, thaw overnight in the refrigerator, then frost and add chocolate topping fresh. Alternatively, freeze fully finished brownies and thaw before serving.
- Use quality peppermint extract for authentic mint flavor; avoid mint extract which can taste like spearmint toothpaste.
- For a smaller batch using a 9-inch square pan, halve the frosting and chocolate topping ingredients accordingly.
- Use parchment paper with an overhang to easily lift brownies whole from the pan.
- To achieve neat cuts, use a sharp knife and wipe it clean with a paper towel after each cut.
Nutrition
- Serving Size: 1 brownie
- Calories: 350 kcal
- Sugar: 35 g
- Sodium: 150 mg
- Fat: 22 g
- Saturated Fat: 13 g
- Unsaturated Fat: 8 g
- Trans Fat: 0.5 g
- Carbohydrates: 40 g
- Fiber: 3 g
- Protein: 4 g
- Cholesterol: 70 mg


