

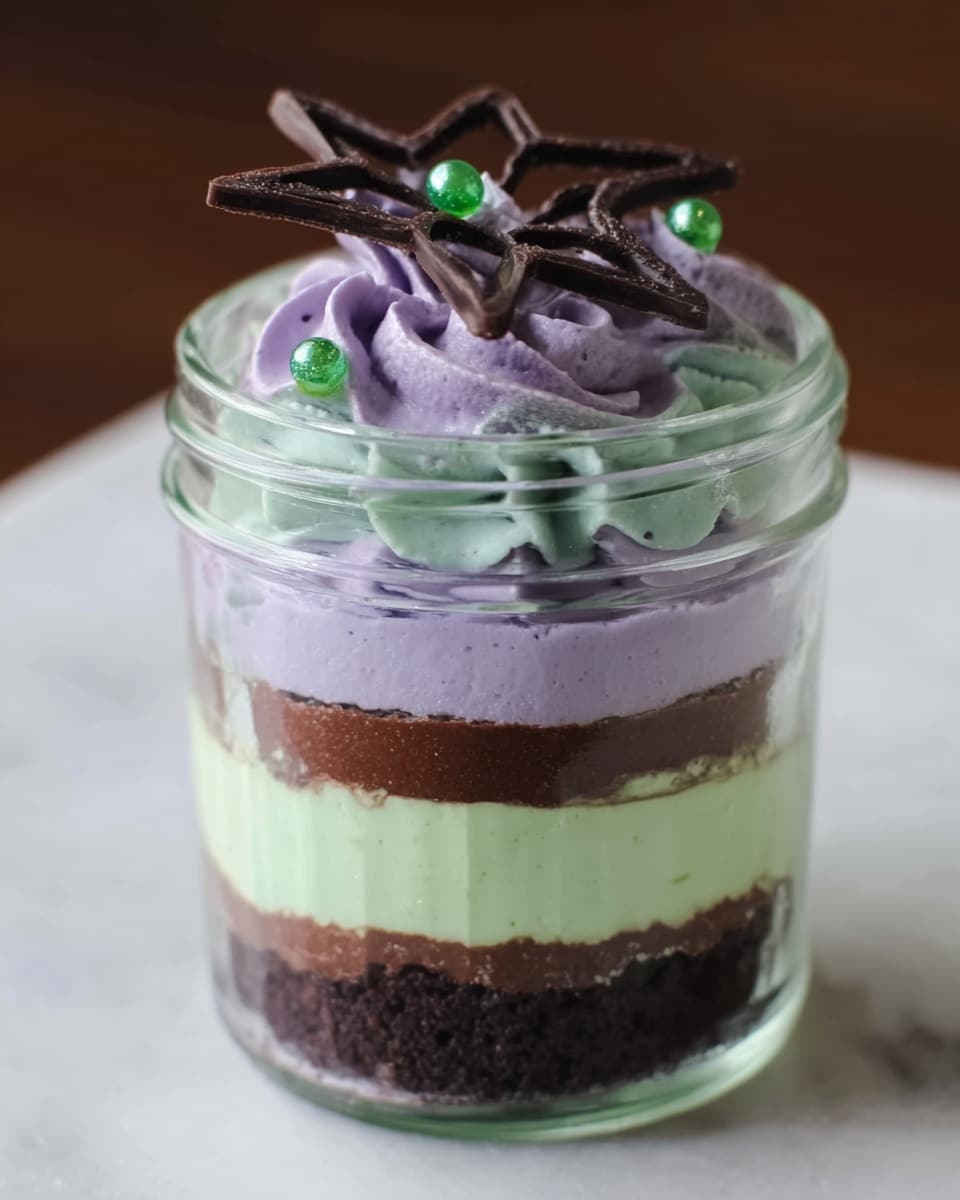
Mason Jar Spider Web Cakes with Purple and Green Frosting Recipe
If you’re anything like me, you love Halloween treats that are both adorable and downright tasty. I’m super excited to share this Mason Jar Spider Web Cakes with Purple and Green Frosting Recipe with you because it’s one of those festive desserts that really steals the show at any spooky gathering. These little mason jar cakes are easy to layer, look so fun with those purple and green swirls, and the spider web chocolate decoration just pulls everything together perfectly. Stick with me—I’ll walk you through everything so you can nail the look and flavor!
Why This Recipe Works
- Perfect Portion Size: Baking these in mason jars means your guests get their own little cake—fun, no mess, and just the right amount.
- Vibrant Frosting Colors: The purple and green frosting not only tastes delicious but also creates that eye-catching, eerie vibe everyone loves.
- Spider Web Detailing: Using melted chocolate to make edible spider webs adds a touch of creativity and impresses without needing fancy tools.
- Simple Ingredients: Using a boxed cake mix and easy-to-find supplies makes this recipe accessible for bakers of all levels.

Ingredients & Why They Work
This recipe keeps things straightforward with simple ingredients that combine for a delicious devil’s food cake base paired with fluffy, creamy frosting. The purple and green add a festive punch, and the chocolate melts are perfect for decorating without fuss.
- Devils Food Chocolate Cake Mix: The rich chocolate flavor is the perfect spooky base, plus it’s easy and consistent.
- Vegetable Oil, Eggs, Water: Following the box instructions ensures your cake layers come out moist and tender every time.
- Butter: Room temperature butter makes for the smoothest, creamiest frosting texture.
- Powdered Sugar: Gives frosting that perfect sweet and silky consistency.
- Marshmallow Cream: Adds extra fluffy sweetness and a dreamy texture to the frosting.
- Vanilla Extract: Boosts flavor depth and balances the sweetness.
- Purple and Green Food Coloring: Creates those fun Halloween colors for your frosting layers.
- Dark Chocolate Candy Melts: Easy to melt and pipe for your spider web decorations.
- Mason Jars (8 oz): Serve as charming little cake holders that are eco-friendly and reusable.
- Ziploc or Piping Bags: For neat and easy frosting application.
- Sprinkles (Optional): Adds an extra pop of festive fun and texture on top.
Make It Your Way
One of my favorite things about this Mason Jar Spider Web Cakes with Purple and Green Frosting Recipe is how customizable it is. You can easily swap out the cake mix for your favorite flavor, change the frosting colors, or even jazz up decorations to suit your theme—or the season.
- Variation: I once swapped out the devil’s food mix for a red velvet one and tinted the frosting pink and black—it was a hit for Valentine’s Day with a spooky twist!
- Dietary Switch: Try using a gluten-free cake mix and dairy-free butter for guests with allergies—I’ve done that and no one missed a beat.
- Seasonal Flare: Instead of spider webs, try piping snowflakes with white chocolate melts during winter holidays for a whole new vibe.
Step-by-Step: How I Make Mason Jar Spider Web Cakes with Purple and Green Frosting Recipe
Step 1: Prep and Bake Your Chocolate Cupcakes
First things first—heat your oven to 350°F. I use regular-size muffin pans lined with paper baking cups, which keeps my cupcakes from sticking and makes them easier to halve later on. Mix up your devil’s food cake batter exactly as the box directs, using the recommended amount of oil, eggs, and water. Pour the batter into the cups until they’re about two-thirds full to give them room to rise without overflowing. Bake for about 18 minutes or until a toothpick comes out clean. Once out, set them on a cooling rack—don’t rush this; cool cupcakes frost better and slice easier without crumbling.
Step 2: Whip Up That Marshmallow Buttercream
While your cupcakes cool, it’s frosting time. Using a stand mixer or hand mixer, cream one cup of room temperature butter until smooth and silky. Add the 7 oz jar of marshmallow cream next, mixing until fluffy. Now, slowly blend in two cups of powdered sugar and a teaspoon of vanilla extract. Beat it all for about 4 minutes so your frosting is perfectly blended and heavenly light—not dense or gritty.
Step 3: Color Your Frosting
Divide your frosting evenly into two bowls. To one, add 3 drops of purple food coloring; to the other, 3 drops of green. Mix each well, adding a drop or two more if you want deeper color. Remember, a little goes a long way!
Step 4: Build Your Layers in Mason Jars
Carefully remove the paper liners from your cooled cupcakes. Slice each cupcake horizontally so you get two thin layers. Place the first half at the bottom of each 8 oz mason jar. Spoon your purple frosting into a Ziploc or piping bag, snip a small corner, and pipe a generous swirl over the cake layer. If you want, sprinkle a few candies or sprinkles on top for some extra texture and color. Repeat with the green frosting and the other cupcake half, finishing with a final layer of frosting and sprinkles on top. The layering is not just tasty but really cute to look at through the jar.
Step 5: Create Your Spider Web Decorations
Here’s the fun artistic part! Draw or print a spider web design on a sheet of paper, then lay wax paper on top. Melt your dark chocolate candy melts in short 30-second bursts in the microwave—be patient here, stirring in between to avoid burning. Pour the melted chocolate into a piping bag or a small Ziploc with a tiny tip cut. Carefully trace the web design on the wax paper and let them cool and harden completely. Once set, slide your chocolate spider webs gently into the top of each jar or lean them against the inside rim for a spooky effect.
Tips from My Kitchen
- Cool Completely Before Frosting: Warm cupcakes will melt your frosting, making it runny instead of pretty layers.
- Use a Sharp Knife to Slice: I’ve found a serrated knife works best to get clean, even cake layers without crumble.
- Piping Bag Control: Don’t overfill your bag—this helps you pipe frosting smoothly without a mess.
- Chocolate Web Patience: Let your chocolate webs harden fully at room temp; refrigeration can cause sweating and make them brittle.
How to Serve Mason Jar Spider Web Cakes with Purple and Green Frosting Recipe
Garnishes
I love toppling these jars with a few whimsical garnishes like mini candy spiders, edible glitter, or even some orange and black Halloween sprinkles. It just makes them feel extra festive. Once, I added a tiny plastic spider on the jar lid for a playful surprise—it went down a treat with the kids!
Side Dishes
Since these cakes are rich and chocolatey, I like serving them with light sides like fresh fruit skewers or a tangy citrus punch to balance out the sweetness. If you’re at a party, some salty popcorn or roasted pumpkin seeds make a fun combo.
Creative Ways to Present
For Halloween parties, I’ve arranged these mason jar spider web cakes inside a decorated wooden crate filled with faux spider webs and tiny LED lights. It really amplifies the spooky atmosphere. Another fun idea is tying a black ribbon or twine around the jars with a cute tag—personalized treats that double as favors!
Make Ahead and Storage
Storing Leftovers
I keep these mason jar cakes refrigerated, covered tightly with a lid or plastic wrap. They stay moist and fresh for up to 3 days. Leaving the spider web decorations off until serving helps them avoid getting soggy or sticky.
Freezing
If you want to prep ahead, I recommend freezing the unfrosted cake layers separately, wrapped well to avoid freezer burn. The frosting can be frozen in airtight containers too. Once thawed, assemble your jars and add the decorations. This helped me when prepping for a big Halloween party last year—total lifesaver.
Reheating
For the best texture, I generally don’t reheat these cakes. But if you want to, just let the jar come to room temp for about 30 minutes before eating, which brings the frosting and cake back to softness without losing that fresh-from-the-oven vibe.
FAQs
-
Can I use homemade cake instead of box mix for Mason Jar Spider Web Cakes with Purple and Green Frosting Recipe?
Absolutely! While the boxed devil’s food mix is a quick and reliable option, homemade chocolate cake works beautifully as well. Just make sure your cake layers are firm enough to slice and hold up in the jars.
-
What if I don’t have purple or green food coloring?
No worries! You can use any colors you like or have on hand. Orange and black are classic for Halloween, but even a pastel palette could be cute—adjust the colors to suit your vibe or event.
-
How long do the spider web chocolate decorations last?
If stored in a cool, dry place, those lovely chocolate spider webs can last up to a week. Just avoid humidity which can make them melt or get sticky.
-
Can these Mason Jar Spider Web Cakes be made gluten-free?
Yes! Simply use a gluten-free devil’s food cake mix and make sure your other ingredients are gluten-free too (which most of them are). It’s a great way to include everyone at your gathering.
Final Thoughts
This Mason Jar Spider Web Cakes with Purple and Green Frosting Recipe really has a special place in my seasonal baking lineup. It’s fun to make, easier than it looks, and always gets big smiles. Plus, serving cake in mason jars just makes everything feel cozier and more personal. If you’re looking for a recipe that combines playful presentation with delicious taste, this one is it. I can’t wait for you to try it out and add your own twists!
Print
Mason Jar Spider Web Cakes with Purple and Green Frosting Recipe
- Prep Time: 25 minutes
- Cook Time: 20 minutes
- Total Time: 45 minutes
- Yield: 8 servings
- Category: Dessert
- Method: Baking
- Cuisine: American
- Diet: Vegetarian
Description
Delightfully fun and festive Mason Jar Cakes made with rich Devils Food Chocolate Cake, layered with creamy marshmallow frosting tinted in vibrant purple and green, topped with chocolate spider web decorations and sprinkles. Perfect for parties, gifts, or a charming dessert presentation.
Ingredients
Cake
- 1 box Devils Food Chocolate Cake mix
- Oil, as directed on box
- Eggs, as directed on box
- Water, as directed on box
Frosting
- 1 cup room temperature butter
- 2 cups powdered sugar
- 1 7 oz jar marshmallow cream
- 1 teaspoon vanilla extract
- Food coloring: purple and green (3 drops each)
Decorations
- 1 bag dark chocolate candy melts
- Sprinkles (optional)
Supplies
- 8 oz mason jars
- Ziploc or piping bags
- Paper baking cups
- Wax paper
Instructions
- Preheat oven: Heat your oven to 350 degrees Fahrenheit to prepare for baking the cupcakes.
- Prepare cupcake pans: Place paper baking cups inside each regular-sized muffin cup to prevent sticking.
- Mix cake batter: Prepare the Devils Food Cake batter as directed on the box using the specified amounts of water, oil, and eggs.
- Bake cupcakes: Pour batter into muffin cups and bake for approximately 18 minutes according to box instructions. Check doneness with a toothpick.
- Cool cupcakes: Remove cupcakes from oven and pan, then allow them to cool completely to room temperature.
- Make frosting: Cream the room temperature butter in a mixer until smooth. Add marshmallow cream and mix well. Gradually add powdered sugar and vanilla extract, mixing about 4 minutes until well blended.
- Color frosting: Divide the frosting evenly into two bowls. Add 3 drops of purple food coloring to one bowl and mix thoroughly; add 3 drops of green food coloring to the other bowl and mix.
- Prepare cake layers: Remove paper baking cups from the cupcakes. Cut each cupcake horizontally into two halves.
- Assemble jars: Place one cupcake half into the bottom of each mason jar. Pipe purple frosting over the cake layer using a Ziploc or piping bag. Add sprinkles or candy melts as desired.
- Layer again: Add the second cupcake half on top of the frosting. Repeat piping with green frosting, topping with sprinkles or candy.
- Make chocolate webs: Place wax paper over a printed or drawn spider web template. Melt dark chocolate candy melts in 30-second intervals in the microwave until smooth. Transfer melted chocolate to a Ziploc bag, cut a small tip off, and carefully trace spider web designs onto the wax paper. Let chocolate harden completely.
- Decorate jars: Once the chocolate spider webs have hardened, place them on top of the mason jars for a spooky and elegant finish.
Notes
- Use room temperature butter for smooth frosting consistency.
- Ensure cupcakes are completely cooled before frosting to avoid melting.
- Chocolate spider webs can be made ahead and stored in a cool place for convenience.
- If food coloring is not desired, frosting can be left white or colored with natural alternatives like beet or spinach powder.
- Replace sprinkles with crushed candy canes or nuts for different textures and flavors.
- Use disposable or reusable mason jars depending on occasion and preference.
Nutrition
- Serving Size: 1 jar (approximately 150g)
- Calories: 380 kcal
- Sugar: 35 g
- Sodium: 220 mg
- Fat: 18 g
- Saturated Fat: 9 g
- Unsaturated Fat: 7 g
- Trans Fat: 0 g
- Carbohydrates: 52 g
- Fiber: 2 g
- Protein: 3 g
- Cholesterol: 50 mg


