

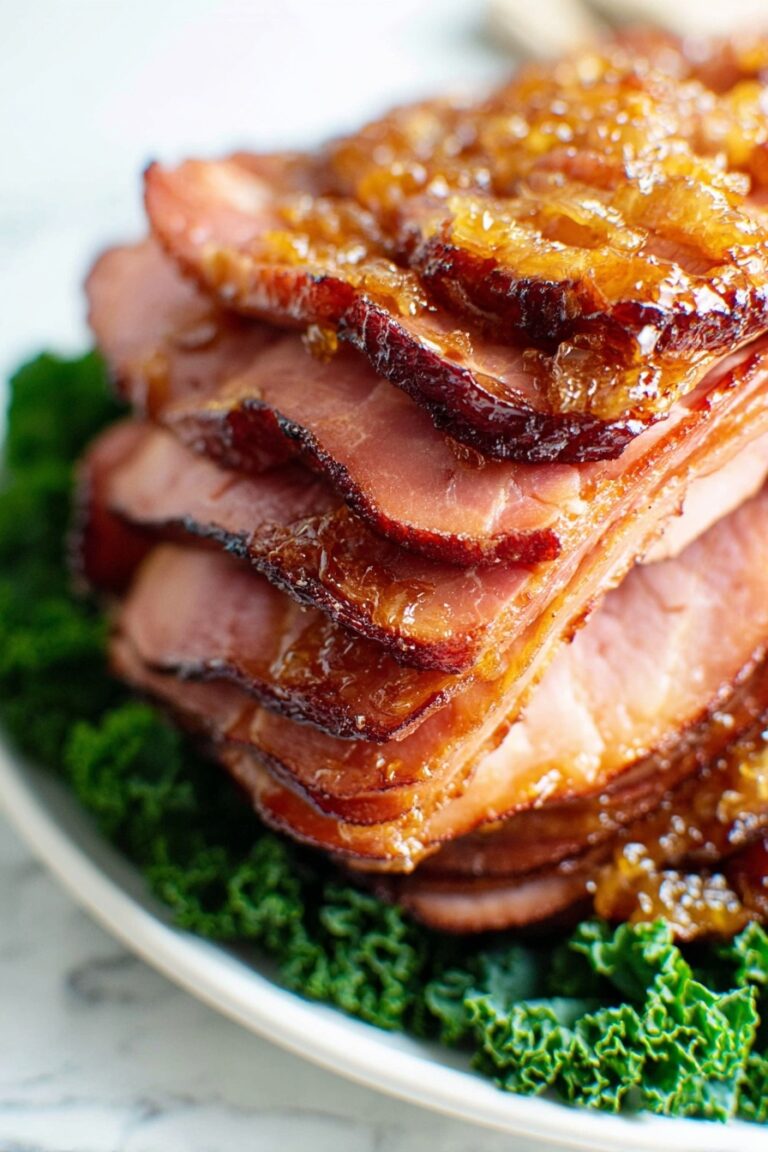
Homemade Pastrami Recipe
If you’ve ever fallen in love with that perfectly spiced, tender, melt-in-your-mouth deli-style meat, then you’re in for a treat. This Homemade Pastrami Recipe is an absolute game-changer—you get all the rich, smoky flavors without needing a smoker or complicated equipment. I promise, once you try this, you’ll wonder why you ever bought pastrami pre-made. Let’s take that humble corned beef and turn it into something spectacular, one spice-crusted slice at a time.
Why This Recipe Works
- Simple starting point: Using store-bought corned beef keeps things accessible without sacrificing flavor or texture.
- Flavor-packed spice rub: A clever blend of pepper, coriander, smoked paprika, and more infuses every slice with that classic pastrami punch.
- Low and slow cooking: Slow cooking tenderizes the meat and lets all those spices meld beautifully, making slicing easier and results juicier.
- Oven bake finish: Baking sets the crust to perfection, giving you that signature pastrami bark without drying the meat out.

Ingredients & Why They Work
The magic of this Homemade Pastrami Recipe lies in the balance between a high-quality corned beef base and a vibrant, aromatic spice mix. Each ingredient plays a role in building those layers of flavor you expect from pastrami, and a few shopping tips will help you pick the best beef and spices.

- Corned beef: Make sure to get a good-quality piece with a thick fat cap—it keeps the meat moist and adds richness during cooking.
- Fresh coarsely ground black pepper: This is the star of the crust and brings that peppery bite pastrami is loved for; fresh grinding is key for maximum aroma.
- Coriander powder: Adds a citrusy, slightly nutty warmth that balances the pepper’s heat.
- Mustard powder: Gives a subtle tang and depth typical in deli-style pastrami.
- Brown sugar: Just the right touch of sweetness to contrast and enhance the spices.
- Smoked paprika: Delivers a gentle smoky note without needing an actual smoker—one of my favorite shortcuts.
- Garlic and onion powder: Classic aromatics that round out the flavor profile, ensuring no bite is dull.
- Liquid smoke (optional): If you want a bolder smokiness, this is a handy addition, but I usually skip it to keep things more natural.
Make It Your Way
One of my favorite things about this Homemade Pastrami Recipe is how easy it is to tweak for your own kitchen style or taste buds. Feel free to play around with the spice amounts or cooking methods until it feels just right for you.
- Liquid Smoke Variation: When I first started making pastrami at home, I was all in on the liquid smoke to mimic the deli flavor. Now I prefer to leave it out and let the smoked paprika and slow cooking do the job—less artificial, more authentic to my taste.
- Cooking Method Swap: If you don’t have a slow cooker, using an electric pressure cooker is a fabulous shortcut. I love how it cuts down cooking time while keeping everything tender and flavorful.
- Spice Mix Experiment: Try adding a pinch of crushed red pepper flakes if you want a little heat, or some ground fennel seed for a sweet anise twist—I’ve done both and loved the results!
Step-by-Step: How I Make Homemade Pastrami Recipe
Step 1: Spice It Up and Prep the Beef
First things first, mix all your spices—black pepper, coriander, mustard powder, brown sugar, smoked paprika, garlic powder, and onion powder—on a tray. Pat your corned beef dry with paper towels; a dry surface helps the spice rub stick better. Then, press that spice mix all over the beef, coating every inch. If you decide to use liquid smoke, sprinkle it on now, but I tend to skip this step because the smoked paprika does such a great job on its own.
Step 2: Wrap and Slow Cook
Place the beef fat cap side down on a large sheet of foil, wrap tightly, then add a second sheet of foil and flip the beef so the fat cap is now on top. The foil wrapping locks in the moisture and helps tenderize the meat during cooking. Next, set a rack inside your slow cooker (or create one with wadded foil balls) to keep the beef off the bottom so it doesn’t cook in its juices. Pop it in and slow cook on low for about 10 hours—yes, it’s a long wait, but it’s worth every minute! If you’re using an electric pressure cooker, cook it on high pressure for 1 hour and 40 minutes instead.
Step 3: Cool and Chill
Once your pastrami is cooked, carefully remove it and let it cool down. Then refrigerate it for at least 6 hours—or even better, overnight. Chilling the meat firms it up, making slicing a breeze and preventing it from falling apart. Don’t throw away the cooking juices! They’re liquid gold for reheating and keeping your pastrami juicy.
Step 4: Bake to Set the Crust
Unwrap your chilled pastrami and place it on a baking rack set over a tray. Bake at 180°C (350°F) for about 30 minutes. This step sets the spice crust and develops that classic pastrami texture you crave. Make sure not to overbake—you’re just aiming to firm up the crust, not cook the meat more. After baking, let it cool slightly before slicing thinly with a sharp knife.
Step 5: Serve and Enjoy!
Serve your pastrami slices warm, spoon over a little reserved juice to keep them moist, and if you fancy, melt some Swiss cheese on top while reheating. I love making a New York deli-style pastrami sandwich with toasted rye bread, plenty of spicy mustard, crunchy pickles on the side, and classic potato crisps to complete the experience. Nothing beats biting into that perfect sandwich after all the effort you put in!
Tips from My Kitchen
- Dry Beef Thoroughly: Patting the corned beef dry before applying the spice mix really helps the spices adhere and form that beloved crust.
- Don’t Skip the Chill: Refrigeration post-cooking is a game-changer for slicing; warm pastrami tends to crumble, so patience pays off here.
- Use a Sharp Knife: Thin, even slices make all the difference when serving; a bread knife or carving knife works perfectly.
- Reserve Cooking Juices: These juices are perfect for reheating and add moisture – don’t pour them out!
How to Serve Homemade Pastrami Recipe

Garnishes
I’m a big fan of keeping it classic with garnishes—think spicy brown mustard, crunchy dill pickles, and some tangy sauerkraut if you’re feeling adventurous. These add that sharpness and crunch that play perfectly with the pastrami’s rich, tender slices.
Side Dishes
Nothing rounds out this pastrami experience better than crisp kettle-cooked potato chips or a simple coleslaw for some freshness. For a heartier meal, creamy macaroni salad or even a bowl of matzo ball soup hits the spot wonderfully.
Creative Ways to Present
For special occasions, I love turning slices of homemade pastrami into sliders with melted Swiss and a smear of Russian dressing—little bites of deli heaven that are sure to impress guests. You can even roll thin slices around pickles or cheese for fun appetizer platters. Trust me, it’s always a hit!
Make Ahead and Storage
Storing Leftovers
I always keep leftover pastrami tightly wrapped in the fridge and consume it within 4-5 days. Wrapping slices in parchment paper before a loose foil seal helps maintain moisture without making them soggy. This way, the pastrami stays tender and flavorful for several days.
Freezing
If you want to freeze some pastrami (and honestly, why wouldn’t you want to?), slice it first, then freeze in single layers between sheets of wax paper or parchment in an airtight container or freezer bag. This keeps slices from sticking together, and thawing only what you need is so convenient.
Reheating
The best way I’ve found to reheat leftover pastrami is by placing slices in a microwave-safe dish, drizzling a small amount of reserved juices over them, covering with a lid or damp paper towel, and microwaving in short bursts until warmed through. This keeps the meat moist and tender instead of drying it out.
FAQs
-
Can I make homemade pastrami without a smoker?
Absolutely! This recipe is designed specifically for that. By using smoked paprika and optionally liquid smoke, plus slow cooking and oven baking, you get the signature smoky flavor and tender texture of pastrami without needing a traditional smoker.
-
What cut of beef should I use for homemade pastrami?
The best cut to start with is a good quality corned beef brisket with a thick fat cap. The fat keeps the meat moist during the long slow cook. Store-bought corned beef brisket is a convenient and economical option that already has a good brine base for pastrami.
-
How thin should I slice homemade pastrami?
Thin slices are key to capturing that authentic pastrami experience. Aim for slices about 1-2 millimeters thick. Chilling the meat before slicing helps achieve neat slices without crumbling, and using a sharp knife makes the process smooth.
-
Can I make this recipe ahead of time?
Definitely! In fact, chilling the cooked pastrami overnight improves slicing and flavor. You can prepare it a day or two ahead, then slice, reheat, and serve when ready. It also stores well in the fridge for several days or can be frozen.
Final Thoughts
Making pastrami at home might seem a little intimidating at first, but trust me, this Homemade Pastrami Recipe is the perfect introduction. It’s like bringing a classic New York deli right into your kitchen, tailored exactly to your taste and timing. I’ve made countless sandwiches and shared this with friends who were blown away by how approachable and delicious it is. So, grab that corned beef, mix up your spices, and get ready to wow yourself—your deli cravings just found their match!
Print
Homemade Pastrami Recipe
- Prep Time: 20 minutes
- Cook Time: 11 hours
- Total Time: 11 hours 20 minutes
- Yield: 9 servings
- Category: Main Course
- Method: Slow Cooking
- Cuisine: American
Description
This homemade pastrami recipe replicates traditional deli flavors without requiring a smoker. Starting with a good quality corned beef, the meat is coated with a robust spice mix, slow cooked or pressure cooked until tender, chilled to firm up for easier slicing, and finished with a brief bake to set the spice crust. Serve warm slices piled high on rye bread with mustard and pickles for a classic New York deli-style pastrami sandwich experience.
Ingredients
Main Ingredient
- 4 lbs corned beef with a thick fat cap
Spice Mix
- 4 tbsp fresh coarsely ground black pepper
- 2 tbsp coriander powder
- 1 1/2 tsp mustard powder
- 1 tbsp brown sugar
- 1 tbsp smoked paprika
- 2 tsp garlic powder
- 2 tsp onion powder
- 2 tbsp liquid smoke (optional)
Instructions
- Prepare the Spice Mix: Combine black pepper, coriander powder, mustard powder, brown sugar, smoked paprika, garlic powder, and onion powder in a bowl. Spread the mixture out on a tray for easy rolling.
- Coat the Beef: Pat the corned beef dry with paper towels. Roll the beef in the spice mix thoroughly, ensuring all sides are evenly coated. If using, sprinkle liquid smoke evenly over the beef.
- Wrap the Beef: Place the beef fat cap side down on a large sheet of foil and wrap tightly. Repeat with a second sheet of foil, then flip the wrapped beef so the fat cap is on top.
- Slow Cook or Pressure Cook: Place a rack inside your slow cooker or pressure cooker to elevate the beef. Set the wrapped beef on the rack, then slow cook on low for 10 hours or pressure cook for 1 hour 40 minutes.
- Cool and Refrigerate: Carefully remove the beef from the cooker and reserve the cooking juices. Let the beef cool, then refrigerate uncovered for at least 6 hours or overnight to firm up for slicing.
- Bake to Set the Crust: Preheat the oven to 180C (350F). Unwrap the beef and place it on a rack set over a baking tray. Bake for 30 minutes until the spice crust sets. The center should remain cold for easier slicing.
- Slice and Serve: Thinly slice the pastrami against the grain. Place slices in a dish and spoon over some of the reserved cooking juices. Cover and warm in the microwave; optionally add a slice of Swiss cheese.
- Assemble Sandwiches: For authentic New York deli style, pile warm pastrami on toasted rye bread with plenty of mustard. Serve with pickles and plain potato crisps for a full deli experience.
Notes
- Use good-quality store-bought corned beef with a thick fat cap for best results. In the UK, use salt beef or pickled beef instead of canned corned beef.
- Elevate the beef off the bottom of the cooker using a rack or scrunched foil balls to ensure even cooking and prevent the bottom from cooking in liquid.
- If using an electric pressure cooker, typically no added liquid is needed as corned beef releases moisture; if the cooker does not reach pressure, add 1/2 cup water.
- For stovetop pressure cookers, add 1/2 cup of water before cooking.
- Oven method (not tested): wrap beef with extra foil, add 1/2 cup water to pan, place beef on a rack in the pan, cover tightly, and bake at 110C (225F) for about 6 hours.
- Slow cooking tenderizes meat and lets spice flavors infuse; chilling makes slicing easier and baking seals the crust without reheating the interior.
- Expect the corned beef to shrink by about 30% during cooking; 4 lbs yields approximately 2.8 lbs cooked meat, enough for about 9 servings at 10 oz each for large sandwiches.
- Store leftovers up to 5 days in the refrigerator; reheat slices gently before serving.
Nutrition
- Serving Size: 100 g
- Calories: 250 kcal
- Sugar: 2 g
- Sodium: 900 mg
- Fat: 15 g
- Saturated Fat: 5 g
- Unsaturated Fat: 9 g
- Trans Fat: 0 g
- Carbohydrates: 3 g
- Fiber: 1 g
- Protein: 23 g
- Cholesterol: 75 mg


