

Homemade Coconut Cream Pie Recipe
If you’re craving a slice of tropical heaven, you absolutely have to try this Homemade Coconut Cream Pie Recipe. Trust me, it’s not just any pie — it’s the perfect blend of creamy, rich coconut filling nestled in a flaky crust, topped with clouds of whipped cream and a sprinkle of toasted coconut. I love making this for gatherings because everyone always asks for seconds, and I’m pretty sure you’ll feel the same way once you take that first luscious bite. Stick with me, and I’ll guide you through every step to nail this fan-freaking-tastic dessert right in your own kitchen!
Why This Recipe Works
- Flaky Crust Base: Blind baking ensures a crisp crust that holds up to the rich, creamy filling without getting soggy.
- Custard Perfection: The combination of egg yolks and cornstarch thickens the coconut milk mixture into a silky pudding without lumps.
- Flavor Balance: A touch of vanilla and optional coconut extract amplifies the tropical notes without overwhelming.
- Whipped Cream Finish: Lightly sweetened whipped cream and toasted coconut provide the ideal airy contrast to the dense filling.

Ingredients & Why They Work
Each ingredient in this Homemade Coconut Cream Pie Recipe plays a special role — from that tender pie crust foundation to the rich, creamy coconut custard. Shopping smart can really elevate your pie, so here’s a quick rundown to help you pick the best ingredients.
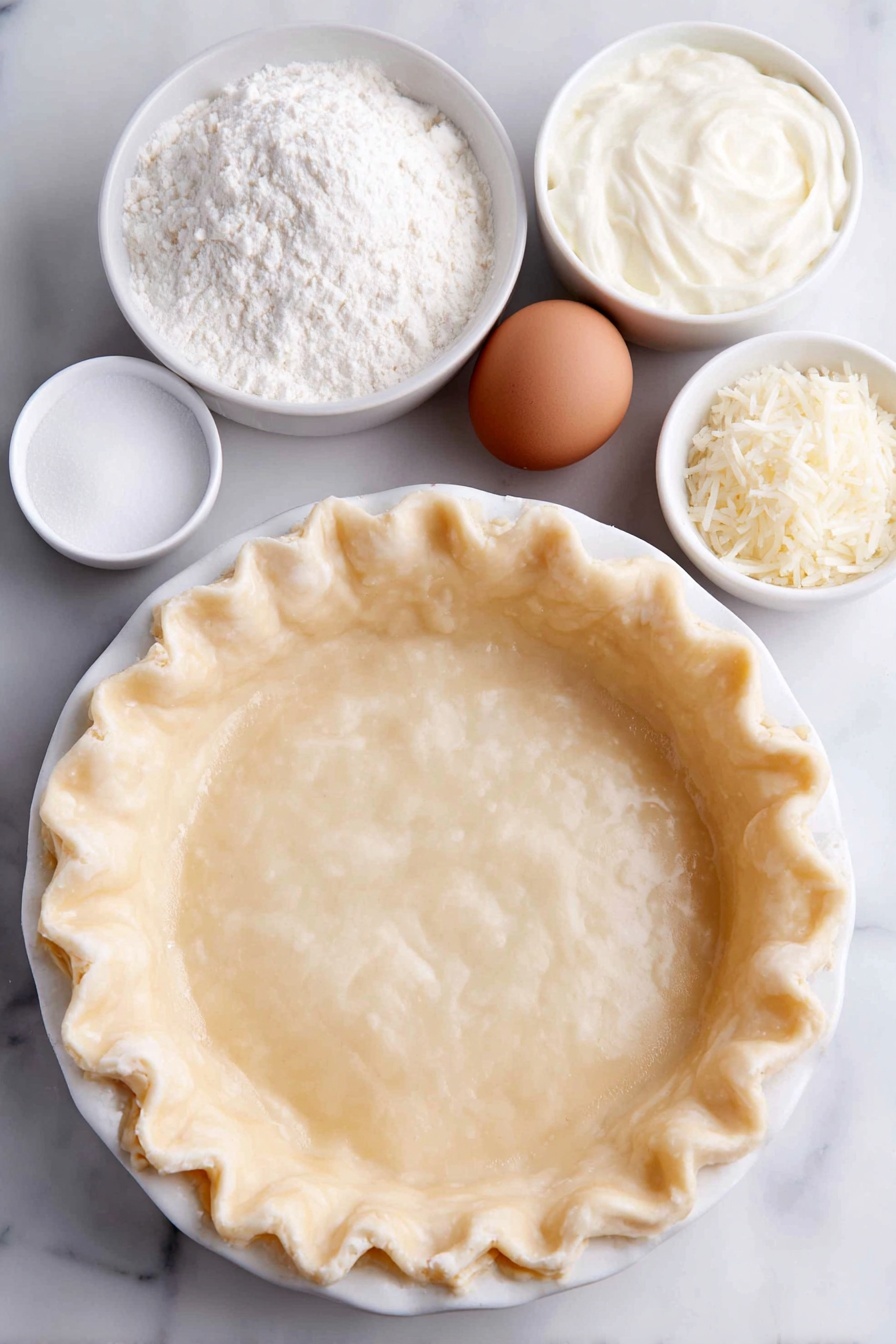
- Pie Crust: A flaky, buttery crust is crucial; I love using homemade or high-quality store-bought for convenience and that perfect tender bite.
- Egg Yolks: They thicken the custard, giving it richness and smooth texture without curdling if you handle them with care.
- Cornstarch: This is your thickening agent alongside the egg yolks; it stabilizes the filling beautifully.
- Full Fat Coconut Milk: Use canned, full-fat coconut milk for creaminess and authentic coconut flavor—not the watery refrigerated carton kind.
- Half-and-Half: Adds balance by tempering the coconut’s richness while keeping the creaminess intact.
- Sugar: Sweetens without overpowering; granulated sugar blends seamlessly into the filling and whipped cream.
- Salt: Enhances all the flavors — never skip it even in sweet recipes!
- Sweetened Shredded Coconut: Adds texture and bursts of coconut flavor within the custard itself.
- Unsalted Butter: Makes the filling luscious and velvety.
- Vanilla Extract: Deepens the flavor; a staple in any good cream pie.
- Coconut Extract (optional): If you want to dial up the coconut punch without adding more actual coconut, this is your friend.
- Heavy Cream: For that cloud-like whipped topping that’s not too sweet but oh so indulgent.
- Confectioners’ or Granulated Sugar (for Whipping): Either works fine; confectioners’ blends in smoother, but granulated is perfectly fine in small amounts.
- Coconut Toppings (optional): Toasted flakes or chips add crunch and decorative flair.
Make It Your Way
This Homemade Coconut Cream Pie Recipe is one I love tweaking depending on my mood or the occasion. It’s your canvas! Feel free to make it richer, lighter, more coconutty, or even dairy-free with a few easy adjustments.
- Variation: For a tropical twist, try folding in fresh diced pineapple or mango chunks just before chilling—the fruity pops add a refreshing contrast I adore during summer BBQs.
- Dairy-Free: Use coconut cream instead of half-and-half and whip up coconut-based whipped topping; it’s a bit softer but still delightful.
- Extra Toasted Coconut: Sprinkle extra toasted coconut on top of the whipped cream for texture and toasty flavor that never fails to impress guests.
- Less Sweet: If you prefer something less sugary, dial back the sugar by about a quarter cup; the natural sweetness from coconut shines through nicely.
Step-by-Step: How I Make Homemade Coconut Cream Pie Recipe
Step 1: Prepare and Blind Bake Your Pie Crust
I like to make the pie dough a day ahead—it really chills and gets easier to roll out that way. After rolling it into your pie dish, I blind bake it at 375°F (190°C) until golden and crisp. This step is key because it prevents a soggy crust once you add the custard. Pro tip: crimp or flute the edges for a pretty finish. Once baked, cool the crust completely. You can even make this crust up to three days ahead, tightly wrapped in the fridge.
Step 2: Whisk Egg Yolks and Cornstarch
In a small bowl, vigorously whisk your egg yolks and cornstarch until smooth and no lumps remain. This combo is what sets your custard up for that satisfying thick, silky texture. Set this mixture aside while you heat the liquids.
Step 3: Heat Coconut Milk Mixture
Combine the full-fat coconut milk, half-and-half, granulated sugar, and salt in a medium saucepan over medium heat. Whisk occasionally and bring to a gentle boil, then let it boil for 2 full minutes. This heating helps the sugar dissolve completely and activates the thickening power in the next step.
Step 4: Temper the Egg Mixture
This part’s a little delicate but I promise it’s doable with patience! Slowly pour about half a cup of the hot coconut mixture into your egg yolk and cornstarch bowl in a thin stream, whisking constantly. This warms the eggs gently so they don’t scramble. Once tempered, pour this egg mixture back into the saucepan in a steady stream while whisking vigorously. The mix will bubble and thicken quickly—stand back!
Step 5: Cook and Stir Until Thickened
Keep whisking and cooking the custard for about 1 minute and 30 seconds on medium-low heat after adding the eggs. You want it to be thick enough to hold its shape but smooth—not a spoonful that runs off too fast. Remove from heat and immediately stir in the shredded coconut, softened butter, vanilla, and coconut extract if you’re using it.
Step 6: Chill the Filling in the Crust
Pour that lovely warm filling into your cooled pie crust. Cover the surface directly with plastic wrap to prevent a skin from forming—that little trick changed my pie game! Pop it into the fridge for at least 3 hours, or overnight if you want the best texture and flavor development.
Step 7: Whip Up the Perfect Topping
When you’re ready, whip cold heavy cream with sugar and vanilla using a mixer until you get soft to medium peaks—the sweet spot for spreading or piping on your pie. I love piping mine with a star tip for that picture-perfect finish, but spreading works just as well.
Step 8: Garnish and Serve
Top with your whipped cream, then sprinkle a generous handful of toasted coconut flakes or sweetened shredded coconut. This adds that gorgeous texture and extra coconut flavor that folks rave about. Serve immediately, or chill for a few hours uncovered for a nice firm topping.
Tips from My Kitchen
- Don’t Rush the Tempering: Pour hot liquid slowly into egg yolks and whisk constantly to avoid scrambled eggs in your filling.
- Cover Custard With Plastic Wrap: Press the wrap directly onto the pudding surface to prevent a skin from forming—that smooth top is worth it!
- Use Full-Fat Coconut Milk: It makes all the difference in richness and flavor, so skip the light or carton coconut milks.
- Toast the Coconut Flakes: A quick triple toasting in the oven transforms the flavor and brings great crunch.
How to Serve Homemade Coconut Cream Pie Recipe
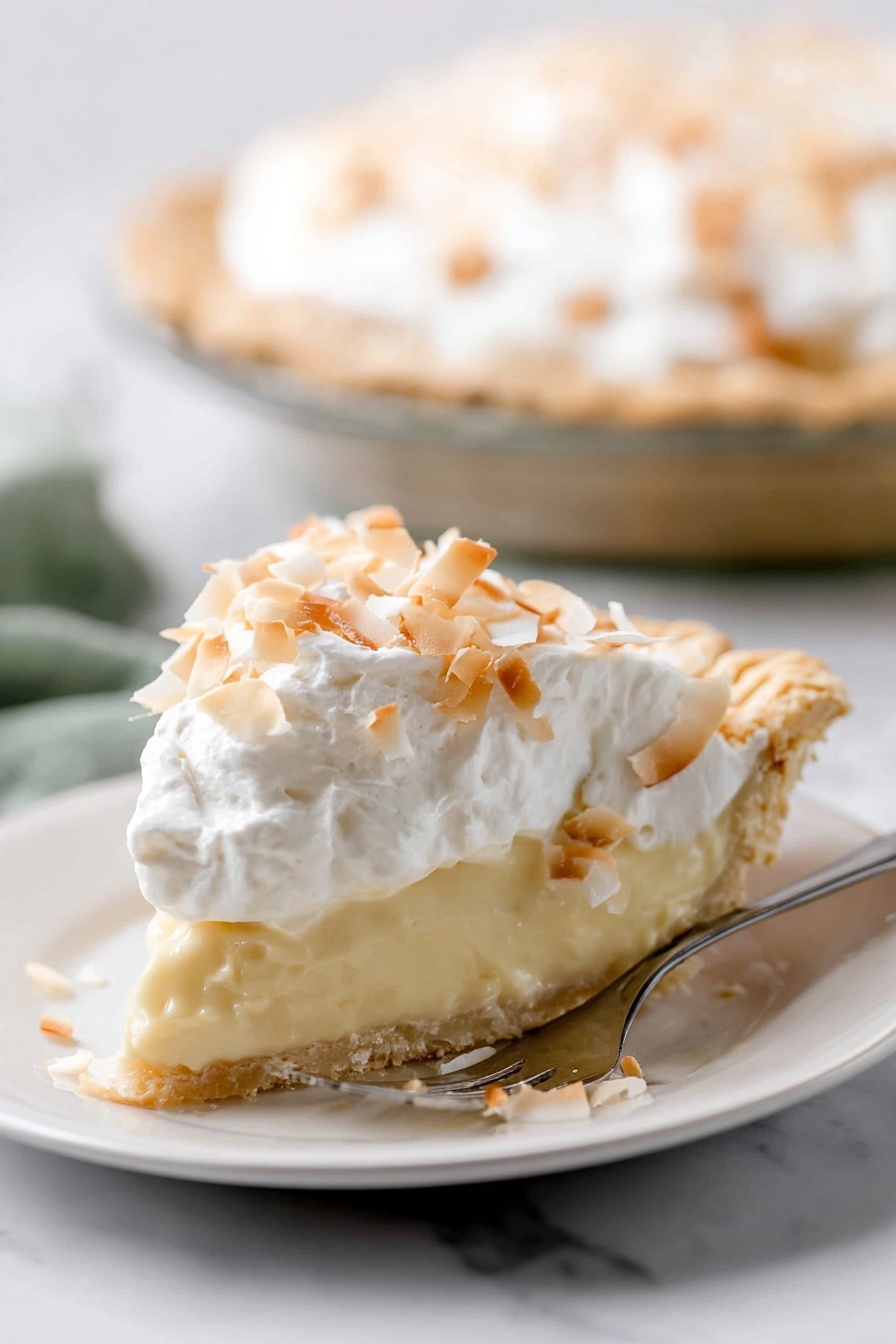
Garnishes
I like to keep it classic by sprinkling toasted unsweetened coconut flakes on top—they look stunning and bring that toasty crunch I adore. Sometimes, if I’m feeling fancy, I add a few coconut chips or a light dusting of edible gold dust for a celebration. Fresh pineapple slices on the side can also elevate the experience if you want to add a fruity flair.
Side Dishes
This pie is a dessert star on its own, but I’ve enjoyed pairing it with a simple fresh fruit salad or a lightly brewed cup of coffee to balance the sweetness. For a special brunch, it goes beautifully alongside grilled tropical fruits or even coconut macaroons for fellow coconut lovers.
Creative Ways to Present
For birthdays or holidays, piping the whipped cream in rosettes or scalloped borders elevates the look instantly. I also love serving individual coconut cream pies in mini tart pans for parties—it makes sharing easier and everyone feels special having their own pie. Adding edible flowers or colorful coconut flakes on top creates that wow-factor every time!
Make Ahead and Storage
Storing Leftovers
Once your pie is topped and ready, cover it loosely with plastic wrap or store it in an airtight container and keep it refrigerated. It stays fresh for up to 5 days, though honestly, in my house, it never lasts that long! Just be sure to keep the whipped cream protected so it doesn’t absorb fridge odors.
Freezing
I’ve frozen this pie at the custard-filled stage (before adding whipped cream) by letting the filling cool completely, then covering with plastic wrap and freezing up to 3 months. When you’re ready to serve, thaw in the fridge overnight and whip your cream topping fresh. This way, you can prep in advance without sacrificing quality.
Reheating
This pie is best served chilled, so reheating isn’t needed. If you want a slightly softer filling after refrigeration, just let the pie sit out at room temperature for about 15 minutes before slicing—this softens the custard perfectly without melting the whipped cream.
FAQs
-
Can I use store-bought pie crust for this Coconut Cream Pie?
Absolutely! A high-quality pre-made pie crust works well and cuts down prep time. Just make sure to blind bake it fully as specified so it stays crispy when filled.
-
What’s the best coconut milk to use for this recipe?
Use canned full-fat coconut milk with no added sugars—this is thick and creamy, perfect for a rich filling. Avoid carton coconut milk which is thinner and meant for drinking.
-
Can I make this pie vegan or dairy-free?
Yes! Substitute half-and-half with additional coconut cream or a plant-based milk, and swap butter with a vegan alternative. For the whipped topping, use coconut whipped cream made from chilled coconut cream for a lovely dairy-free finish.
-
How do I avoid a grainy custard filling?
Temper your egg yolks slowly by whisking in hot liquid in small amounts and keep whisking constantly while cooking. This prevents scrambling and ensures a smooth texture.
-
How long can I prepare this pie in advance?
You can prepare the pie crust up to 3 days ahead and the filled pie can be chilled for up to 1 day before adding whipped cream and serving. For longer storage, freeze the pie after step 5 for up to 3 months.
Final Thoughts
This Homemade Coconut Cream Pie Recipe holds a special place in my heart—not just because it’s a showstopper at gatherings, but because it’s a recipe that feels like a warm hug in dessert form. The way the creamy coconut filling pairs with the crisp crust and fluffy whipped topping is pure magic. I can’t recommend you try it enough; you’ll impress yourself and everyone lucky enough to share in the slice. So pull out your pie dish, and let’s make some coconut cream pie memories together!
Print
Homemade Coconut Cream Pie Recipe
- Prep Time: 6 hours
- Cook Time: 35 minutes
- Total Time: 6 hours 35 minutes
- Yield: 1 9-inch pie
- Category: Dessert
- Method: Baking
- Cuisine: American
- Diet: Vegetarian
Description
This Homemade Coconut Cream Pie features a flaky pie crust filled with a rich, creamy coconut custard made from full-fat coconut milk and half-and-half. Topped with luscious whipped cream and garnished with shredded coconut, this dessert is perfect for coconut lovers looking for a classic, comforting pie with a tropical twist.
Ingredients
Pie Crust
- 1 unbaked flaky pie crust or all butter pie crust
Coconut Filling
- 4 large egg yolks
- 1/4 cup (30g) cornstarch
- 1 (14 ounce) can full fat coconut milk
- 1 cup (240ml) half-and-half
- 2/3 cup (130g) granulated sugar
- 1/4 teaspoon salt
- 1 cup (80g) sweetened shredded coconut
- 2 tablespoons (28g) unsalted butter, softened to room temperature
- 1 teaspoon pure vanilla extract
- 1/2 teaspoon coconut extract (optional)
Whipped Cream
- 1 and 1/2 cups (360ml) cold heavy cream or heavy whipping cream
- 3 tablespoons (20g) confectioners’ sugar or granulated sugar
- 3/4 teaspoon pure vanilla extract
- Unsweetened coconut shavings, coconut chips, or sweetened shredded coconut for garnish (optional)
Instructions
- Prepare Pie Crust: Make the pie dough the night before and chill it in the refrigerator for at least 2 hours. Preheat the oven to 375°F (190°C). Blind bake the pie crust by crimping or fluting the edges before baking. Cool the pie crust completely before filling; it can be stored covered in the refrigerator for up to 3 days.
- Mix Egg Yolks and Cornstarch: In a bowl, whisk together the egg yolks and cornstarch until smooth and set aside.
- Heat Dairy Mixture: In a medium saucepan over medium heat, whisk together the coconut milk, half-and-half, granulated sugar, and salt. Whisk occasionally as you bring the mixture to a boil. Boil for 2 minutes, then reduce heat to medium-low.
- Temper Egg Mixture: Slowly remove about 1/2 cup of the hot dairy mixture and, in a slow steady stream, whisk it into the egg yolk and cornstarch mixture to temper it, preventing curdling. Then, slowly pour and whisk the egg yolk mixture back into the saucepan.
- Cook Filling: The pudding will bubble and thicken immediately; stir and cook for 1 minute and 30 seconds while whisking continuously. Remove from heat and stir in shredded coconut, softened butter, vanilla extract, and optional coconut extract.
- Chill Filling: Pour the warm filling into the cooled pie crust. Cover tightly with plastic wrap directly on the surface to prevent skin forming. Refrigerate for at least 3 hours or overnight until chilled and set.
- Make Whipped Cream: Using a hand mixer or stand mixer with a whisk attachment, whip the cold heavy cream, sugar, and vanilla extract on medium-high speed for 3-4 minutes until medium peaks form.
- Assemble Pie: Spread or pipe the whipped cream over the chilled pie filling. Garnish with coconut shavings or chips if desired. Serve immediately or chill uncovered for a few hours for firmer topping.
- Store Leftovers: Cover leftover pie and refrigerate for up to 5 days.
Notes
- The pie dough can be made ahead and stored in the refrigerator for up to 5 days or frozen for up to 3 months.
- Freeze the pie after filling it (step 5), but ensure the filling is fully cooled before freezing. Cover tightly with plastic wrap for freezing up to 3 months. Thaw in the refrigerator or at room temperature before adding whipped cream.
- You can use either confectioners’ sugar or granulated sugar in the whipped cream; both work fine.
- For coconut garnish, use unsweetened coconut flakes or sweetened shredded coconut; optionally toast in a 300°F (149°C) oven for 6-8 minutes until golden brown.
- Both flaky and all-butter pie crusts work well; the recipe only requires one crust, so freeze the leftover dough for another use.
- Use canned full-fat unsweetened coconut milk (not carton), found near Thai food products, shaken before use.
Nutrition
- Serving Size: 1 slice (1/8 of pie)
- Calories: 350 kcal
- Sugar: 25 g
- Sodium: 150 mg
- Fat: 22 g
- Saturated Fat: 15 g
- Unsaturated Fat: 5 g
- Trans Fat: 0 g
- Carbohydrates: 30 g
- Fiber: 2 g
- Protein: 4 g
- Cholesterol: 110 mg


