

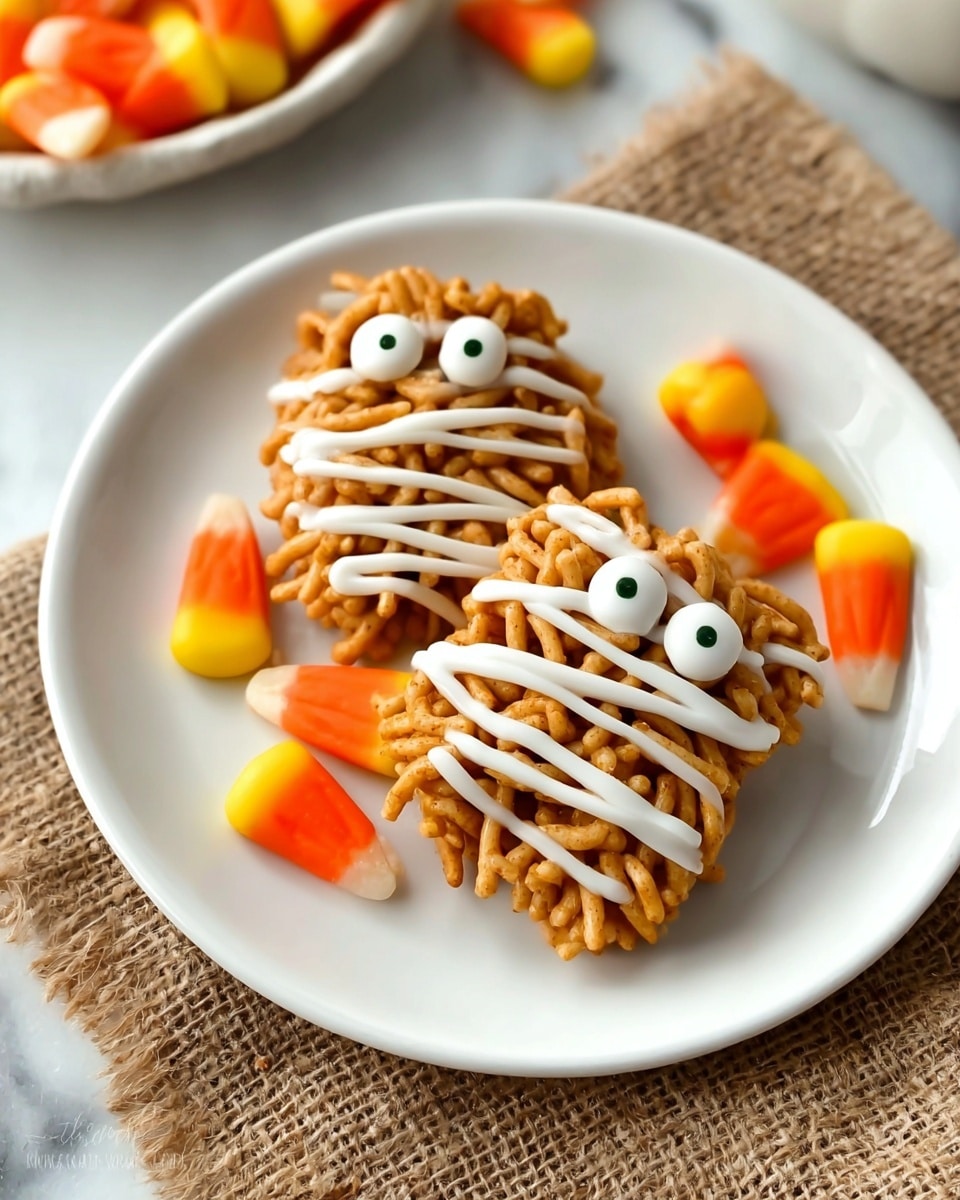
Halloween Haystacks Recipe
If you’re on the hunt for a delightful, spooky treat that’s quick to whip up and absolutely addictive, then this Halloween Haystacks Recipe is about to become your new go-to. I’ve made these adorable little nests more times than I can count around October, and trust me, once you try them, you’ll understand why they vanish almost instantly at any Halloween party or cozy night in. They’re crunchy, sweet, and a ton of fun to make—plus, those googly candy eyes just add that perfect creepy-cute vibe!
Why This Recipe Works
- Simple Ingredients, Big Impact: Using just a handful of pantry staples makes these haystacks easy and fuss-free.
- Perfect Texture Play: Crunchy chow mein noodles with smooth peanut butter and butterscotch chips create a delicious contrast.
- Super Quick to Make: You can have these spooky treats ready in just 15 minutes—bonus points for last-minute party prep!
- Fun for All Ages: Decorating with candy eyes and icing makes it a fun activity for kids and adults alike.

Ingredients & Why They Work
This Halloween Haystacks Recipe is all about balancing textures and complementary flavors. The crunchy chow mein noodles add that satisfying crisp, while the peanut butter and butterscotch chips melt together to form a sweet, sticky binder. Add a touch of vanilla frosting and candy eyes, and you’ve got a treat that’s as festive as it is delicious. When shopping, I always look for freshest noodles and high-quality peanut butter for best results.
- Crunchy chow mein noodles: These provide the signature crispy texture, so don’t substitute with softer noodles or chips.
- Butterscotch chips: They melt smoothly and add a rich, mellow sweetness that pairs beautifully with peanut butter.
- Peanut butter: Choose creamy for easy melting; natural varieties can work but may need stirring to avoid separation.
- Candy eyes: These are the stars of the show for Halloween and give your haystacks that playful, spooky look.
- Vanilla frosting: Using it to pipe decorative zigzags enhances flavor and adds a little extra fun texture and contrast.
Make It Your Way
I love how versatile this Halloween Haystacks Recipe is—once you’ve got the base down, you can riff on it to fit your vibe. I often toss in mini chocolate chips or swap out candy eyes for gummy spiders depending on who I’m making them for. Don’t be afraid to get creative and make it your own!
- Variation: One year, I added a sprinkle of cinnamon to the melted peanut butter and butterscotch mixture for an autumnal twist—it was a surprise hit!
- Dietary tweaks: For a nut-free version, sunflower seed butter works well, just expect a slightly different flavor but the same creamy binding effect.
- Texture play: If you want extra crunch, toast the chow mein noodles lightly in a dry pan before mixing—they get even more addictive that way.
Step-by-Step: How I Make Halloween Haystacks Recipe
Step 1: Melt the Magic
Start by placing the butterscotch chips and peanut butter in a microwave-safe bowl. Heat it in 30-second bursts, stirring between each cycle, until everything is smooth and glossy. I like to keep an eye here because overheating can make the mix grainy or separate. Stirring well after each interval helps maintain that silky texture.
Step 2: Coat the Crunch
Pour your melted mixture over the crunchy chow mein noodles, then gently fold it together until every noodle gets that perfect candy coating. Be gentle—you want all those noodles covered but still intact for maximum crunchiness. If things get too clumpy, a quick stir with a spatula usually does the trick.
Step 3: Shape & Spookify
Scoop spoonfuls onto a parchment-lined baking sheet to form your haystacks. This part is highly customizable—make them small and bite-sized or bigger for sharing. Then, press two candy eyes onto each stack. These little eyes always make me smile—they’re so fun and add instant personality!
Step 4: Pipe the Final Touch
Fill a ziplock bag with vanilla frosting and snip a tiny hole in one corner, or use a pastry bag if you have one handy. Pipe zigzag lines across the haystacks for a whimsical finish. Let them set at room temperature until firm or pop them in the fridge to speed things up. Trust me, chilling them helps keep their shape perfect until you’re ready to devour.
Tips from My Kitchen
- Slow and Steady Melting: Heating the chips and peanut butter in short bursts prevents burning and keeps the texture smooth.
- Gentle Mixing: Folding the noodles carefully avoids breaking their crunch, which is key to the “haystack” feel.
- Frosting Fun: Use a piping bag or a snipped ziplock bag for easy, mess-free decoration that looks way more professional than you’d expect.
- Quick Set: Refrigerate the haystacks soon after decorating—they hold their shape better and taste fresher.
How to Serve Halloween Haystacks Recipe
Garnishes
I personally love adding a pinch of edible glitter or a bit of crushed Halloween-themed sprinkles on top of the frosting zigzags—adds a fun sparkle without overpowering the flavors. And honestly, those candy eyes are the easiest, cutest garnish that instantly turns these into a Halloween hit.
Side Dishes
Serve these sweet haystacks alongside apple cider or hot chocolate for a cozy fall treat spread. I’ve also paired them with a simple mini pumpkin cheesecake or even some salty popcorn for a nice sweet-and-salty combo at parties.
Creative Ways to Present
One year, I presented these Halloween Haystacks on a platter lined with fake cobwebs and surrounded them with mini pumpkins and autumn leaves. Another fun idea is to serve them in small cupcake liners, which makes them perfect for grab-and-go snacking at classroom parties or family gatherings.
Make Ahead and Storage
Storing Leftovers
I keep leftover Halloween Haystacks in an airtight container in the fridge to preserve that crisp texture and firm frosting. They stay fresh for about 3-4 days this way, though honestly, they rarely last that long in my house!
Freezing
I’ve tried freezing these, and it mostly works—but the frosting can lose some of its charm after thawing. If you do freeze them, place them on a tray first to freeze solid, then transfer to a freezer bag. Thaw gently in the fridge to keep them from getting soggy.
Reheating
Since these are no-bake treats, reheating isn’t really necessary, but if you prefer slightly softer haystacks, you can leave them at room temperature for 10-15 minutes before serving. Avoid microwaving as it can melt the frosting and make them lose their structure.
FAQs
-
Can I use other types of chips instead of butterscotch?
Absolutely! White chocolate chips or even milk chocolate chips work well too, though they’ll change the flavor slightly. Just melt them with the peanut butter in the same way for a different but equally delicious twist.
-
How do I prevent the haystacks from sticking to the parchment paper?
Make sure to use parchment paper or a non-stick mat before placing the haystacks. Letting them set and harden fully either at room temperature or in the fridge also prevents sticking when you lift them off.
-
Can I make this recipe nut-free?
Yes, you can swap peanut butter for a seed butter like sunflower seed butter to make it nut-free. Just check the ingredients for any cross-contamination warnings if allergies are a concern.
-
Do I have to use vanilla frosting for decorating?
Vanilla frosting is great for flavor and looks, but you can also use melted chocolate or colored royal icing if you want to get creative with your Halloween designs!
-
How long will the Halloween Haystacks last?
When stored properly in an airtight container in the fridge, they’ll stay fresh and crunchy for about 3-4 days. Enjoy them sooner for the best texture and taste!
Final Thoughts
This Halloween Haystacks Recipe is honestly one of my favorite seasonal treats to make because it’s quick, fun, and a little bit nostalgic. It brings out the kid in me every time — whether I’m sneaking one after dinner or sharing them with friends at a party. I hope you enjoy making (and eating!) these as much as I do. Give it a try and watch how quickly they disappear — Halloween magic in every bite!
Print
Halloween Haystacks Recipe
- Prep Time: 15 minutes
- Cook Time: 0 minutes
- Total Time: 15 minutes
- Yield: 8 servings
- Category: Snack
- Method: No-Cook
- Cuisine: American
Description
Halloween Haystacks are a fun and festive no-bake treat perfect for spooky celebrations. These crunchy delights combine chow mein noodles coated in a smooth butterscotch and peanut butter mixture, adorned with candy eyes and drizzled with vanilla frosting for a sweet and crunchy bite.
Ingredients
Main Ingredients
- 2 cup crunchy chow mein noodles
- 1/2 cup butterscotch chips
- 1/2 cup peanut butter
- 2 candy eyes per haystack (16 total for 8 servings)
- 1 tub vanilla frosting
Instructions
- Prepare the coating: Melt butterscotch chips and peanut butter together in the microwave, heating for 30 seconds at a time and stirring after each interval until the mixture is smooth and fully combined.
- Mix with noodles: Pour the melted mixture over the crunchy chow mein noodles and stir well to ensure all noodles are evenly coated.
- Shape the haystacks: Using a spoon, scoop the coated noodles and place them onto parchment paper, forming the shapes you desire for each haystack.
- Add candy eyes: Press two candy eyes onto each haystack to give them a fun Halloween look.
- Pipe frosting decoration: Transfer the vanilla frosting into a ziploc or pastry bag and pipe zigzag patterns across the haystacks for added sweetness and decoration.
- Set and chill: Allow the haystacks to set until the frosting hardens and the shapes hold. Placing them in the refrigerator speeds up this process and keeps them firm until ready to serve.
Notes
- Use creamy peanut butter for easier mixing and coating.
- If you don’t have candy eyes, small chocolate chips or colored sprinkles can be used as a substitute for decoration.
- For faster setting, refrigerate the haystacks for at least 30 minutes before serving.
- Store haystacks in an airtight container in the refrigerator to maintain their shape and freshness.
Nutrition
- Serving Size: 1 serving
- Calories: 250 kcal
- Sugar: 15 g
- Sodium: 150 mg
- Fat: 18 g
- Saturated Fat: 5 g
- Unsaturated Fat: 12 g
- Trans Fat: 0 g
- Carbohydrates: 20 g
- Fiber: 1 g
- Protein: 5 g
- Cholesterol: 0 mg


