

Halloween Dirt Cake Recipe
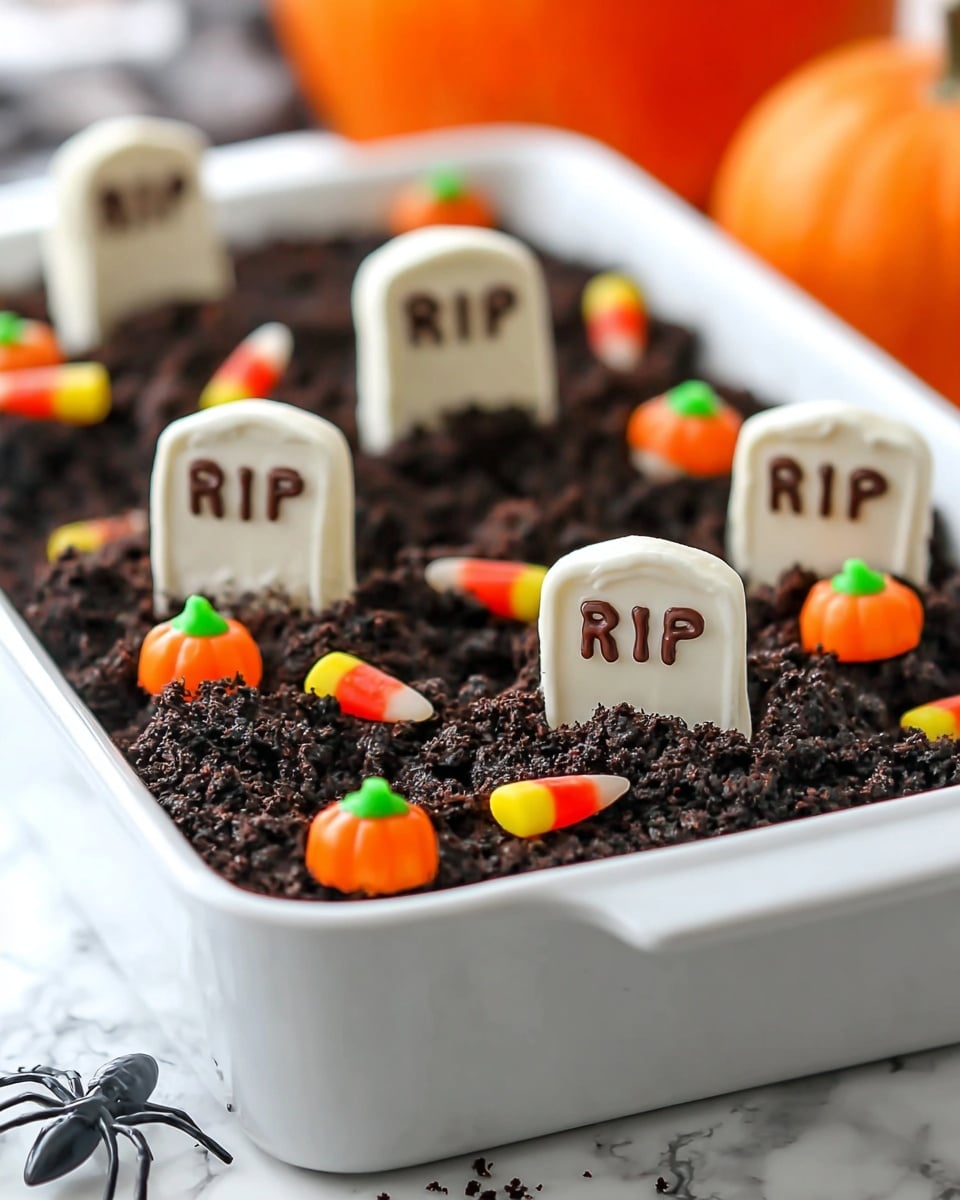
If you’re anything like me, you love a Halloween treat that’s as fun to make as it is to eat. That’s why I’m so excited to share this Halloween Dirt Cake Recipe with you—it’s one of those fan-freaking-tastic recipes that’s perfect for parties, school events, or just cozying up with something delightfully spooky at home. Creamy, chocolatey, and topped with cute little “tombstones” and gummy worms, it’s a total crowd-pleaser that’s surprisingly easy to whip up. Trust me, once you make it, you’ll want to keep it in your seasonal dessert rotation.
Why This Recipe Works
- No-Bake Ease: You don’t have to heat up the oven, which makes it perfect even for last-minute Halloween fun.
- Perfect Texture Combo: Creamy pudding mingles with crunchy Oreo crumbs for that ultimate “dirt” effect everyone loves.
- Halloween Flair: Nutter Butter tombstones and gummy worms turn a simple dessert into a spooky conversation starter.
- Family Friendly: Easily adaptable if you want to swap out ingredients or adjust sweetness to suit every taste bud.

Ingredients & Why They Work
Every ingredient in this Halloween Dirt Cake Recipe has its role to perfect the layers and flavor. From creamy cream cheese to that unmistakable Oreo crunch, I’ll share some tips to help you pick the best versions and get the most out of each one.
- Cream Cheese: Softened cream cheese keeps the filling smooth and adds a slight tang that cuts sweetness nicely.
- Butter: Helps create a rich, creamy base that blends beautifully with the cream cheese.
- Powdered Sugar: Dissolves smoothly for a silky, sweet touch without any grittiness.
- Frozen Whipped Topping: Thawed and mixed in for lightness—don’t skip softening it first for the best texture!
- Instant Chocolate Pudding Mix: The star flavor and texture; remember to use the instant kind for a no-bake cake.
- Milk: Essential to make that pudding just right — full cream milk gives the best flavor.
- Oreo Cookies: You want the full cookie experience, including filling, crushed finely for a realistic dirt effect.
- Nutter Butter Cookies: These become adorable tombstones once dipped and decorated.
- White Candy Melts: Perfect for coating the tombstones evenly — melts smoothly and sets firm.
- Chocolate Chips: Melt these to write out “RIP” on each cookie for an authentic spooky vibe.
- Gummy Worms: No dirt cake is complete without a wriggly surprise on top!
Make It Your Way
One of my favorite things about this Halloween Dirt Cake Recipe is how easy it is to personalize. When I make it, I sometimes sneak in extra layers or swap out candies to keep it fresh and fun — and you should feel free to do the same!
- Variation: I’ve made this with peanut butter pudding for a little twist, which adds a fun flavor that my family enjoyed just as much.
- Dietary Modification: You can use dairy-free cream cheese and pudding mix to make it suitable for lactose intolerance — it still tastes incredible.
- Seasonal Changes: Swap gummy worms for candy pumpkins to bring a fall vibe that’s a little less “creepy” and more festive.
Step-by-Step: How I Make Halloween Dirt Cake Recipe
Step 1: Cream the Cream Cheese and Butter
Start by letting your cream cheese and butter soften at room temperature for about 30 minutes—that makes all the difference in getting a silky smooth base. Then, blend them together with your mixer until everything is light and creamy. This step is key for creating that luscious filling we all love.
Step 2: Add Sugar and Whipped Topping
Slowly mix in the powdered sugar and the thawed whipped topping, keeping your mixer speed low so it folds in evenly without deflating. This keeps your filling fluffy and sweet without being overly dense.
Step 3: Prepare the Pudding Layer
Next, make your instant pudding with the cold milk as directed on the package. Once it’s thickened up, fold in your cream cheese mixture gently with a spatula—don’t overmix here, or you’ll lose that creamy texture you want.
Step 4: Crush the Oreos
Pop your Oreos into a food processor and pulse until you get fine crumbs that look just like dirt. If you don’t have a processor handy, no worries—seal them in a plastic bag and crush with a rolling pin or kitchen mallet. Uniform crumbs will help build the perfect crust and topping.
Step 5: Build Your Dirt Cake
Firmly press half of your Oreo crumbs into the bottom of a 9 x 13 pan using your hands or a flat-bottomed cup—that’s your crunchy base. Spread the pudding layer evenly on top, then sprinkle the remaining crumbs over the surface to look like freshly turned soil. Chill it in the fridge for at least 2 hours to set.
Step 6: Make the Tombstones
While your cake is chilling, melt the white candy melts in short bursts in the microwave, stirring between each. Dip each Nutter Butter cookie in the melted candy and set on parchment paper to dry. Then, melt your chocolate chips and use a small cut corner of a plastic bag to pipe “RIP” on the cookies. Let these dry completely before topping the cake.
Step 7: Decorate and Serve
Once the dirt cake is firm, press your tombstone cookies into the top. Scatter gummy worms and any other fun Halloween candies across the surface for a perfectly spooky finish. Serve cold and watch your friends and family dig right in!
Tips from My Kitchen
- Room Temperature is Key: Don’t skip softening your cream cheese and whipped topping—it makes mixing way easier and smoother.
- Crush Oreos Right: I tried just snapping Oreos in half once, but fresh crumbs all the way with a processor or rolling pin really brings the dirt cake to life.
- Piping “RIP” Letters: Using a small plastic bag for chocolate writing is my favorite hack—it’s neater than a knife and easier than a pastry bag.
- Chill Time Matters: Don’t rush the refrigerator step! Your dirt cake needs that minimum 2 hours to hold its layers and flavors perfectly.
How to Serve Halloween Dirt Cake Recipe
Garnishes
I love topping mine with classic gummy worms—they’re colorful, chewy, and curly just like real worms! The white chocolate-dipped Nutter Butter “tombstones” are my signature touch; they make the cake insta-worthy and add a crunchy contrast. Feel free to sprinkle edible Halloween sprinkles or mini candy pumpkins if you want an extra pop.
Side Dishes
Since this dessert is rich and sweet, I like to pair it with light, refreshing sides like crisp apple slices or a simple fruit salad. If you’re hosting a Halloween party, consider serving alongside savory snacks like popcorn or a cheese plate to balance things out.
Creative Ways to Present
For a crowd-pleasing presentation, I’ve served this dirt cake in clear glass trifle bowls layered in individual cups so everyone gets their own spooky treat. Another fun idea is to build mini graves with tombstone cookies in small mason jars for a super cute grab-and-go option at parties.
Make Ahead and Storage
Storing Leftovers
Once your Halloween Dirt Cake is made and decorated, store it tightly covered with plastic wrap in the fridge. I’ve kept leftovers fresh and delicious for up to 5 days—just make sure it stays chilled to keep the pudding and crushed Oreos from getting soggy.
Freezing
I’ve experimented with freezing this dirt cake, but because of the whipped topping and pudding layers, it’s best eaten fresh. Freezing can cause texture changes, especially with the creamy filling, so I recommend enjoying it within a couple of days refrigerated for the best experience.
Reheating
This dessert is best served cold, so reheating isn’t really recommended. Just pull it out of the fridge about 10 minutes before serving so it’s not too chilled but still deliciously creamy and soft.
FAQs
-
Can I make the Halloween Dirt Cake Recipe ahead of time?
Absolutely! This recipe actually benefits from chilling overnight because it allows the flavors to meld and the layers to set firmly. Just keep it covered tightly in the fridge until serving.
-
What can I substitute for the Nutter Butter tombstones?
If you can’t find Nutter Butters, graham crackers or rectangular chocolate cookies work well. Just decorate them with white candy melts and chocolate writing for that iconic tombstone effect.
-
Is there a way to make this dessert dairy-free?
Yes! Use dairy-free cream cheese and whipped topping alternatives, along with a nondairy instant pudding mix. There are plenty of great plant-based options available that still taste amazing.
-
Do I need a food processor to crush the Oreos?
Not at all. You can place cookies in a zip-top bag and carefully crush them using a rolling pin or meat mallet until you get crumbs that look like dirt.
-
Can kids help make this Halloween Dirt Cake Recipe?
Definitely! This is such a fun and safe recipe to involve little hands—kids love crushing Oreos and decorating with gummy worms and tombstones. Just supervise the chocolate melting step for safety.
Final Thoughts
This Halloween Dirt Cake Recipe holds a special place in my heart because it’s always been my go-to for spooky celebrations that delight kids and adults alike. What I love most isn’t just the taste—which is incredible—but how easy and fun it is to personalize and share. So go ahead, gather those ingredients, invite some helpers into the kitchen, and make this your new Halloween tradition. I promise, once your family tastes that creamy, chocolatey “dirt,” they’ll be asking for it year after year!
Print
Halloween Dirt Cake Recipe
- Prep Time: 20 minutes
- Cook Time: 0 minutes
- Total Time: 2 hours 20 minutes
- Yield: 20 servings
- Category: Dessert
- Method: No-Cook
- Cuisine: American
Description
This Halloween Dirt Cake is a festive no-bake dessert featuring a creamy chocolate pudding layer with a crunchy Oreo crust, decorated with spooky tombstone cookies and gummy worms. It’s perfect for Halloween parties and easy to prepare with simple ingredients.
Ingredients
Main Filling
- 8 ounces cream cheese (1 package room temperature)
- ½ cup butter (softened)
- 1 cup powdered sugar
- 8 ounce container frozen whipped topping (thawed)
- 2 3.4 ounce boxes Instant Chocolate pudding
- 3 cups milk (to make the pudding)
Oreo Crust and Topping
- 1 15.5 ounce package Oreo Cookies (a regular size bag)
Tombstone Graveyard Decorations
- 8-10 Nutter Butter Cookies
- 6 ounces White Candy Melts
- ¼ cup chocolate chips (melted for writing RIP on cookies)
- 8-9 gummy worms (or other Halloween candy)
Instructions
- Prepare the cream cheese mixture: Blend the softened cream cheese with a stand or hand mixer until smooth. Add the softened butter and mix until combined. Slowly add the powdered sugar and thawed whipped topping and mix at a slow speed until incorporated. Set aside.
- Make the pudding: Prepare the instant chocolate pudding in a large bowl using 3 cups of milk according to the package directions. Once set, gently fold the cream cheese mixture into the pudding using a spatula until fully combined. Set aside.
- Crush the Oreos: Place Oreo cookies, including filling, into a food processor and pulse until finely crushed. You may need to crush in two batches if necessary.
- Create the Oreo crust: Firmly press about half of the crushed Oreo crumbs into the bottom of a 9 x 13 inch pan to form an even crust. Use your hands or the bottom of a measuring cup for even pressing.
- Assemble the pudding layer: Spread the pudding and cream cheese mixture evenly over the Oreo crust in the pan.
- Top with remaining Oreos: Sprinkle the remaining crushed Oreos evenly on top of the pudding layer to resemble dirt.
- Refrigerate: Place the assembled cake in the refrigerator for at least 2 hours or up to overnight to allow it to set firmly.
- Prepare tombstones: While the cake chills, melt the white candy melts in the microwave. Dip each Nutter Butter cookie into the melted candy to coat fully, then lay them on parchment paper to dry.
- Decorate tombstones: Melt the chocolate chips in the microwave and transfer to a small plastic bag with a cut corner. Pipe “RIP” onto each coated Nutter Butter cookie and let the writing dry completely.
- Decorate the cake: Once the cake is set, press the decorated tombstone cookies into the top layer of the cake. Add gummy worms and other Halloween candies to complete your graveyard scene.
- Serve: Serve the Halloween Dirt Cake immediately or keep refrigerated until ready to serve.
Notes
- Use instant pudding mix only, avoid cook and serve pudding for this no-bake dessert.
- Soften cream cheese and whipped topping by leaving them at room temperature for about 30 minutes before mixing for easier incorporation.
- If you lack a food processor, crush Oreos by placing them in a large ziplock plastic bag and using a rolling pin or kitchen mallet to crush them into uniform crumbs.
- Store leftover cake covered with plastic wrap in the refrigerator for up to 5 days to maintain freshness.
- Nutritional values are approximate and vary depending on brands used and preparation methods.
Nutrition
- Serving Size: 1 slice
- Calories: 320 kcal
- Sugar: 26 g
- Sodium: 150 mg
- Fat: 20 g
- Saturated Fat: 10 g
- Unsaturated Fat: 8 g
- Trans Fat: 0 g
- Carbohydrates: 32 g
- Fiber: 1 g
- Protein: 4 g
- Cholesterol: 40 mg


