

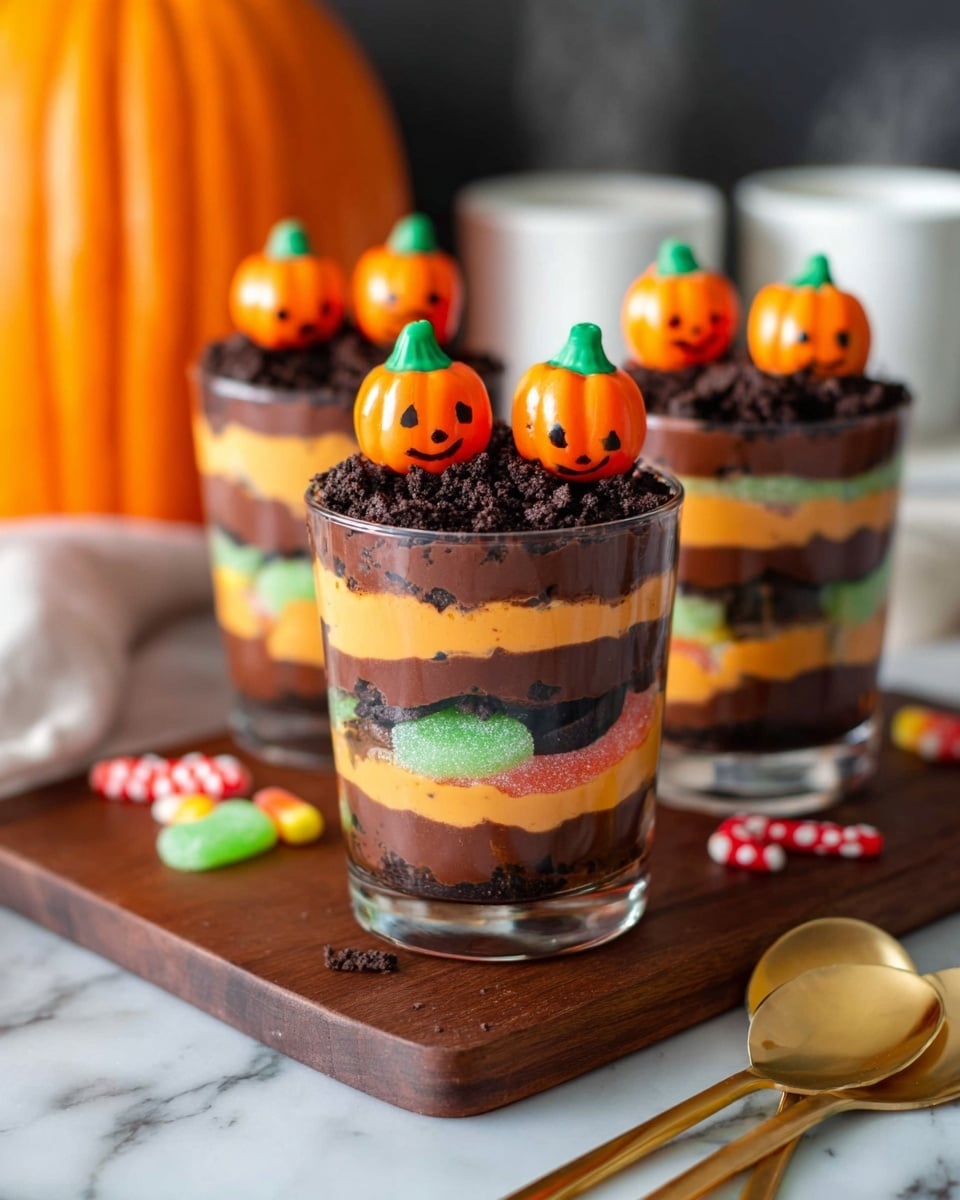
Halloween Dirt Cake Cups Recipe
If you’re on the lookout for a dessert that’s as fun to make as it is to eat, then you’ll absolutely want to try my Halloween Dirt Cake Cups Recipe. This treat is a total crowd-pleaser—perfectly spooky, delightfully creamy, and super simple to throw together for any Halloween gathering. Trust me, these dirt cups have that irresistible blend of chocolate pudding, crushed Oreos, gummy worms, and pumpkin candies that hits just right every time. Stick with me, and I’ll walk you through every step to nail this fan-freaking-tastic recipe with ease!
Why This Recipe Works
- Layered Flavors: The combination of chocolate and orange-colored vanilla pudding creates a rich, festive taste that keeps you coming back for more.
- Festive Textures: Crushed Oreos add just the right crunch to complement the creamy puddings and chewy gummy worms.
- Quick & Easy Prep: Using instant pudding mix means you can whip this up in less than 30 minutes—no baking skills required.
- Perfect for Parties: The individual cups are perfect for serving at Halloween get-togethers or as fun treats for the kids.

Ingredients & Why They Work
These ingredients are carefully chosen to create that classic “dirt cup” vibe—with a Halloween twist. The instant pudding mixes make it quick, while the crushed Oreos and gummy worms bring texture and fun. Plus, a splash of orange food coloring gives it that seasonal pop!
- Milk: Needed to prepare the instant pudding, look for whole milk for the creamiest results.
- Instant chocolate pudding mix: The star flavor that forms the chocolate “dirt” base.
- Instant vanilla pudding mix: Gets a festive twist with orange food coloring to add color and contrast.
- Orange food coloring: Essential for that perfect Halloween hue—if you don’t have it, blending red and yellow works too!
- Gummy worms: These bring an adorable, creepy-crawly element that kids and adults love.
- Oreo cookies: Crushed to mimic dirt’s texture and add crunch.
- Pumpkin candies: Perfect to finish the look and add sweetness on top.
- Bone sprinkles (optional): For an extra spooky touch if you can find them.
Make It Your Way
One of the best parts about this Halloween Dirt Cake Cups Recipe is how easy it is to customize. Over the years, I’ve tweaked it to match my family’s preferences—whether that’s adding more gummy worms or swapping candies. Feel free to make it your own!
- Variation: I’ve tried using crushed chocolate cookie crumbs instead of Oreos for a less sweet crunch, and it’s just as tasty with a deeper cocoa flavor.
- Dietary tweaks: You can use dairy-free pudding mixes and milk alternatives to accommodate lactose intolerance, and it still turns out creamy and delicious.
- Seasonal switch-up: Swap the pumpkin candies for candy corn or mini marshmallows depending on your Halloween stash.
- Extra flair: Sprinkle edible glitter or colored sugar on top if you’re serving these at a party for an added wow factor.
Step-by-Step: How I Make Halloween Dirt Cake Cups Recipe
Step 1: Chill & Color Your Puddings
Start by preparing each pudding mix separately using your milk according to the box instructions, then pop them in the fridge to chill. While the vanilla pudding chills, add a few drops of orange food coloring and stir. Taste and add more drops little by little until you reach a fun Halloween orange shade—don’t rush this part or the color can get uneven.
Step 2: Layer the Chocolate and Worms
Once chilled, spoon half of the chocolate pudding evenly into the bottom of your serving cups or glasses. Then, scatter gummy worms all over that chocolate base, making sure they peek out—that’s the fun visual element kids love.
Step 3: Add the Oreo “Dirt” and Orange Pudding
Sprinkle about one third of your crushed Oreos over the gummy worms. Then, layer half of the orange-tinted vanilla pudding evenly over the cookies. Spread gently so you don’t disturb the layers underneath. Set aside the remaining orange pudding for another use or as a backup for any cups that need topping later.
Step 4: Final Layers and Decoration
Top the orange pudding with another third of crushed Oreos, then spread the remaining chocolate pudding on top, finishing with the last of the Oreos. To really nail the Halloween vibe, place 3 pumpkin candies on the surface of each cup and add bone sprinkles if you want to get extra spooky. Chill before serving so flavors meld together—about 30 minutes is ideal.
Tips from My Kitchen
- Coloring the Pudding: Add food coloring slowly to avoid an unnatural hue; stirring well helps distribute it evenly.
- Layering Trick: Use the back of a spoon to gently spread puddings; this keeps layers neat and defined.
- Oreo Crunch: Crush Oreos just before assembling to keep them from getting soggy.
- Assembly Order: Follow the pudding and cookie layering closely to get the best “dirt” effect and flavor balance.
How to Serve Halloween Dirt Cake Cups Recipe
Garnishes
I always like to top my dirt cups with cute pumpkin candies and gummy worms for that extra pop. Sometimes I add little plastic spiders or bone-shaped sprinkles when I’m feeling over-the-top spooky for a party. The kids get a kick out of fishing the gummy worms out first!
Side Dishes
If you’re serving these at a Halloween party, pair them with something salty like popcorn or pretzels for a sweet-and-salty combo. They also go great alongside classic finger foods like mini sandwiches or even pumpkin-shaped cookies to keep the theme alive.
Creative Ways to Present
I’ve found that serving these Halloween Dirt Cake Cups in clear mason jars or small clear plastic cups with cute little plastic spoons makes them even more festive. For a party, line them up on a rustic wooden tray with fake spider webs for an easy centerpiece that doubles as dessert.
Make Ahead and Storage
Storing Leftovers
These cups keep really well in the fridge for up to 2 days if covered tightly with plastic wrap or kept in an airtight container. I recommend waiting to add the gummy worms and pumpkin candies until right before serving to keep them fresh and chewy.
Freezing
I haven’t had the best luck freezing these because the pudding texture changes after thawing, often getting watery. If you want to save leftovers, I suggest storing them in the fridge only and planning to eat them within a couple of days.
Reheating
Since this is a cold dessert, it’s best enjoyed chilled. If leftovers are too firm from refrigeration, let them sit at room temperature for 10-15 minutes before serving so the pudding softens slightly.
FAQs
-
Can I make Halloween Dirt Cake Cups Recipe ahead of time?
Absolutely! You can prepare the puddings and assemble the cups the day before your event. Just cover them well and keep them refrigerated. Add gummy worms and pumpkin candies just before serving to keep them fresh.
-
What if I don’t have orange food coloring?
No worries! Simply mix a few drops of red and yellow food coloring to create orange. Start with a little and adjust until you get the shade you want.
-
Can I substitute the gummy worms for something else?
Definitely! You can swap gummy worms for other candy shapes like gummy spiders, small jelly beans, or even fruit snacks, depending on your preferences and what you have on hand.
-
Is there a way to make this recipe dairy-free?
Yes! Use dairy-free milk like almond or oat milk and find pudding mixes labeled dairy-free. The texture might be slightly different, but it’s still delicious and perfect for those avoiding dairy.
Final Thoughts
This Halloween Dirt Cake Cups Recipe is one of those treats I come back to year after year because it just captures the spirit of Halloween so perfectly—fun, a little silly, and totally tasty. It’s quick enough for a last-minute party and impressive enough to make guests smile. I’m confident you’ll enjoy making it as much as eating it, and it might just become your go-to Halloween dessert too. Give it a try and watch those smiles grow—you’ve got this!
Print
Halloween Dirt Cake Cups Recipe
- Prep Time: 25 minutes
- Cook Time: 0 minutes
- Total Time: 25 minutes
- Yield: 8 servings
- Category: Dessert
- Method: No-Cook
- Cuisine: American
Description
Halloween Dirt Cake Cups are a fun and festive dessert perfect for Halloween parties. Layers of rich chocolate and creamy orange-tinted vanilla pudding are combined with crushed Oreos and gummy worms, topped with pumpkin candies and optional bone sprinkles for a spooky treat that looks like dirt-filled cups.
Ingredients
Puddings
- 4 cups milk divided, for preparing puddings
- 1 box instant chocolate pudding mix 3.4 ounces
- 1 box instant vanilla pudding mix 3.4 ounces
- Orange food coloring as needed
Toppings
- 1 cup gummy worms
- 22 Oreo cookies crushed
- 24 pumpkin candies
- 2 tablespoons bone sprinkles optional
Instructions
- Prepare puddings: Use milk to prepare and chill each box of pudding in separate bowls according to package instructions.
- Color vanilla pudding: Add a few drops of orange food coloring to the vanilla pudding and stir. Gradually add additional drops as needed to achieve the desired orange color.
- Layer chocolate pudding: Divide half of the chocolate pudding evenly into the bottom of each glass.
- Add gummy worms: Distribute the gummy worms over the chocolate pudding layer.
- Sprinkle crushed Oreos: Sprinkle one-third of the crushed Oreos evenly over the gummy worms.
- Layer orange vanilla pudding: Divide half of the orange-colored vanilla pudding over the gummy worms and spread evenly.
- Sprinkle more Oreos: Sprinkle one-third of the crushed Oreos over the orange pudding layer.
- Top with remaining chocolate pudding: Spread the remaining chocolate pudding evenly over the Oreo layer.
- Final Oreo topping: Sprinkle the remaining crushed Oreos over the top chocolate pudding layer.
- Garnish cups: Place three pumpkin candies on top of each glass and decorate with bone sprinkles if desired.
Notes
- If orange food coloring is not available, mix four drops of red and five drops of yellow food coloring to make orange. Adjust based on the type of food coloring (gel or liquid).
- Use concentrated gel food coloring sparingly and adjust gradually to avoid overly vibrant colors.
- Bone sprinkles are optional but add extra Halloween flair to the cups.
- These cups can be prepared ahead and refrigerated until serving.
Nutrition
- Serving Size: 1 cup
- Calories: 350 kcal
- Sugar: 30 g
- Sodium: 150 mg
- Fat: 15 g
- Saturated Fat: 7 g
- Unsaturated Fat: 7 g
- Trans Fat: 0 g
- Carbohydrates: 45 g
- Fiber: 2 g
- Protein: 4 g
- Cholesterol: 30 mg


