

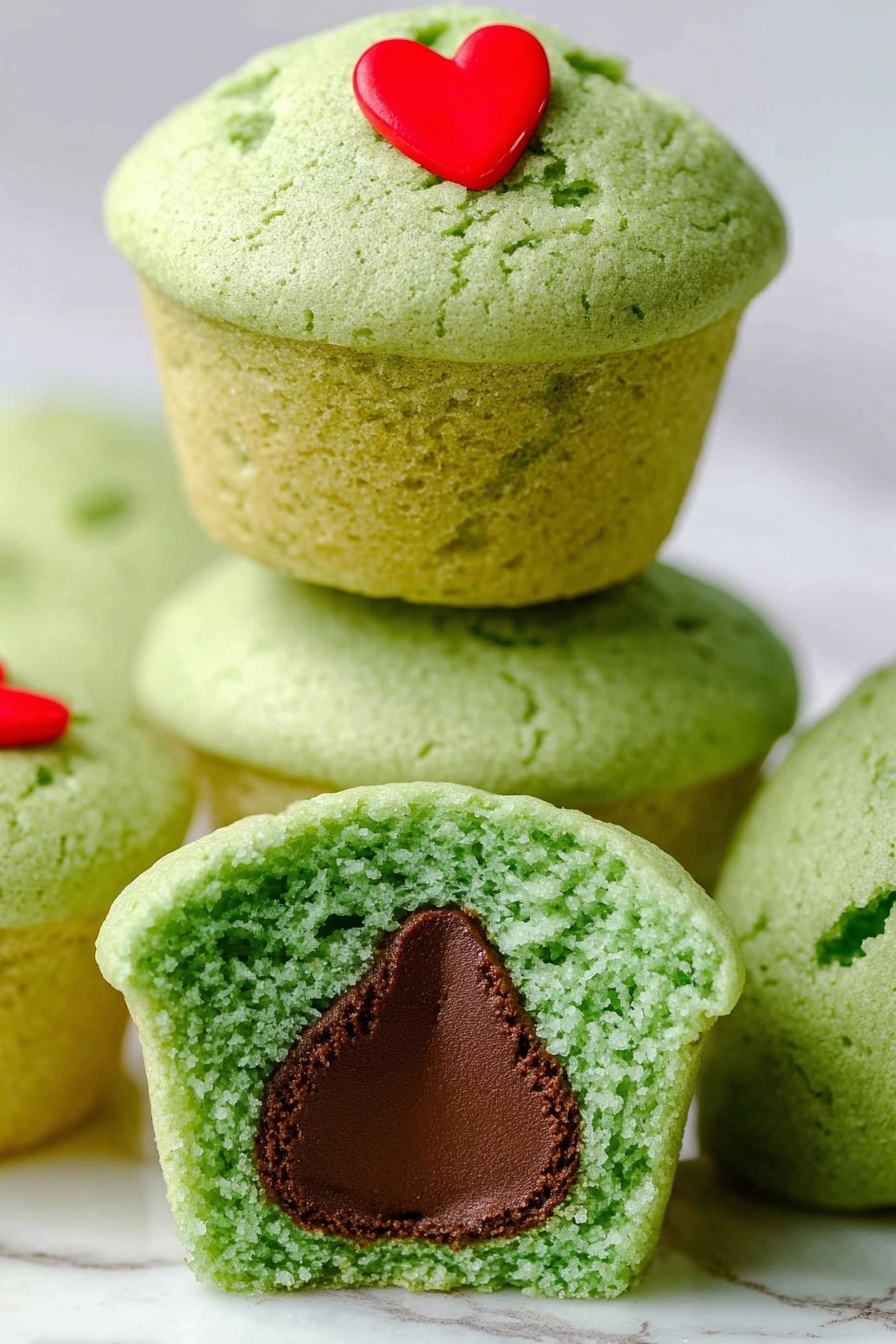
Grinch Cookies with Hershey’s Kisses Recipe
If you’re on the hunt for a festive, fun, and downright adorable holiday treat, I’ve got just the thing for you. These Grinch Cookies with Hershey’s Kisses Recipe are a game-changer in holiday baking—and trust me, they’ll steal the show at your next gathering. Imagine soft, green sugar cookie cups with a melty Hershey’s Kiss surprise inside, topped with a cute little heart candy sprinkle. Sounds like Christmas magic, right? Stick with me, and I’ll share everything you need to nail this recipe perfectly!
Why This Recipe Works
- Simple Ingredients: Uses mostly pantry staples and a trusted sugar cookie mix to make prep fast and fuss-free.
- Perfect Texture: The dough crisps just enough on the outside while staying soft and tender inside, hugging the chocolate perfectly.
- Cute Presentation: The mini muffin pan shapes the cookies into charming little cups that look festive and inviting.
- Personal Touch: The heart candy sprinkle adds just the right pop of color and sweetness, making these cookies extra special.

Ingredients & Why They Work
This Grinch Cookies with Hershey’s Kisses Recipe keeps things straightforward but brilliant by combining a sugar cookie mix with fresh butter and egg, plus that magical green gel coloring for the perfect festive vibe. Each ingredient plays its part to balance flavor, texture, and that lovable green color that’s as classic as the Grinch himself.
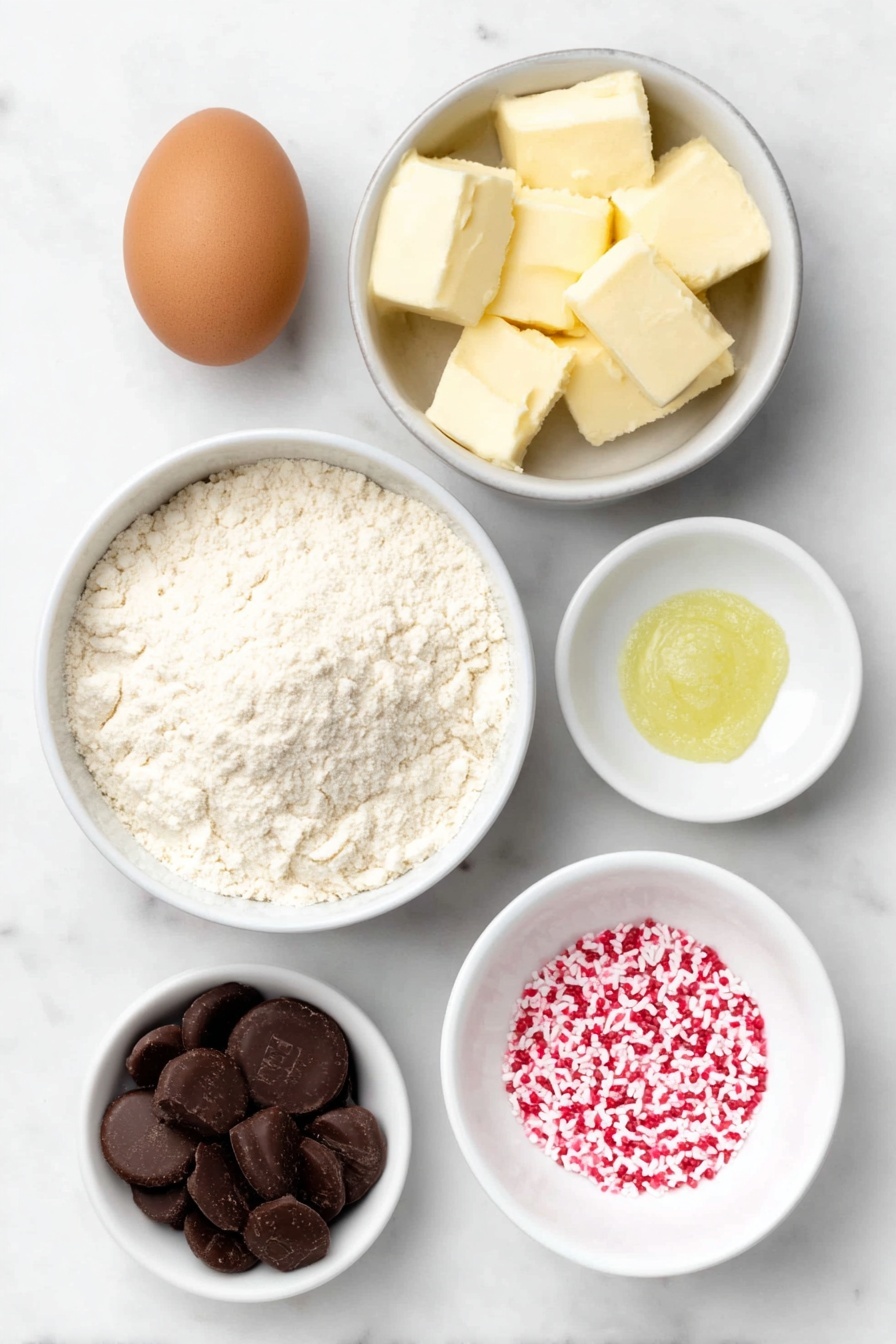
- Sugar Cookie Mix: The base for tender, sweet cookies without the hassle of making dough from scratch.
- All-Purpose Flour: Adds structure and firmness to help the cookie cups hold their shape around the kisses.
- Unsalted Butter: Room temperature for easy blending and rich flavor.
- Large Egg: Helps bind everything together and, when mixed with gel food coloring, evenly distributes that iconic green color.
- Green Gel Food Coloring: Gives the cookie dough a festive, vibrant look without thinning it out like liquid colorings do.
- Hershey’s Kisses: The melty chocolate surprise inside each cookie cup.
- Heart Candy Sprinkles: Adds a sweet, whimsical touch, perfect for the Grinch’s little heart “growing.”
Make It Your Way
I love that this Grinch Cookies with Hershey’s Kisses Recipe is flexible enough to suit your creative flair. Whether you want to amp up the green color, swap out sprinkles for different holidays, or try alternative chocolates, you’ve got room to play!
- Variation: I once swapped the heart sprinkles for tiny red star-shaped candies during Christmas Eve dinner, and they went down a treat with the kids—they thought it was a secret holiday code!
- Dietary swap: If you’re avoiding dairy, using vegan butter and dairy-free kisses works beautifully, just keep an eye on baking time.
- Seasonal twist: Try orange gel food coloring and candy pumpkins for a Halloween Grinch twist that’s just as fun.
Step-by-Step: How I Make Grinch Cookies with Hershey’s Kisses Recipe
Step 1: Prep Your Ingredients and Pan
Start by preheating your oven to 375°F. Give your mini muffin pan a good spray with a non-stick baker’s spray or line the cups with mini paper liners to make removal easy—and trust me, you’ll want that when the cookies come out hot and gooey.
Step 2: Mix the Egg with the Green Gel Food Coloring
This little trick makes a world of difference: whisk the egg and green gel food coloring together in a small bowl until you get a nice even color. Mixing them first ensures your dough turns bright and consistent—no splotches or streaks here!
Step 3: Combine Cookie Mix, Flour, Butter, and Egg Mixture
Using a handheld mixer on low speed, blend the sugar cookie mix, flour, butter, and your egg mixture for 2 to 3 minutes. You’ll notice the dough gets very thick—that’s exactly what you want because it makes shaping around the Hershey’s Kisses so much easier later.
Step 4: Form Cookie Cups with Hershey’s Kisses Inside
Here’s the fun part! Using a 1½ tablespoon cookie scoop, scoop out your dough and flatten it into a 3-inch disc. Now, place a Hershey’s Kiss candy right in the center, making sure it stays upright. Then, carefully pull the dough edges up and around to cover the chocolate, shaping it into a neat ball. Place each cookie cup into your prepared mini muffin tin with the chocolate still standing tall—it helps the kiss stay in place as it melts.
Step 5: Bake and Add Your Finishing Touch
Bake your cookie cups for 10 to 12 minutes, watching closely to avoid any browning—you want them just set but not browned. When you pull them out, gently press a heart candy sprinkle just to the right of center on each cookie cup. Let them cool for at least 10 minutes in the pan before moving them to a wire rack to finish cooling completely.
Tips from My Kitchen
- Egg and Gel Food Coloring Mixing: Whisking the egg with gel coloring first ensures an even, vibrant green dough without streaks.
- Keeping the Kiss Upright: I learned the hard way that if the kiss falls over while baking, the cookie shape falters—so be gentle when placing each cookie cup in the pan.
- Don’t Over-bake: Baking just until set keeps the cookie tender and chewy; browned edges mean they’re overdone and lose that perfect soft cup feel.
- Cooling in the Pan: Letting cookies cool in the muffin tin helps them firm up enough so they don’t break apart when you remove them.
How to Serve Grinch Cookies with Hershey’s Kisses Recipe
Garnishes
I like to keep it simple with the classic red heart sprinkles—it’s such a sweet nod to the Grinch’s changing heart. Sometimes I add a tiny dusting of powdered sugar or even some edible gold glitter for sparkle at holiday parties. It’s an easy way to glam these up without extra work.
Side Dishes
These cookies are perfect with a cozy cup of hot cocoa or a spiced peppermint latte. At my last holiday brunch, I paired them with a creamy eggnog and fresh fruit salad for balance—a sweet and refreshing combo that everyone loved.
Creative Ways to Present
For a holiday gift, I packed these Grinch Cookie cups in mini clear boxes layered with festive tissue paper. Another time, I arranged them on a tiered cake stand with green and red ribbons—kids smiled big seeing those bright green treats stacked like little presents!
Make Ahead and Storage
Storing Leftovers
I store leftover Grinch Cookies in an airtight container at room temperature for up to 4 days. Just make sure they’re completely cooled before sealing to avoid sogginess. They stay soft and flavorful, ready to enjoy anytime.
Freezing
If you want to bake ahead, I recommend freezing the formed cookie dough balls before baking. Just place them on a tray, freeze until solid, then transfer to a freezer-safe bag. When ready, bake straight from frozen, adding an extra minute or two to the bake time.
Reheating
To warm leftovers, pop them in the microwave for 10–15 seconds or briefly in a warm oven at 300°F for 5 minutes. This brings back that melty chocolate goodness and soft cookie texture without drying them out.
FAQs
-
Can I use homemade sugar cookie dough for this recipe instead of a mix?
Absolutely! Just be sure your dough is firm enough to shape into cups around the Hershey’s Kisses. You might need to chill your homemade dough slightly for easier handling, especially if it’s softer than store-bought mixes.
-
Why should I keep the Hershey’s Kiss upright during baking?
Keeping the chocolate upright ensures it stays centered and melts evenly inside the cookie cup. If it tilts or falls over, the cookie loses that signature shape and the kiss may ooze out too much, making a mess.
-
Can I make these cookies gluten-free?
Yes! Use a gluten-free sugar cookie mix and gluten-free all-purpose flour blend. Just keep an eye on baking time since gluten-free doughs can behave a little differently depending on the brand.
-
How do I avoid the cookies from overbaking and becoming hard?
Set a timer for 10 minutes and keep a close eye during the last couple of minutes. The cookie cups should look just set, not browned. Pull them out early if needed; they firm up as they cool, so it’s better to err slightly underdone than overbaked.
Final Thoughts
This Grinch Cookies with Hershey’s Kisses Recipe has become one of my go-to holiday hits not just because they’re adorable, but because they’re genuinely delicious and surprisingly easy to make. I hope you have as much fun baking them as I do, and that they bring a smile to everyone who tries them. So grab your green gel, those Hershey’s Kisses, and let’s make some sweet holiday memories together!
Print
Grinch Cookies with Hershey’s Kisses Recipe
- Prep Time: 5 minutes
- Cook Time: 12 minutes
- Total Time: 17 minutes
- Yield: 18 cookies
- Category: Dessert
- Method: Baking
- Cuisine: American
Description
Delight in the festive spirit with these Grinch Cookies—soft sugar cookie cups filled with Hershey’s Kisses and topped with heart candy sprinkles. Perfect for holiday gatherings, these cookies feature a vibrant green hue, achieved by blending green gel food coloring with egg, wrapped around a chocolate center for a sweet surprise in every bite.
Ingredients
Cookie Dough
- 17.5 ounces sugar cookie mix
- 1/4 cup all-purpose flour
- 1 large egg
- 1/2 cup unsalted butter, room temperature
- 3/4 teaspoon green gel food coloring
Filling and Topping
- 18 Hershey’s Kisses, unwrapped
- 18 large heart candy sprinkles
Instructions
- Preheat Oven and Prepare Pan: Preheat your oven to 375°F. Lightly spray a mini muffin pan with baker’s spray or line it with paper cups, then set aside to be ready for the dough.
- Mix Egg with Food Coloring: In a small bowl, whisk the egg and green gel food coloring together thoroughly using a fork until the color is evenly blended into the egg mixture.
- Combine Dough Ingredients: In a large mixing bowl, use a handheld mixer on low speed to combine the sugar cookie mix, all-purpose flour, softened butter, and the green egg mixture. Mix for 2 to 3 minutes until the dough is thick and fully combined.
- Form Cookie Cups: Using a 1½ tablespoon cookie scoop, portion out dough balls. Flatten each dough ball into a 3-inch disc in your hand. Place one Hershey’s Kiss in the center, then carefully pull the dough up around the candy to cover it completely, shaping it back into a ball. Ensure the Hershey’s Kiss remains upright while shaping and placing in the pan.
- Bake the Cookies: Place the prepared dough balls in the mini muffin pan, keeping the Hershey’s Kiss upright. Bake for 12 minutes at 375°F, being careful not to let the dough brown; the cookies should be set but soft, ensuring the center is cooked through.
- Add Heart Sprinkles and Cool: Upon removing the cookies from the oven, gently press one heart candy sprinkle offset to the right of the center on each cookie cup. Let the cookies cool in the muffin tin for at least 10 minutes to set before transferring them to a wire rack to cool completely.
Notes
- Mixing the green food coloring with the egg ensures even color distribution throughout the dough.
- Keep the Hershey’s Kiss candy upright when placing and baking the cookies to maintain the iconic look and proper melting.
- Do not overbake to avoid browning; these cookies are best when soft and slightly chewy.
- Use room temperature butter for easier mixing and better dough texture.
- If you don’t have a mini muffin pan, standard muffin pans can be used, but adjust baking time slightly.
Nutrition
- Serving Size: 1 cookie
- Calories: 150 kcal
- Sugar: 12 g
- Sodium: 90 mg
- Fat: 7 g
- Saturated Fat: 4 g
- Unsaturated Fat: 3 g
- Trans Fat: 0 g
- Carbohydrates: 20 g
- Fiber: 0.5 g
- Protein: 1 g
- Cholesterol: 25 mg


