

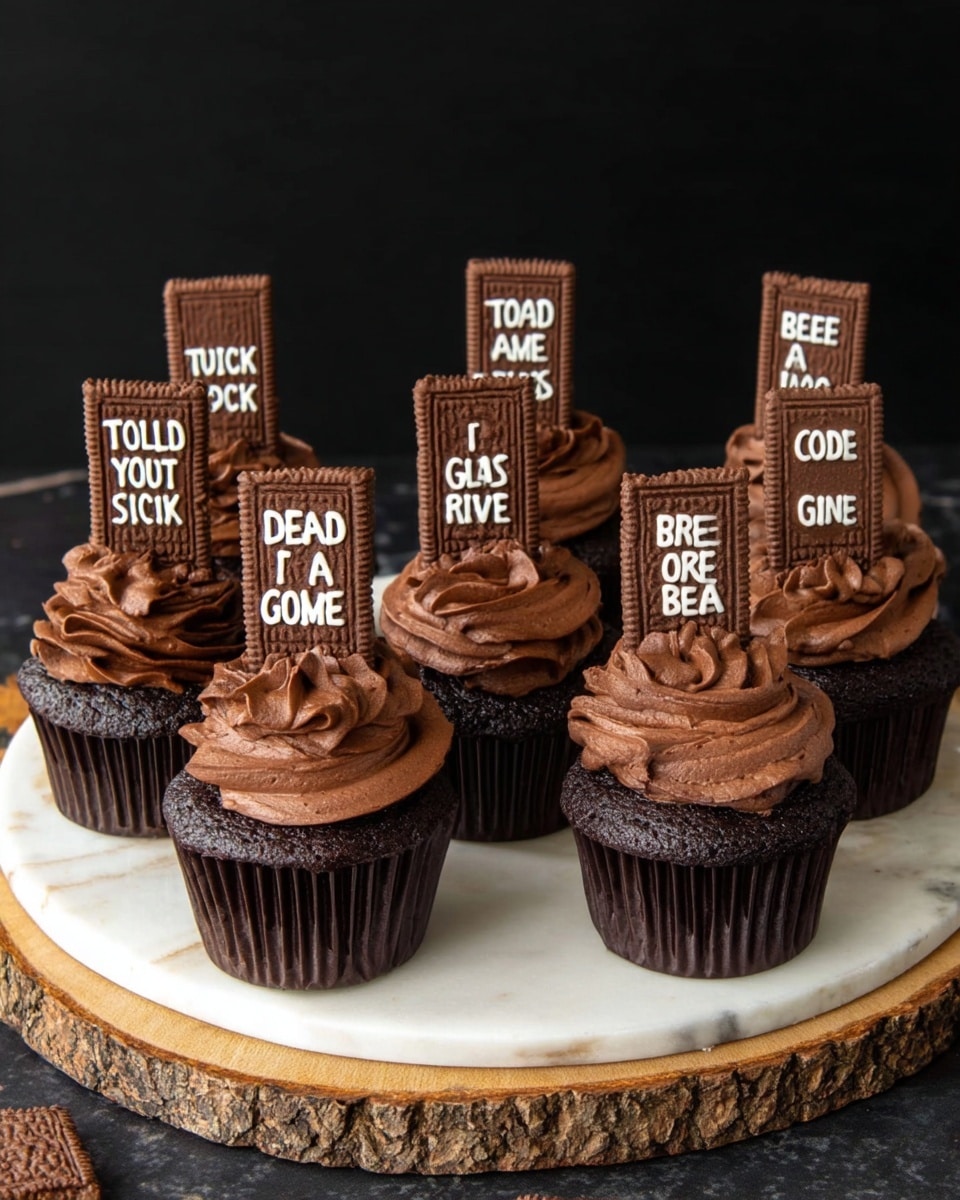
Graveyard Cupcakes Recipe
If you’re anything like me, you love a Halloween treat that’s both spooky and downright delicious. Well, let me tell you about this *Graveyard Cupcakes Recipe* that I stumbled upon and now swear by every fall season. They’re rich, chocolatey, and decorated with adorable (and hilarious) tombstone cookies that instantly bring a smile. Whether you’re baking with kids or just want to impress at a party, these cupcakes totally deliver on flavor and fun. Ready to dive into a fan-freaking-tastic baked treat? Let’s get to it!
Why This Recipe Works
- Perfect Texture: The combination of melted butter and chocolate with buttermilk creates cupcakes that are irresistibly moist and tender.
- Rich Chocolate Flavor: Using both cocoa powder and semisweet chocolate chips amps the deep chocolate taste in every bite.
- Fun & Easy Decoration: The edible tombstone cookies and ganache filling add a festive touch with little extra effort.
- Built-in Surprise: The chocolate ganache center is a delightful secret that makes these cupcakes memorable every time.

Ingredients & Why They Work
Each ingredient in this Graveyard Cupcakes Recipe plays a special role in delivering that perfect texture and fabulous chocolate flavor. Plus, knowing a bit about what you need and why helps you choose the best quality baking essentials for cupcake success.
- All-purpose flour: Gives structure to the cupcakes without weighing them down.
- Unsweetened cocoa powder: Adds deep, intense chocolate flavor that balances sweetness.
- Baking powder & baking soda: Together, they provide just the right amount of lift for a soft, fluffy crumb.
- Kosher salt: Enhances flavor complexity and cuts through the sweetness.
- Unsalted butter: Using room temperature butter creates a smooth batter and rich taste.
- Semisweet chocolate chips: Melting these doubles down on chocolate goodness in batter and ganache.
- Brown sugar: Moisturizes and adds a slight caramel note for depth.
- Eggs: Bind everything together and contribute to moistness and structure.
- Vanilla extract: Elevates all the chocolate flavors with a warm aroma.
- Buttermilk: Reacts with baking soda, tenderizes the crumb, and adds subtle tang that makes cupcakes taste freshly baked.
- Heavy cream & corn syrup (for ganache): Make the filling silky smooth and glossy with a perfect shine.
- Powdered sugar & cocoa powder (for frosting): Create fluffy, silky frosting that’s easy to pipe and tastes dreamy.
- Chocolate-coated graham crackers: Double as “tombstones” that take the cupcakes from tasty to Halloween-party-ready.
- Baker’s white chocolate: Perfect for writing spooky messages on the tombstones with precision.
Make It Your Way
I love playing around with this Graveyard Cupcakes Recipe to match the vibe of the party or just what we have in the pantry. You should totally make it your own, too, whether that means adjusting sweetness, swapping chocolate types, or even trying different “tombstone” decorations.
- Variation: Once, I swapped semisweet chips for dark chocolate and the cupcakes had a sophisticated, slightly bitter edge—the grown-ups loved it!
- Dairy-Free Adaptation: You can substitute the butter with vegan butter and use a dairy-free milk with a splash of lemon for the buttermilk effect—works surprisingly well.
- Spiced Version: Adding a pinch of cinnamon or cayenne to the batter adds an unexpected warm kick that’s perfect for autumn.
Step-by-Step: How I Make Graveyard Cupcakes Recipe
Step 1: Prep and Mix the Dry Ingredients
The first thing I do after preheating the oven is whisk together the flour, cocoa powder, baking powder, baking soda, and salt in a medium bowl. Whisking here is key to make sure everything distributes evenly—this little step avoids any lumps or uneven pockets of leavening later on. Set that aside and line your cupcake tins with liners (I like using a bit extra to catch drips).
Step 2: Melt Butter and Chocolate Chips Together
I pop the butter and chocolate chips in a microwave-safe bowl and zap it for about a minute, stirring well after. If it’s not totally melted, I keep heating in 30-second bursts and stirring until silky smooth. Don’t let it get too hot—you want warm melted chocolate, not hot molten lava, to avoid cooking the eggs later. This combo is the secret to that rich, fudgy cupcake base!
Step 3: Combine Wet Ingredients and Batter
Next up, I stir the brown sugar gently into the melted chocolate mixture (no electric mixers here—that’s a crucial tip to keep cupcakes tender). Then whisk in the eggs and vanilla right away—they’ll mix in much smoother this way. Now, I alternate adding the dry ingredients and buttermilk in batches. This technique helps avoid overmixing, which can make cupcakes tough. Just stir until everything’s combined and no flour patches remain.
Step 4: Bake and Cool the Cupcakes
Fill each cupcake liner only halfway—I made the mistake once of overfilling and ended up with flat muffins instead of perfect cupcakes. Bake at 350°F for about 15-16 minutes. The toothpick test always saves me here—a clean toothpick means ready! And don’t forget to take them out of the tins immediately and onto a wire rack. Leaving them in the hot tins makes them dry out, which is the last thing you want.
Step 5: Prepare the Ganache Filling
While the cupcakes cool, I heat the heavy cream in the microwave until almost boiling, then pour it over the chocolate chips and let it sit for 5 minutes to soften. After stirring, the ganache turns ultra glossy. Adding a tablespoon of corn syrup keeps that silkiness and shine. Pop it in the fridge for about 30 minutes to thicken—it makes filling those cupcakes a breeze!
Step 6: Whip Up the Chocolate Frosting
I use a stand mixer to beat powdered sugar, melted butter, cocoa powder, and vanilla until fluffy and light—this frosting is creamy but holds its shape well for piping. I usually use a Wilton 1M tip for that pretty swirl effect, but you can skip the tip and still get great results.
Step 7: Customize Your Tombstones
Melting white chocolate for decorating is one of the fun parts! Pour it into a small bag and cut a tiny hole for writing messages on your chocolate-coated graham crackers. I’ve written everything from “RIP” to “Game Over”—they always get a laugh. Then pop the decorated “tombstones” in the freezer for about 5-10 minutes so the white chocolate hardens nicely.
Step 8: Assemble and Decorate
Use a small knife to carve a hole into the top of each cupcake to fill with ganache—about a teaspoon does the trick. I put the little cupcake “lid” back on top and then pipe frosting generously over. Finally, stick your personalized tombstone right in the top and watch your guests do a double take!
Tips from My Kitchen
- Don’t Overmix: For the batter, gentle folding keeps cupcakes soft and light—as soon as flour disappears, stop stirring.
- Cool Before Filling: Trust me, trying to fill warm cupcakes is a mess—I always wait until they’re fully cooled for neat ganache centers.
- Use Room Temperature Ingredients: Eggs, butter, even buttermilk being room temp helps everything blend seamlessly.
- Freeze Tombstones Briefly: The frozen plaques are easier to insert without breaking and keep their charm on your cupcakes.
How to Serve Graveyard Cupcakes Recipe
Garnishes
I keep garnishes simple because the tombstone cookies already steal the show. Sometimes I sprinkle a touch of crushed chocolate cookies on the frosting to mimic “dirt,” and a few little candy eyeballs for a creepy crawl vibe. These small touches up the Halloween factor and are sooo fun to see your guests’ reactions!
Side Dishes
Since these cupcakes are magic on their own, I usually pair them with some light sides—think fresh fruit or a simple pumpkin spice latte. They’re a perfect sweet finish after a savory Halloween dinner like chili or roasted veggies. Trust me, the contrast makes every bite even yummier.
Creative Ways to Present
One year, I arranged the Graveyard Cupcakes Recipe on a black platter with edible “spider webs” made from spun sugar and plastic spider decorations—so cute and a bit creepy! Another time, I put them in mini cauldrons surrounded by dry ice for a spooky fog effect. Don’t be afraid to get playful—that’s part of the fun!
Make Ahead and Storage
Storing Leftovers
I usually store leftovers in an airtight container at room temperature if we plan to eat them within a day or two, but if it’s warmer or humid, the fridge is better. Just remember to bring them back to room temperature before enjoying—the frosting softens up nicely and the ganache filling tastes indulgent.
Freezing
Freezing these cupcakes works great! I skip frosting before freezing and freeze the plain cupcakes in a single layer on a baking sheet first, then transfer them to a zipper bag or airtight container. When ready to serve, thaw completely and frost as usual—this keeps the texture fresh.
Reheating
If your cupcakes end up a bit chilled or stale, warming them gently in the microwave for 10-15 seconds revives that freshly-baked softness. Just be careful not to overheat or they’ll get dry. The ganache filling also gets a lovely gooey texture with a quick warm-up.
FAQs
-
Can I make Graveyard Cupcakes Recipe ahead of time?
Absolutely! You can bake the cupcakes a day or two in advance and store them in an airtight container. Wait to add the ganache filling and frosting until just before serving for the freshest presentation.
-
How do I avoid overfilling the cupcake liners?
Fill each liner only about halfway with batter—filling more than that can cause the cupcakes to overflow and bake unevenly. Using a small cookie scoop or two spoons helps control portion size.
-
What if I don’t have buttermilk?
No worries! You can make a quick buttermilk substitute by adding 1 tablespoon of lemon juice or white vinegar to ½ cup of milk. Let it sit for five minutes and use as directed in the recipe.
-
Can I use regular graham crackers instead of chocolate-coated ones for the tombstones?
You can, but the chocolate coating adds an extra layer of flavor and sturdiness that works perfectly with the white chocolate message decoration. Regular crackers might be more fragile or absorb frosting moisture.
-
Is the ganache filling necessary?
The ganache adds that lovely gooey surprise inside which makes these cupcakes stand out, but if you’re in a hurry, you can skip filling and still have delicious chocolate cupcakes topped with frosting and a tombstone. Just know the ganache really elevates the experience!
Final Thoughts
This Graveyard Cupcakes Recipe has become a cozy tradition in my kitchen every fall—not just because they taste amazing, but because the decorating lets me get playful and creative. If you’re looking for a dessert that’s a crowd-pleaser, easy to make, and fun to personalize, I can’t recommend this one enough. Whip up a batch, grab your favorite scary movie, and let those spooky vibes—and chocolate—take center stage!
Print
Graveyard Cupcakes Recipe
- Prep Time: 45 minutes
- Cook Time: 16 minutes
- Total Time: 1 hour 36 minutes
- Yield: 20 cupcakes
- Category: Dessert
- Method: Baking
- Cuisine: American
Description
Graveyard Cupcakes are rich, moist chocolate cupcakes filled with decadent chocolate ganache, topped with fluffy chocolate frosting and fun tombstone cookie decorations. Perfect for Halloween or any spooky-themed celebration, this treat combines a delicious combination of chocolate elements with a playful presentation.
Ingredients
For the Cupcakes
- 1½ cups all-purpose flour (210 grams)
- ¼ cup unsweetened cocoa powder (25 grams)
- 1 teaspoon baking powder (4 grams)
- ½ teaspoon baking soda (3 grams)
- ¼ teaspoon kosher salt
- 1 cup unsalted butter (226 grams), room temperature (2 sticks)
- 1 cup semisweet chocolate chips (170 grams)
- 1 cup brown sugar (200 grams)
- 2 large eggs (100 grams), room temperature
- 1 teaspoon pure vanilla extract (4 grams)
- ½ cup buttermilk (114 grams), room temperature
For the Chocolate Ganache
- 1 cup 33% fat heavy cream (227 grams), room temperature
- 1 cup semisweet chocolate chips (170 grams)
- 1 tablespoon corn syrup (20 grams)
For the Frosting
- 3 cups powdered sugar (360 grams)
- 1 cup unsalted butter (226 grams), slightly melted (2 sticks)
- ½ cup unsweetened cocoa powder (50 grams)
- 1 teaspoon pure vanilla extract (4 grams)
For Decorating
- 1 ounce Baker’s white chocolate (28 grams)
- 20 chocolate-coated graham crackers such as Keebler Deluxe Grahams
Instructions
- Preheat and Prepare Liners: Preheat oven to 350°F. Line 12-count cupcake tins with 20 cupcake liners to prepare for baking.
- Mix Dry Ingredients: In a medium bowl, whisk together the flour, unsweetened cocoa powder, baking powder, baking soda, and kosher salt. Set this mixture aside for later.
- Melt Butter and Chocolate: Place butter and chocolate chips in a large microwave-safe bowl. Microwave on high for 1 minute, then stir thoroughly. If not completely melted, continue heating in 30-second intervals, stirring each time, until smooth and melted but not hot.
- Add Brown Sugar: Stir the brown sugar into the melted chocolate and butter mixture using a spoon, avoiding electric beaters to ensure the right texture.
- Incorporate Eggs and Vanilla: Whisk the eggs and vanilla extract into the melted chocolate-butter mixture until smooth and combined.
- Add Dry Ingredients and Buttermilk: Pour half of the dry mixture into the wet ingredients and stir gently just until combined. Add all the buttermilk and stir just until mixed. Finally, add the remaining dry mixture and stir until no white flour remains, careful not to overmix to maintain cupcake softness.
- Fill Cupcake Liners and Bake: Fill each cupcake liner halfway with batter, making about 20 cupcakes. Bake in the oven for 16 minutes, or until a toothpick inserted into the center comes out clean.
- Cool Cupcakes: Remove the cupcakes from the hot tins and transfer to a wire rack to cool completely to avoid drying out from residual heat.
- Make Ganache: Heat heavy cream in a microwave-safe bowl for about 1½ minutes until hot. Pour in chocolate chips and let sit for 5 minutes. Stir until smooth, then stir in corn syrup. Chill in refrigerator for 30 minutes to thicken.
- Make Frosting: Using a stand mixer fitted with a paddle attachment, beat powdered sugar, butter, cocoa powder, and vanilla extract on high speed for about 2 minutes until light and fluffy. Place frosting in an icing bag with or without a tip and set aside at room temperature.
- Decorate Cookies: Melt white chocolate in a small microwave-safe bowl starting with 30 seconds, then stir carefully until just melted. Transfer to an icing bag with a small hole cut at the tip. Write humorous sayings on the chocolate-coated graham crackers, then place decorated cookies in the freezer for 5-10 minutes to harden the white chocolate.
- Fill Cupcakes with Ganache: Using a small knife, cut a small well in the top of each cupcake and spoon about a teaspoon of chilled ganache inside. Replace the cut cupcake piece on top to cover the filling.
- Frost and Finish: Pipe the prepared frosting on top of each filled cupcake. Insert a decorated tombstone cookie on the top to complete the look of the Graveyard Cupcakes.
Notes
- For the buttermilk substitute, mix ½ cup milk with 1 teaspoon lemon juice or vinegar and let sit for 5 minutes.
- Ensure cupcakes are fully cooled before frosting to prevent frosting from melting.
- Do not overmix the batter to keep cupcakes soft and tender.
- Use room temperature ingredients for better mixing results.
- Microwave chocolate gently to prevent burning; stir frequently.
- Use a small icing tip for neat writing on the graham cracker tombstones.
- Store cupcakes in an airtight container at room temperature for up to 2 days or refrigerate for 4 days.
- Bring refrigerated cupcakes back to room temperature before serving for best flavor.
Nutrition
- Serving Size: 1 cupcake
- Calories: 350 kcal
- Sugar: 28 g
- Sodium: 150 mg
- Fat: 22 g
- Saturated Fat: 13 g
- Unsaturated Fat: 7 g
- Trans Fat: 0 g
- Carbohydrates: 38 g
- Fiber: 3 g
- Protein: 4 g
- Cholesterol: 65 mg

