

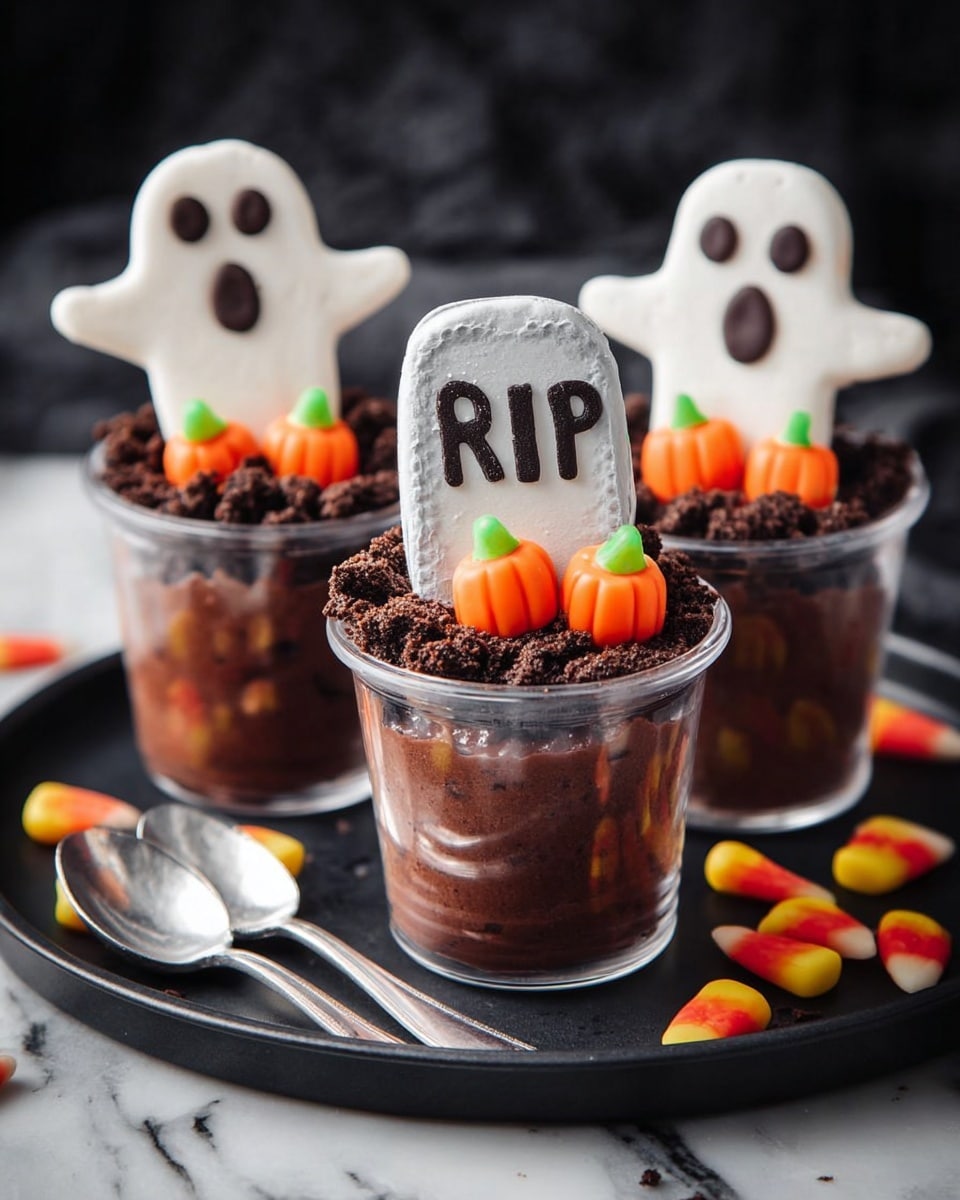
Ghosts in the Graveyard Dirt Pudding Cups Recipe
If you’re on the hunt for a Halloween treat that’s both spooky and seriously delicious, you’ve got to try my Ghosts in the Graveyard Dirt Pudding Cups Recipe. It’s a quick and playful dessert that’s perfect for parties or a fun family night. Imagine creamy chocolate pudding layered with crunchy chocolate crumbs, topped with a little graveyard scene complete with marshmallow ghosts and candy pumpkins — it’s cute, creepy, and absolutely irresistible. Stick with me and I’ll show you how to make these little edible masterpieces that always get rave reviews.
Why This Recipe Works
- Simplicity: No baking required, meaning you’ll have these ready in about 10 minutes flat — game changer for last-minute Halloween fun.
- Visual Appeal: The clear cups let the layers show through, creating the perfect spooky dirt effect that delights kids and adults alike.
- Customizable: You can easily swap cookie crumbs or candy to suit your taste or what you have on hand — making it a versatile crowd-pleaser.
- Family Friendly: Everyone from little ones to grown-ups can get involved decorating these adorable “graves,” which turns dessert into a fun activity.

Ingredients & Why They Work
The balance of creamy pudding, crunchy crumbs, and sweet decorations in this Ghosts in the Graveyard Dirt Pudding Cups Recipe comes together perfectly. Each ingredient plays a role, and with a quick stop at the store, you’ll have everything ready to build your spooky scene.
- Chocolate pudding: Smooth and rich, pudding forms the “dirt” base — I prefer homemade but store-bought works great for quick prep.
- Chocolate graham cracker crumbs: Adds texture and mimics dirt; I love using Oreo crumbs for extra chocolate punch.
- Milano cookie: Perfectly sized to be your “headstone” and sturdy enough to stand up in the cup.
- Chocolate frosting: Use it to pipe “RIP” on the cookie — the little details really bring the graveyard to life.
- Marshmallow ghost: Soft, sweet, and adorable — the star ghost of your graveyard scene.
- Candy pumpkins: Adds bright pops of color and seasonal charm.
Make It Your Way
One of the things I love most about the Ghosts in the Graveyard Dirt Pudding Cups Recipe is how easy it is to tweak and make your own. Whether you’re avoiding dairy, working with kids, or just want to swap out decorations, this recipe is super forgiving and fun to personalize.
- Variation: I sometimes swap the pudding for a dairy-free version when friends come over with allergies — it still tastes amazing and keeps everyone in the spooky spirit.
- Extra Creepy: Adding gummy worms or candy spiders on top creates a creepy-crawly effect that’s great for parties.
- Mini Size: Use smaller cups to make bite-sized versions for easy party servings and less fuss.
- Colorful Fun: Switch candy pumpkins out for candy eyeballs or edible glitter to jazz up the look depending on your theme.
Step-by-Step: How I Make Ghosts in the Graveyard Dirt Pudding Cups Recipe
Step 1: Set the Stage with Your “Dirt” Base
Start by spooning your prepared chocolate pudding into a clear plastic cup — I like to fill it almost to the top but leave a little room for the “graveyard” decorations. The pudding acts as the dirt, so don’t rush this part. Smooth the top gently with the back of your spoon to create a flat surface for the crumb layer. This way, your “dirt” looks neat and realistic.
Step 2: Add the Crumb “Dirt” Layer
Sprinkle 2 tablespoons of chocolate graham cracker crumbs or Oreo cookie crumbs generously on top of the pudding. Don’t be shy here—the crumbs add both crunch and the right visual look for your graveyard dirt. I always tap a little off if it piles too high, so it sits nicely without covering too much of the pudding surface.
Step 3: Decorate the Headstone
Grab a Milano cookie and use chocolate frosting to pipe “RIP” right onto it. I use a small decorating tip or just snip the corner off a plastic baggy for this. Don’t worry if your writing isn’t picture perfect; the charm of these pudding cups is in their homemade look. Set your decorated cookie gently into the dirt layer, standing it upright so it looks like a little tombstone.
Step 4: Place the Ghost and Candy Pumpkins
Pop a marshmallow ghost into the cup — I nestle it close to the cookie so it looks like it’s haunting the grave. Add a few candy pumpkins scattered around for that pop of orange and extra festivity. Feel free to add gummy worms here for an even creepier effect!
Step 5: Chill or Serve
At this point, you can serve your Ghosts in the Graveyard Dirt Pudding Cups immediately, or cover them tightly with plastic wrap and pop them in the fridge for up to 24 hours. Just keep in mind that the cookies might start getting a little soggy, and the marshmallows could dry out if they sit too long, so I usually aim to serve them same day for best results.
Tips from My Kitchen
- Use Clear Cups: I like clear plastic cups so the dirt and pudding layers really stand out — it amps up the spooky effect!
- Pipe “RIP” Beforehand: Piping on the cookie ahead of time makes assembly faster, especially when making several cups.
- Keep Pudding Chilled: Chilled pudding tastes best and holds its shape better for neat layering.
- Don’t Overdo the Crumbs: Too many crumbs can hide your decorations, so layer them just enough for a dirt look without overpowering the graveyard scene.
How to Serve Ghosts in the Graveyard Dirt Pudding Cups Recipe
Garnishes
I usually stick with the marshmallow ghosts and candy pumpkins because they’re simple and festive, but I’ll often add tiny gummy worms crawling over the crumbs for an extra creepy touch. If you’re feeling creative, edible googly eyes or candy spiders make excellent garnishes too — just pop them gently onto the crumbs for extra Halloween charm.
Side Dishes
Since these pudding cups are plenty sweet and rich, I like to serve them alongside fresh fruit like apple slices or orange segments, which help cut through the chocolatey indulgence. For a party, a plate of roasted pumpkin seeds or a light popcorn snack complements the theme without weighing everyone down.
Creative Ways to Present
I love using miniature plastic cauldrons or small mason jars with Halloween-themed stickers as an alternative to plastic cups for an extra festive touch. For kids’ parties, arranging the cups on a spooky-themed tray with fake spiders and cobwebs instantly amps up the atmosphere. And if you want to really wow your guests, stack the cups in a tiered stand with some flickering LED candles around for a haunted dessert display.
Make Ahead and Storage
Storing Leftovers
When I have leftovers, I tightly cover each cup with plastic wrap and keep them in the fridge. They hold up great for about 24 hours, though I do notice the cookies lose their crunchiness and the marshmallow ghosts aren’t quite as soft. I try to enjoy them fresh for the best texture and flavor.
Freezing
Honestly, I don’t recommend freezing this recipe because the texture of the pudding and marshmallows changes after thawing — you might find the pudding gets a bit watery and the marshmallows tough. It’s best to make these cups fresh or store refrigerated briefly.
Reheating
Since this is a chilled dessert, reheating isn’t necessary or recommended. If your cups have been refrigerated for a while, just let them sit at room temperature for 10-15 minutes before serving to take the chill off and enjoy the flavors more fully.
FAQs
-
Can I make the Ghosts in the Graveyard Dirt Pudding Cups Recipe vegan?
Absolutely! Use a dairy-free chocolate pudding alternative (there are plenty of coconut or almond milk-based options), vegan chocolate cookies or graham cracker crumbs, and vegan marshmallows. You can also find plant-based frosting or make your own for piping “RIP” on the cookies. The end result is just as fun and delicious without any animal products.
-
How far ahead can I assemble these pudding cups?
It’s best to assemble them no more than 24 hours before serving. While you can prepare all the components earlier, putting together the cups too far in advance means the cookies might get soggy and marshmallows will dry out. For crisp, fresh tasting treats, assemble on the day you plan to enjoy them.
-
What other candies work well for decorating?
Try mini candy corn, gummy worms, candy spiders, or chocolate chips to mix things up. Edible eyes or Halloween-themed sprinkles are also great for putting your own creative spin on the graveyard scene.
-
Can I use homemade pudding for this recipe?
Yes! Homemade pudding tastes fantastic here and allows you to control sweetness and texture. Just make sure the pudding is fully chilled before assembling for the best results.
Final Thoughts
This Ghosts in the Graveyard Dirt Pudding Cups Recipe has become a Halloween staple in my house because it’s easy, fun, and downright tasty. I love how it doubles as a little craft project, getting everyone involved in decorating their own dessert. Plus, the spooky theme is just the right amount of festive without being too scary for kids. Whether you’re pulling it together on a whim or planning a big Halloween bash, these pudding cups deliver all the fun with none of the stress. Give it a try — I promise you’ll be hooked!
Print
Ghosts in the Graveyard Dirt Pudding Cups Recipe
- Prep Time: 10 minutes
- Cook Time: 0 minutes
- Total Time: 10 minutes
- Yield: 1 serving
- Category: Dessert
- Method: No-Cook
- Cuisine: American
Description
These “Ghosts in the Graveyard” Dirt Pudding Cups are a fun and spooky Halloween treat featuring creamy chocolate pudding layered with chocolate cookie crumbs, decorated with a Milano cookie headstone piped with “RIP,” a marshmallow ghost, and candy pumpkins. Perfect for a festive dessert that’s easy to assemble and delightfully creepy.
Ingredients
Main Ingredients
- 8 ounces prepared chocolate pudding
- 2 tablespoons chocolate graham cracker crumbs or Oreo cookie crumbs
- 1 Milano cookie
- Chocolate frosting for piping
- 1 marshmallow ghost
- 3 candy pumpkins
Instructions
- Fill the cup: Place the prepared chocolate pudding in a clear plastic cup, filling it almost to the top to create the base layer of the dessert.
- Add crumbs: Sprinkle the chocolate graham cracker crumbs evenly over the pudding to resemble dirt in the graveyard scene.
- Pipe the headstone letters: Using chocolate frosting with a small decorating tip or a plastic bag with a corner snipped off, pipe the letters “RIP” onto the Milano cookie to create the graveyard headstone.
- Assemble decorations: Place the decorated Milano cookie, the marshmallow ghost, and the candy pumpkins inside the cup, arranging them to look like a spooky graveyard scene.
- Serve or refrigerate: Serve the cups immediately, or cover each with plastic wrap and refrigerate for up to 24 hours. Note that the cookies may become soggy and marshmallows may dry out if stored longer.
Notes
- Scale the recipe up or down to make as many pudding cups as you need for your group.
- If using small prepared pudding cups, you will need about 2 cups of pudding to fill each 9-ounce plastic cup.
- Add additional decorations like gummy worms, candy spiders, or other Halloween-themed candies for extra spooky effect.
- The pudding cups are best enjoyed fresh but can be refrigerated for up to 24 hours.
- Cover tightly with plastic wrap to prevent drying out if storing in the refrigerator.
Nutrition
- Serving Size: 1 cup
- Calories: 350 kcal
- Sugar: 30 g
- Sodium: 150 mg
- Fat: 15 g
- Saturated Fat: 7 g
- Unsaturated Fat: 6 g
- Trans Fat: 0 g
- Carbohydrates: 45 g
- Fiber: 2 g
- Protein: 4 g
- Cholesterol: 25 mg


