

Garlic Butter Dinner Rolls Recipe
If you’re on the hunt for the fluffiest, most melt-in-your-mouth rolls to add a gourmet touch to your dinner table, you’re in the right place. This Garlic Butter Dinner Rolls Recipe is honestly a game-changer—soft, buttery, with just the right hint of garlic that feels like a warm hug in carb form. I’ve made these countless times, and whether it’s for a weeknight supper or a holiday feast, they never fail to impress. Stick with me, and I’ll share all the little tricks so you nail these rolls every single time.
Why This Recipe Works
- Perfectly Soft Texture: The long kneading and proofing create a tender, airy crumb that’s just right—not too dense or chewy.
- Flavor Balance: Garlic butter brushed on fresh from the oven takes these rolls from simple to irresistible.
- Easy to Follow: Minimal ingredients and step-by-step instructions make it beginner-friendly but impressive enough for guests.
- Versatile: These rolls pair beautifully with anything from hearty stews to light salads.

Ingredients & Why They Work
Each ingredient here plays a key role in both flavor and texture. Picking quality basics like fresh yeast and real butter makes a noticeable difference—and knowing why they’re included helps you troubleshoot or swap if needed.
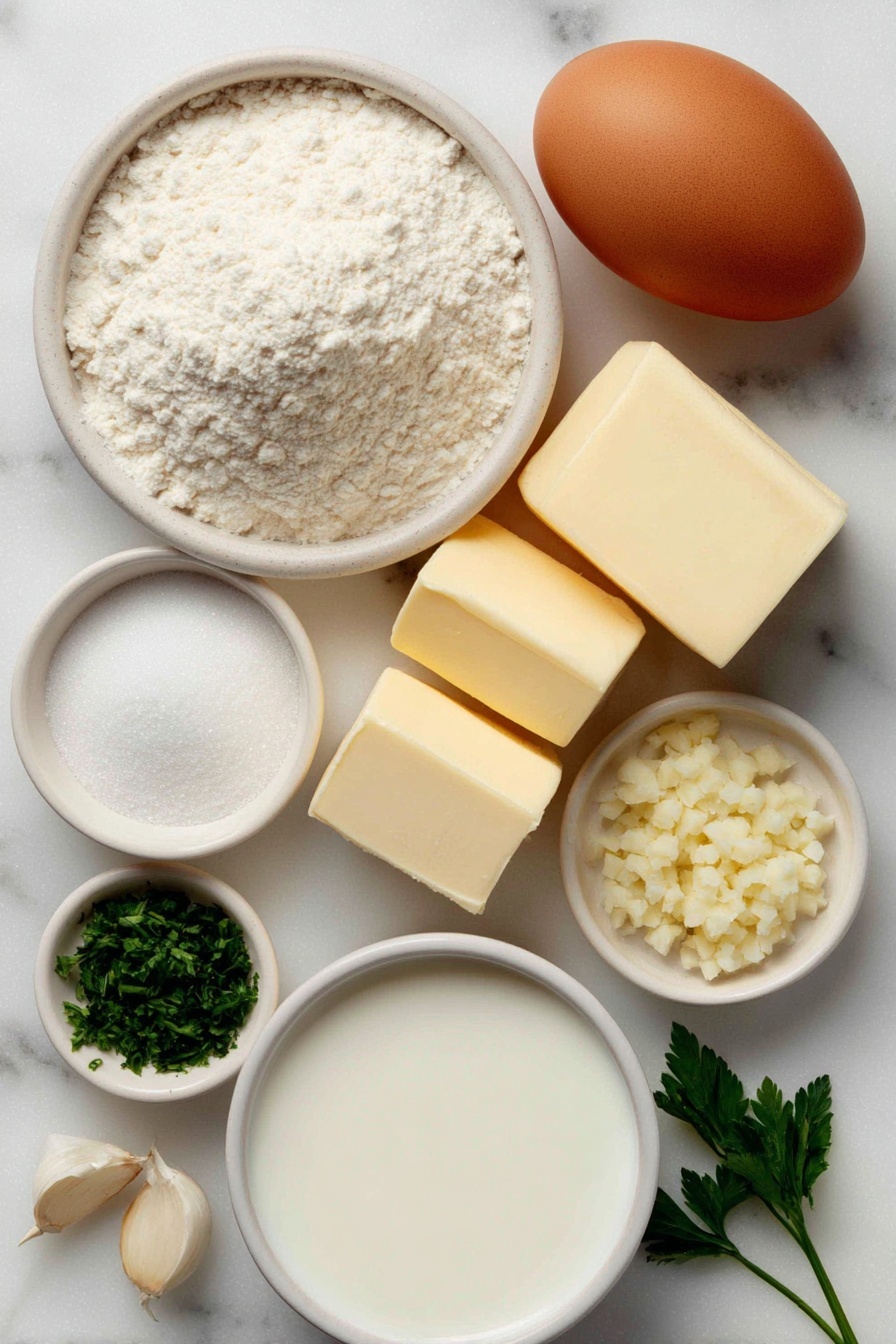
- Warm whole milk: It activates the yeast gently and adds richness; too hot and it can kill the yeast, too cold and the dough rises slowly.
- Active dry or instant yeast: The magic behind the rise, creating those beautiful airy pockets inside the rolls.
- Sugar: Feeds the yeast and balances the savory garlic, while helping create a soft crust.
- All-purpose flour: Provides structure; if you use bread flour, expect chewier rolls, but all-purpose yields softer results.
- Large egg: Adds richness, improves texture, and helps with browning.
- Salt: Essential for flavor balance and controlling yeast activity.
- Unsalted butter (softened): Adds moisture and tenderness; use softened butter so it incorporates evenly.
- Egg wash (egg yolk + milk): Gives the rolls their shiny, golden crust that’s so inviting.
- Salted butter for garlic butter: Adds luscious garlic flavor and glossy finish.
- Fresh garlic cloves: Finely chopped so the flavor infuses the butter perfectly without being overpowering.
- Fresh parsley: Adds a pop of color and fresh herbal brightness.
Make It Your Way
While I adore the classic garlic butter flavor, I love tweaking this recipe to suit different moods and occasions. Don’t hesitate to make it your own—these rolls are a great canvas for all kinds of fun flavors.
- Herby Twist: I’ve mixed in rosemary or thyme with the parsley for a more aromatic touch that pairs well with roasted meats.
- Cheesy Variation: Adding a sprinkle of parmesan on top before baking adds a delicious savory crust.
- Vegan Adaptation: Swap the butter for plant-based margarine and use a flax egg or aquafaba for the egg wash.
- Spicy Kick: Toss in a pinch of red pepper flakes to the garlic butter for a gentle heat boost.
Step-by-Step: How I Make Garlic Butter Dinner Rolls Recipe
Step 1: Activate the yeast and gather ingredients
Warm your milk to about 110°F — it should feel warm but not hot to the touch. Mix in the yeast and let it sit for about 5 minutes until it’s foamy—that’s how you know the yeast is happily awake and ready to go.
Step 2: Combine and start your dough
Add the rest of the ingredients—flour, sugar, egg, salt, and softened butter—right into the yeast-milk mixture. Stir with a wooden spoon or your hand until it forms a rough, shaggy dough. Don’t worry if it’s sticky—that’s perfect.
Step 3: Knead to perfection
Turn the dough out onto a clean, lightly floured surface and knead using the push-pull motion with your palms for about 15 minutes. Don’t add extra flour—it’ll toughen up your rolls. If your dough is sticky at first, that’s normal; just keep going. Look for it to become smooth and elastic—when you can stretch a small piece thin like paper without tearing, you’re golden.
Step 4: First rise – patience is key
Oil a large bowl and place your dough inside, covering it with cling wrap. Put it somewhere warm and cozy—a slightly warm oven, or near a sunny window—until it doubles in size. This usually takes about 90 minutes. This step is what gives these rolls that fluffy lightness, so resist the urge to rush it!
Step 5: Shape the rolls
Punch the dough down gently and turn it onto your work surface. Divide into 12 equal pieces—use a kitchen scale if you want to be super precise. Roll each piece into a tight, smooth ball. I like cupping a dough ball in one hand and rotating it with the other to get a taut surface without wrinkles. This step really helps your rolls look bakery-quality.
Step 6: Second rise and egg wash
Place the balls onto a parchment-lined baking sheet, spacing evenly. Whisk together egg yolk and milk for the egg wash and brush it generously over all the rolls. Then let them rise again for 30–45 minutes until puffy and soft.
Step 7: Bake & make garlic butter
Preheat your oven to 350°F about 20 minutes before baking. Give the rolls another brush of egg wash for that gorgeous shine and bake for 20-22 minutes. Meanwhile, melt butter in a small saucepan, sauté garlic until fragrant (about 1-2 minutes), then stir in fresh parsley off the heat.
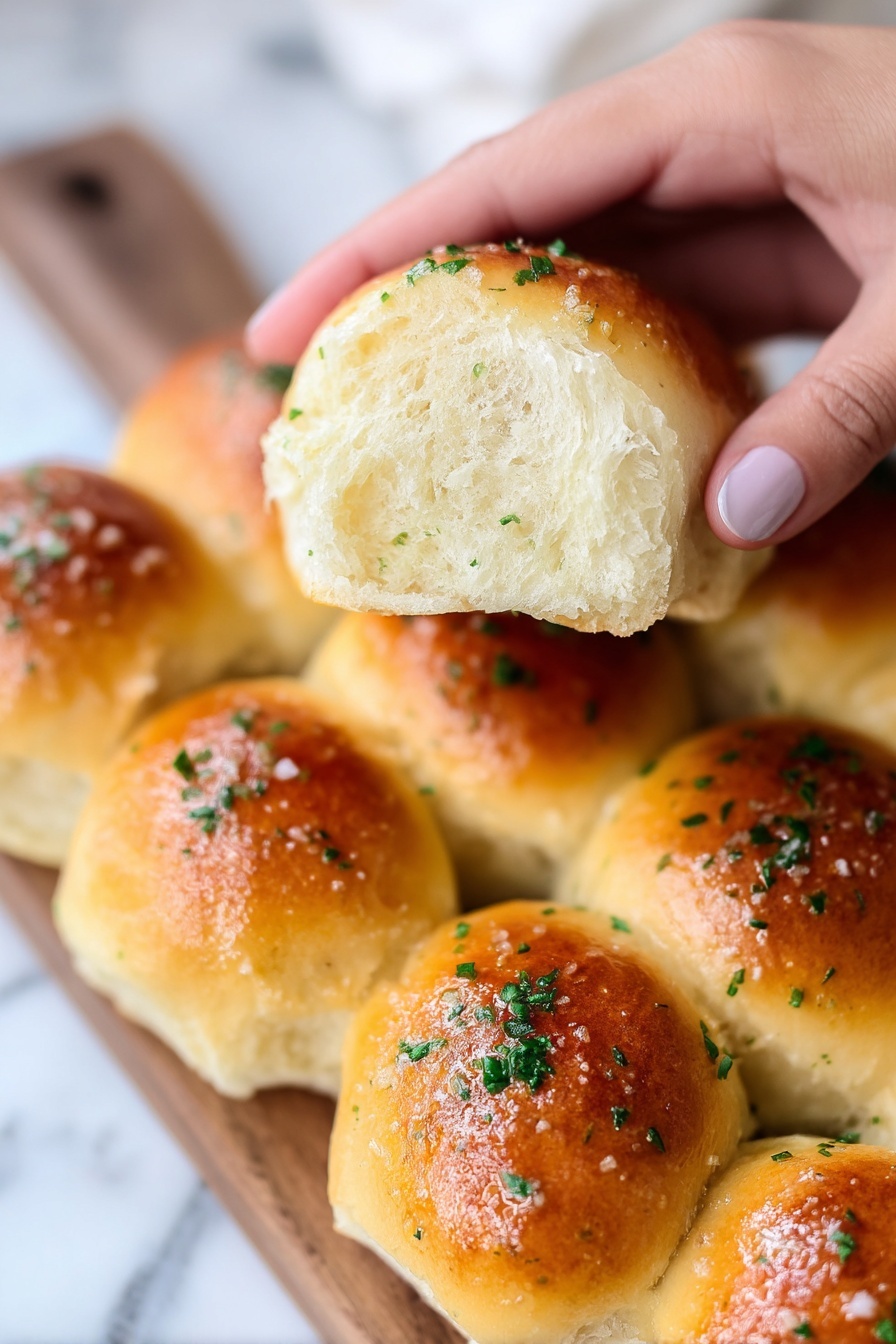
Step 8: Final touch
Right when the rolls come out of the oven and are still warm, brush them with that luscious garlic butter. This step is *the* difference-maker, locking in flavor and creating a melt-in-your-mouth experience.
Tips from My Kitchen
- Don’t Rush the Kneading: I once tried speeding through this step and ended up with dense rolls. Spending those 15 minutes kneading is worth every second.
- Use a Kitchen Scale: Weighing your dough pieces ensures even baking and uniform roll size, which looks so professional on the table.
- Fresh Garlic Matters: Pre-chopping garlic and letting it sit in butter for a couple of minutes off heat really mellows the sharpness and makes the rolls cozy and comforting.
- Second Rise is Crucial: If you skip or shorten this, rolls won’t puff up as nicely, so give them the time they deserve—even if you’re hungry!
How to Serve Garlic Butter Dinner Rolls Recipe
Garnishes
I usually sprinkle a little extra fresh parsley over the rolls right after brushing with garlic butter. It adds just the right freshness and a lovely pop of color. Sometimes, I love adding a tiny hint of flaky sea salt on top for a delicate crunch that contrasts with the softness.
Side Dishes
These rolls are my go-to side for comfort meals like roast chicken, beef stew, or creamy pasta dishes. I also love serving them alongside a fresh green salad or a warm bowl of tomato soup—the garlic butter transforms them into a full meal experience.
Creative Ways to Present
For holiday dinners or special occasions, I arrange the garlic butter rolls in a circular pattern on a wooden board, topping them with little piles of flavored butters (like honey butter or herbed cream cheese). It turns a simple bread into a beautiful centerpiece that guests can’t resist digging into.
Make Ahead and Storage
Storing Leftovers
I like to store leftover rolls in an airtight container or a resealable bag at room temperature for up to 2 days. They stay soft, but if you find them a bit dry, a quick warm-up will bring them back to life.
Freezing
These rolls freeze beautifully—just cool completely, wrap them tightly in foil or plastic wrap, then place in a freezer bag. They keep well for up to 3 months. I usually freeze them right after baking and brushing with garlic butter; you can always reheat with a little extra garlic butter brushed on.
Reheating
To warm rolls, I pop them in a 350°F oven wrapped loosely in foil for about 10-15 minutes. This keeps them soft and moist, and if you brush on more garlic butter before reheating, it feels freshly baked every time.
FAQs
-
Can I use instant yeast instead of active dry yeast in this Garlic Butter Dinner Rolls Recipe?
Absolutely! Instant yeast can be used interchangeably with active dry yeast. Just mix it directly with the flour and other ingredients without needing to proof it in warm milk first. It might even speed up the rising time slightly.
-
My rolls turned out dense—what went wrong?
This usually happens if the dough wasn’t kneaded enough or didn’t rise fully before baking. Make sure to knead the dough until it’s smooth and stretchy and allow it to double in size during the first rise. Also, avoid adding too much extra flour during kneading.
-
Can I prepare the dough the night before?
Yes! You can prepare the dough and let it rise once, then cover and refrigerate it overnight. The next day, take it out, shape the rolls, do the second rise, and bake. This slow fermentation actually enhances the flavor.
-
How many rolls does this recipe yield?
You’ll get 12 perfectly sized rolls, ideal for sharing with family or friends.
Final Thoughts
This Garlic Butter Dinner Rolls Recipe holds a special place in my kitchen—it’s the recipe I turn to when I want something utterly comforting but still a little fancy. Whether shared around the table with loved ones or tucked into a solo cozy meal, these rolls have a way of making any occasion feel a little warmer. I hope you try making them and love the process as much as the delicious results. Trust me, once you master this recipe, you’ll have everyone asking for seconds and the secret behind your irresistible garlic butter rolls!
Print
Garlic Butter Dinner Rolls Recipe
- Prep Time: 25 minutes
- Cook Time: 22 minutes
- Total Time: 3 hours 15 minutes
- Yield: 12 dinner rolls
- Category: Bread
- Method: Baking
- Cuisine: American
- Diet: Vegetarian
Description
These Easy Garlic Butter Dinner Rolls are soft, fluffy, and perfect for any meal. Made from scratch with warm milk, yeast, and plenty of butter, they are brushed with a flavorful garlic butter for a deliciously golden finish. Ideal for family dinners or special occasions, these rolls rise twice to achieve their perfect texture and shine.
Ingredients
Dinner Rolls:
- 1 cup whole milk (240g), warm (around 110F)
- 3 teaspoons active dry yeast or instant yeast
- ⅓ cup sugar (70g)
- 3 ¾ cup all purpose flour (490g)
- 1 large egg
- 1.5 teaspoon salt
- 6 tbsp unsalted butter, softened at room temperature (85g)
Egg Wash:
- 1 egg yolk
- 1 tablespoon milk
Garlic Butter:
- ¼ cup salted butter (57g)
- 2-3 garlic cloves, finely chopped
- 1-2 tablespoon freshly chopped parsley
Instructions
- Activate Yeast: In a large bowl, stir together the warm milk with the yeast and let it activate for a few minutes until frothy.
- Mix Dough Ingredients: Add the sugar, all purpose flour, egg, salt, and softened unsalted butter to the bowl with the yeast mixture, stirring until a shaggy dough forms.
- Knead Dough: Turn the dough out onto a clean surface and knead using a push-pull motion with your palms for 15 minutes. The dough will transition from sticky to smooth and stretchy. Perform the window-pane test to check readiness by stretching a piece thin without ripping.
- First Proof: Transfer the dough to a clean, lightly oiled large bowl, cover with cling wrap, and place in a warm, humid spot to rise until it doubles in size, approximately 90 minutes.
- Shape Rolls: Once risen, punch down the dough and divide it into 12 equal pieces. Roll each piece into a tight, smooth ball without wrinkles or cracks using your palms.
- Prepare for Second Rise: Line a 9×13 inch baking sheet with parchment paper and space the rolls evenly. Mix egg yolk and milk to make the egg wash and generously brush all rolls.
- Second Proof: Allow the rolls to rise again in a warm spot for 45 minutes until puffy.
- Preheat Oven: Heat the oven to 350F (conventional) in the last 20 minutes of proofing.
- Final Egg Wash: Brush the risen rolls with another generous layer of egg wash before baking.
- Bake Rolls: Bake the rolls for 22 minutes until they develop a shiny golden crust.
- Make Garlic Butter: While baking, melt the salted butter in a saucepan, sauté the finely chopped garlic for 1-2 minutes, then remove from heat and stir in the fresh parsley.
- Brush Rolls: Immediately brush the hot rolls with the garlic butter after removing them from the oven.
- Serve: Serve the warm garlic butter dinner rolls and enjoy!
Notes
- Ensure the milk is warm but not hot to avoid killing the yeast.
- Do not add extra flour during kneading; the dough should be sticky initially.
- Use the window-pane test to judge dough readiness to avoid dense rolls.
- Proofing times may vary depending on the room temperature.
- For softer rolls, cover the dough with a damp cloth during proofing to maintain humidity.
- You can substitute fresh parsley with dried parsley, using half the amount.
- Store leftover rolls in an airtight container and reheat with a brush of garlic butter for freshness.
Nutrition
- Serving Size: 1 roll
- Calories: 180 kcal
- Sugar: 5 g
- Sodium: 180 mg
- Fat: 7 g
- Saturated Fat: 4 g
- Unsaturated Fat: 3 g
- Trans Fat: 0 g
- Carbohydrates: 25 g
- Fiber: 1 g
- Protein: 4 g
- Cholesterol: 35 mg


