

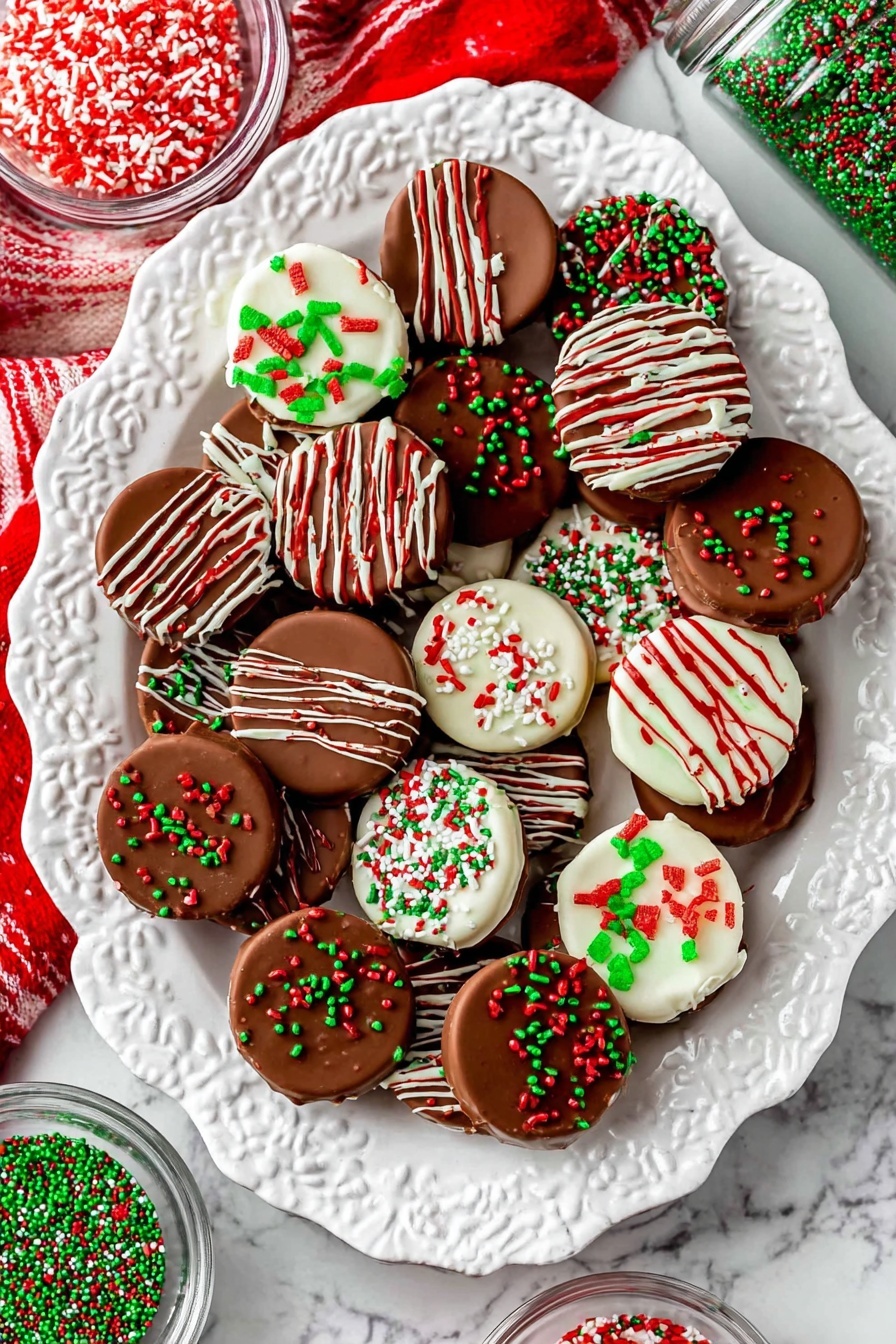
Festive Chocolate Covered Oreos Recipe
If you’re looking for a show-stopping treat this holiday season, you’ve got to try this Festive Chocolate Covered Oreos Recipe. I promise, these cookies look like they came from a fancy bakery but come together so easily at home. Perfectly crunchy Oreos dipped in silky milk and white chocolate, then sprinkled with festive sprinkles? What’s not to love? Stick around because I’m sharing all my best tips to make sure your batch turns out gorgeous and delicious every single time.
Why This Recipe Works
- Smooth Melting Chocolate: Using Ghirardelli melting wafers ensures silky chocolate that coats the Oreos evenly without clumps.
- Double Dipping Magic: The option to dip in both milk and white chocolate creates a beautiful layered look and adds flavor contrast.
- Festive Finishing Touches: Sprinkles and colored drizzles transform simple cookies into holiday delights that everyone will rave about.
- Easy to Customize: Simple ingredient swaps let you adapt the recipe to any theme or occasion.

Ingredients & Why They Work
This Festive Chocolate Covered Oreos Recipe uses a minimal number of ingredients, but the key is selecting quality components and understanding their role for the best outcome. Each ingredient adds texture, flavor, or that signature holiday look.

- Oreos: I love mint Oreos for a wintery twist, but classic or Double Stuf work beautifully for that creamy center.
- Milk chocolate melts: Choose melting wafers like Ghirardelli’s for smooth, glossy coverage that sticks perfectly.
- White chocolate melts: Optional but highly recommended for the double-dipped effect and festive colored drizzles.
- Assorted Christmas sprinkles: Adds texture and vibrant color to make the cookies pop for holiday gatherings.
- Red and green food coloring: For tinting white chocolate, these colors make your drizzles extra festive and fun.
Make It Your Way
One of the best parts about this Festive Chocolate Covered Oreos Recipe is how adaptable it is. I usually stick to the classic milk and white chocolate combo, but you can totally customize the look and flavors to suit your mood or event.
- Variation: Sometimes I swap the milk chocolate for dark chocolate when I want a richer flavor and less sweetness. My family still loves it!
- Dietary Switch: For dairy-free friends, I’ve experimented with vegan chocolate melts and it works great, just be sure to check the melting consistency.
- Seasonal Flair: Beyond Christmas, I’ve used pastel sprinkles and colored drizzles for Easter and birthdays — same recipe, totally different vibe.
Step-by-Step: How I Make Festive Chocolate Covered Oreos Recipe
Step 1: Prep Your Chocolate Melts
I start by melting the milk chocolate wafers in a microwave-safe bowl. I zap them in 30 second bursts, stirring in between, to avoid overheating. If you want to double-dip with white chocolate, melt that separately the same way. Using Ghirardelli melting wafers helps because they melt evenly without clumping, making dipping smooth and stress-free.
Step 2: Dip and Decorate
Grab an Oreo and use a fork to dip it into the melted milk chocolate, letting the excess drip off gently before you place it on a wire rack lined with wax paper. If you’re double-dipping, wait for this layer to fully set (about an hour at room temperature), then dip half the cookie in white chocolate. Don’t rush this or you might smudge the first layer! While the chocolate is still soft, sprinkle on your colorful Christmas sprinkles for that festive sparkle.
Step 3: Add Colored Chocolate Drizzles
If you want to take your Festive Chocolate Covered Oreos Recipe up a notch, add some red and green food coloring to the white chocolate melts. I transfer the tinted chocolates into small plastic bags, snip off a corner, and drizzle over the cookies in swirls or zigzags. This extra step makes the cookies look professionally decorated and they’re always a hit at parties!
Step 4: Let Them Set and Enjoy!
Let your cookies set at room temperature for about an hour. I avoid chilling them straight away because the glossy finish dulls when refrigerated. But if you’re in a hurry, a quick trip to the fridge works fine — just be aware the finish won’t be as shiny. Once set, these beauties are ready to taste and impress your guests.
Tips from My Kitchen
- Use Quality Melting Wafers: I swear by Ghirardelli wafers — they melt smoothly and stay liquid long enough to dip many cookies without seizing.
- Don’t Rush Setting Time: Waiting for the chocolate to fully set before double dipping prevents smudges and keeps designs crisp.
- Choose Your Oreos Wisely: Mint Oreos add a seasonal flavor twist, but classic ones offer a creamy familiar taste everyone loves.
- Avoid Overheating Chocolate: Melt your chocolate slowly in bursts to avoid burning, which can ruin the texture and taste.
How to Serve Festive Chocolate Covered Oreos Recipe
Garnishes
I love sprinkling on a mix of red, green, and white sugar crystals or tiny snowflake shaped sprinkles to keep the festive vibe. Sometimes, a tiny dusting of edible glitter turns these cookies into sparkly little gems that wow at cookie exchanges.
Side Dishes
Pair these gorgeous Oreos with a cozy cup of hot cocoa or a peppermint mocha for a classic holiday combo. They also go surprisingly well alongside a cheese and fruit platter to contrast sweet and savory flavors at your celebrations.
Creative Ways to Present
I’ve wrapped these cookies in clear cellophane bags tied with a festive ribbon for last-minute gifts. For parties, I arrange them on tiered dessert stands or nestle them in colorful cupcake liners to make an irresistible holiday display that guests can’t help reaching for.
Make Ahead and Storage
Storing Leftovers
Keeps well in an airtight container at room temperature for up to two weeks. I usually store mine in a single layer on wax paper between each layer of cookies so nothing sticks together. If you don’t have room, the fridge works fine but expect the chocolate shine to dull slightly.
Freezing
These cookies freeze beautifully for up to six months. Wrap them tightly in plastic wrap and then place in an airtight container or freezer bag. I’ve frozen batches ahead of time for holiday gatherings, and they come out tasting just as fresh after thawing.
Reheating
Since they’re best enjoyed chilled or at room temp, I usually let frozen ones thaw slowly overnight in the fridge before serving. Reheating isn’t necessary and can cause the chocolate to bloom, so I avoid heat to keep that perfect texture and gloss.
FAQs
-
Can I use regular chocolate chips instead of melting wafers?
While you technically can, I don’t recommend it for this Festive Chocolate Covered Oreos Recipe. Chocolate chips have stabilizers that make them tough to melt smoothly and can seize easily, especially white chocolate chips. Melting wafers like Ghirardelli’s are formulated for even melting and easy dipping.
-
How do I prevent the chocolate from dulling when setting?
The best way is to let your chocolate set at room temperature rather than refrigerating. Rapid cooling causes bloom and dullness. Patience here pays off for a beautiful glossy finish.
-
Can I double dip with the same chocolate instead of mixing milk and white?
Absolutely! You can double dip in just milk chocolate or just white — it’s really about the look and flavor you want. Mixing chocolate types just adds extra visual interest and contrast.
-
What if I don’t have colored sprinkles?
No worries — plain or metallic sprinkles work great too! You can also get creative with crushed peppermint candies or edible glitter for festive effects.
Final Thoughts
This Festive Chocolate Covered Oreos Recipe has become a holiday staple in my kitchen because it’s deceptively easy yet impressively festive. Every time I share these cookies, friends ask for the recipe and I love that it brings a smile with every bite. Try them out — once you make them, you’ll want to keep this recipe on repeat every Christmas (or whenever you need a chocolatey pick-me-up!). Honestly, sharing these treats feels like giving a little bit of joy wrapped in chocolate-covered magic.
Print
Festive Chocolate Covered Oreos Recipe
- Prep Time: 15 minutes
- Cook Time: 0 minutes
- Total Time: 1 hour 15 minutes
- Yield: 36 servings
- Category: Dessert
- Method: No-Cook
- Cuisine: American
Description
Festive Christmas Chocolate Covered Oreos are a delightful holiday treat featuring classic Oreos dipped in smooth milk and white chocolate, decorated with colorful sprinkles and optional food coloring for a vibrant seasonal touch. Perfect for gifting or party platters.
Ingredients
Cookies
- 1 (15-ounce) package Oreos (mint, regular, or Double Stuf)
Chocolate Coatings
- 1 (10-ounce) package Ghirardelli milk chocolate melts
- 1 (10-ounce) package Ghirardelli white chocolate melts (optional for double-dipped cookies)
Decorations
- Assorted Christmas sprinkles, as desired
- Red food coloring, optional and as desired
- Green food coloring, optional and as desired
Instructions
- Melt Milk Chocolate: In a medium, microwave-safe bowl, melt the Ghirardelli milk chocolate melts according to package instructions, stirring occasionally until smooth.
- Melt White Chocolate (Optional): In a separate medium, microwave-safe bowl, melt the Ghirardelli white chocolate melts if you want to double-dip the cookies. Add red or green food coloring as desired.
- Dip Oreos in Milk Chocolate: Place a piece of wax paper under a wire rack. Using a fork, dip each Oreo in the melted milk chocolate, letting the excess drip off between the fork tines, then place gently on the rack.
- Double Dip Oreos (Optional): Allow milk chocolate to fully set. Then, pick up cookies with your fingers and dip half of each cookie into the melted white chocolate. Place back on the rack.
- Add Sprinkles: Before the chocolate sets, sprinkle the cookies with assorted Christmas sprinkles to decorate.
- Pipe Colored Chocolate Drizzles (Optional): Add red or green food coloring to melted white chocolate, transfer to small plastic bags, snip a corner, and carefully drizzle over the cookies for extra decoration.
- Set Cookies: Allow the chocolate coating to set at room temperature for about 1 hour. Avoid refrigerating immediately to maintain glossy finish, although refrigeration or freezing is possible with some chocolate dulling.
- Storage: Store cookies airtight at room temperature for up to 2 weeks, in the fridge for up to 1 month, or in the freezer up to 6 months.
Notes
- You can use semi-sweet chocolate instead of milk chocolate but milk chocolate is more traditional for this recipe.
- Any combination of milk and white chocolate dipping is fine—fully dipped or half dipped.
- Chocolate candy melts or melting wafers are recommended for smooth melting and coating.
- Melted chocolate chips are not recommended due to difficulty in melting smoothly, especially white chocolate chips which tend to seize.
- Allow chocolate to set at room temperature for shiny, glossy finish; refrigeration causes dulling but doesn’t affect taste.
Nutrition
- Serving Size: 1 cookie
- Calories: 150 kcal
- Sugar: 14 g
- Sodium: 90 mg
- Fat: 9 g
- Saturated Fat: 5 g
- Unsaturated Fat: 3 g
- Trans Fat: 0 g
- Carbohydrates: 18 g
- Fiber: 1 g
- Protein: 1 g
- Cholesterol: 10 mg


