

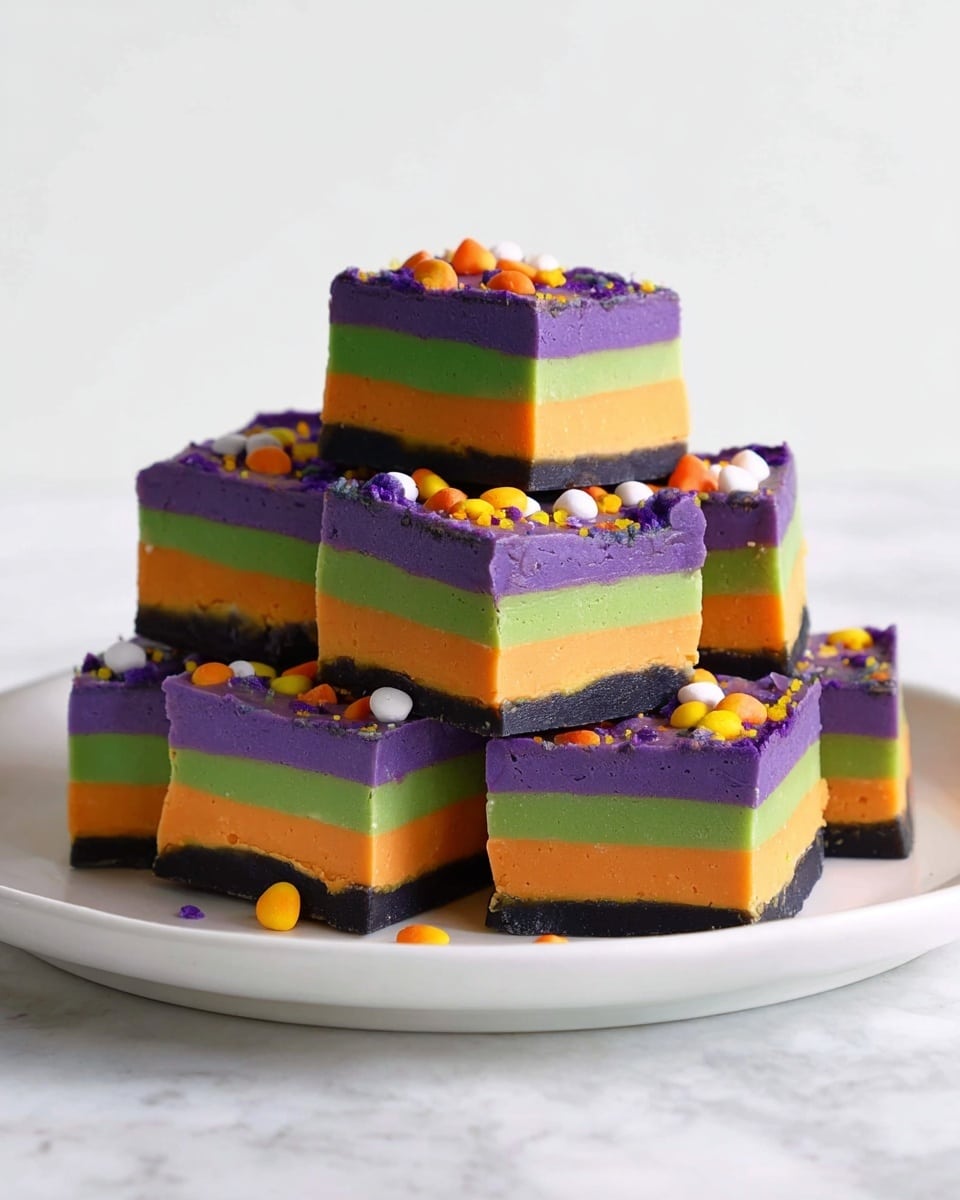
Easy Halloween Fudge Recipe
If you’re like me and love whipping up treats that get everyone talking at Halloween parties, you’ve got to try this Easy Halloween Fudge Recipe. It’s super simple, ridiculously delicious, and really fun to make—perfect for adding that spooky pop of color and flavor to your autumn celebrations. Plus, I’ll share some insider tips that make this fudge turn out perfectly every time, so stick around!
Why This Recipe Works
- Simple Ingredients: Only a handful of pantry staples, so no hunting around for weird stuff.
- Beautiful Colors: Using food coloring lets you create those classic Halloween shades—black, orange, green, and purple—that kids go crazy for.
- No-Bake Magic: You just melt, mix, and chill; no complicated candy thermometers or multi-step processes involved.
- Customizable Fun: You get to add your favorite spooky sprinkles or candies for a festive touch that’s all you.

Ingredients & Why They Work
This Easy Halloween Fudge Recipe is all about balance: creamy, sweet white chocolate pairs up with rich condensed milk, while a little vegetable oil keeps the texture silky smooth as you add bursts of color and sprinkles. Choosing quality white chocolate will really elevate the fudge’s flavor and texture, so definitely use the best you can find.
- White chocolate: It melts into a creamy base and keeps the fudge sweet and smooth—just don’t use chips made for baking only, they don’t melt as well.
- Sweetened condensed milk: This adds moisture and sweetness, making the fudge luscious and fudgy without any graininess.
- Food colouring (black, orange, green, purple): This is what brings Halloween to life on your fudge canvas; gel colors work best because they don’t thin the mixture.
- Vegetable oil: A few drops prevent the chocolate from seizing (which can happen when adding coloring), ensuring your fudge stays silky.
- Halloween sprinkles or candies: Choose a mix with spooky shapes for a festive vibe—think bats, pumpkins, or ghosts!
Make It Your Way
What I love about this Easy Halloween Fudge Recipe is how easy it is to switch things up. I sometimes mix in pumpkin spice to get that cozy fall feel, or swap sprinkles for mini chocolate chips if I’m aiming for a richer taste. Feel free to tweak colors or toppings—make it your own!
- Variation: Last year, I added a splash of peppermint extract for a minty twist, which was a big hit with the adults.
- Diet-friendly: You can try replacing white chocolate with vegan white chocolate and use coconut condensed milk for a dairy-free version.
- Seasonal changes: Swap those spooky colors and sprinkles for pastels and edible flowers to make this fudge work for spring events too.
Step-by-Step: How I Make Easy Halloween Fudge Recipe
Step 1: Prep Your Pan and Ingredients
First things first, I always line an 8×8-inch square baking tin with baking paper—this makes lifting the fudge out so much easier later and keeps everything mess-free. Then, break your white chocolate into chunks so it melts evenly. Having everything ready before you start melting helps it go smoothly.
Step 2: Gently Melt Chocolate and Condensed Milk
Pop your saucepan on low heat and add the white chocolate chunks and sweetened condensed milk. Stir gently but consistently—I usually use a silicone spatula—to coax the chocolate into melting slowly without burning. You’re looking for a thick, glossy mixture—that’s your fudge base! Patience here pays off; rushing might cause the chocolate to seize or separate.
Step 3: Divide and Color Your Fudge
Pour the fudge mixture evenly into four separate bowls. Now comes the fun part—adding your food coloring! Add a different color to each bowl: black, orange, green, and purple. Don’t forget to add a few drops of vegetable oil to each to stop the chocolate from seizing—that little trick saved me the first time I made this!
Step 4: Layer and Decorate in the Tin
Spread each colored fudge layer into your lined tin one at a time. Work quickly but carefully; if the fudge thickens before you’re done, zap it in the microwave for 10 to 20 seconds to soften it back up. Once all colors are layered, sprinkle on your Halloween-themed cakes sprinkles or candies—this part makes it so festive and fun to look at.
Step 5: Chill and Cut
Pop your tin into the fridge for at least four hours until the fudge firms right up. When it’s set, lift it out by the baking paper edges, cut into squares, and boom—you’ve got a perfectly colorful, creamy batch of Halloween fudge to impress your friends and family.
Tips from My Kitchen
- Use Gel Food Coloring: It gives bright, bold colors without thinning the fudge, keeping the texture perfect.
- Add Oil to Prevent Seizing: A few drops of vegetable oil when coloring stops the chocolate from clumping up—a lifesaver!
- Microwave to Soften: If your fudge thickens while layering, pop it in the microwave for a quick softening—don’t overheat!
- Line the Pan with Extra Paper: Use a little extra baking paper hanging over the sides so you can easily lift out the fudge for cutting.
How to Serve Easy Halloween Fudge Recipe
Garnishes
I always sprinkle a mix of candy eyeballs, tiny bats, and glittery sugar right on top before chilling the fudge—those little touches take it from sweet to spooky-fun. Sometimes, I also like to drizzle a little melted dark chocolate on top for contrast and extra flavor.
Side Dishes
Pair this fudge with a warm cup of spiced apple cider or a creamy pumpkin latte to balance the sweetness. At parties, I like serving it alongside salted caramel popcorn or roasted pumpkin seeds—sweet and salty makes a perfect combo.
Creative Ways to Present
Try cutting your fudge into fun shapes using seasonal cookie cutters—little pumpkins, ghosts, or bats are perfect—and arrange them on a black slate platter sprinkled with edible glitter. I’ve also wrapped individual squares in clear cellophane tied with orange and black ribbons to turn them into perfect party favors.
Make Ahead and Storage
Storing Leftovers
I store leftover fudge in an airtight container in the fridge, where it keeps beautifully for up to two weeks. Just make sure to separate layers with parchment paper if you stack the fudge squares to avoid sticking.
Freezing
Freezing this fudge works surprisingly well! I wrap individual squares in plastic wrap, then tuck them into a freezer-safe container. When you’re ready to enjoy, just thaw in the fridge overnight—no texture loss at all.
Reheating
If you want to soften the fudge a bit before serving, a quick 10-second zap in the microwave does wonders—just be careful not to melt it completely. Otherwise, room temperature is great for serving perfect bites with a smooth, creamy texture.
FAQs
-
Can I use dark or milk chocolate instead of white chocolate in this Easy Halloween Fudge Recipe?
Absolutely! While white chocolate gives that classic creamy base ideal for bright colors, you can swap in dark or milk chocolate. Just keep in mind that darker chocolates will change the color vibrancy, so you might want to use lighter food coloring or adjust accordingly.
-
Why do I need vegetable oil with the food coloring?
The vegetable oil helps prevent the chocolate from seizing or clumping when you add the food coloring. Since food coloring can sometimes cause chocolate to tighten up, the oil keeps everything smooth and workable.
-
Can I make this recipe without food coloring?
Yes! If you prefer a more classic white chocolate fudge look, you can skip the coloring entirely and just swirl in a bit of vanilla or almond extract for extra flavor. But the colors are really what make this recipe festive and fun for Halloween.
-
How long does the fudge take to set in the fridge?
Plan on at least 4 hours for the fudge to firm up completely, but overnight is even better if you have the time. This ensures clean slicing and perfect texture.
Final Thoughts
This Easy Halloween Fudge Recipe has been one of my go-tos for years, especially when I need something quick but still super impressive at Halloween gatherings. The ease of melting everything in one pot and the joy of dividing it into colorful layers is half the fun! I promise, you’ll enjoy making it as much as you enjoy eating it. So grab your favorite sprinkles, line your pan, and let’s get festive in the kitchen together.
Print
Easy Halloween Fudge Recipe
- Prep Time: 10 minutes
- Cook Time: 10 minutes
- Total Time: 4 hours 20 minutes
- Yield: 16 servings
- Category: Dessert
- Method: Stovetop
- Cuisine: American
- Diet: Vegetarian
Description
This Easy Halloween Fudge recipe combines creamy white chocolate and sweetened condensed milk, transformed into festive layers of black, orange, green, and purple hues. Topped with spooky Halloween sprinkles, this colorful fudge is perfect for seasonal treats and parties.
Ingredients
Main Ingredients
- 450 g white chocolate (16 oz)
- 397 g sweetened condensed milk (14 oz)
- 1 teaspoon vegetable oil
Coloring and Decoration
- Black food colouring
- Orange food colouring
- Green food colouring
- Purple food colouring
- 2-3 tablespoons Halloween cake sprinkles or candies (such as Cake Decor spooky mix sprinkles)
Instructions
- Prepare the Tin: Line an 8×8-inch baking tin with baking paper to ensure the fudge can be easily removed later.
- Melt Chocolate Mixture: Break the white chocolate into chunks and place it in a saucepan with the sweetened condensed milk. Heat over low heat on the stove, stirring gently until the chocolate has fully melted and the mixture is thick and glossy.
- Divide and Colour the Mixture: Divide the fudge mixture equally into four separate bowls. Add different food colouring to each bowl—black, orange, green, and purple—and add a few drops of vegetable oil to each to prevent the chocolate from seizing.
- Layer the Fudge: Spread each colored fudge portion into the lined tin one colour at a time. If the fudge thickens while spreading, warm it in the microwave for 10-20 seconds to restore smoothness.
- Add Sprinkles and Chill: Top the layered fudge with Halloween sprinkles, then refrigerate for 4 hours until firm.
- Serve: Once set, remove the fudge from the tin, cut into squares, and enjoy your festive Halloween treat!
Notes
- Store the fudge in an airtight container in the refrigerator for up to 2 weeks to maintain freshness.
- If the fudge becomes difficult to spread, briefly microwaving it helps to soften it without overheating.
- Use vegetable oil to prevent seizing when adding food colouring to the chocolate mixture.
- Customize your festive sprinkles or candies according to your Halloween theme or preference.
Nutrition
- Serving Size: 1 square (about 30 g)
- Calories: 150 kcal
- Sugar: 18 g
- Sodium: 30 mg
- Fat: 8 g
- Saturated Fat: 5 g
- Unsaturated Fat: 2 g
- Trans Fat: 0 g
- Carbohydrates: 20 g
- Fiber: 0 g
- Protein: 2 g
- Cholesterol: 10 mg


