
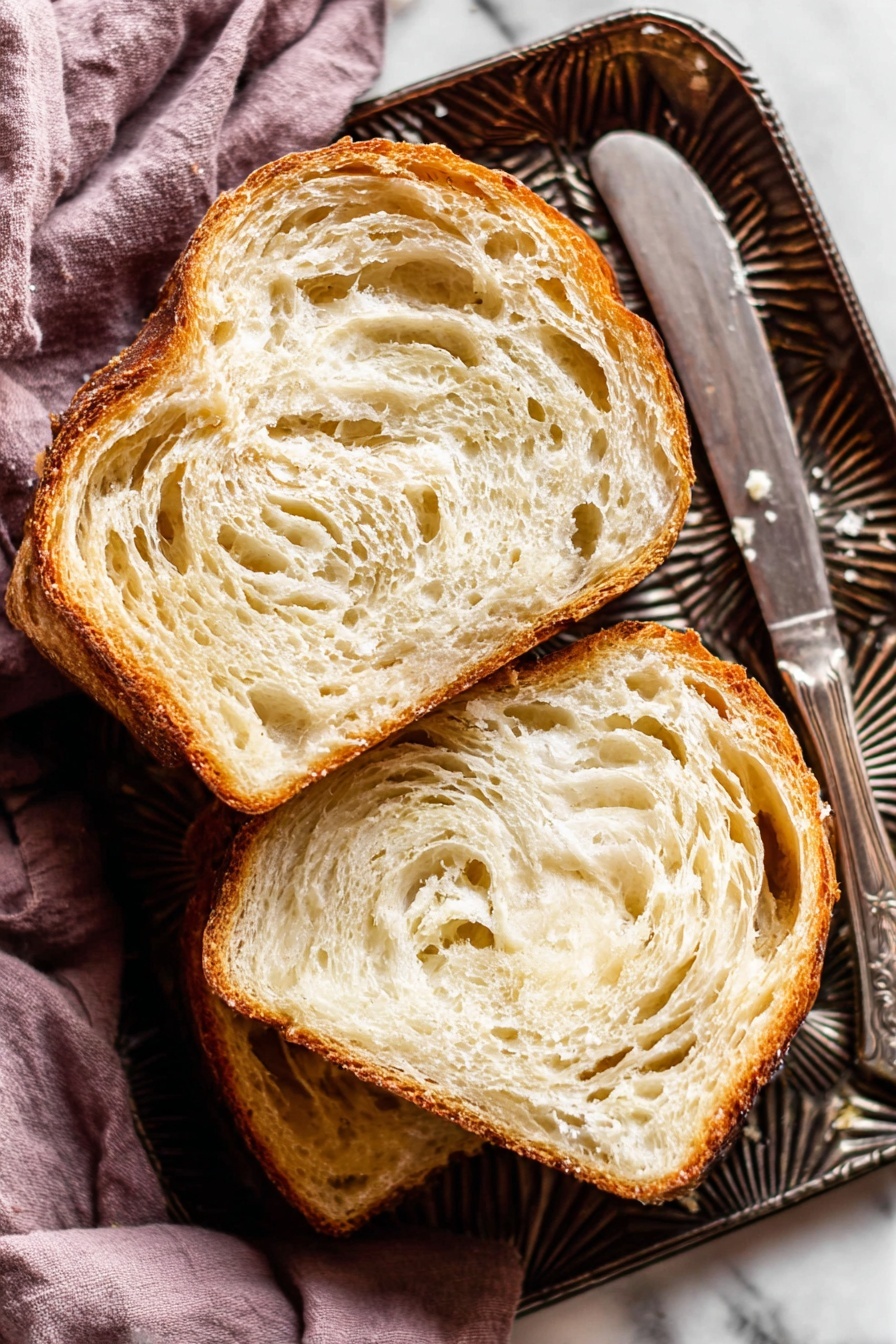
Croissant Bread Recipe
If you’ve ever dreamed of having buttery, flaky croissant texture in a convenient loaf form, you’re in for a real treat with this Croissant Bread Recipe. It’s that perfect middle ground between a classic croissant and a pull-apart bread, beautifully layered with butter and soft dough — ideal for lazy weekend mornings or an impressive brunch. Stick with me, because this recipe is not just delicious, but also surprisingly doable, even if you’re not a professional baker!
Why This Recipe Works
- Layered Laminated Dough: The butter layering technique creates those signature flaky, tender layers similar to croissants but baked in loaf form.
- Soft, Enriched Dough: Using milk, sugar, and butter in the dough results in a rich crumb that feels indulgent yet light.
- Stepwise Refrigeration: Chilling the dough at key stages helps the butter stay solid for the perfect lamination while relaxing the gluten for easy rolling.
- Balanced Rising Times: Proper proofing ensures the bread rises beautifully without over-expanding, giving a tender, not gummy, crumb.

Ingredients & Why They Work
This Croissant Bread Recipe combines the classic ingredients of yeast bread with careful lamination butter to create those buttery, flaky layers. Quality ingredients and attention to temperature will make all the difference here.
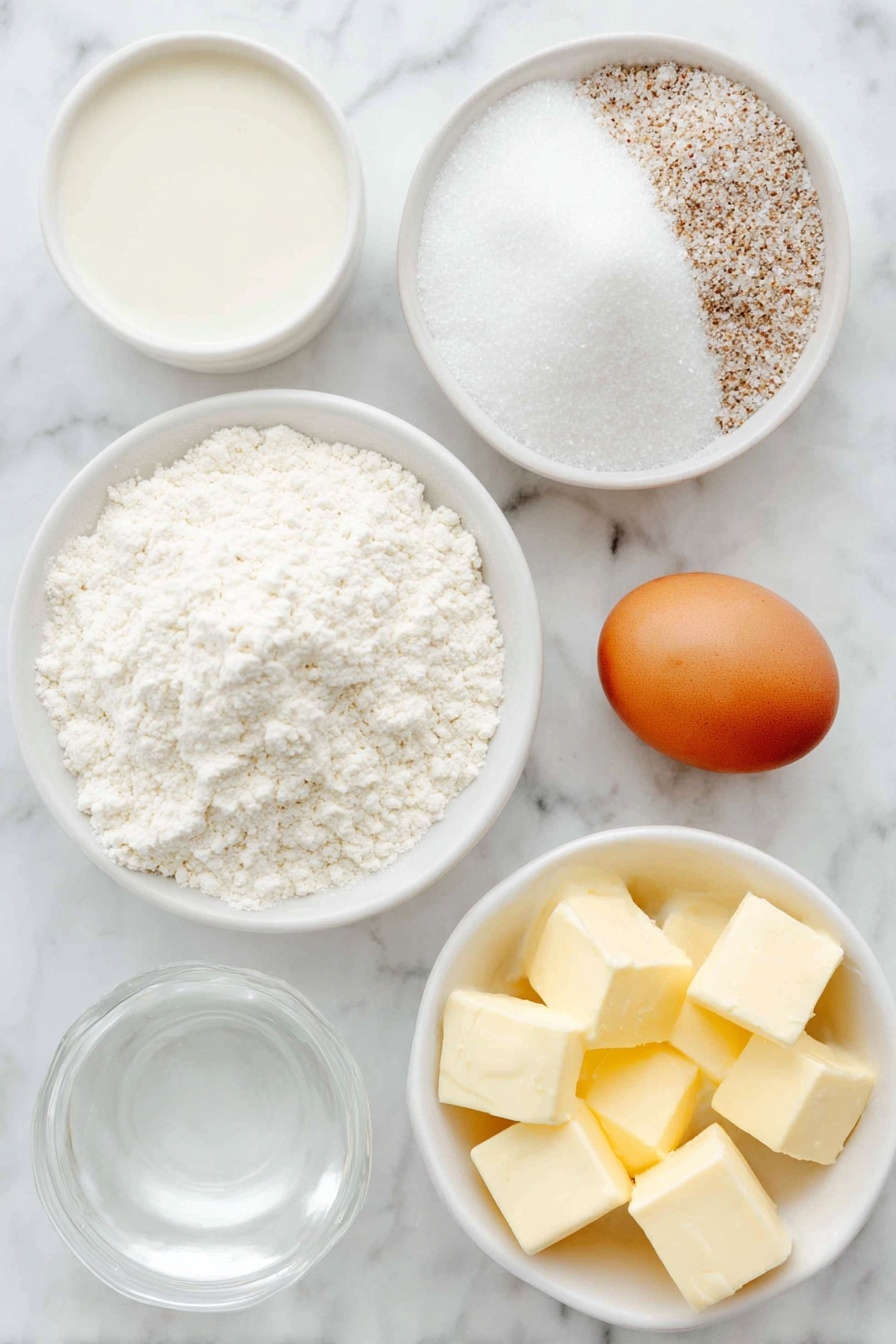
- Whole Milk: Adds richness and tenderness; warmed to activate the yeast without killing it.
- Yeast: Choose instant or active dry yeast; both work well but check about rise times if using active dry.
- Granulated Sugar: Feeds the yeast and adds slight sweetness to balance the buttery layers.
- Salt: Essential for flavor and balancing the sweetness; don’t skip it.
- Butter (softened for dough): Enriches dough and tenderizes crumb.
- All-Purpose Flour: The bread’s structure; spooned and leveled for accuracy.
- Salted Butter (for lamination): The star of the show — soft but not greasy to create flaky layers.
- Egg and Water (egg wash): Gives that gorgeous golden-brown, shiny finish.
Make It Your Way
I love to keep things classic, but this croissant bread also welcomes your creativity. Whether you want to add a swirl of cinnamon sugar or toss in some chopped nuts for crunch, these tweaks make it uniquely yours. Don’t be afraid to experiment!
- Cinnamon Sugar Twist: I once added a simple cinnamon-sugar mix just before rolling up the dough, and the subtle spice made the loaf smell incredible while baking.
- Nutty Upgrade: Toasted pistachios or almonds folded into the dough layer add great texture and flavor without complicating the process.
- Chocolate Chips: A fun addition for a sweet breakfast loaf; spread sparingly to avoid soggy spots.
- Dietary Swaps: You can substitute whole milk with full-fat non-dairy milk like oat or coconut for a dairy-free version, with slight texture differences.
Step-by-Step: How I Make Croissant Bread Recipe
Step 1: Activate Your Yeast and Form the Dough
First, warm your milk to about 110°F (43°C) — comfortably warm, not hot (this keeps your yeast happy). Whisk the milk, yeast, and sugar in your mixer bowl until frothy, which should take around 5 minutes. If you don’t have a stand mixer, grab a large bowl and wooden spoon; I find mixing by hand gives you great control over this sticky dough. Next, add salt, softened butter pieces, and 2 cups of flour. Beat on medium speed for a couple of minutes until somewhat combined — it’s okay if chunks of butter still peek through. Add the remaining flour and mix slowly until the dough just starts to come together but is still soft and slightly tacky.
Step 2: Knead Until Smooth and Silky
Kneading is where the dough starts developing its structure. Use the mixer with a dough hook for an extra 5 minutes or knead by hand on a lightly floured surface — I love doing this because it’s so tactile and connecting. Don’t over-flour the dough here; it should be soft and springy. A simple poke test helps: if your finger bounces back slowly, you’re golden. The “windowpane test” is also a great benchmark if you want to get fancy — stretch a small piece; if light shines through without tearing, the gluten’s good!
Step 3: First Rise — Let It Puff Up
Lightly oil a large bowl and nestle your dough in, turning it so every side gets coated with a little oil. Cover with cling film or a clean towel and set it somewhere warm and cozy for about 1.5 to 2 hours until nearly doubled. This patience pays off — the dough becomes airy and soft with a lovely yeast aroma.
Step 4: Shape and Chill the Dough for Lamination
After the rise, give the dough a gentle punch to push out the air. Flatten it on a silicone baking mat or parchment sheet into roughly a 10×14-inch rectangle. Why silicone mats? Because they help keep the dough from sliding when you roll. Cover it gently and pop it in the fridge for 20 minutes. This chilling relaxes the gluten and firms up the dough, prepping it for the buttery folds ahead.
Step 5: First Lamination — Wrapping the Butter
While the dough chills, slice your salted butter into ¼-inch thick slabs. The butter should be soft enough to spread a bit but not oily or melting — I use a thermometer to target about 60°F (15°C) for both butter and dough, so they laminate seamlessly. Lay the butter slabs down the center third of your chilled dough. Fold one side of the dough over the butter, then the other side on top, like folding a business letter. Pinch the ends to seal the butter inside—don’t worry if you see any small tears; just a dusting of flour can help patch those. Now, roll the dough out to a 9×12-inch rectangle, fold into thirds again, cover, and refrigerate another 20 minutes.
Step 6: Second and Third Laminations — Layer It Up
Remove the dough and repeat the rolling and folding process twice more, always rolling to about 9×12 inches and folding like a letter. These folds create all those flaky layers croissants are known for. Keeping dough and butter cold but pliable is key — if it resists rolling, just rest it a bit to let the gluten chill out. After the final fold, chill for 20 minutes once again.
Step 7: Final Shaping and Rolling into the Loaf
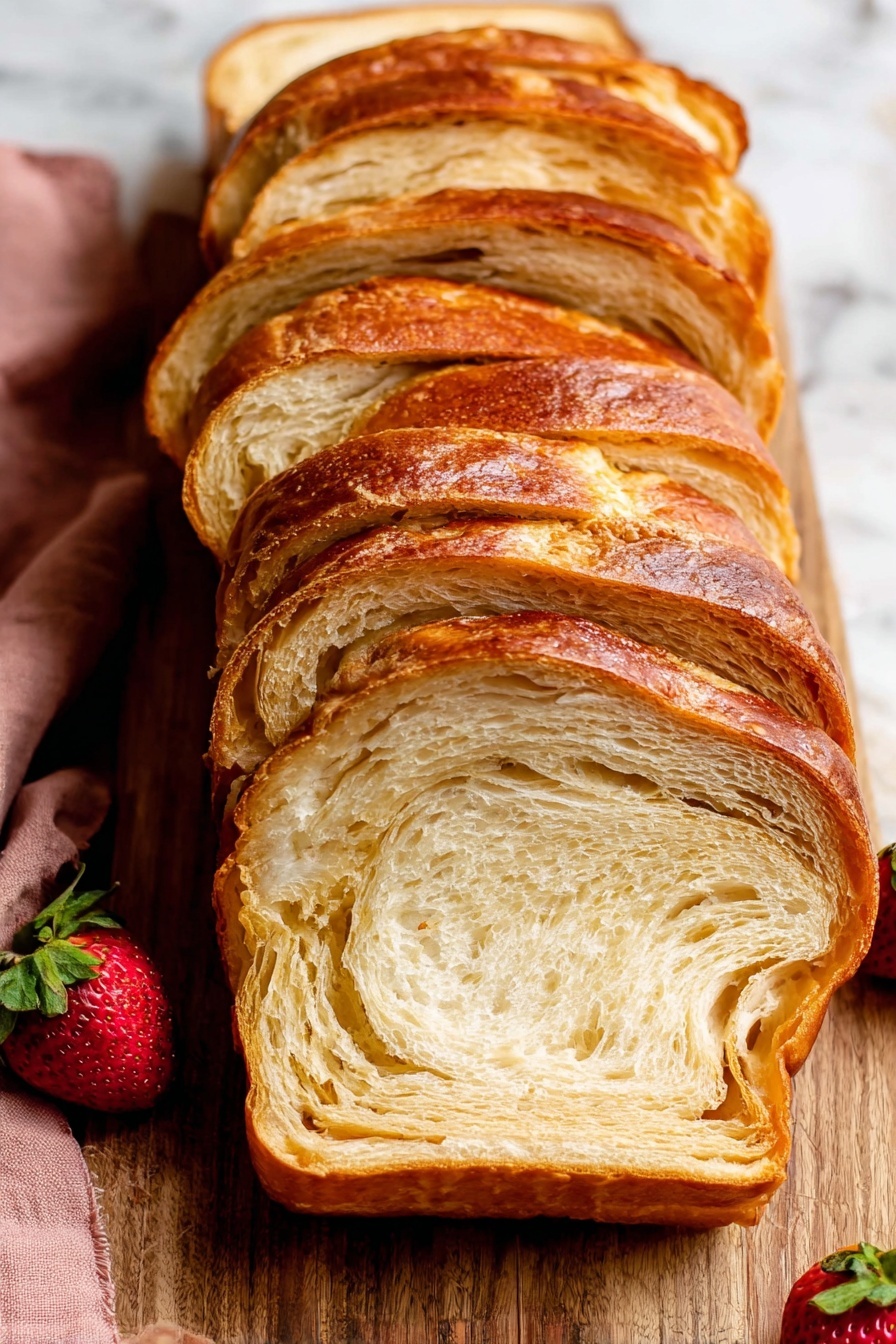
After the last chill, roll the dough into a 9×12-inch rectangle one final time. From the shorter 9-inch side, roll the dough up tightly like a jelly roll or cinnamon roll. Place the log on a cutting board and slice into 5 even rolls. These are layered, spiral bundles of buttery goodness ready to go into your loaf pan.
Step 8: Second Rise — The Pre-Bake Proof
Grease a 9×5-inch loaf pan and place your rolls seam-side down snugly inside. Cover tightly and let them rise for about 45 to 60 minutes until the rolls look puffy, but don’t let them overproof or the butter layers might leak out.
Step 9: Egg Wash and Bake
Preheat your oven to 350°F (177°C). Whisk together the egg and water for the egg wash — this gives the bread a stunning golden sheen. Brush the tops generously and pop the loaf into the oven. Bake for an hour, but here’s my trick: after 25 minutes, tent the loaf loosely with foil to prevent the top from over-browning before the center is cooked through. Check for doneness by inserting an instant-read thermometer in the loaf’s center; it should read 195°F (90°C). Cool the loaf in the pan for 30 minutes before removing it carefully to cool on a rack — slicing too early will make it fall apart.
Tips from My Kitchen
- Butter Temperature: Use a thermometer to match butter and dough temps around 60°F for easier lamination and fewer tears.
- Don’t Rush Proofing: Give the dough its full rising time; rushing makes the loaf dense instead of fluffy.
- Egg Wash Magic: Don’t skip it! Brushing egg wash right before baking gives that irresistible golden color and slight gloss.
- Slice at Room Temperature: Waiting for the bread to cool before slicing keeps your layers intact and the loaf from crumbling.
How to Serve Croissant Bread Recipe
Garnishes
When I serve croissant bread, I like to keep it simple with a pat of good quality butter or some homemade fruit preserves to complement the buttery layers without overshadowing them. A dusting of powdered sugar adds a delicate sweetness if you’re feeling fancy, especially for brunch.
Side Dishes
Pair this bread with soft scrambled eggs, a fresh fruit salad, and maybe some smoked salmon or crispy bacon for a complete breakfast or brunch spread. It also works beautifully alongside warm soups or creamy stews for a cozy dinner.
Creative Ways to Present
One of my favorite presentation ideas is to slice the loaf into thick rounds and toast them, then serve as mini “croissant bread sandwiches” with ham and cheese or avocado and smoked salmon. It looks gorgeous on a wooden board with little ramekins of spreads, making it perfect for parties or holiday gatherings.
Make Ahead and Storage
Storing Leftovers
I usually cover leftover croissant bread tightly with plastic wrap and keep it at room temperature for up to 3 days — it stays fresh and maintains its beautiful flaky layers. If I need it to last longer, the fridge is okay for up to a week, but I always recommend reheating gently.
Freezing
Freezing works like a charm with this loaf—wrap it tightly in foil and then plastic wrap to avoid freezer burn. It lasts up to 3 months in the freezer. When ready, thaw overnight in the fridge, then bring to room temperature before warming. The layers hold up wonderfully!
Reheating
To revive the croissant bread after storing or freezing, I pop slices into a toaster oven or regular oven preheated to 350°F for about 5–7 minutes, just enough to get the crust crisp and the layers warm and flaky again. Avoid microwaving as it can make the bread soggy.
FAQs
-
Can I make this Croissant Bread Recipe without a stand mixer?
Absolutely! Mixing the dough by hand with a large wooden spoon or silicone spatula works well, especially for the initial mixing stages. Kneading by hand on a floured surface is also great and gives you a better feel for the dough’s texture. Just allow yourself a bit more elbow grease and patience during kneading.
-
What if my dough tears during lamination?
If the dough tears and butter shows through, lightly sprinkle some flour over the exposed butter to help patch it. If rolling becomes too difficult, flip the dough over or let it rest for 5 minutes to relax the gluten, then continue. Keeping temperatures right during lamination helps prevent tearing too.
-
Can I add fillings like jam or chocolate?
Dry fillings like cinnamon sugar, nuts, or chocolate chips can be incorporated easily before rolling. However, wet fillings like jam may cause sogginess and make rolling tricky, so I don’t recommend them unless you want a looser, more rustic style.
-
How long will the bread stay fresh once baked?
At room temperature, wrapped well, it stays fresh for up to 3 days. Refrigerated, it lasts about a week. For longer storage, freezing is best.
-
Can I prepare the dough ahead of time?
Yes! You can refrigerate the dough after shaping it in the loaf pan for up to 15 hours, then allow it to rise at room temperature before baking. This overnight method saves time on the day you want fresh bread.
Final Thoughts
This Croissant Bread Recipe holds a special spot in my kitchen because it bridges the gap between flaky pastries and comforting bread — it feels like a little luxury you can make at home without the fussiness of individual croissants. I promise if you take your time with the lamination and proofing, you’ll be rewarded with a stunning loaf that’s flaky, buttery, and irresistible. So grab your rolling pin, and let’s bring a bakery-worthy bread right into your oven. You’ll love the way it tastes and smells, and trust me, friends will be asking for seconds!
Print
Croissant Bread Recipe
- Prep Time: 4 hours 45 minutes
- Cook Time: 1 hour
- Total Time: 6 hours 30 minutes
- Yield: 1 loaf
- Category: Bread
- Method: Baking
- Cuisine: French
Description
This Croissant Bread Loaf recipe combines the flaky layered texture of classic croissants with the convenience of a loaf, perfect for slicing and serving at breakfast or as a snack. The dough is enriched and laminated with butter to create delicate layers, then shaped, risen, and baked to golden perfection, resulting in a soft, buttery bread with a tender crumb and crisp crust.
Ingredients
Dough
- 1 cup (240ml) whole milk, warmed to about 110°F (43°C)
- 2 and 1/4 teaspoons (7g) instant or active dry yeast (1 standard packet)
- 3 Tablespoons (38g) granulated sugar
- 1 and 1/4 teaspoons salt
- 3 Tablespoons (43g) unsalted or salted butter, softened to room temperature and cut into 3 equal pieces
- 3 cups (375g) all-purpose flour (spooned & leveled), plus more as needed and for lamination
Lamination
- 3/4 cup (12 Tbsp; 170g) salted butter, slightly softened
Egg Wash
- 1 large egg, cold or room temperature
- 1 Tablespoon (15ml) water
Instructions
- Prepare the dough: Whisk the warm milk, yeast, and sugar together in the bowl of a stand mixer fitted with a dough hook. Cover and let sit about 5 minutes until foamy. Add salt, butter, and 2 cups flour; beat on medium speed 2 minutes. Add remaining flour; beat on low until a soft dough forms and pulls from bowl sides. Add 2–3 more tablespoons flour if very sticky, but avoid too much flour.
- Knead the dough: Beat dough in mixer 5 more minutes or knead by hand on lightly floured surface for 5 minutes until soft and elastic. Use windowpane test to check readiness.
- First rise: Lightly grease a large bowl, place dough inside, turn to coat, cover, and allow to rise in a warm spot for 1.5–2 hours or until nearly doubled.
- Flatten dough: Punch down dough to release air. On floured or silicone mat-lined baking sheet, gently flatten dough into 10×14-inch rectangle with floured hands. Cover and chill in refrigerator for 20 minutes.
- Prepare lamination butter: Slice 3/4 cup salted butter into 1/4-inch thick pieces.
- First lamination: Remove dough and place butter evenly along the center third. Fold one long side over butter, then the other side on top, sealing ends. Rotate dough, flour top lightly, roll to 9×12-inch rectangle, fold edges over like a letter. Cover and refrigerate 20 minutes.
- Second and third laminations: Repeat rolling and folding as in previous step twice more, covering and refrigerating for 20 minutes after each fold.
- Final lamination and shaping: Perform one last set of folds and rolling. Then, roll dough from a 9-inch side into a log. Cut log into 5 even rolls.
- Second rise: Grease a 9×5-inch loaf pan, place rolls seam side down inside, cover tightly, and let rise 45–60 minutes until slightly puffy.
- Preheat oven and apply egg wash: Preheat to 350°F (177°C). Whisk egg and water; brush over risen rolls.
- Bake: Bake loaf for 1 hour, loosely tenting with foil after 25 minutes to prevent over-browning. Bread is done when internal temp reaches 195°F (90°C).
- Cool bread: Remove loaf pan to wire rack, cool 30 minutes in pan, then release bread and cool at least 15 more minutes on wire rack before slicing.
Notes
- For overnight dough, refrigerate shaped rolls after lamination, covered, for up to 15 hours. Remove and rise 1–2 hours before baking.
- To freeze dough, freeze shaped loaf after lamination for up to 3 months. Thaw in refrigerator at least 3 hours, then let rise 1–2 hours before baking.
- Use whole milk for best flavor and texture, but lower-fat or non-dairy milk can be substituted; avoid nonfat milk.
- You may use either instant or active dry yeast, adjusting rise times slightly for active dry yeast.
- Butter for lamination should be pliable but not too soft or cold, ideally about 60°F (15°C).
- Do not halve or double the recipe; make additional loaves separately if needed.
- Add dry fillings like cinnamon sugar, chopped nuts, or chocolate chips before rolling for variety. Avoid wet fillings like jam.
- Use a silicone baking mat for easy rolling and shaping without dough sticking.
Nutrition
- Serving Size: 1 slice (about 80g)
- Calories: 290 kcal
- Sugar: 5 g
- Sodium: 180 mg
- Fat: 14 g
- Saturated Fat: 8 g
- Unsaturated Fat: 5 g
- Trans Fat: 0 g
- Carbohydrates: 31 g
- Fiber: 1 g
- Protein: 6 g
- Cholesterol: 45 mg


