

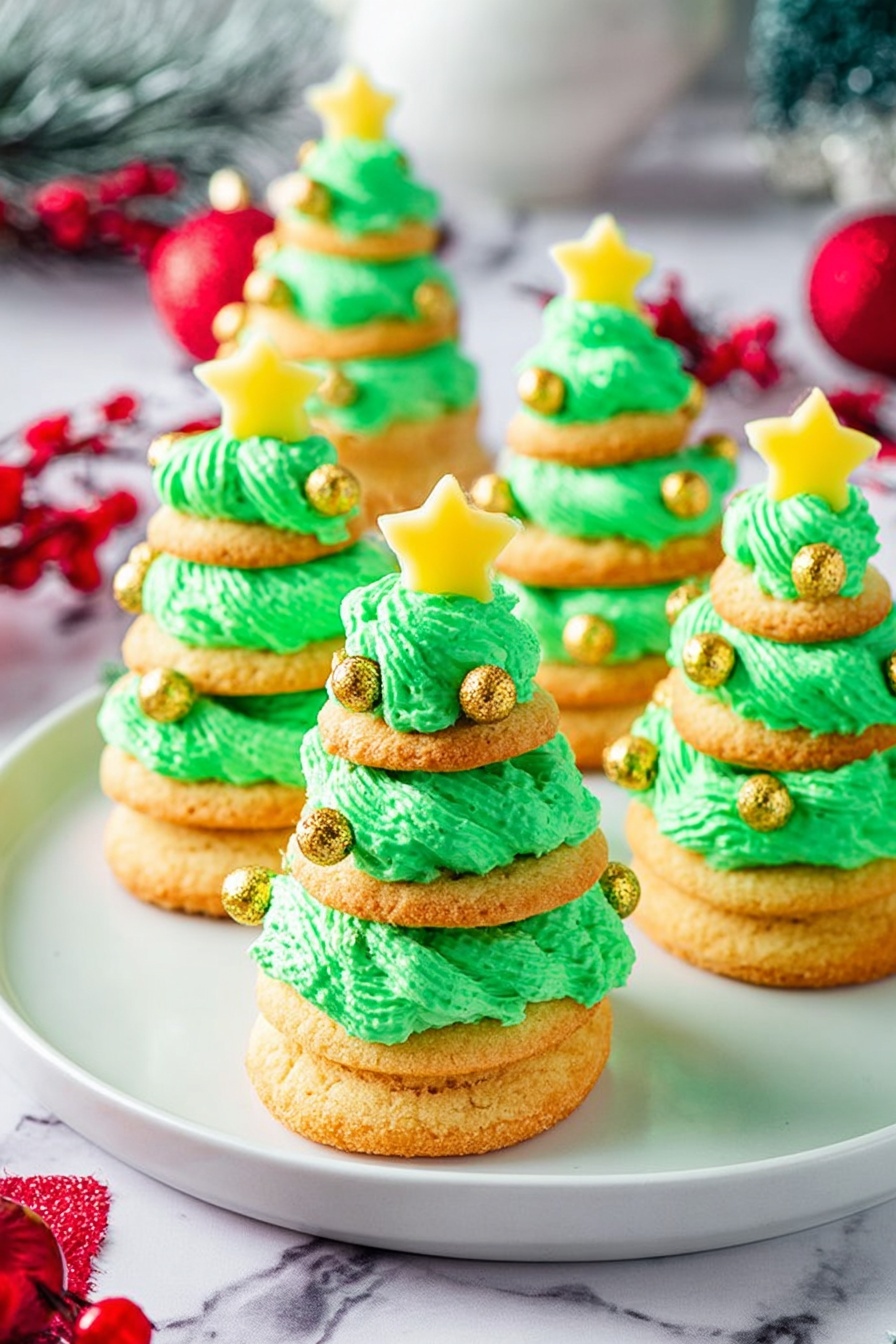
Christmas Tree Cookie Stackers Recipe
If you’re anything like me, the holiday season calls for treats that not only taste amazing but also bring that extra shine of festive joy to your table. That’s why I’m excited to share this Christmas Tree Cookie Stackers Recipe — it’s fun, flavorful, and honestly, a total game-changer for holiday cookie trays. Imagine stacking little green frosted cookies that look just like miniature Christmas trees, all decorated with sparkly sprinkles and a twinkling star on top. Trust me, you’ll want to make these for your next party or just to brighten up a chilly afternoon with a cup of cocoa.
Why This Recipe Works
- Perfect Texture: The cookies are soft yet sturdy enough to stack without crumbling.
- Beautiful Presentation: The varying cookie sizes and green buttercream make your stacks look like real Christmas trees.
- Easy to Customize: You can adjust the frosting color and sprinkles to match your holiday vibe.
- Make-Ahead Friendly: These cookies freeze and store well, so you can prep ahead without stress.

Ingredients & Why They Work
Every ingredient in this Christmas Tree Cookie Stackers Recipe was chosen to balance flavor and easy assembly. The butter makes the cookies tender and rich, while confectioners’ sugar ensures a smooth, sweet frosting perfect for piping and stacking. When shopping, opt for high-quality butter and pure vanilla extract for the best aroma and taste.
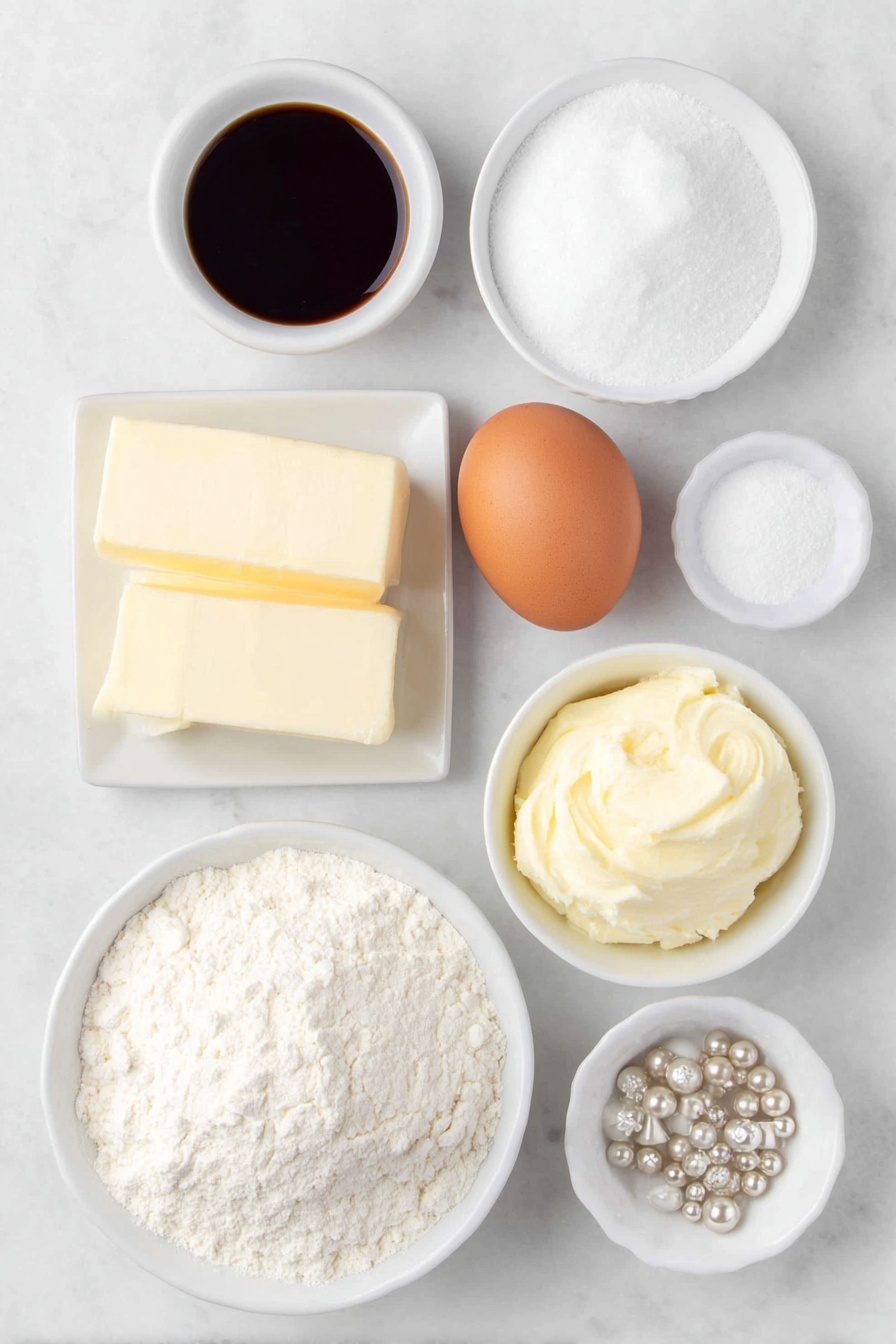
- Unsalted butter: Using unsalted lets you control the saltiness; softened butter creams beautifully with sugar for tender cookies and fluffy frosting.
- Confectioners’ sugar: This powdery sugar is key to smooth frosting and delicate cookie sweetness—regular sugar won’t give the same texture.
- Egg: Helps bind the dough for soft yet resilient cookies that will hold their shape under frosting.
- Vanilla extract: Real vanilla warms the flavor, making every bite cozy and aromatic.
- All-purpose flour: Provides structure; too much makes cookies tough, so the recipe balances just right.
- Baking soda: Gives a slight lift for a tender bite without puffing up too much, maintaining stackability.
- Salt: Enhances sweetness and balances flavors in both cookies and frosting.
- Green food coloring: Adds that festive tree color; gel or liquid works, just add a few drops at a time.
- Decorative sprinkles: Yellow star sprinkles and gold/silver pearls bring sparkle and holiday charm to your stackers.
Make It Your Way
One of my favorite things about this Christmas Tree Cookie Stackers Recipe is how you can make it your own. Maybe you want a different color scheme, or to swap in a flavored frosting. Don’t hesitate to tweak it — the recipe is flexible and forgiving.
- Variation: I once tried a peppermint buttercream instead of vanilla, adding crushed candy canes for a minty twist — total crowd-pleaser!
- Dietary adjustment: I’ve had success using gluten-free flour blends; just watch the dough consistency and add a splash of milk if it feels dry.
- Decor suggestions: Red and green sprinkles or edible glitter create a festive sparkle if you want to go beyond the stars and pearls.
- Difficulty: Beginners, don’t stress about perfect circles — these cookies look charming with a bit of rustic charm in their shape.
Step-by-Step: How I Make Christmas Tree Cookie Stackers Recipe
Step 1: Cream the Butter and Sugar Like a Pro
Start by beating the softened butter on high speed until it’s creamy and smooth—that usually takes me about 2 to 3 minutes. Scrape down the bowl so everything blends evenly. Then add the confectioners’ sugar and whip it together for another 3 minutes. This step is key for that flawless cookie texture and frosting later on.
Step 2: Mix in the Egg, Vanilla, and Dry Ingredients
Add the egg and vanilla next, beating until completely combined. This binds the dough and gives that classic buttery aroma. Then, slowly add your flour, baking soda, and salt, beating just until everything’s incorporated. Overmixing here can make your cookies tough, so stop as soon as you see no more streaks of flour.
Step 3: Shape and Bake Your Cookies
One little trick I swear by is making three sizes of cookie dough balls: small (1 teaspoon), medium (2 teaspoons), and large (3 teaspoons). You’ll have about 20 of each, perfect for stacking. Bake the large ones around 10 minutes, medium for 7-8, and small for 5-6, but keep an eye on them—they’re done when the edges set, even if the centers look slightly soft.
Step 4: Whip up that Lush Green Buttercream
Use the same mixing bowl to beat the softened butter for the frosting until silky, about 3 to 4 minutes. Gradually add the confectioners’ sugar in two parts, mixing well each time and scraping the bowl. Then stir in vanilla and salt. Now comes the fun part—add green food coloring a few drops at a time until you get that perfect festive hue.
Step 5: Decorate and Stack Your Tree Cookies
Fill a piping bag fitted with a star tip (I love using the 1M) with the green frosting. Pipe generous swirls on the large and medium cookies, and a pretty swirl on the small ones to create the “tree top.” Place a yellow star sprinkle on the smallest ones to mimic the star atop a Christmas tree. Then stack a large cookie as a base, top it with a medium, and finish with the small cookie. Add silver and gold pearls—or whatever sparkly sprinkles you adore—to bring your cookie trees to life.
Tips from My Kitchen
- Batch Baking: I bake one sheet at a time on the center rack and rotate halfway for even baking that keeps cookies perfectly shaped.
- Don’t Overmix: Overworking the dough gave me tough cookies before — now I stop as soon as the flour disappears for tender results.
- Color Control: Add your green food coloring gradually; I’m always surprised how much I need to get that deep evergreen color.
- Stacking Stability: Pipe a thick layer of frosting between sizes for glue-like hold—less frosting = wobbly stacks in my experience!
How to Serve Christmas Tree Cookie Stackers Recipe
Garnishes
I usually go for the classic yellow star on top of the smallest cookie because it instantly screams Christmas. Then I sprinkle gold and silver pearls around for that extra sparkle—trust me, it elevates the look without any fuss. But feel free to jazz these up with colorful jimmies or edible glitter if you’re feeling festive!
Side Dishes
These cookie stackers shine as a sweet centerpiece alongside warm mulled cider or hot chocolate. I also love serving them with a simple cheese platter or spiced nuts for a party spread, giving guests that perfect sweet-savory combo.
Creative Ways to Present
This year, I arranged my Christmas Tree Cookie Stackers Recipe on a wooden board sprinkled with fake snow (read: powdered sugar) and tiny twinkle lights woven around the platter—it looked magical! You could also place stacks of different heights on cupcake stands or tiered trays to create an eye-catching dessert display.
Make Ahead and Storage
Storing Leftovers
After decorating, I usually store these cookies airtight at room temperature for up to 4 days, which keeps them tasting fresh and the frosting nicely soft. If your kitchen is warm or you want them to last longer, storing them in the fridge for 1 to 2 weeks works well too, just be mindful the frosting can firm up slightly.
Freezing
I recommend freezing the baked cookies before frosting, wrapped tightly in plastic wrap and stored in an airtight container or ziplock bag. When you’re ready to serve, thaw them fully, then pipe on your frosting and decorate—this keeps everything fresh without frosting damage.
Reheating
These cookies are best enjoyed at room temperature, so I let them sit out for about 30 minutes after taking them from the fridge or freezer. If you want to slightly warm them, a brief 10-second zap in the microwave softens the buttercream nicely, but be careful not to melt the decorations.
FAQs
-
Can I make the Christmas Tree Cookie Stackers Recipe ahead of time?
Absolutely! You can bake the cookies up to a week in advance and freeze them unfrosted for even longer. Frost and decorate right before serving for the freshest look and taste.
-
What’s the best way to avoid cookies from spreading?
Make sure your butter is properly softened but not melted, and chill your dough briefly if it feels too soft. Also, measure ingredients accurately and line your baking sheets to prevent sticking.
-
Can I use food coloring other than green?
Of course! Feel free to make the frosting any color you like to match your holiday décor or party theme. Red, white, or even pastel colors would look adorable as well.
-
What piping tip works best for these cookies?
I recommend a star tip like the Wilton 1M for those classic swirls that look like fir tree branches. It’s easy to use and creates beautiful texture on your cookies.
-
Can I make this recipe gluten-free?
Yes! Swap the all-purpose flour for a gluten-free blend that measures cup-for-cup. You might need to adjust dough consistency slightly, but the cookies will still be delicious and stackable.
Final Thoughts
This Christmas Tree Cookie Stackers Recipe is one of those holiday gems that I keep coming back to year after year. It’s more than just a cookie — it’s a fun activity, a festive decoration, and a sweet tradition all rolled into one. I love how simple yet stunning these stacks look, and how they always bring smiles from kids and adults alike. So next time you want a dessert that’s both impressive and delicious, give this recipe a try. I can’t wait to hear how your cookie trees turn out!
Print
Christmas Tree Cookie Stackers Recipe
- Prep Time: 30 minutes
- Cook Time: 10 minutes
- Total Time: 1 hour 10 minutes
- Yield: 20 servings
- Category: Dessert
- Method: Baking
- Cuisine: American
- Diet: Vegetarian
Description
These Stacked Christmas Tree Cookies are a festive and fun holiday treat made from buttery sugar cookies layered with smooth green buttercream frosting and decorated with festive sprinkles. Perfect for celebrating the season, these cookies are shaped into a charming stacked tree design that adds a whimsical touch to any holiday dessert table.
Ingredients
Cookies
- ¾ cup unsalted butter, softened
- ¾ cup confectioners’ sugar
- 1 large egg
- 1 teaspoon vanilla extract
- 2 ¼ cups all-purpose flour
- 1 teaspoon baking soda
- ½ teaspoon salt
Buttercream Frosting
- 1 cup unsalted butter, softened
- 4 cups confectioners’ sugar
- 1 teaspoon pure vanilla extract
- ¼ teaspoon salt
- Drops green food coloring, as desired
Garnishing
- Yellow star sprinkles
- Silver and gold pearl-shaped sprinkles
Instructions
- Preheat and prepare baking sheets: Preheat your oven to 350 degrees Fahrenheit and line at least two baking sheets with Silpat liners or parchment paper; set aside.
- Cream butter: In a stand mixer fitted with the paddle attachment or a large bowl with a handheld electric mixer, beat the softened butter on high speed until creamy, about 2 to 3 minutes. Scrape down the sides of the bowl to ensure even mixing.
- Add sugar and cream: Add the confectioners’ sugar and continue beating until incorporated and creamy, about 3 minutes.
- Incorporate egg and vanilla: Add the egg and vanilla extract, beating until well combined. Scrape the sides of the bowl again.
- Add dry ingredients: Add the all-purpose flour, baking soda, and salt. Beat on low speed until just incorporated, being careful not to overmix.
- Form dough balls: Divide the dough to make balls in three sizes: small (1 teaspoon), medium (2 teaspoons), and large (3 teaspoons). Aim for about 20 balls of each size, approximately 60 total.
- Bake cookies: Place the dough balls on the prepared baking sheets. Bake the large size for 10 minutes, the medium size for 8 minutes, and the small size for 6 minutes, or until set around the edges. Cookies may look slightly underdone in the center but will firm up as they cool.
- Cool cookies: Let the cookies cool on the baking sheets for 10 minutes before transferring to wire racks to cool completely.
- Make buttercream frosting: Using the same mixing bowl, beat softened butter on high speed until smooth and creamy, about 3 to 4 minutes. Add half the confectioners’ sugar and beat on medium until incorporated. Add the rest of the sugar and beat again until smooth. Incorporate vanilla extract and salt, then add green food coloring gradually until you reach your desired shade.
- Decorate and assemble: Fit a piping bag with a star tip (such as 1M) and fill it with green buttercream. Pipe frosting onto the largest cookies first, followed by the medium cookies. Pipe a small swirl on top of the smallest cookies to resemble the tree tops. Add yellow star sprinkles on top of the smallest cookies.
- Stack cookies: Create cookie trees by stacking a large cookie as the base, then a medium cookie, and topping with the small decorated cookie. Repeat with all cookies.
- Add final decorations: Garnish your stacked cookie trees with silver and gold pearl-shaped sprinkles or any festive sprinkles you prefer.
Notes
- Baking time may vary based on cookie size, your oven, climate, and ingredient brands. Watch your cookies closely and adjust time as needed based on doneness.
- Store decorated cookies in an airtight container in the fridge for 1 to 2 weeks for best freshness; alternatively, keep them at room temperature airtight for up to 4 days.
- For freezing, freeze baked but undecorated cookies in airtight containers or zip-top bags. Frost after thawing rather than before freezing.
- Use a star piping tip like 1M to create realistic tree frosting designs.
- Rotate your baking sheet midway through baking when baking one sheet at a time to ensure even baking.
Nutrition
- Serving Size: 1 serving
- Calories: 250 kcal
- Sugar: 20 g
- Sodium: 100 mg
- Fat: 15 g
- Saturated Fat: 9 g
- Unsaturated Fat: 5 g
- Trans Fat: 0 g
- Carbohydrates: 28 g
- Fiber: 1 g
- Protein: 2 g
- Cholesterol: 40 mg

