

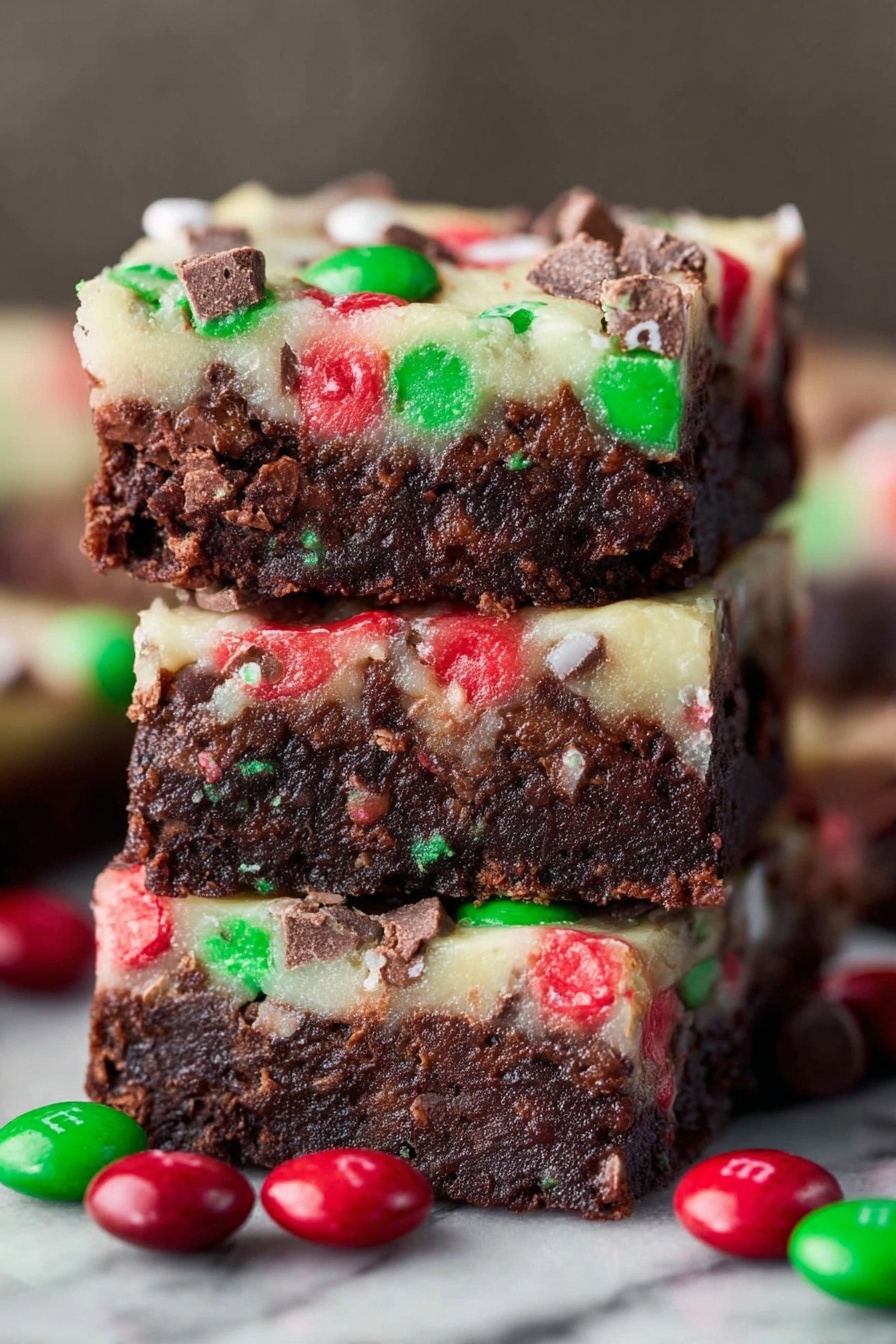
Christmas Brownie Bars with M&Ms Recipe
If you’re on the hunt for a festive treat that’s bursting with holiday cheer, you’ve got to try my Christmas Brownie Bars with M&Ms Recipe. These bars are not your average brownies—they’re loaded with layers of rich chocolate, crunchy nuts, gooey coconut, and those colorful holiday M&Ms that give every bite a fun, crunchy surprise. Trust me, once you taste these, they’ll be your go-to dessert for the season (and beyond!). Keep reading because I’m sharing all my best tips to make sure these brownies turn out just right every time.
Why This Recipe Works
- Layered Goodness: Combining a fudgy brownie base with a gooey topping of coconut and condensed milk creates a texture-packed bite every time.
- Festive M&M Crunch: The holiday-themed M&Ms add pops of color and that fun, melty crunch that everyone loves in Christmas treats.
- Easy Yet Impressive: With simple steps and common ingredients, these bars look like you spent hours, but really, they’re a breeze to whip up.
- Customizable Toppings: You can swap or add nuts, sprinkles, or extra chocolate chips to match your holiday vibe and preferences.

Ingredients & Why They Work
The magic behind these Christmas Brownie Bars with M&Ms Recipe is all in the layering: a rich chocolate brownie base paired with a luscious topping that bakes into a chewy, nutty, and colorful masterpiece. Each ingredient plays its part, from the semi-sweet chocolate chips to the sweetened condensed milk, crafting an irresistible harmony. When shopping, look for fresh, high-quality chocolate chips and holiday M&Ms to really boost flavor and festive appeal.
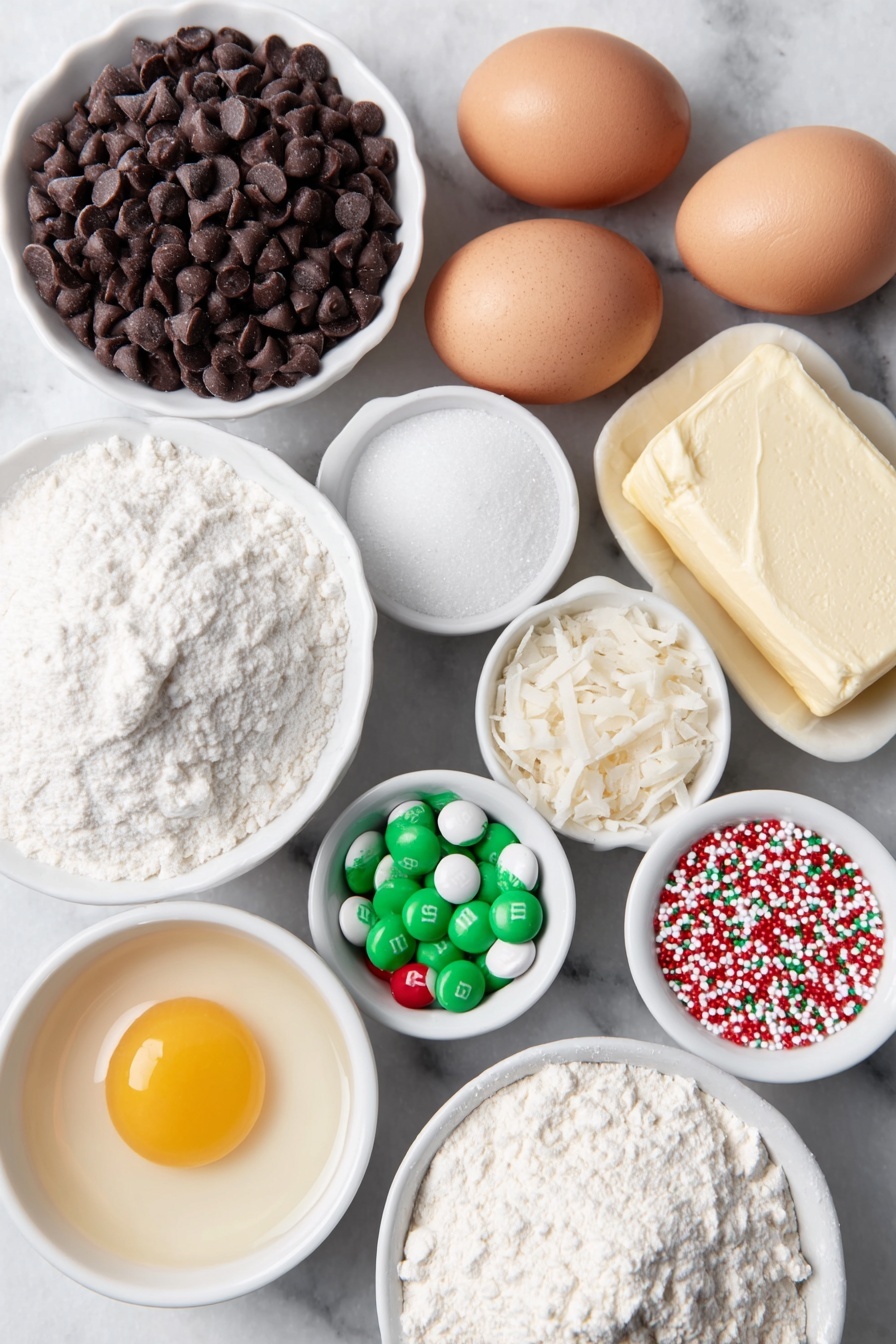
- Semi-sweet chocolate chips: Melts smoothly for that perfect fudgy brownie base and provides chocolate bursts in the topping.
- Salted butter: Adds richness and balances sweetness, making the brownies moist and tender.
- Granulated sugar: Sweetens without overpowering, helping the brownies achieve that classic texture.
- Eggs and egg yolk: Give structure and fudginess—don’t skip the extra yolk for that gooey center.
- All-purpose flour: Just enough to bind without making it cakey.
- Vanilla extract: Boosts all the chocolate flavors, adding warmth and aroma.
- Nuts (optional): I love walnuts or pecans here for crunch and a toasty note.
- Holiday M&Ms (mini and regular): These are the show-stoppers—colorful, crunchy, and perfect to get everyone in the spirit.
- Sweetened flaked coconut: Adds chewy texture and subtle tropical sweetness that pairs beautifully with chocolate.
- Sweetened condensed milk: Pouring this over the topping layer creates a rich, caramel-like glaze.
- Holiday sprinkles: For an extra splash of holiday magic—totally optional but adored!
Make It Your Way
One of my favorite things about this Christmas Brownie Bars with M&Ms Recipe is how adaptable it is. I often switch up the toppings depending on what I have on hand or who I’m baking for. Don’t be afraid to get creative—it’s your kitchen, your rules!
- Nuts variation: I’ve swapped walnuts for chopped pecans or even toasted almonds, and each brings a unique flavor and texture.
- Non-dairy substitution: For a dairy-free twist, try coconut oil instead of butter and plant-based condensed milk; just watch the baking time closely.
- Extra chocolatey: Sometimes I add a handful of white chocolate chips in the topping for a sweet contrast that’s divine.
- Seasonal twists: Peppermint M&Ms swap in wonderfully for a cool, minty holiday flavor that’s super popular with my guests.
Step-by-Step: How I Make Christmas Brownie Bars with M&Ms Recipe
Step 1: Prep your pan and melt the chocolate
Start by preheating your oven to 350°F (175°C), and line a 9-inch baking pan with foil or parchment paper, making sure to spray it with nonstick spray. This will save you a lot of heartache when it’s time to get the brownies out. Next, pop the butter and semi-sweet chocolate chips into a microwave-safe bowl. I like to microwave them in 30-second intervals, stirring each time until it’s silky smooth—this prevents scorching. A smooth chocolate base makes everything fudgier and tastier!
Step 2: Mix your batter gently
Once your chocolate and butter are melted, beat in the sugar first—this helps incorporate it evenly. Then add vanilla and your eggs (both whole eggs plus that extra yolk for richness). Mix until it’s all combined but be gentle to avoid over-mixing. Finally, stir in the flour just until you no longer see it; this keeps your brownies tender, not cakey.
Step 3: Bake your brownie base, then layer
Pour your batter into the prepared pan, smoothing the top gently, and bake for 20 minutes. When you pull it out, don’t worry if it jiggles a bit in the middle—that’s perfect. Now comes the fun part: layering! Sprinkle half of your nuts, half the chocolate chips, and half the M&Ms evenly on top, then add the shredded coconut. Pour the sweetened condensed milk over evenly and spread gently with a spatula. Finally, top with the remaining chocolate chips, M&Ms, and the colorful holiday sprinkles. This layered approach creates that wow factor each time.
Step 4: Final bake and cool completely
Return the pan to the oven and bake for another 25 minutes or until the edges are golden and the center has set with just a slight browning on top. If you find the top is browning too fast, tent a piece of foil loosely to protect it. Once your brownies are out, cool them completely before slicing—this helps the layers set and the knife glide cleanly for perfect squares.
Tips from My Kitchen
- Use Fresh M&Ms: Old M&Ms can dull the color and texture—fresh ones give your bars that classic holiday pop.
- Don’t Overbake: Those brownies should jiggle slightly when you take them out, guaranteeing gooey goodness inside.
- Layer Evenly: Distribute toppings evenly so every bar gets a bit of everything—no bland squares allowed!
- Sharp Knife Serving: Use a sharp, warm knife when cutting for clean, beautiful edges without crumbling.
How to Serve Christmas Brownie Bars with M&Ms Recipe
Garnishes
I usually keep it simple here—just a light dusting of powdered sugar or a few extra holiday sprinkles on top right before serving. Sometimes I add a few whole M&Ms on each square to make them look extra festive. If you want to get fancy, a drizzle of melted white chocolate or a sprinkle of crushed candy canes adds a beautiful holiday sparkle, too.
Side Dishes
These bars are rich and sweet, so I love pairing them with simple, light sides like fresh fruit or a scoop of vanilla ice cream. At Christmas parties, they’re a hit alongside hot cocoa or coffee, making every bite feel cozy and indulgent.
Creative Ways to Present
When I’m hosting, I sometimes stack these bars staggered on a tiered tray with festive greenery and twinkling lights. Another fun idea is wrapping individual bars in cellophane tied with ribbon for easy gifting or a treat everyone can take home. Holiday bake sales? These presentation tricks make them fly off the table!
Make Ahead and Storage
Storing Leftovers
I store leftover Christmas Brownie Bars with M&Ms Recipe in an airtight container at room temperature, layering parchment paper between squares to keep them from sticking. They last beautifully for up to one week this way, though they’re usually gone before then in my house!
Freezing
If you want to freeze them, I lift the entire block out of the pan and wrap it tightly in plastic wrap followed by foil. You can also individually wrap bars for portion control. They freeze well for up to three months and thaw gently on the counter for about an hour before enjoying.
Reheating
To reheat leftovers, I pop a square in the microwave for about 15 seconds until just warm—this revives the melted chocolate and soft texture without drying out the bar. Be careful not to overheat or they can become tough.
FAQs
-
Can I use regular M&Ms instead of holiday-themed ones?
Absolutely! Regular M&Ms work just fine and will give you the same great crunch and chocolate flavor. Holiday-themed M&Ms are mainly for festive color and vibe, so feel free to swap based on what you have or prefer.
-
Can I make these brownies gluten-free?
Yes, you can substitute the all-purpose flour with a gluten-free baking blend that measures cup-for-cup like regular flour. Just be sure to check the blend for any xanthan gum or other binders that affect texture. Baking time might vary slightly, so keep an eye on the bars as they bake.
-
What if I don’t have sweetened condensed milk?
You can try making your own by simmering evaporated milk with sugar until thickened, but for best results, sweetened condensed milk provides the perfect balance of sweetness and gooeyness critical to the topping layer.
-
How do I prevent the top of the brownies from burning?
If you notice the top browning too quickly during the second bake, gently tent the pan with aluminum foil. This shields the sugars and toppings while the middle finishes cooking to perfection.
-
Can I make these bars ahead of time for holiday parties?
Definitely! They actually taste even better after the flavors meld for a day or two. Just store them in an airtight container and bring them out at room temperature when ready to serve.
Final Thoughts
There’s something truly special about these Christmas Brownie Bars with M&Ms Recipe that makes the holidays shine brighter for me—and I hope you feel that magic too. Whether you’re baking to gift neighbors or to impress at your family gathering, these bars bring joy, color, and the best kind of chocolatey comfort. Give them a try and watch how fast they disappear (spoiler: you’ll want to make a double batch!). Happy baking, friend!
Print
Christmas Brownie Bars with M&Ms Recipe
- Prep Time: 15 minutes
- Cook Time: 45 minutes
- Total Time: 1 hour
- Yield: 9 bars
- Category: Dessert
- Method: Baking
- Cuisine: American
Description
Delight in the festive flavors of these Christmas Magic Layer Brownie Bars, combining a rich chocolate brownie base with layers of nuts, holiday M&Ms, coconut, sweetened condensed milk, and sprinkles for a perfect holiday treat.
Ingredients
Brownie Layer:
- 1½ cups semi-sweet chocolate chips
- ½ cup salted butter (1 stick)
- 1 cup granulated sugar
- 2 large eggs
- 1 large egg yolk
- 1 cup all-purpose flour
- ½ teaspoon vanilla extract
Toppings Layer:
- ¾ cup nuts, optional, divided
- ¼ cup mini holiday M&Ms, divided
- ¾ cup regular holiday M&Ms, divided
- ½ cup semi-sweet chocolate chips, divided
- 1 cup sweetened flaked coconut
- ¾ cup sweetened condensed milk from a 14 ounce can
- ¼ cup holiday sprinkles
Instructions
- Preheat oven: Preheat your oven to 350 degrees Fahrenheit. Line a 9-inch baking pan with foil or parchment paper and spray it with nonstick cooking spray to prevent sticking.
- Melt chocolate and butter: Place the butter and semi-sweet chocolate chips in a large microwave-safe bowl. Microwave on high for 30 seconds, stir, and continue microwaving in 30-second intervals, stirring each time, until the mixture is melted and smooth.
- Mix wet ingredients: Beat in the granulated sugar, then add vanilla extract, eggs, and egg yolk. Mix until the batter is well combined and smooth.
- Add dry ingredients: Gently stir in the all-purpose flour until just combined to avoid overmixing, creating the brownie batter.
- Bake brownie base: Pour the brownie batter into the prepared baking dish, spreading evenly. Bake in the preheated oven for 20 minutes or until the top is set but still slightly jiggly.
- Layer toppings: Remove the brownies from the oven and evenly layer on half of the nuts, half of the semi-sweet chocolate chips, half of the mini holiday M&Ms, half of the regular holiday M&Ms, and all of the shredded coconut.
- Add condensed milk: Pour the sweetened condensed milk evenly over the toppings and gently spread to distribute without disturbing the layers.
- Finish topping: Sprinkle the remaining half of the chocolate chips, mini M&Ms, regular M&Ms, nuts, and finally the holiday sprinkles over the top.
- Bake again: Return the pan to the oven and bake for an additional 25 minutes or until the edges are golden and the center is set with slight browning. If the top browns too quickly, loosely tent foil over the pan.
- Cool and serve: Allow brownies to cool completely in the pan before cutting into squares with a sharp knife. Store in an airtight container for up to one week.
Notes
- Store brownies at room temperature in an airtight container for up to one week; refrigerate for up to two weeks with parchment paper between layers to prevent sticking.
- Freeze brownies by lifting them from the pan, wrapping thoroughly with plastic wrap and aluminum foil, and freeze up to three months; thaw at room temperature before serving.
- Use foil or parchment paper to line the pan for easier removal and cleaner slices.
- Optional nuts add texture and flavor but can be omitted for nut-free versions.
- If the topping browns too fast during baking, covering loosely with foil will protect the surface while the center sets.
Nutrition
- Serving Size: 1 bar
- Calories: 350 kcal
- Sugar: 28 g
- Sodium: 110 mg
- Fat: 18 g
- Saturated Fat: 10 g
- Unsaturated Fat: 7 g
- Trans Fat: 0 g
- Carbohydrates: 42 g
- Fiber: 2 g
- Protein: 4 g
- Cholesterol: 75 mg


