

Chocolate Swirl Buns Recipe
If you’re craving something that feels like a hug in bun form, you’re going to love this Chocolate Swirl Buns Recipe. Soft, fluffy dough twirled with a luscious, bittersweet chocolate filling makes these buns an irresistible treat for breakfast, snack time, or even dessert. I’ve made these more times than I can count because they strike that perfect balance between simple to prepare and totally show-stopping in flavor—trust me, once you try this recipe, you’ll want to bake them over and over!
Why This Recipe Works
- Perfectly Fluffy Dough: A balance of yeast, egg, and butter creates soft, tender buns that rise beautifully.
- Rich Chocolate Swirl: The bittersweet chocolate filling is smooth and deeply flavorful without being overwhelming.
- Visual WOW Factor: The twisted swirls and layers offer a stunning look that’s surprisingly easy to achieve.
- Flexible and Fun: The dough is forgiving, allowing room to customize your swirl pattern or filling for your taste.

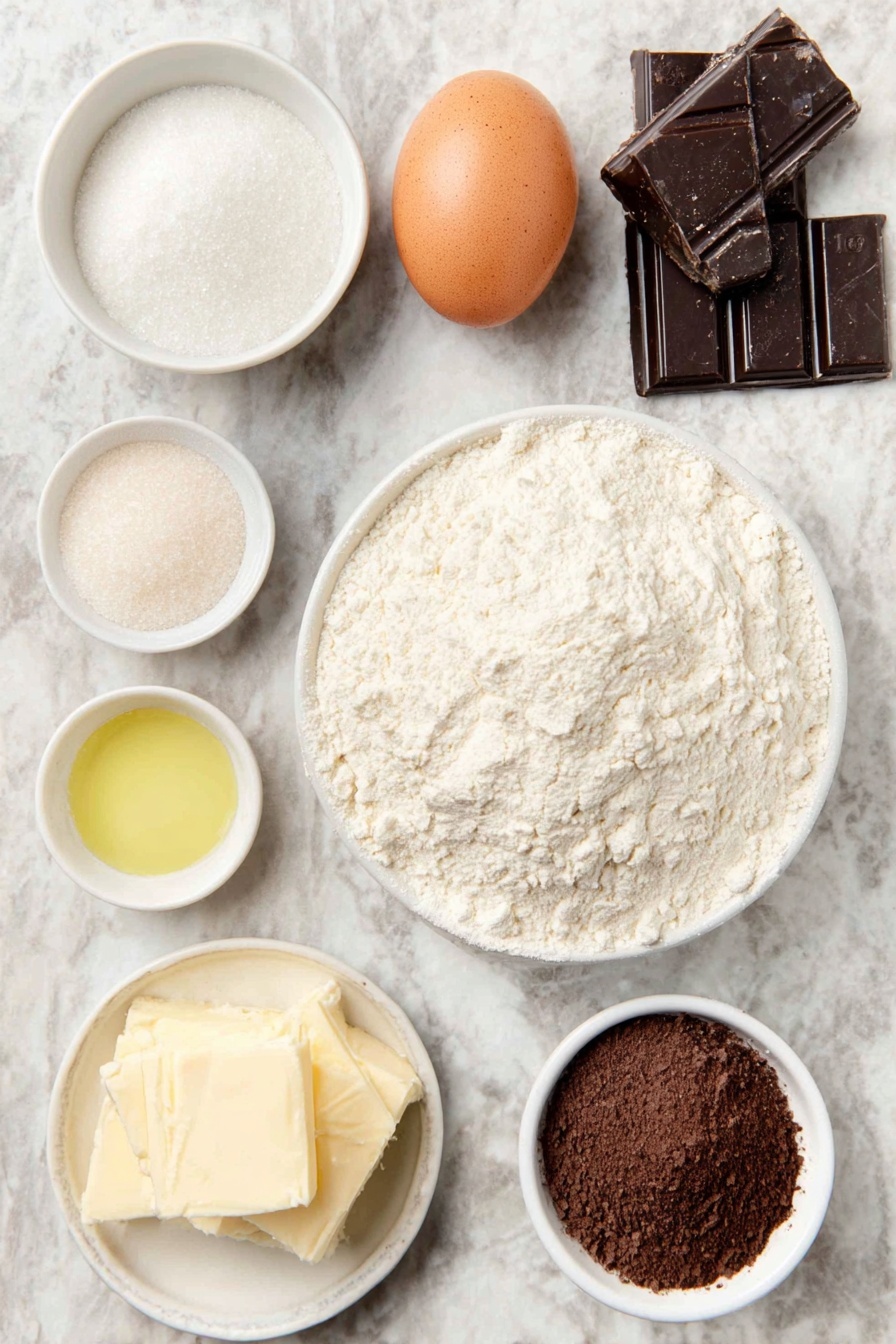
Ingredients & Why They Work
Every ingredient in this Chocolate Swirl Buns Recipe plays a starring role, harmonizing into a perfect bun that’s tender yet structured enough to hold that gorgeous chocolate swirl. Let me walk you through the key players and what to watch for when you shop.
- Warm Milk: Activates the yeast and adds moisture; make sure it’s just warm (not hot) for the best rise.
- Sugar: Feeds the yeast and adds a touch of sweetness to the dough without overpowering the chocolate.
- Fresh Yeast: This is my go-to for that classic, fluffy bun texture; if you can only find dry yeast, it’ll still work but adjust quantities.
- Egg: Brings richness and helps bind the dough—a key for tender buns.
- Melted Butter: Adds flavor and softness; don’t use margarine here for best results.
- Flour: Provides structure; using all-purpose flour works well, but you can try bread flour for an even chewier texture.
- Salt: Enhances flavor and balances sweetness.
- Bittersweet Chocolate: Ensures that perfect chocolate punch without being too sweet.
- Butter (for filling): Creates that melt-in-your-mouth chocolate filling.
- Cocoa Powder: Intensifies the chocolate flavor and adds a nice depth.
- Powdered Sugar: Sweetens the filling smoothly—no graininess here.
- Oil (for filling): Keeps the filling soft and spreadable, which really helps with the swirling.
- Egg (for egg wash): Gives the buns a shiny, golden finish.
Make It Your Way
One of the best things about this Chocolate Swirl Buns Recipe is how versatile it is. Over time, I’ve tried it with a few tweaks that keep things fresh and exciting. Don’t hesitate to make this your own—after all, that’s what home baking is all about!
- Nutty Twist: I love sprinkling chopped toasted hazelnuts or walnuts over the chocolate filling before folding—it adds a delightful crunch that goes perfectly with the smooth cocoa.
- Spiced Up: Sometimes I add a pinch of cinnamon or a dash of chili powder into the filling for a little extra warmth—you might be surprised how much it amps up the flavor!
- Healthier Version: Swapping half the flour for whole wheat adds fiber without compromising the fluffiness too much. Just keep an eye on hydration and possibly add a bit more milk.
- Chocolate-Free Option: Instead of cocoa and chocolate, try a cinnamon sugar filling for a classic twist—equally delicious, especially fresh out of the oven.
Step-by-Step: How I Make Chocolate Swirl Buns Recipe
Step 1: Activate Your Yeast Like a Pro
Start by warming your milk until it’s pleasantly warm to the touch—think cozy bath temperature, not hot! Stir in the sugar, then sprinkle the fresh yeast on top. Let it sit for about 5–10 minutes until it’s frothy and alive. This step is crucial because a lively yeast froth means your buns will rise beautifully. If you don’t see froth after 10 minutes, your yeast might be old or the milk too hot—don’t skip this check!
Step 2: Mix, Knead, and Rise
Once your yeast is ready, whisk in the egg, melted butter, and salt for that rich base. Gradually add the flour, mixing until you form a soft, slightly tacky dough. Turn it out onto a floured surface and knead for about 8–10 minutes until it’s smooth and elastic. The dough should spring back when you poke it gently. Then, cover the bowl with a clean kitchen towel or plastic wrap and let it rise in a warm spot for about an hour, or until it’s doubled in size. I like to preheat my oven to the lowest setting for a minute, then turn it off and place the dough inside with the door cracked for a cozy rise environment.
Step 3: Make the Magical Chocolate Filling
While the dough’s rising, melt the bittersweet chocolate and butter together gently—either in short bursts in the microwave or over a double boiler. Remove from heat and whisk in cocoa powder, powdered sugar, and oil until silky smooth. This filling is your flavor powerhouse, so tastetest it (I do, every time) and make sure it’s rich and spreadable but not too oily. Let it cool slightly while you prep the dough.
Step 4: Roll, Spread, and Fold the Dough
Divide your risen dough into two equal pieces and roll each into a large rectangle. Spread half the chocolate filling evenly, leaving a thin border around the edges. Fold the rectangle in half and roll gently again to combine the layers. Repeat spreading filling on half of the folded dough and fold once more. Trim any ragged edges for clean swirls—don’t toss the scraps; I usually shape them into cute mini buns for snacking later! Remember to keep flouring your work surface and dough to avoid sticky situations or tearing, which can make the swirls look messy.
Step 5: Twisting and Baking to Perfection
Roll the folded dough gently but firmly, then cut it into strips roughly the width of four fingers. For each strip, slice three times vertically in the center, being careful not to cut all the way through to the edges—this technique helps create those stunning twisted swirls. Give each strip a twist and then roll it up into a bun shape. Place your buns on a parchment-lined baking sheet, cover, and let them proof for about 35 minutes. Finally, brush them with beaten egg for that golden shine and bake in a preheated oven at 375°F (190°C) for 20–35 minutes, until beautifully golden. Let cool just a bit—you want them warm to really appreciate the ooey-gooey chocolate goodness inside.
Tips from My Kitchen
- Keep Things Cozy: Proof your dough in a warm, draft-free spot—I often use my oven with just the light on for consistent warmth.
- Flour Smartly: Flour your rolling surface *and* your dough lightly but consistently—too much flour makes the dough stiff, too little and it can tear.
- Don’t Rush the Rise: Let the dough truly double to give you those soft buns with lovely crumb texture.
- Egg Wash Magic: Brushing the buns twice (once before baking, once midway) amps up their golden sparkle and makes them look bakery-perfect.
How to Serve Chocolate Swirl Buns Recipe

Garnishes
I love to keep it simple and elegant by dusting the buns with a light sprinkle of powdered sugar right before serving—just enough to catch the eye and add a hint of sweetness. Sometimes, I drizzle a thin glaze of melted chocolate or a coffee-infused icing for brunch parties. Fresh berries on the side also add a lively pop of color and freshness if you want a bit of balance.
Side Dishes
These chocolate swirl buns pair wonderfully with a steaming cup of coffee or chai tea—something with spice to cut through the richness. For a more substantial brunch, I like to serve them with creamy scrambled eggs or fresh yogurt sprinkled with granola and honey on the side. They’re also fantastic just on their own, especially warm, because you get that melty chocolate surprise inside!
Creative Ways to Present
For holidays or special gatherings, I arrange the buns in a circular “wreath” shape on a nice platter, sometimes tucking in fresh mint leaves or edible flowers for flair. I’ve also made mini versions to serve as party favors, wrapped in parchment and tied with a little ribbon. Kids love helping twist the dough too, making it a family baking activity that’s as fun as the eating!
Make Ahead and Storage
Storing Leftovers
I store leftover buns in an airtight container at room temperature for up to two days. To keep them soft, I sometimes add a slice of bread or apple in the container—it might sound odd, but it really helps maintain moisture. If you notice they’re drying out, it’s best to reheat gently (see below) for that fresh-baked feel.
Freezing
This Chocolate Swirl Buns Recipe freezes beautifully. I usually wrap each bun tightly in plastic wrap and pop them in a freezer bag. When I want a treat, I thaw overnight in the fridge or at room temperature for a few hours. They come out almost like freshly baked!
Reheating
To warm them up, I wrap the buns in foil and heat in a 300°F (150°C) oven for 10–12 minutes. This keeps the chocolate melty and the dough soft without drying it out. Microwaving works in a pinch, but I find the oven method maintains that fresh-baked texture better.
FAQs
-
Can I use dry yeast instead of fresh yeast for the Chocolate Swirl Buns Recipe?
Absolutely! If you only have dry yeast, use about one-third of the fresh yeast amount (around 8g). Activate it the same way by dissolving in warm milk with sugar, waiting for it to foam before mixing into the dough.
-
How can I prevent the dough from tearing while shaping the buns?
Keep your hands and rolling surface lightly floured to avoid sticking. Roll gently, don’t rush, and if the dough starts tearing, let it rest for a few minutes before continuing—this relaxes the gluten, making it easier to handle.
-
Can I make these buns without chocolate?
Yes! Swap the chocolate filling for a cinnamon sugar blend, nutella, or even a fruit jam spread—just keep the spreading consistency similar for best shaping results.
-
What’s the best way to store leftover buns to keep them fresh?
Store leftovers in an airtight container at room temperature for up to two days. Adding a slice of bread or apple inside can help maintain moisture. For longer storage, freezing is ideal.
-
Do I need to use an egg wash before baking?
While it’s not absolutely required, brushing with an egg wash gives the buns a beautiful golden color and shiny finish that makes them look extra tempting. I recommend it if you have an egg handy.
Final Thoughts
This Chocolate Swirl Buns Recipe holds a special place in my heart—the way the dough softly embraces the rich chocolate filling reminds me of cozy mornings and sharing something homemade with family. Once you master these buns, you’ll have a go-to recipe that feels both gourmet and comforting. Give it a try, and I promise you’ll be reaching for this recipe again and again, just like I do!
Print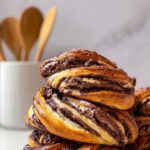
Chocolate Swirl Buns Recipe
- Prep Time: 10 minutes
- Cook Time: 35 minutes
- Total Time: 2 hours
- Yield: 8 buns
- Category: Breakfast
- Method: Baking
- Cuisine: European
Description
Delight in these Swirled Chocolate Buns, a perfect combination of soft, fluffy dough and rich, bittersweet chocolate filling. This recipe guides you through making a homemade yeast dough filled with a luscious cocoa and chocolate mixture, twisted into beautiful buns and baked to golden perfection. Ideal for a comforting breakfast or an indulgent snack.
Ingredients
For the Dough
- 1 ⅓ cups warm milk (320 ml)
- ⅓ cup sugar (70 g)
- 0.9 oz fresh yeast (25 g)
- 1 large egg (room temperature)
- ¼ cup melted butter (60 g)
- 4 ⅓ cups flour (560 g)
- 1 tsp salt (7 g)
For the Filling
- 3.5 oz bittersweet chocolate (100 g)
- ½ cup butter (100 g)
- ¾ cup cocoa powder (75 g)
- ¾ cup powdered sugar (75 g)
- ¼ cup oil (60 ml)
For the Egg Wash
- 1 egg (beaten)
Instructions
- Activate the Yeast: In a large bowl, mix the warm milk and sugar. Add the fresh yeast and let it sit for 10 minutes until it becomes frothy, indicating the yeast is active.
- Prepare the Dough: Add the egg, melted butter, and salt to the yeast mixture, then gradually incorporate the flour while stirring to form a soft dough.
- Knead the Dough: Knead the dough on a floured surface until it is soft and elastic. Place the dough in a bowl, cover it, and let it rise in a warm place for 1 hour or until it doubles in size.
- Make the Filling: Melt the bittersweet chocolate and butter together in a microwave or over a double boiler. Remove from heat and stir in cocoa powder, powdered sugar, and oil until smooth. Allow it to cool slightly.
- Roll and Layer Dough: Divide the risen dough into two equal parts. Roll each into a large rectangle. Spread half of the chocolate filling over one rectangle, leaving a small border around the edges.
- Fold and Roll: Fold the dough in half over the filling and gently roll it out again to flatten slightly.
- Add More Filling and Fold Again: Spread more filling on half of the folded dough, then fold it again. Trim any rough edges, reserving the trimmings to make smaller buns.
- Prevent Sticking: Flour the surface and dough continuously during rolling and folding to prevent sticking or tearing.
- Create Strips and Cuts: Roll the dough tightly one more time. Cut the dough into strips about 4 fingers wide. For each strip, make 3 vertical cuts in the center without cutting through to the edges to create a twistable shape.
- Twist and Shape Buns: Twist each strip and roll it to form a bun shape. Repeat for all strips and place the buns on a baking sheet lined with parchment paper.
- Second Proof: Cover the buns with a clean cloth and let them rise for 35 minutes until slightly puffed.
- Preheat Oven and Egg Wash: Preheat the oven to 375°F (190°C). Brush the tops of the buns gently with the beaten egg wash for a glossy, golden finish.
- Bake: Bake the buns for 35 minutes or until they are golden brown and cooked through.
- Cool and Serve: Allow the buns to cool slightly before serving. Enjoy warm to experience the best of the rich chocolate filling.
Notes
- Ensure the milk is warm but not hot to avoid killing the yeast.
- Keep the dough well-floured when rolling and folding to avoid tearing and sticking.
- Trimmed dough edges can be reshaped into smaller buns to avoid waste.
- Use high-quality bittersweet chocolate for a rich chocolate flavor.
- If the dough is too sticky, add a tablespoon of flour at a time until manageable.
- Egg wash can be substituted with milk for a less shiny finish.
- The buns are best enjoyed warm but can be reheated gently before serving.
Nutrition
- Serving Size: 1 bun
- Calories: 320 kcal
- Sugar: 18 g
- Sodium: 150 mg
- Fat: 15 g
- Saturated Fat: 8 g
- Unsaturated Fat: 6 g
- Trans Fat: 0 g
- Carbohydrates: 40 g
- Fiber: 3 g
- Protein: 5 g
- Cholesterol: 55 mg


