

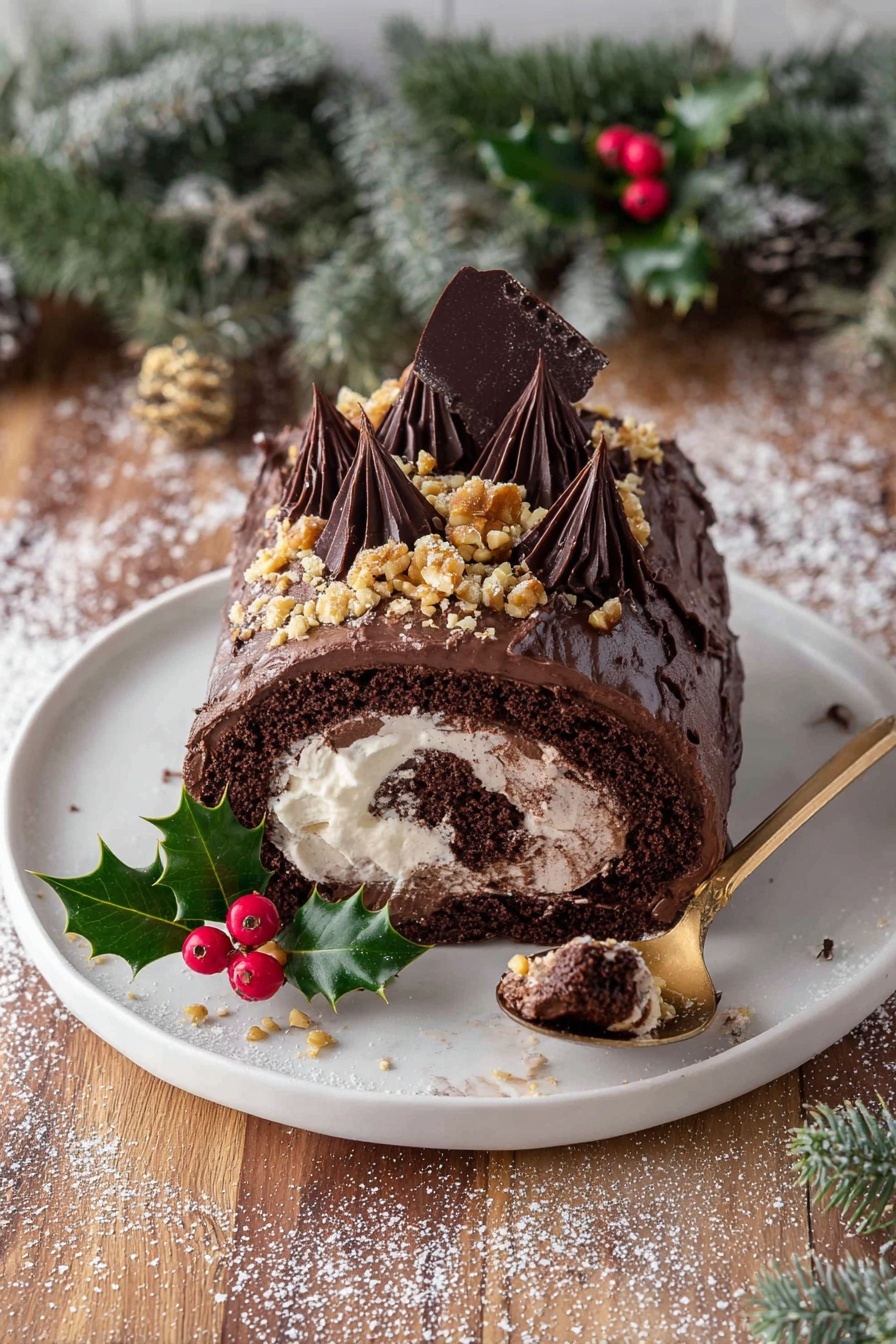
Chocolate Hazelnut Yule Log Recipe
If you’ve ever wanted to wow your guests with a show-stopping dessert, this Chocolate Hazelnut Yule Log Recipe is exactly what you need. It’s that perfect holiday centerpiece—rich chocolate sponge rolled with creamy hazelnut filling and covered in fluffy chocolate whipped cream, finished with crunchy chocolate shards and toasted hazelnuts. Trust me, once you’ve tasted this, you’ll wonder why you ever bought anything else for festive gatherings. Let’s jump into the good stuff and I’ll share every tip to help you nail it on your first try.
Why This Recipe Works
- Light and Airy Sponge: The delicate folding and separate whipping of egg whites create a sponge that’s perfectly tender, not dense or heavy.
- Balanced Chocolate and Hazelnut Flavors: Combining chocolate cocoa powder, espresso powder, and chocolate hazelnut spread gives a deep, nutty, luscious taste.
- Texture Contrast: The crunchy chocolate shards and toasted hazelnuts add a delightful crunch against the smooth cream and soft cake.
- Beautiful Presentation: The rustic bark-like chocolate shards and dusting of icing sugar make it look just like a real Yule log, impressing even the toughest critics.

Ingredients & Why They Work
Every ingredient in this Chocolate Hazelnut Yule Log Recipe plays a crucial role—whether it’s the cocoa powder for richness or the espresso powder that subtly boosts the chocolate flavor. Using quality ingredients will make a noticeable difference, especially when it comes to the chocolate and cream.
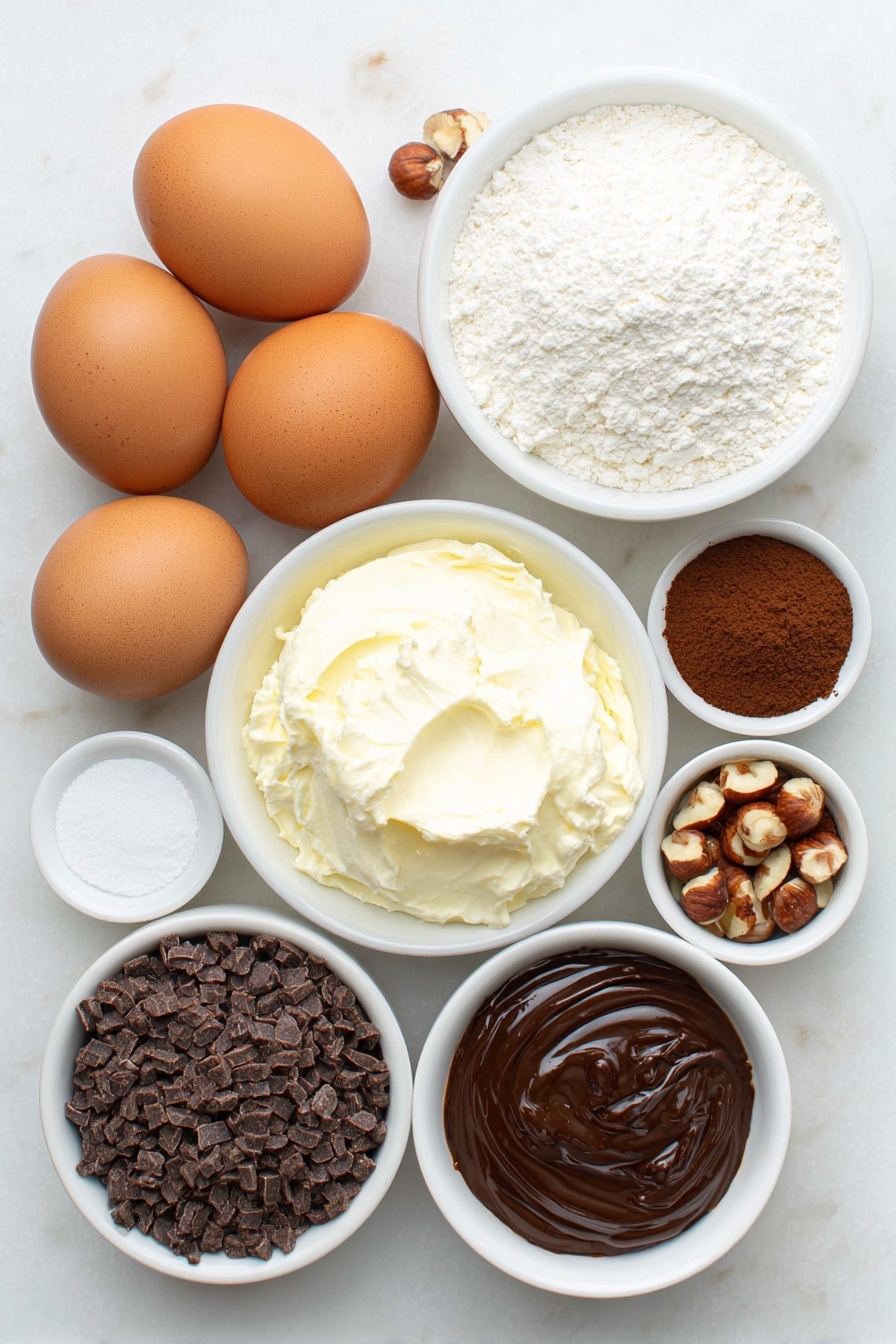
- Eggs: Fresh and at room temperature for smooth, even batter aeration.
- Caster sugar: Dissolves quickly for even sweetness without graininess.
- Vanilla extract: Lifts flavors and adds warmth.
- Plain flour: Keeps the sponge light without making it heavy.
- Cocoa powder: Provides that classic chocolate depth; make sure it’s unsweetened and good quality.
- Espresso powder: Enhances the chocolate flavor without tasting like coffee.
- Baking powder: Helps the sponge rise gently and retain airiness.
- Fine salt: Balances sweetness and intensifies flavors.
- Double cream: For rich, thick, and stable whipped cream.
- Powdered icing sugar: Blends seamlessly into cream without graininess.
- Vanilla bean paste: Adds natural vanilla specks and stronger aroma.
- Cocoa powder (for cream): Creates a luscious chocolate coat on the outside.
- Chocolate hazelnut spread: The star filling—go for your favorite brand that melts smoothly.
- Dark chocolate (70%): For making shards that bring crunch and bitterness contrast.
- Whole hazelnuts: Toasted to accentuate nuttiness and add texture.
Make It Your Way
I love adding a little extra hazelnut liqueur to the whipped cream when I’m feeling fancy, but this recipe is super forgiving. You can tweak the filling to be more chocolatey or nutty, or even swap the hazelnut spread for a homemade praline if you’re up for an adventure. It’s all about making it your own without losing that classic Yule log charm.
- Nut-Free Version: Swap hazelnut spread with a sunflower seed butter and cocoa powder combo for a nut-allergy friendly option—I’ve tried it with great success!
- Dairy-Free Option: Use coconut cream instead of double cream, and a dairy-free chocolate spread; the texture changes slightly but it’s still yummy.
- Extra Chocolate Go-Getter: Mix some finely chopped roasted hazelnuts into the filling for a surprise crunch in each bite.
Step-by-Step: How I Make Chocolate Hazelnut Yule Log Recipe
Step 1: Whipping Up That Light, Fluffy Chocolate Sponge
First things first: preheat your oven to 180°C (350°F) and prep your pan with butter and parchment paper—don’t skip greasing the parchment, it’s a lifesaver for easy removal later. Whisk your egg whites to soft peaks using a mixer—that airy stage is key for sponge fluffiness. Meanwhile, whip your egg yolks with sugar and vanilla until super creamy and pale; I usually time this with my phone timer to get it just right. Then sift all your dry ingredients—the cocoa, espresso powder, flour, baking powder, and salt—so they blend in smoothly.
Fold everything together gently: half your dry mixture into the egg yolks first, then half the egg whites, folding carefully. Repeat with the remaining ingredients. The trick is to keep as much air as possible by folding softly—overmixing squashes that fluffiness we want! Pour the batter into the pan and shake it a bit so it settles evenly, then bake for 10-12 minutes. Keep an eye on it; you want it just firm but bounce back when touched.
Step 2: Rolling the Sponge While It’s Warm (Not Hot!)
Once baked, cool the sponge in the pan for about 10 minutes until it’s warm but not steaming. While it cools, dust a clean tea towel generously with cocoa powder—this helps keep your roll neat and prevents sticking. Then invert the sponge onto the towel and gently peel off the parchment. Start rolling slowly from the short edge, rolling it up inside the towel to help it “remember” its shape—this is key to avoiding cracks when you add the filling. Let it rest fully rolled while you whip the cream.
Step 3: Making the Sweetened Whipped Cream with a Chocolate Twist
Pour cold double cream into your stand mixer bowl and whisk until soft peaks form. Then sprinkle in powdered sugar, vanilla bean paste, and whisk again until you see firm peaks that hold their shape well. This means the cream won’t slide off the sponge or squish out when you roll it back up. Set aside half for spreading inside and mix cocoa powder gently into the other half for frosting the outside.
Step 4: Filling, Rolling, and Chilling Your Chocolate Hazelnut Yule Log
Unroll your sponge carefully and spread a layer of your chocolate hazelnut spread first. If it’s a bit stiff from the fridge, just zap it in the microwave for 10 seconds—makes it so much easier to work with. Next, dollop on the sweetened whipped cream and smooth it out with an offset spatula. Roll it back tightly but gently, avoiding squeezing out the filling. Wrap it in baking paper and plastic wrap to keep it all in place, then pop it in the fridge for at least 2 hours—longer if you can wait. This chills the cream to hold the shape perfectly for decorating.
Step 5: Crafting the Chocolate Shards for Rustic Elegance
Melt your finely chopped dark chocolate in a bowl over simmering water, stirring until smooth. Spread it thinly and evenly over parchment paper, cover with a second sheet, and roll it into a tight tube to create tension that will crack the chocolate as it hardens. Refrigerate until firm—about 30 minutes. When you unroll, you’ll hear that satisfying crack! Peel back the top parchment and break the chocolate into rustic shards perfect for decorating.
Step 6: Decorating Like a Pro
Lift the chilled log from the fridge and spread the chocolate whipped cream all over its surface, pressing on the cream so it’s thick enough to hold the shards. Stick the chocolate shards around the log’s sides and top, letting them overlap irregularly like natural tree bark. Sprinkle toasted hazelnuts over the shards and scatter some at the base. A light dusting of icing sugar adds that magical snow-like finish. If you have any sprigs of holly or fresh rosemary, tuck them in for that authentic Yule log look.
Tips from My Kitchen
- Don’t Skip the Parchment Paper Grease: This little step saved me from fumbling sponge removal multiple times.
- Watch the Sponge Closely: Overbaking causes cracks—and nothing kills the look like a cracked roll.
- Cool Before Rolling: Rolling when still too hot traps steam and causes sticking or tearing, so be patient.
- Firm Whipped Cream is Key: Under-whipped cream makes filling messy—whisk till stiffness but avoid turning it into butter.
How to Serve Chocolate Hazelnut Yule Log Recipe
Garnishes
I love using toasted whole hazelnuts because they complement the chocolate perfectly with a toasty crunch and beautiful contrast. A light dusting of powdered sugar feels like festive snowfall. Sometimes, I’ll add a sprig or two of fresh rosemary or holly for that holiday vibe—it makes the whole dessert feel like a winter forest scene.
Side Dishes
This Yule log shines as a solo star but pairs wonderfully with a scoop of vanilla bean ice cream or a simple orange salad to cut through the richness. For grown-up gatherings, a small glass of hazelnut liqueur on the side echoes the flavors beautifully.
Creative Ways to Present
One time, I placed the finished log on a rustic wooden slab, surrounded by pinecones and cinnamon sticks, which instantly made my table feel cozy and festive. Another holiday, I cut the log into thick slices, stacked them upright, and dusted each with cocoa powder to mimic mini trunks—guests loved the playful presentation!
Make Ahead and Storage
Storing Leftovers
Once decorated, store your Yule log in an airtight container in the fridge, where it will keep beautifully for up to five days. I wrap mine loosely in plastic wrap as an extra measure to prevent it from drying out.
Freezing
If you want to prep ahead, you can freeze the unfilled, rolled sponge tightly wrapped in plastic and foil for up to two months. When you’re ready, thaw it overnight in the fridge and allow it to come to room temperature before adding the filling and continuing with the recipe.
Reheating
This dessert isn’t one you’d warm up, but if you want to bring it slightly closer to room temp before serving, simply take it out of the fridge about 30 minutes prior. This softens the cream and chocolate just enough to enjoy the flavors at their best.
FAQs
-
Can I make this Chocolate Hazelnut Yule Log Recipe ahead of time?
Absolutely! The sponge can be baked and rolled without filling and frozen for up to two months. When you’re ready, thaw it, add the filling, and decorate. The assembled log can also be made a day or two in advance and kept in the fridge.
-
What if my sponge cracks when rolling?
Cracks usually happen if the sponge cools too long before rolling or is overbaked. Rolling it warm (not hot) while it’s still pliable helps prevent breakage. If cracks do appear, the cream and chocolate shards help camouflage them during decorating.
-
Can I substitute the chocolate hazelnut spread?
Yes! If you prefer, use any nut butter mixed with a bit of melted chocolate or cocoa powder. Keep in mind the flavor will change slightly but still delicious.
-
Why add espresso powder to the sponge?
The espresso powder doesn’t make the sponge taste like coffee, but it intensifies and deepens the chocolate flavor, making it more robust and satisfying.
-
How do I get firm peaks in my whipped cream?
Use very cold double cream and a chilled bowl if possible. Whisk at medium-high speed, watching carefully until peaks stand straight when you lift the whisk but aren’t grainy or turning into butter.
Final Thoughts
I can’t recommend this Chocolate Hazelnut Yule Log Recipe enough if you want a dessert that’s as beautiful as it is delicious. I remember the first time I made it for Christmas—the rich chocolate, the toasty hazelnuts, and that creamy filling had everyone asking for seconds (and thirds!). Whether it’s your holiday party centerpiece or just a treat for your loved ones, this recipe is sure to impress, and the best part is you don’t have to be a pro baker to get it right. So grab your ingredients, put on your favorite holiday playlist, and let’s make some magic!
Print
Chocolate Hazelnut Yule Log Recipe
- Prep Time: 30 minutes
- Cook Time: 12 minutes
- Total Time: 3 hours
- Yield: 12 slices
- Category: Dessert
- Method: Baking
- Cuisine: French
- Diet: Vegetarian
Description
A classic Chocolate Hazelnut Bûche de Noël featuring a light and airy chocolate sponge rolled with luscious chocolate hazelnut spread and sweetened whipped cream. Decorated with chocolate shards and toasted hazelnuts, this festive Yule log cake is a show-stopping dessert perfect for the holiday season.
Ingredients
Chocolate Sponge
- 4 large eggs, room temperature
- 100 g caster sugar (super-fine)
- 1 teaspoon vanilla extract
- 65 g plain flour (all-purpose)
- 35 g cocoa powder, plus extra for dusting
- 1 teaspoon espresso powder
- 1 teaspoon baking powder
- ¼ teaspoon fine salt
Sweetened Whipped Cream
- 480 ml double cream (heavy cream), cold
- 45 g powdered icing sugar (confectioners’ sugar)
- 1 teaspoon vanilla bean paste (or extract)
- 10 g cocoa powder
- 210 g chocolate hazelnut spread
Chocolate Shards
- 100 g dark chocolate 70%, finely chopped
To Serve
- 35 g whole hazelnuts, toasted, optional
Instructions
- Prepare Pan and Oven: Preheat the oven to 180°C (350°F). Grease a 25x38cm baking pan thoroughly with butter or non-stick spray. Line the pan with parchment paper leaving an overhang, and grease the parchment with butter to ease removal of the sponge later.
- Whisk Egg Whites: Using either an electric hand mixer or stand mixer with whisk attachment, whisk egg whites at medium-high speed until soft peaks form.
- Whip Egg Yolks and Sugar: In a separate bowl, whisk egg yolks, caster sugar, and vanilla extract on medium-high speed for 5 minutes until the mixture is light, creamy, and thick enough to leave trails when the whisk is lifted.
- Sift Dry Ingredients: Sift plain flour, cocoa powder, espresso powder, baking powder, and fine salt into a bowl and mix lightly to combine.
- Combine Mixtures: Fold half of the dry ingredients into the egg yolk mixture, then fold in half of the whipped egg whites gently to preserve air. Repeat with the remaining dry ingredients and egg whites, folding until just combined with a few streaks remaining to avoid overmixing.
- Bake Sponge: Pour the batter into the prepared pan, gently shaking it to distribute batter evenly. Smooth the surface with an offset spatula if needed. Bake for 12 minutes until a toothpick inserted in the center comes out clean and the sponge springs back when lightly pressed.
- Cool Sponge: Remove the sponge from the oven and cool in the pan for 10 minutes. Meanwhile, prepare a tea towel or parchment paper on a work surface, dusted generously with cocoa powder.
- Invert and Roll Sponge: Carefully invert the warm sponge onto the prepared tea towel, remove the parchment paper, and starting from the short end, roll the sponge along with the tea towel into a tight roll. Set aside to cool completely, seam side down.
- Whisk Cream: In a chilled bowl, whisk the double cream until soft peaks form. Add powdered icing sugar and vanilla bean paste, then whisk to firm peaks.
- Prepare Filling and Frosting: Remove half of the sweetened whipped cream and set aside for the cake filling. Sift cocoa powder into remaining whipped cream and fold to combine for the outer frosting. Refrigerate both until needed.
- Fill and Re-roll: If the chocolate hazelnut spread is too firm, warm briefly in the microwave for 10 seconds. Unroll the cooled sponge and spread an even layer of hazelnut spread. Dollop the reserved whipped cream over the spread and smooth evenly. Carefully re-roll the sponge without squeezing out filling. Wrap tightly in baking paper and plastic wrap. Refrigerate for at least 2 hours to set.
- Make Chocolate Shards: Melt the chopped dark chocolate over a double boiler until smooth. Spread chocolate thinly on parchment paper approximately the width of the cake roll. Place another parchment sheet on top and roll into a tight tube, wrapping with plastic wrap. Refrigerate until chocolate sets solid.
- Create Shards: Once solid, unroll the parchment; the chocolate will crack into shards. Remove the top parchment layer. Break larger shards if necessary.
- Decorate Cake: Unwrap the chilled cake roll and cover it entirely with the chocolate whipped cream. Press chocolate shards randomly on top and sides, mimicking tree bark texture, leaving ends uncovered. Sprinkle toasted hazelnuts over the shards and around the base. Dust lightly with icing sugar and optionally add a holly sprig. Keep refrigerated until serving.
Notes
- Refer to the blog’s step-by-step photos for visual guidance throughout the recipe.
- Store the finished Yule Log in an airtight container in the refrigerator for up to 5 days.
- Freeze the unfilled, rolled sponge wrapped tightly in plastic wrap and foil for up to 2 months. Thaw overnight in the refrigerator and bring to room temperature before filling.
- Use digital scales for accurate measurement of flour and cocoa powder to ensure the best texture.
- Avoid overbaking the sponge to prevent cracks and dryness.
- Allow the sponge to cool for about 10 minutes before rolling to prevent sticking caused by steam.
- Whisk cream to firm peaks for proper structure to hold fillings and toppings.
- Refrigerate the roll before adding the chocolate ganache topping to help set the shape and prevent filling from oozing.
Nutrition
- Serving Size: 1 slice
- Calories: 420 kcal
- Sugar: 28 g
- Sodium: 90 mg
- Fat: 30 g
- Saturated Fat: 15 g
- Unsaturated Fat: 12 g
- Trans Fat: 0 g
- Carbohydrates: 35 g
- Fiber: 4 g
- Protein: 6 g
- Cholesterol: 150 mg


