

Cherry Pie Bars with Glaze Recipe
If you’re craving something sweet, fruity, and a little bit nostalgic, you’re going to absolutely love this Cherry Pie Bars with Glaze Recipe. These bars combine the charm of traditional cherry pie with the convenience of a bar dessert, making them a perfect treat for gatherings, potlucks, or any time you want a bite of pure happiness. Plus, the homemade glaze ties everything together in that irresistible way that keeps you reaching for just one more piece. Trust me, this recipe is fan-freaking-tastic and I’m excited to share it with you!
Why This Recipe Works
- Balanced Sweetness: The combination of granulated sugar and powdered sugar in the glaze creates a perfect sweet contrast to the tart cherries.
- Texture Harmony: Soft, buttery bars with a slightly crisp top provide just the right bite without overwhelming the cherry filling.
- Easy Assembly: This is a layered bar so it’s super forgiving – you spread, dollop, and bake, no complicated rolling or crimping needed.
- Glossy Finishing Touch: The glaze ties the bars together, adding a bit of moisture and a shiny, eye-catching finish that will impress everyone you serve.

Ingredients & Why They Work
The ingredients in this Cherry Pie Bars with Glaze Recipe come together in a way that’s approachable but still yields bakery-quality results. Each plays a key role, whether it’s the buttery base or the juicy cherry filling. Shopping tip? Look for good quality cherry pie filling that’s not overly runny – it makes all the difference in keeping the bars intact.

- Unsalted Butter: Softened butter is crucial for creaming with sugar, creating that tender crumb you want in the crust and topping.
- Granulated Sugar: Adds sweetness and helps build structure through creaming with butter.
- Large Eggs: Eggs bind the batter and add moisture, helping everything come together perfectly.
- Vanilla Extract: A classic flavor booster that makes the batter smell heavenly.
- Almond Extract: Adds a subtle nutty undertone that pairs beautifully with cherries.
- All-Purpose Flour: The backbone of the bars, it provides structure without being too dense.
- Salt: Enhances all the flavors and balances the sweetness.
- Cherry Pie Filling: The star ingredient! Adds that fruity, tart, and sweet burst in every bite.
- Powdered Sugar (for glaze): Gives the glaze a smooth, melt-in-your-mouth sweetness without graininess.
- Milk (for glaze): Helps create a pourable consistency for easy drizzling.
Make It Your Way
One of the things I love about this Cherry Pie Bars with Glaze Recipe is how easy it is to make your own. I often tweak the spice or add nuts for a little crunch, but feel free to get creative!
- Variation: Adding chopped toasted pecans or walnuts on top before baking gives a wonderful texture contrast – my family can’t get enough of this twist.
- Gluten-Free Option: I’ve swapped regular flour for a 1:1 gluten-free blend and it worked beautifully—just watch baking time closely.
- Fresh Cherry Upgrade: In cherry season, I like to swap pie filling with fresh pitted cherries tossed in a bit of sugar and cornstarch for a fresher, less sweet bite.
Step-by-Step: How I Make Cherry Pie Bars with Glaze Recipe
Step 1: Cream the Butter and Sugar Until Fluffy
Start by softening your butter—not melting it. Cream the butter and granulated sugar together using a mixer on medium speed until it’s light and fluffy, about 3-4 minutes. This step is key: fluffy butter and sugar trap air, which helps the bars rise just right. Then add in your eggs one at a time, mixing well after each addition. Finish with vanilla and almond extracts—this combo really wakes up the whole batter with warm, nutty notes.
Step 2: Combine Dry Ingredients and Mix
In a separate bowl, whisk the flour and salt together. Slowly add these dry ingredients to your wet mixture. Mix until just combined—don’t overmix! Overworking the batter can make your bars tough, and you definitely want them tender and soft.
Step 3: Layer the Batter and Cherry Filling
Spread about 3 cups of the batter evenly into your prepared 9×13 pan. I like to use a spatula slightly dipped in water to smooth it out—it helps prevent sticking. Next, spoon out your cherry pie filling across the batter in an even layer. Then, dollop the remaining batter all over the cherries in little blobs. This top layer might look uneven, but trust me, it bakes into a beautifully textured crown.
Step 4: Bake to Golden Perfection
Bake at 350°F (175°C) for 35-40 minutes, or until a toothpick inserted in the middle comes out clean and the top has a lovely golden hue. If your pan is a little bigger or smaller, just keep an eye on it starting at 30 minutes—oven sizes differ, so it’s always best to test doneness visually and with the toothpick. Once it’s out, let the bars cool completely—this helps the layers set nicely and makes slicing easier.
Step 5: Whip Up the Glaze and Drizzle
While the bars cool, whisk together powdered sugar, vanilla extract, almond extract, and milk until smooth and pourable. Pour or drizzle it over the top once the bars are fully cooled—warm bars will melt the glaze into a sad puddle instead of a pretty finish. This glaze adds a final pop of sweetness and that gorgeous shine that makes these bars impossible to resist.
Tips from My Kitchen
- Butter Temperature: Don’t rush—set your butter out an hour ahead for perfect softening, or use a microwave in 10-second bursts to avoid melting.
- Balancing Filling Moisture: If your cherry pie filling seems very watery, drain excess juice before layering to keep the bars from getting soggy.
- Glaze Consistency: Adjust the milk by adding a drop at a time—too runny glaze can drip off and too thick won’t drizzle well.
- Cooling Patience: Wait until completely cool before glazing to avoid a melty mess.
How to Serve Cherry Pie Bars with Glaze Recipe

Garnishes
I like to sprinkle a bit of finely chopped toasted almonds or a light dusting of powdered sugar on top after glazing for an extra touch of elegance and crunch. A few fresh mint leaves can also brighten the presentation and add a subtle fresh aroma.
Side Dishes
These bars shine on their own but pair beautifully with a scoop of vanilla bean ice cream or a dollop of lightly sweetened whipped cream. If you’re serving tea or coffee, a simple pot of black tea or a medium roast coffee complements the cherry sweetness perfectly.
Creative Ways to Present
For holiday gatherings or birthdays, I love cutting these bars into mini bite-sized squares and serving them on decorative trays with little festive picks. You could also add fresh cherries on toothpicks as a fun garnish or plate them alongside a drizzle of chocolate sauce for extra decadence.
Make Ahead and Storage
Storing Leftovers
I store leftover bars in an airtight container at room temperature if I plan to eat them within two days—this keeps them moist but still nicely textured. For longer storage, putting them in the fridge is best, especially if it’s warm out, but just bring them back to room temperature before serving to take the chill off.
Freezing
These cherry bars freeze quite well! I cut them into squares first, then separately wrap each piece in plastic wrap and place them in a freezer bag. When you want some, just thaw at room temperature or warm briefly in a low oven. The glaze holds up, too, making it an easy make-ahead dessert.
Reheating
I gently warm the bars in a 325°F oven for about 8-10 minutes if I want them warm without melting the glaze. Microwave works in a pinch but tends to soften the texture too much, so oven reheating is my go-to method.
FAQs
-
Can I use fresh cherries instead of canned cherry pie filling for Cherry Pie Bars with Glaze Recipe?
Absolutely! If you want to use fresh cherries, make sure to pit them and cook them down briefly with sugar and a bit of cornstarch to thicken the mixture, mimicking the texture of pie filling. This keeps your bars from getting soggy and enhances that bright cherry flavor.
-
How long do Cherry Pie Bars with Glaze last?
Stored properly in an airtight container, these bars last about 3 to 4 days at room temperature or up to a week in the refrigerator. Always cover them well to prevent drying out.
-
Can I make this Cherry Pie Bars with Glaze Recipe gluten-free?
Yes! Simply swap all-purpose flour for a reliable 1:1 gluten-free baking flour. You might need to adjust baking time by a few minutes, so keep an eye on them as they bake.
-
What if I don’t have almond extract?
No worries at all. Vanilla extract will work on its own, but almond extract adds that subtle nutty background note that really elevates the cherry flavor. If you want, you can skip it or add a tiny bit of almond flour for a similar effect.
Final Thoughts
Honestly, this Cherry Pie Bars with Glaze Recipe holds a special place in my recipe box because it’s that perfect balance of simple and impressive. Whether you’re making it for a quick weeknight dessert or a special occasion, it delivers every time. I hope you enjoy baking and sharing it as much as I do—don’t forget, these bars are best served with a big smile (and maybe a cup of coffee). Go ahead, try it out, and watch how quickly they disappear from the plate!
Print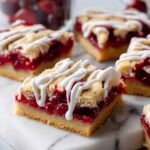
Cherry Pie Bars with Glaze Recipe
- Prep Time: 20 minutes
- Cook Time: 40 minutes
- Total Time: 1 hour
- Yield: 24 bars
- Category: Dessert
- Method: Baking
- Cuisine: American
Description
Delight in these Cherry Pie Bars featuring a buttery crust layered with luscious cherry pie filling, finished with a smooth vanilla-almond glaze. Perfect for a dessert or snack, these bars combine classic cherry pie flavors in a convenient, easy-to-cut form.
Ingredients
Bars
- 1 cup softened unsalted butter
- 2 cups granulated sugar
- 4 large eggs
- 1 teaspoon vanilla extract
- ¼ teaspoon almond extract
- 3 cups all-purpose flour
- 1 teaspoon salt
- 2 (21-ounce) cans cherry pie filling
Glaze
- 1 cup powdered sugar
- ½ teaspoon vanilla extract
- ½ teaspoon almond extract
- 2 tablespoons milk
Instructions
- Preheat and prepare pan: Preheat your oven to 350 degrees Fahrenheit. Spray a 9 x 13 x 2-inch baking pan with pan spray and set it aside to get ready for the batter.
- Cream butter and sugar: In a large bowl, cream together 1 cup of softened unsalted butter and 2 cups of granulated sugar until smooth and fluffy. This will create a rich base for the bars.
- Add eggs and extracts: Beat in 4 large eggs one at a time, ensuring they are fully incorporated. Then add 1 teaspoon vanilla extract and ¼ teaspoon almond extract, mixing well for flavor.
- Combine dry ingredients: In a separate bowl, whisk together 3 cups all-purpose flour and 1 teaspoon salt. Gradually add this flour mixture to the creamed ingredients and mix until just combined to form the batter.
- Layer batter and filling: Spread about 3 cups of the batter evenly on the bottom of the prepared pan. Next, evenly spread the 2 (21-ounce) cans of cherry pie filling over the batter. Using the remaining batter, drop dollops evenly over the filling to partially cover it.
- Bake the bars: Place the pan in the oven and bake for 40 minutes until a toothpick inserted comes out clean and the top turns lightly golden brown. If using a larger 15 x 10-inch pan, bake for about 30 minutes instead.
- Cool the bars: Remove from the oven and allow the bars to cool completely in the pan to set properly before glazing.
- Prepare and apply glaze: In a small bowl, whisk together 1 cup powdered sugar, ½ teaspoon vanilla extract, ½ teaspoon almond extract, and 2 tablespoons milk until smooth. Drizzle this glaze evenly over the cooled bars.
- Serve: Once glazed, cut the bars into 24 pieces and serve as a delightful sweet treat.
Notes
- Use softened butter at room temperature for easier creaming with sugar.
- Cherry pie filling can be substituted with other fruit fillings like blueberry or apple for variation.
- If pan size differs, adjust baking time accordingly and check doneness with a toothpick.
- Allow bars to cool fully before glazing to prevent glaze from melting into the bars.
- Store the bars in an airtight container at room temperature for up to 3 days or refrigerate for longer freshness.
Nutrition
- Serving Size: 1 bar
- Calories: 320 kcal
- Sugar: 28 g
- Sodium: 210 mg
- Fat: 13 g
- Saturated Fat: 7 g
- Unsaturated Fat: 5 g
- Trans Fat: 0 g
- Carbohydrates: 44 g
- Fiber: 1 g
- Protein: 4 g
- Cholesterol: 65 mg
