

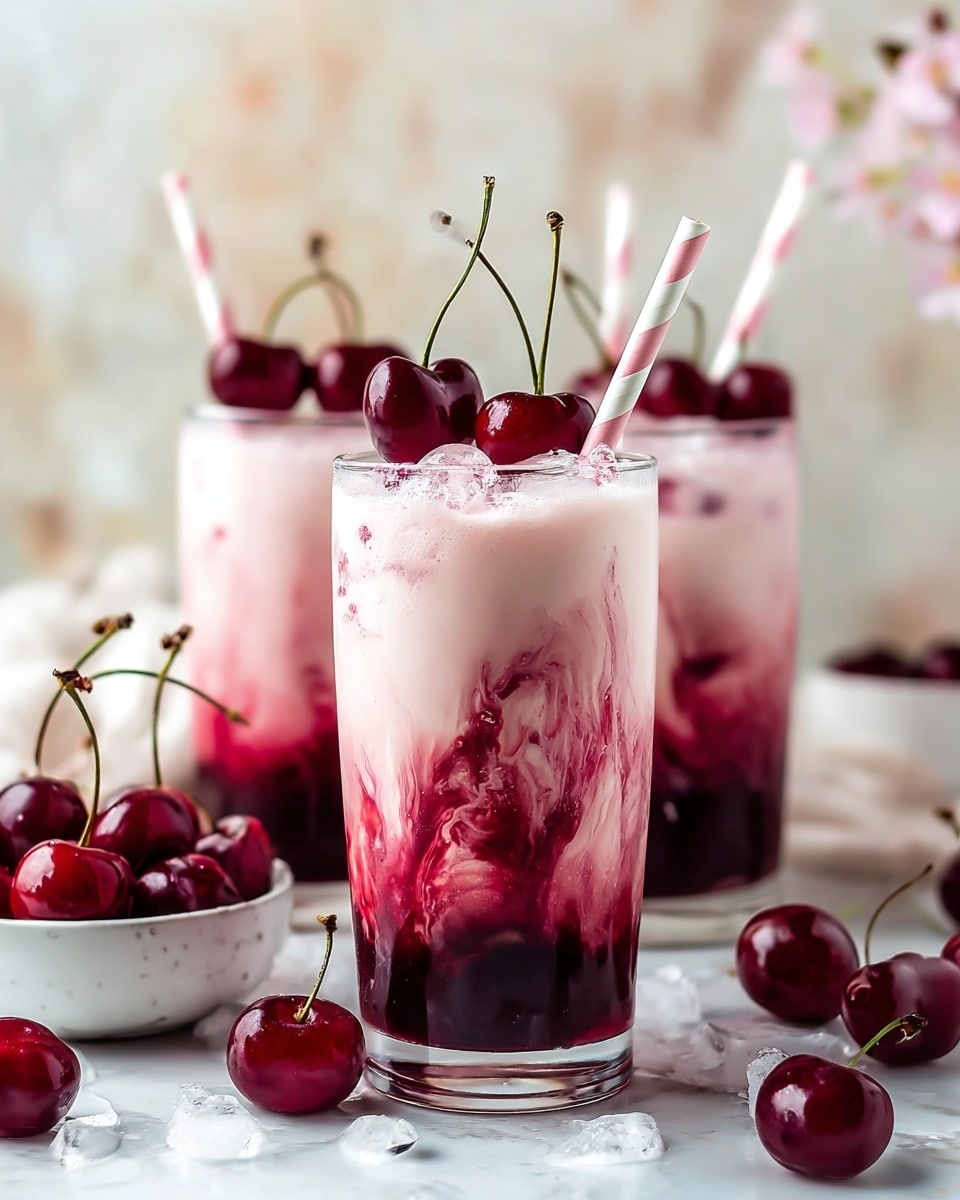
Cherry Earl Grey Milk Tea Recipe
If you love tea with a twist, you’re going to adore this Cherry Earl Grey Milk Tea Recipe. It combines the classic, comforting aroma of bergamot-infused Earl Grey with the tart sweetness of fresh cherries, creating a drink that’s both soothing and delightfully bright. Whether you want a cozy afternoon treat or a refreshing iced beverage on a warm day, this recipe adapts beautifully to your mood.
I first stumbled on this combo when craving something more interesting than my regular cup of tea, and now it’s become my go-to when I want to impress friends or simply indulge myself. The cherry infusion adds a natural fruitiness that pairs perfectly with creamy milk and a hint of vanilla – trust me, it’s worth trying!
Why This Recipe Works
- Balanced Flavors: The tartness of fresh cherries brightens the fragrant Earl Grey, creating a unique flavor harmony.
- Customizable Sweetness: Vanilla syrup lets you adjust the sweetness to your preference without overpowering the tea.
- Versatile Serving: Enjoy it warm on chilly days or iced when you want a refreshing treat.
- Simple Prep: Minimal ingredients and straightforward steps make this easy to whip up anytime.

Ingredients & Why They Work
Each ingredient in this Cherry Earl Grey Milk Tea Recipe plays a key role, and I love how they come together naturally. Fresh cherries provide vibrant flavor, while the Earl Grey tea brings its signature bergamot essence. Plus, a splash of vanilla syrup adds just the right amount of sweetness without any fuss.
- Earl Grey tea: The bergamot oil in Earl Grey gives this recipe its unique citrusy aroma that pairs amazingly with cherry.
- Fresh cherries: Using fresh cherries adds natural sweetness and a slight tartness that brightens the tea.
- Milk: Any milk works! I love oat milk for creaminess, but dairy or almond are great too.
- Vanilla syrup: Adds warmth and smooth sweetness, balancing the tart cherry and fragrant tea.
- Cinnamon stick (optional): A subtle spice that deepens the flavor—perfect if you want a cozy twist.
- Water: For brewing and simmering the cherries, essential to extract all the flavor.
- Ice (optional): For making a refreshing iced Cherry Earl Grey Milk Tea on warmer days.
Make It Your Way
I love making this Cherry Earl Grey Milk Tea Recipe my own by playing around with the milk and sweetness levels. Sometimes I swap vanilla syrup for honey or maple syrup if I want a more natural touch. You can also skip the cinnamon for a lighter taste or add a splash of almond extract for an extra nutty note.
- Variation: I once made this with coconut milk and a dash of cardamom for a tropical twist that my guests raved about.
- Dairy-Free: Using oat or almond milk works perfectly if you’re avoiding dairy.
- Seasonal: Swap fresh cherries for frozen when it’s out of season – just simmer a little longer to bring out the flavor.
Step-by-Step: How I Make Cherry Earl Grey Milk Tea Recipe
Step 1: Simmer the Fresh Cherries
Start by placing your pitted and halved cherries in a small saucepan with about 2 tablespoons of water. Turn the heat to low and let them simmer gently for 3 to 5 minutes until they soften and release their juices. Use a spoon or fork to gently mash the cherries while they cook — this helps infuse the milk with plenty of cherry flavor. Keep an eye on it so the water doesn’t evaporate entirely or the cherries burn; a bit of steam is just right.
Step 2: Brew the Earl Grey Tea
While your cherries are simmering, bring 1 cup of water to a boil and steep your Earl Grey tea for 3 to 5 minutes—longer if you prefer a stronger, more robust tea. I recommend using a tea bag or loose leaf Earl Grey if you have it, but either works well here. Once brewed, remove the tea bag or strain the leaves and set your tea aside.
Step 3: Warm the Milk and Cherry Mixture
Next, pour your choice of milk into the saucepan with softened cherries and gently warm the mixture over medium-low heat. Stir occasionally so the milk doesn’t scald, and if you want a warmed, cozy note, toss in a cinnamon stick while heating. It’s subtle but brings a lovely depth of flavor that I never skip during colder months.
Step 4: Add Vanilla and Combine
Stir in 1 to 2 teaspoons of vanilla syrup directly into the warm milk and cherry mixture. I usually start with 1 teaspoon and taste before adding more since sweetness preference varies. Then pour the brewed Earl Grey tea into your favorite mug, and strain the warm milk and cherry mixture into it. Press gently on the cherries to squeeze out every last bit of juicy flavor. Give it a good stir to marry all those aromas and flavors.
Step 5: Serve Hot or Iced
Enjoy your tea immediately while warm, or let it cool slightly before pouring over ice if you want an iced Cherry Earl Grey Milk Tea Recipe. I love both ways, but iced is especially refreshing once the weather heats up. Garnish with a fresh cherry or a dusting of cinnamon for that extra touch.
Tips from My Kitchen
- Cherry Prep: Always pit your cherries before cooking to avoid any bitterness and make sipping easier.
- Steeping Time: For stronger tea flavor, steep the Earl Grey for the full 5 minutes but avoid bitterness by not going longer.
- Milk Choices: Oat milk creates a naturally creamy texture that mixes beautifully, but adjust heating time for nut milks to avoid curdling.
- Sweetness Balance: Start with less vanilla syrup and add more as needed; fresh cherries bring some natural sweetness already.
How to Serve Cherry Earl Grey Milk Tea Recipe
Garnishes
I often garnish my Cherry Earl Grey Milk Tea with a fresh cherry perched on the rim of the mug or a little sprinkle of cinnamon powder on top for warmth and visual appeal. If you want to get playful, a tiny edible flower adds a lovely, elegant touch for serving guests.
Side Dishes
This tea pairs beautifully with buttery shortbread cookies or soft almond biscotti. I like serving it alongside a small fruit tart or a slice of lemon loaf for a perfect afternoon tea vibe. The tartness of these treats complements the cherry and bergamot flavor perfectly.
Creative Ways to Present
For special occasions, try layering the iced Cherry Earl Grey Milk Tea in a glass with fresh cherries and a swirl of vanilla syrup, finishing with whipped cream and a cherry on top. I’ve even served it in clear glass jars at brunches — the rich color and visible cherries always spark compliments and curiosity.
Make Ahead and Storage
Storing Leftovers
If you happen to have any leftover milk tea, store it in an airtight container in the refrigerator for up to 2 days. I recommend giving it a quick stir or gentle reheat to bring back flavors before drinking. Sometimes the cherry flavor intensifies a bit overnight, which I actually love!
Freezing
I don’t usually freeze this Cherry Earl Grey Milk Tea Recipe because the milk can separate when thawed, changing the texture. However, if you want to save the brewed tea separately, that freezes well and can be brewed fresh with warmed milk later.
Reheating
Reheat leftover milk tea gently on the stove or in the microwave using short intervals to avoid boiling. Stir between intervals so the flavors blend well. Avoid overheating to prevent curdling, especially if using plant-based milks.
FAQs
-
Can I use frozen cherries instead of fresh for the Cherry Earl Grey Milk Tea Recipe?
Absolutely! Frozen cherries work well, especially outside cherry season. Just simmer them a little longer to extract full flavor and naturally sweet juices before combining with the milk and tea.
-
Is it okay to use any milk with this recipe?
Yes, feel free to use any milk you prefer—dairy, almond, oat, or coconut milk all work well. Just be mindful that nut and plant-based milks can sometimes heat differently, so warm gently to avoid curdling.
-
How long can I store the Cherry Earl Grey Milk Tea once made?
Store it in a sealed container in the fridge for up to 2 days for best flavor and freshness. Reheat gently before drinking, and give it a stir to refresh the texture.
-
Can I make this tea ahead for a party?
You can prepare the cherry milk mixture and the brewed tea separately ahead of time. Just combine and heat (or chill and serve over ice) right before your guests arrive to keep everything fresh and vibrant.
Final Thoughts
This Cherry Earl Grey Milk Tea Recipe has quickly become one of my favorite little indulgences because it’s simple, flavorful, and feels a bit fancy without any fuss. I love sharing it with friends who are curious about trying something new with their tea ritual, and I’m confident you’ll enjoy it just as much. So go ahead, give this one a shot next time you need a comforting cup with a fruity, fragrant twist—you won’t regret it!
Print
Cherry Earl Grey Milk Tea Recipe
- Prep Time: 10 minutes
- Cook Time: 10 minutes
- Total Time: 20 minutes
- Yield: 1 serving
- Category: Beverage
- Method: Stovetop
- Cuisine: Fusion
Description
A delightful Cherry Earl Grey Milk Tea combining the floral bergamot notes of Earl Grey with the sweet tartness of fresh cherries and creamy milk, enhanced with vanilla syrup and a hint of cinnamon. Perfect served hot or iced for a refreshing and comforting beverage.
Ingredients
Tea Base
- 1 Earl Grey tea bag or 1 tsp loose leaf Earl Grey tea
- 1 cup water
- 1 cinnamon stick (optional)
Cherry Milk Mixture
- 4-5 fresh cherries, pitted and halved
- 2 tablespoons water
- 1/2 cup milk (any type: dairy, almond, oat, etc.)
- 1-2 tsp vanilla syrup (adjust to taste)
To Serve
- Ice (optional for iced version)
- Fresh cherry or sprinkle of cinnamon for garnish (optional)
Instructions
- Prepare Cherries: In a small saucepan, add the fresh cherries and about 2 tablespoons of water. Simmer on low heat for 5 minutes until the cherries soften and release their juices. Gently mash the cherries to extract more flavor.
- Brew Tea: While the cherries simmer, bring 1 cup of water to a boil. Steep the Earl Grey tea bag or loose leaf tea for 5 minutes for full flavor. Remove the tea bag or strain the leaves.
- Heat Milk Mixture: Pour the milk into the saucepan with the softened cherries and heat gently, stirring occasionally until warmed through. Add the cinnamon stick if using to infuse a subtle spice.
- Add Sweetness: Stir in 2 teaspoons of vanilla syrup into the milk and cherry mixture, adjusting sweetness to your liking.
- Combine Tea and Milk Mixture: Pour the brewed Earl Grey tea into a mug, then strain the warm milk and cherry mixture into the mug, pressing on the cherries to release all juices. Stir well to combine.
- Serve: For iced tea, allow the mixture to cool slightly and pour over ice in a glass. For hot tea, serve immediately. Garnish with a fresh cherry or sprinkle of cinnamon if desired.
Notes
- You can substitute fresh cherries with frozen cherries if fresh are out of season; thaw them first.
- Adjust vanilla syrup according to sweetness preference or use honey/maple syrup as alternatives.
- Use any milk type to suit dietary needs such as almond, oat, or dairy milk.
- For a stronger cherry flavor, simmer cherries a bit longer or add cherry syrup.
- The optional cinnamon stick adds warmth but can be omitted if spice is not preferred.
- Serve with or without ice based on your preference for hot or cold beverage.
Nutrition
- Serving Size: 1 cup
- Calories: 150 kcal
- Sugar: 12 g
- Sodium: 50 mg
- Fat: 5 g
- Saturated Fat: 2 g
- Unsaturated Fat: 3 g
- Trans Fat: 0 g
- Carbohydrates: 18 g
- Fiber: 1 g
- Protein: 4 g
- Cholesterol: 10 mg


