

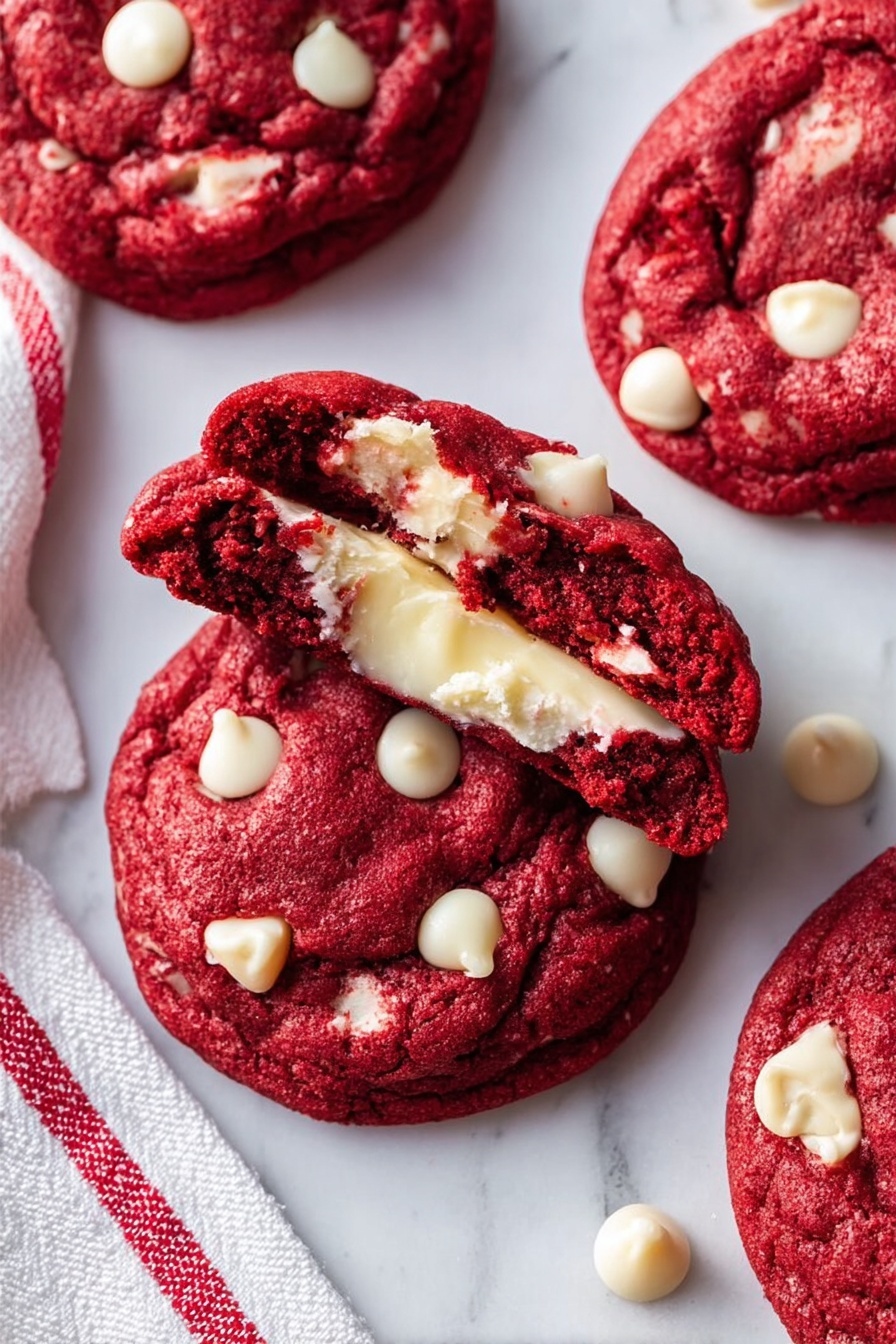
Cheesecake Stuffed Red Velvet Cookies Recipe
If you’re on the hunt for a dessert that’s utterly irresistible and guaranteed to wow anyone who tries it, you’ve got to make my Cheesecake Stuffed Red Velvet Cookies Recipe. Imagine the rich, fudgy bite of a red velvet cookie wrapped around a smooth, creamy cheesecake center. These aren’t your average cookies—they have that luxurious cheesecake surprise inside that’ll make you swoon. Stick with me, and I’ll walk you through every step to get them perfectly soft, gooey, and utterly drool-worthy.
Why This Recipe Works
- Perfect Texture Combination: The red velvet cookie dough stays soft while the cheesecake center remains creamy without leaking.
- Flavor Harmony: The subtle cocoa in the red velvet and the sweetness of white chocolate perfectly complement the tang of cream cheese.
- Easy to Assemble: Step-by-step instructions that make stuffing cookies with cheesecake foolproof, even if you’re new to baking.

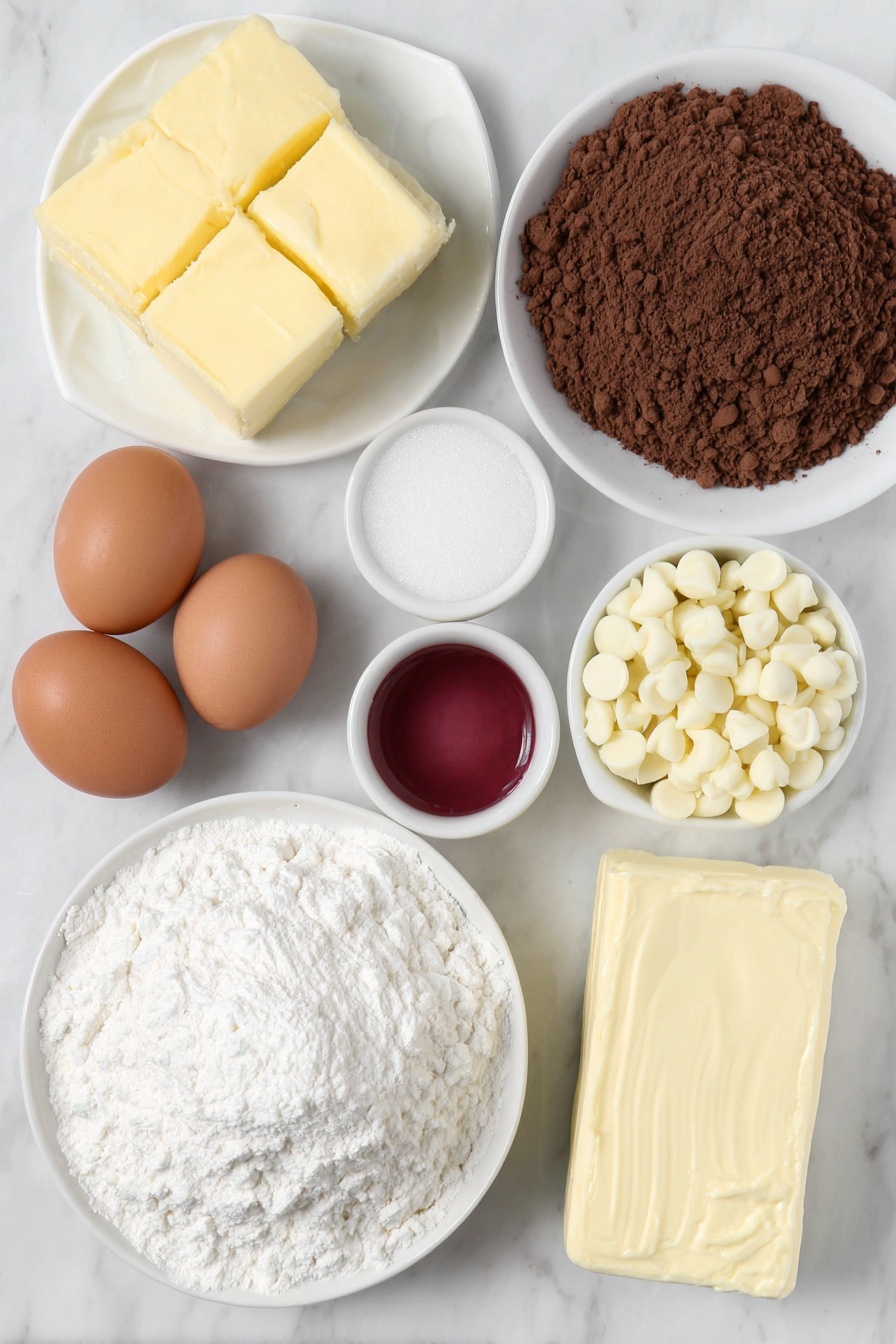
Ingredients & Why They Work
The ingredients in this Cheesecake Stuffed Red Velvet Cookies Recipe come together to achieve that perfect cookie-cheesecake balance. I always recommend using high-quality cream cheese and good cocoa powder because they really boost the flavor. Plus, the red food coloring gives these cookies their signature festive look.
- Butter: Use barely softened butter to cream well with sugars, creating that tender crumb texture.
- Brown Sugar & Granulated Sugar: Together they add moisture and sweetness, plus help with that chewy edge.
- Eggs: Bind everything while adding richness without making the dough too dense.
- Vanilla Extract: Gives warm depth; vanilla bean paste is an even better swap if you have it.
- Red Food Coloring or Gel: Essential for that iconic red velvet color—gel works best for vibrant hues without changing dough consistency.
- Unsweetened Cocoa Powder: Adds subtle chocolate undertones that make red velvet what it is.
- Flour: The base that holds the dough; the amount controls cookie thickness. I usually stick to 3 cups for bulkier cookies.
- Baking Soda: Helps cookies rise slightly and spread evenly.
- Cornstarch: Keeps cookies tender and soft by limiting gluten formation.
- Salt: Balances sweetness and enhances all the flavors.
- White Chocolate Chips: Melt into sweet pockets that contrast beautifully with the cheesecake filling.
- Cream Cheese: The star of the cheesecake filling—softened so it whips perfectly smooth.
- Powdered Sugar: Sweetens and smooths the cheesecake filling without grit.
Make It Your Way
One of my favorite things about this Cheesecake Stuffed Red Velvet Cookies Recipe is how easy it is to make your own. Whether you want to dial up the chocolate, make it gluten-free, or swap in your favorite frosting for the filling, this recipe is a fantastic base for personalization.
- White Chocolate Swap: I’ve tried mixing in dark chocolate chips instead of white chocolate for a richer flavor—totally delicious!
- Vanilla Bean Paste: Using vanilla bean paste instead of extract in the cheesecake filling adds those lovely specks and a deeper vanilla flavor.
- Nut-Free Version: This recipe is naturally nut-free, but always double-check your ingredient labels if allergies are a concern.
- Thinner or Taller Cookies: If you prefer thinner cookies, use 2 3/4 cups of flour and flatten the dough balls more before stuffing.
Step-by-Step: How I Make Cheesecake Stuffed Red Velvet Cookies Recipe
Step 1: Prepare the Cheesecake Filling First
Start by whisking together cream cheese, powdered sugar, and vanilla until smooth and creamy. I like to scoop the filling into small 16 portions on a parchment-lined tray and freeze them for about an hour. Freezing the filling makes it much easier to stuff the cookies without messy leaks later. Trust me, it’s a game-changer!
Step 2: Whip Up Your Red Velvet Dough
While the cheesecake is chilling, preheat your oven to 350°F and line baking sheets with parchment paper. Cream the butter and sugars until fluffy—don’t rush this part, as it’s key to light cookies. Add the eggs one at a time, then vanilla and red food coloring for that gorgeous hue. Finally, fold in cocoa, cornstarch, baking soda, salt, and flour, mixing just until combined. Fold in white chocolate chips last for pockets of melty sweetness.
Step 3: Assemble the Stuffed Cookies
Form your dough into 16 equal balls. Flatten each one gently into a disc. Grab one frozen cheesecake ball and put it right in the center. Make sure the cheesecake is nice and firm—that cold filling prevents it from oozing out. Wrap the dough around the cheesecake, pinching seams tightly and rolling gently into a smooth ball so it’s completely enclosed. This step might take a bit of patience, but it’s worth it to avoid any cheesecake leakage while baking!
Step 4: Bake and Shape Like a Pro
Bake your stuffed cookies for 10 to 13 minutes, watching carefully so the edges are set but centers stay soft—that’s the sweet spot for gooeyness. Straight out of the oven, use a round spatula, the rim of a glass, or a spoon to gently press the cookies into perfect circles. I learned this trick from a baker friend, and it really makes your cookies look professional and consistent!
Step 5: Let Them Cool and Add a Finishing Touch
Let the cookies cool for a few minutes on the baking sheet before moving them to a wire rack. If you want to glam things up, drizzle melted white chocolate over the top or sprinkle with festive sprinkles. I like microwaving the white chocolate with a teaspoon of oil at half power, stirring every 30 seconds until silky smooth. It gives the cookies that extra wow factor for parties or gifts.
Tips from My Kitchen
- Chill Your Filling: Freezing the cheesecake balls helped me avoid the filling bursting out during baking—don’t skip this step!
- Don’t Overmix Dough: Combining dry ingredients just until blended keeps your cookies tender, not tough.
- Shape Right After Baking: Gently pressing cookies into round shapes right from the oven gives a perfect smooth top, so they look bakery-level gorgeous.
- Watch Baking Time: Undercooking slightly ensures the soft chewy center you want, as cookies firm up more once cooled.
How to Serve Cheesecake Stuffed Red Velvet Cookies Recipe
Garnishes
I love topping these cookies with a drizzle of melted white chocolate or a light sprinkle of festive holiday sprinkles. It adds just the right touch of extra sweetness and a charming look. Some days, I even toss on a pinch of edible glitter for that wow factor when serving at parties.
Side Dishes
Pair these cookies with a tall glass of cold milk or a warm cup of coffee or chai tea. They’re perfect for dessert or afternoon tea. During the holidays, I serve them alongside fresh berries or a simple whipped cream for a beautiful and balanced treat.
Creative Ways to Present
For special occasions, try stacking the cookies on a decorative cake stand with fresh flowers or holiday greenery around the base. Wrapping individual cookies in cellophane tied with a matching ribbon also makes for adorable gifts. If you’re feeling fancy, arrange them in a box lined with parchment for a beautiful cookie gift set.
Make Ahead and Storage
Storing Leftovers
I store leftover cheesecake stuffed red velvet cookies in an airtight container at room temperature for up to 3 days. If it’s warm or humid, pop them in the fridge to keep the cheesecake filling fresh. Let them come to room temperature before enjoying for the best texture.
Freezing
Great news: these cookies freeze excellently! I freeze them individually on a baking sheet first, then transfer to a freezer-safe bag or container. When you want a treat, thaw at room temp or gently warm in a low oven. Freezing helps preserve that creamy cheesecake center and keeps cookies soft.
Reheating
To reheat, I pop the cookies in a 300°F oven for about 5-7 minutes—just until warmed through. This refreshes their softness and brings out the creaminess of the cheesecake filling without melting it away. If pressed for time, a quick 10-second zap in the microwave works too, but watch out—it can get too melty.
FAQs
-
Can I make the cheesecake filling ahead of time?
Absolutely! Making and freezing the cheesecake filling ahead of time actually makes the assembly smoother. I usually make the filling a day or two before baking and keep the portions frozen until ready to use.
-
What’s the best way to prevent the cheesecake from leaking?
Freezing the cheesecake portions so they’re very firm before stuffing is key, along with making sure you pinch the cookie dough seams tightly around the filling to fully encase it.
-
Can I use a different flavor of chips in this recipe?
Yes! While white chocolate chips complement the red velvet beautifully, feel free to try milk chocolate, dark chocolate, or even butterscotch chips for a fun spin.
-
How thick should I flatten the cookie dough before stuffing?
About 1/4 to 1/3 inch thick works perfectly. Thinner dough makes it easier to wrap but can lead to thinner cookies; thicker dough around filling results in a chunkier cookie but requires more flour, so adjust as you like.
Final Thoughts
These Cheesecake Stuffed Red Velvet Cookies Recipe have become my go-to for any time I want a truly special treat that feels both homey and impressive. The creamy cheesecake center surprises everyone, and the soft red velvet exterior just melts in your mouth. If you’re ever unsure about making stuffed cookies, start with this recipe—I promise it’s a joyful baking experience and a total crowd-pleaser. Whip up a batch, share them with friends (or keep them all for yourself!), and enjoy those happy smiles for days.
Print
Cheesecake Stuffed Red Velvet Cookies Recipe
- Prep Time: 25 minutes
- Cook Time: 13 minutes
- Total Time: 38 minutes
- Yield: 16 servings
- Category: Dessert
- Method: Baking
- Cuisine: American
- Diet: Vegetarian
Description
Indulge in these decadent Cheesecake Stuffed Red Velvet Cookies, featuring a soft and rich red velvet cookie exterior filled with a creamy, sweet cheesecake center. Perfectly baked with white chocolate chips and a hint of cocoa, these cookies offer a delightful contrast of textures and flavors that make them a crowd-pleaser for any occasion.
Ingredients
Red Velvet Cookies:
- 1 cup Butter (barely softened)
- 1 cup Brown Sugar
- 1/2 cup Sugar
- 2 large Eggs
- 2 teaspoons Vanilla Extract
- 2 teaspoons Red Food Coloring or Gel
- 1/3 cup Unsweetened Cocoa Powder
- 3 cups Flour
- 1 teaspoon Baking Soda
- 1/2 teaspoon Cornstarch
- 1 teaspoon Salt (use 1/2 teaspoon if using salted butter)
- 1 3/4 to 2 cups White Chocolate Chips
Cheesecake Filling:
- 8 ounces Cream Cheese (barely softened)
- 1 cup Powdered Sugar
- 1 teaspoon Vanilla Extract or Vanilla Bean Paste
Instructions
- Prepare Cheesecake Filling: In a medium bowl, beat the cream cheese, powdered sugar, and vanilla extract until smooth and creamy. Scoop into 16 small portions on a parchment-lined baking sheet and freeze for 45 minutes to 1 hour until firm.
- Preheat Oven and Prepare Baking Sheets: Preheat your oven to 350 degrees Fahrenheit and line baking sheets with parchment paper.
- Cream Butter and Sugars: In a large bowl, cream together the butter, brown sugar, and granulated sugar until light and fluffy using a mixer or by hand.
- Add Eggs and Flavorings: Beat in the eggs one at a time, then add the vanilla extract and red food coloring, mixing until fully combined.
- Add Dry Ingredients: Fold in the flour, cocoa powder, cornstarch, baking soda, and salt gradually, mixing just until combined to avoid overmixing.
- Incorporate White Chocolate Chips: Fold in the white chocolate chips evenly throughout the cookie dough.
- Shape Cookies with Cheesecake: Scoop the red velvet dough into 16 balls and flatten each into a disc. Place a frozen cheesecake ball in the center of each disc, then carefully wrap the dough around the cheesecake, sealing completely and smoothing into a ball to prevent any leaks.
- Place on Baking Sheet: Position the dough balls on the prepared baking sheet about 2 inches apart to allow for spreading.
- Bake the Cookies: Bake for 13 minutes or until the edges are set but the centers still look soft. Avoid overbaking to keep the cookies tender as they will continue to set after removal.
- Shape Cookies While Warm: Immediately after removing from the oven, use a spatula or the rim of a glass to gently press and shape the cookies into perfect circles.
- Cool the Cookies: Let the cookies cool on the baking sheet for 5 minutes before transferring them to a wire rack to cool completely.
- Optional Decoration: Drizzle the cooled cookies with melted white chocolate or sprinkle with festive sprinkles for an elegant finish.
Notes
- For thinner cookies, flatten the dough balls more before baking or reduce flour to 2 3/4 cups; for thicker cookies, use all 3 cups of flour and roll into larger balls.
- You may reserve 1 cup of white chocolate chips to melt and drizzle over the baked cookies for added decoration and flavor.
- To melt white chocolate, place it in a microwave-safe bowl with 1 teaspoon of oil and heat at 50% power in 30-second increments, stirring well each time until smooth.
- Ensure the cheesecake filling is well frozen before wrapping in dough to prevent leakage during baking.
- Use parchment paper on baking sheets to prevent sticking and facilitate easy cleanup.
Nutrition
- Serving Size: 1 cookie
- Calories: 320 kcal
- Sugar: 24 g
- Sodium: 180 mg
- Fat: 18 g
- Saturated Fat: 10 g
- Unsaturated Fat: 7 g
- Trans Fat: 0 g
- Carbohydrates: 35 g
- Fiber: 1 g
- Protein: 4 g
- Cholesterol: 55 mg

