

Cauldron Cookie Cups Recipe
I’m so excited to share this Cauldron Cookie Cups Recipe with you because it’s hands down one of the most fun and festive treats you’ll ever whip up. These little cauldrons are not only adorable but also bursting with rich chocolate flavor and creamy frosting, making them a guaranteed hit whether it’s Halloween or just a fun baking day. Keep reading, and I’ll walk you through every step to get these perfect little puffed-up cookie cups decorated with spooky flair.
Why This Recipe Works
- Simple Ingredients: Using a boxed Devil’s Food cake mix saves time without sacrificing that deep chocolate flavor.
- Perfect Shape: Pressing the indentation while the cookie is warm shapes the perfect “cauldron” cup.
- Customizable Decorating: You get to get creative with spooky sprinkles, candy eyeballs, and pretzel “stir sticks” to give your cauldrons personality.

Ingredients & Why They Work
One of the awesome things about this Cauldron Cookie Cups Recipe is how straightforward it is. The ingredients all come together to create that dark, rich cookie base paired with fluffy, vibrant green frosting—and the fun toppings? They seal the deal. Here’s what you need and a bit about why each ingredient matters.
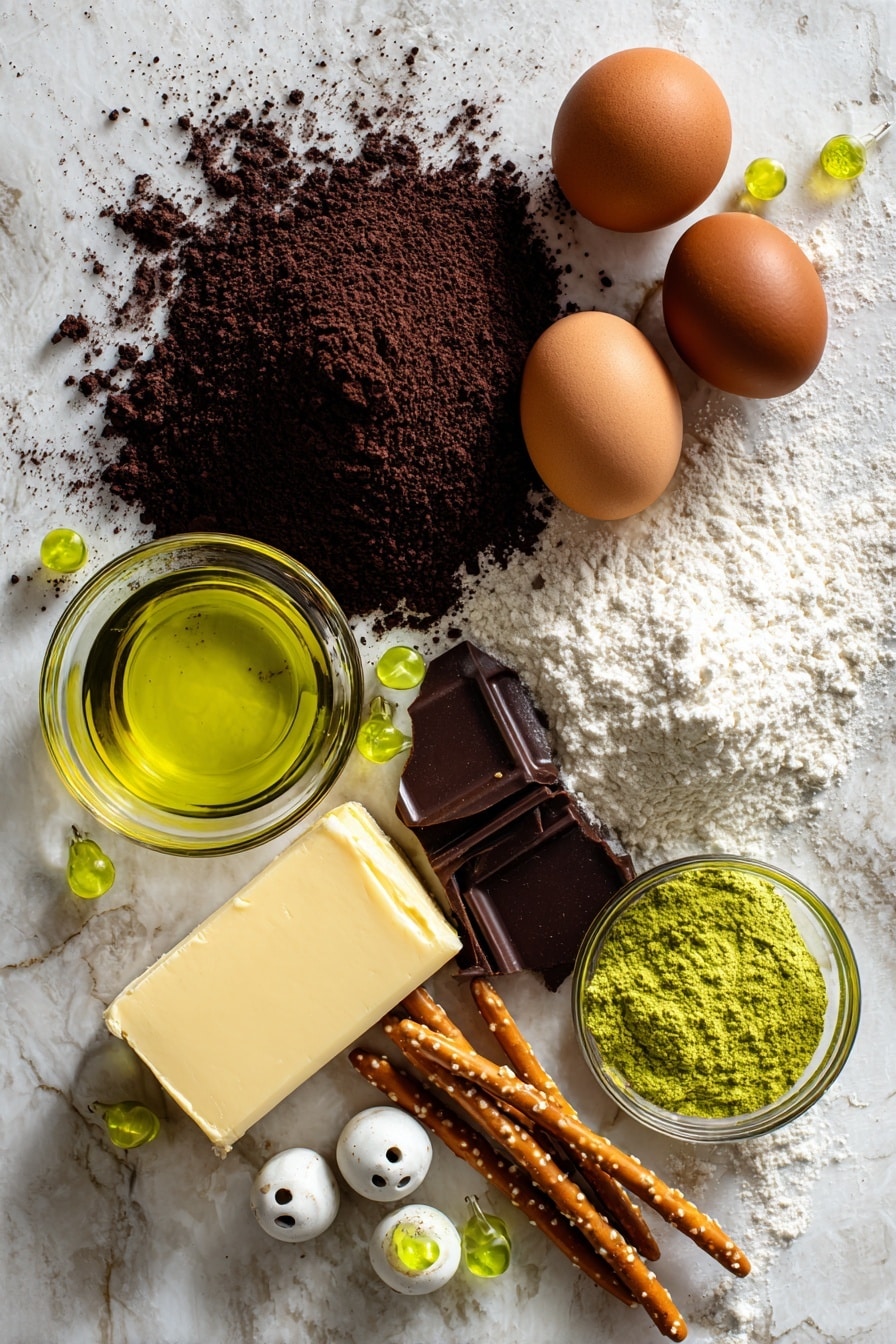
- Devil’s Food cake mix: This gives you a moist chocolate cookie that’s rich but quick to prepare—no need to start from scratch!
- Eggs: They bind the dough, providing structure so your cookie cups hold their shape well.
- Canola or vegetable oil: Keeps the cookies tender and moist without the heaviness of butter.
- Black food coloring (optional): Adds that witchy dark tone to deepen the spooky vibe, but isn’t necessary if you prefer natural-looking cupcakes.
- Butter: The base of the frosting, makes it luxuriously creamy.
- Powdered sugar: Sweetens and thickens the frosting perfectly so it pipes well.
- Vanilla extract: Adds warmth and depth to the frosting flavor.
- Salt: Balances sweetness—it’s an underrated little hero here.
- Milk: Adjusts frosting texture to get it just pipeable but still fluffy.
- Green food coloring: Essential for that vibrant cauldron potion look.
- Round green sprinkles, Halloween sprinkles, candy eyeballs, pretzel sticks: These bring the fun and quirkiness, turning these treats into miniature spooky cauldrons with personality.
Make It Your Way
I always love tweaking this Cauldron Cookie Cups Recipe depending on the occasion or who I’m baking for. It’s such a versatile base that you can make it as spooky or as sweet as you want—don’t be afraid to put your own spin on it.
- Variation: Once, I swapped the green frosting for a bias-pinkish-purple to match a birthday party theme, and it was a hit. You can also add a little peppermint extract for a refreshing twist.
- Dietary tweaks: I’ve experimented with gluten-free cake mix and dairy-free butter substitutes to accommodate friends’ diets—it works well but watch the baking time closely!
- Seasonal changes: Swap the sprinkles with red and white for Valentine’s or orange and purple year-round Halloween vibes.
Step-by-Step: How I Make Cauldron Cookie Cups Recipe
Step 1: Mix Your Cookie Dough
First things first, preheat your oven to 350°F (175°C) and lightly grease three 12-count mini muffin pans. In a large bowl, I whisk together the Devil’s Food cake mix, eggs, oil, and black food coloring if you’re going for that extra-dark cauldron look. Be sure everything is combined but don’t overmix—it’ll just make the cookies tough.
Step 2: Shape the Cookie Cups
Scoop about a half tablespoon of dough for each cup and place it in the mini muffin pans. Press the dough down gently with your fingers to flatten it. This helps the cookies spread evenly and create that perfect cup shape when baked.
Step 3: Bake and Mold the Cauldrons
Bake your cookie cups for 8 to 10 minutes until the edges are set but the centers are still soft. This is key because once you pull them out of the oven, immediately press an indentation into each warm cookie using the back of a tablespoon—this will form the iconic cauldron bubble. Set the pans aside to cool completely so the shape holds.
Step 4: Whip Up the Frosting
While your cookie cups cool, make the buttercream frosting. Beat one cup of softened butter until creamy, then gradually add powdered sugar, vanilla, and salt. To achieve the perfect piping consistency, add 1 to 3 tablespoons of milk a little at a time. Finally, stir in green food coloring until you get that bubbling potion color.
Step 5: Decorate Your Cauldrons
Once your cookie cups have cooled completely, it’s time to pipe the frosting inside, filling each cup to mimic a bubbling brew. Then go crazy decorating—green sprinkles, candy eyeballs, Halloween confetti, and pretzel sticks for “stirrers” make these treats come alive. I love how creative you can get with this part!
Tips from My Kitchen
- Timing is Everything: Don’t wait too long to press the indentation — warm cookies are pliable, but once cooled, they harden and won’t shape nicely.
- Consistent Dough Portions: Using a half tablespoon scoop keeps the cookie cups uniform in size so they bake evenly.
- Frosting Texture: Add milk slowly to get a frosting that’s firm enough to hold shape but smooth enough to pipe beautifully.
- Decoration Fun: Don’t be shy about mixing sprinkles and candy for a playful effect; that’s what makes these cookies stand out.
How to Serve Cauldron Cookie Cups Recipe
Garnishes
I tend to go heavy on the candy eyeballs and Halloween sprinkles because they add that eerie pop of personality to each cauldron. The green sprinkles give the frosting an extra texture that looks like bubbling potion bubbles, and the pretzel sticks are perfect “stir sticks” that guests love to pick up and play with.
Side Dishes
Since these are sweet handheld treats, I usually serve them alongside a simple glass of cold milk or a festive hot chocolate with marshmallows to complement the rich chocolate cookie flavor. They’re perfect for a party dessert spread or alongside a savory platter if you want sweet and salty.
Creative Ways to Present
For Halloween parties, I love arranging the cauldron cookie cups on a platter lined with dry ice or a bowl of cotton candy “smoke” to really create that bubbling cauldron effect. Another tip: place them in mini cauldron-shaped bowls or black muffin liners for an extra spooky twist. Kids and adults alike are always wowed!
Make Ahead and Storage
Storing Leftovers
If you have any leftovers, store the cookie cups in an airtight container at room temperature for up to 3-4 days. If you want to stretch that to a week, refrigeration works great—just remember the frosting might firm up more in the fridge.
Freezing
I’ve frozen undecorated cookie cups (just the baked cups without frosting or decorations) for up to three months. When I’m ready to use them, I thaw them completely before adding frosting and decorating. This method keeps the cookies fresh but prevents the frosting from getting soggy or melting during freezing.
Reheating
If you want to give your frozen or refrigerated cookie cups a little fresh-baked feeling, just warm them in the oven at 300°F for about 5 minutes before frosting. It helps bring back that soft pillowy texture without drying them out.
FAQs
-
Can I use a different cake mix for the Cauldron Cookie Cups Recipe?
Absolutely! While Devil’s Food cake mix gives a rich chocolate base, you can experiment with other chocolate or even red velvet cake mixes to change up the flavor. Just keep in mind that baking times may vary slightly.
-
What’s the best way to get the indentation in the cookie cups?
The key is to press down while the cookies are still warm right out of the oven. Use the back of a tablespoon and gently press into the center of each cup right away. Once cooled, they harden and won’t shape properly.
-
Can I make the frosting dairy-free?
Yes! You can substitute the butter with dairy-free margarine or coconut oil and use a non-dairy milk to maintain a similar texture. You might want to chill the frosting a bit if it’s too soft.
-
How do I store decorated Cauldron Cookie Cups?
Once decorated, store them in a single layer in an airtight container at room temperature for a few days. Keep them away from humidity to prevent the sprinkles and candy decorations from getting sticky.
Final Thoughts
This Cauldron Cookie Cups Recipe will quickly become a favorite in your baking rotation. I love how easy it is to make something so visually impressive with just a few ingredients and simple steps. Whether you’re baking for Halloween, a themed party, or just because, these little cookie cups always bring smiles and compliments. Give them a try—you’ll have so much fun decorating them, and even more joy eating them!
Print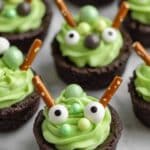
Cauldron Cookie Cups Recipe
- Prep Time: 20 minutes
- Cook Time: 10 minutes
- Total Time: 30 minutes
- Yield: 36 Cookies
- Category: Dessert
- Method: Baking
- Cuisine: American
Description
Delightfully spooky Cauldron Cookie Cups are perfect for Halloween celebrations. These mini cookie cups are made from a rich Devil’s Food cake mix dough, shaped into miniature cups, baked, and then filled with smooth green buttercream frosting. Decorated with festive sprinkles, candy eyeballs, and pretzel stick stirrers, they make a fun and delicious treat for parties and gatherings.
Ingredients
Cookies
- 1 (15.25 ounce) box Devil’s Food cake mix
- 2 large eggs
- 1/2 cup canola or vegetable oil
- Black food coloring (optional)
Frosting
- 1 cup unsalted butter, softened
- 3 cups powdered sugar
- 1 teaspoon vanilla extract
- 1/2 teaspoon salt
- 1 to 3 tablespoons milk
- Green food coloring
Decorations
- Round green sprinkles
- Halloween sprinkles
- Candy eyeballs
- Pretzel sticks
Instructions
- Preheat oven: Preheat the oven to 350 degrees F and lightly grease three 12-count mini muffin pans to prepare for baking.
- Make cookie dough: In a large bowl, mix the Devil’s Food cake mix, 2 large eggs, 1/2 cup canola or vegetable oil, and black food coloring (if using) until the dough is well combined and uniform in color.
- Shape dough cups: Using about 1/2 tablespoon of dough per cup, scoop and place it into the mini muffin pans. Flatten the dough gently with your fingers to form small cups.
- Bake cookie cups: Bake the cookie cups in the oven for 10 minutes or until the edges are set. Remove from the oven and immediately press an indentation into each warm cookie using the back of a 1 tablespoon measuring spoon to create a cup shape. Allow to cool completely in the pans.
- Prepare buttercream frosting: While the cookie cups cool, beat 1 cup softened unsalted butter in a medium bowl until creamy. Gradually add 3 cups powdered sugar, 1 teaspoon vanilla extract, and 1/2 teaspoon salt, mixing until smooth. Add 1 to 3 tablespoons of milk a little at a time until the frosting reaches a smooth, pipeable consistency. Mix in green food coloring until you achieve the desired shade.
- Fill cookie cups: Pipe the green buttercream into the cooled cookie cups, filling each cavity to resemble bubbling potion cauldrons filled with green magic.
- Decorate: Garnish each filled cookie cup with round green sprinkles, Halloween sprinkles, and candy eyeballs. Break pretzel sticks in half and insert one into each cookie cup as a whimsical stir stick.
- Serve: Serve immediately or store as needed. Enjoy your spooky and sweet Cauldron Cookie Cups!
Notes
- Store the cookie cups in an airtight container at room temperature for 3-4 days or refrigerate for up to one week to maintain freshness.
- If undecorated, cookie cups freeze well for up to three months. Thaw before frosting and decorating for best results.
- Using black food coloring in the dough is optional but adds a spooky dark cauldron appearance.
- Milk quantity for frosting may vary; add slowly to reach ideal pipeable texture.
- Use mini muffin pans for perfect-sized cookie cups; regular muffin pans will make larger portions.
Nutrition
- Serving Size: 1 cookie
- Calories: 150 kcal
- Sugar: 15 g
- Sodium: 90 mg
- Fat: 8 g
- Saturated Fat: 4 g
- Unsaturated Fat: 3 g
- Trans Fat: 0 g
- Carbohydrates: 20 g
- Fiber: 1 g
- Protein: 1 g
- Cholesterol: 30 mg


