

Braised Pork Shoulder with Apples Recipe
If you’re craving a dish that feels like a warm hug on a plate, you’ve got to try this Braised Pork Shoulder with Apples Recipe. It’s one of those recipes that’s simple in ingredients but shines with its cozy, comforting flavors that meld beautifully together. Trust me, once you’ve made this, it becomes a go-to for family dinners or impressing guests without fuss.
Why This Recipe Works
- Perfect Balance of Flavors: The apples add a lovely sweetness that perfectly cuts through the richness of the pork shoulder.
- Rich, Deep Taste: Browning the pork first and deglazing the pan infuses an unbeatable depth of flavor.
- Tender, Melt-in-Your-Mouth Texture: Slow braising ensures the pork becomes so tender you can cut it with a fork.
- Simple Ingredients, Big Impact: With just a few pantry staples and fresh herbs, you get a comforting, gourmet meal.

Ingredients & Why They Work
This Braised Pork Shoulder with Apples Recipe combines ingredients that bring out the best in each other. The pork’s marbling ensures juiciness, while the apples introduce a subtle tartness that complements the savory herbs.
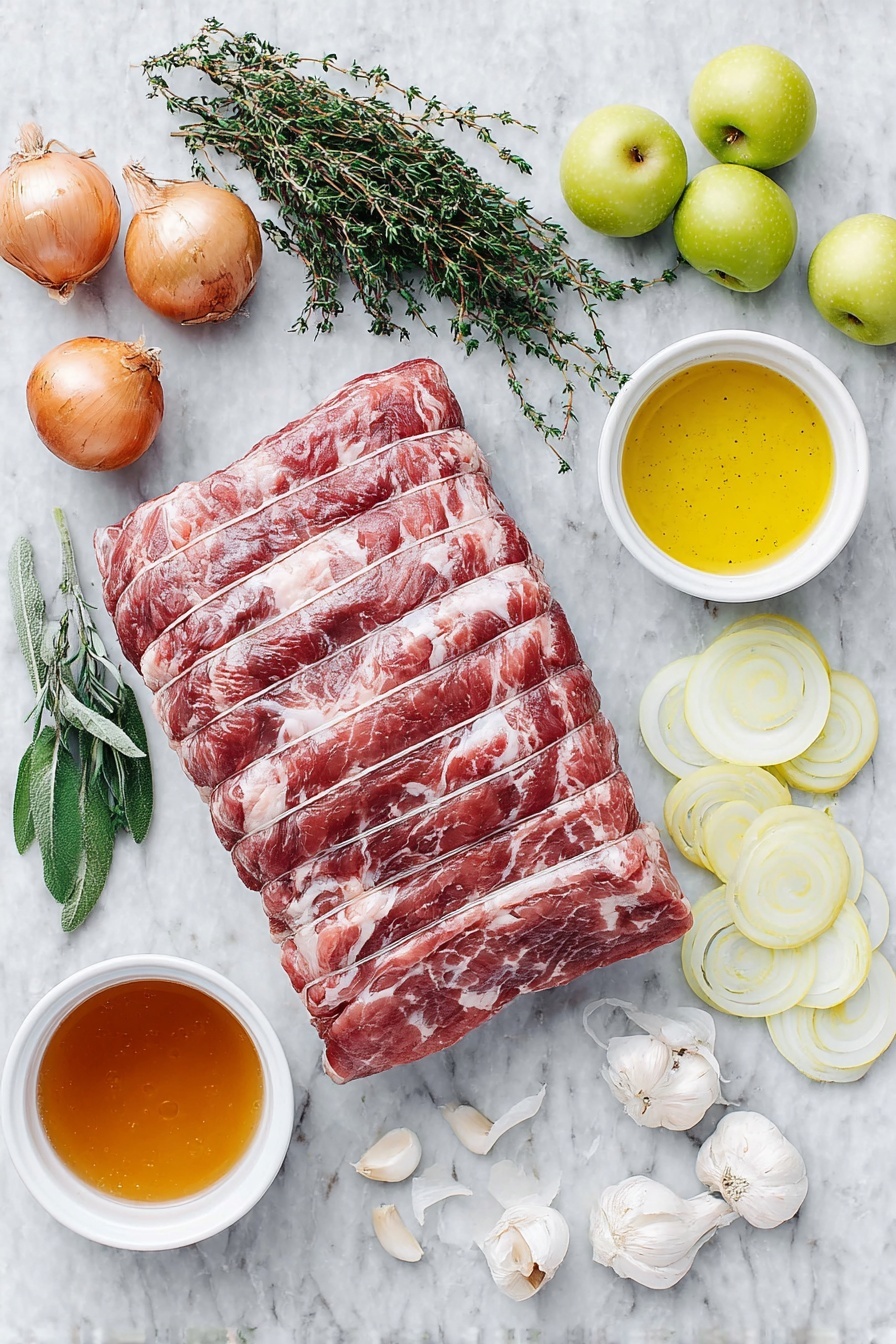
- Pork shoulder: Look for a cut with good marbling for juicy and flavorful meat after braising.
- Kosher salt and black pepper: Essential for seasoning and enhancing the natural pork flavors.
- Olive oil: Helps achieve a beautiful brown crust on the pork without burning.
- Yellow onions: Their sweetness deepens during braising, enriching the sauce.
- Garlic: Adds a warm, aromatic punch that pairs perfectly with pork.
- Dry white wine: Great for deglazing and adding subtle acidity to balance richness.
- Fresh thyme and rosemary: These herbs bring earthiness and depth; dried versions work fine too.
- Smoked paprika: Introduces a lovely smoky warmth that layers beautifully into the dish.
- Apple cider: Not vinegar—this sweet, tangy liquid is key for that fall-inspired apple flavor.
- Low sodium chicken broth: Adds moisture and body to the braising liquid without overwhelming saltiness.
- Bay leaves: Small but powerful, these add complexity to the sauce.
- Granny Smith apples: Their tartness holds up during cooking and offsets the pork’s richness.
Make It Your Way
One of the things I love about this Braised Pork Shoulder with Apples Recipe is how easy it is to customize it. Whether you want it a little sweeter, more herbaceous, or adjusted for dietary needs, it’s super flexible and forgiving.
- Herb swaps: I sometimes swap rosemary for fresh sage, especially in the fall—it adds an earthy twist that’s divine with apples.
- Spice it up: Adding a pinch of crushed red pepper flakes gives it a subtle heat that balances the sweetness from the apples.
- Make it gluten-free: This recipe is naturally gluten-free—just be sure your broth and wine are labeled gluten-free.
- Vegetarian variation: Though not the same, try braising hearty vegetables like mushrooms and root veggies in apple cider and broth with similar seasonings for a veggie-friendly option.
Step-by-Step: How I Make Braised Pork Shoulder with Apples Recipe
Step 1: Prep and Season Like a Pro
Start by patting your pork shoulder dry with paper towels—this is key to getting a good sear. Then season it generously with kosher salt and fresh ground black pepper all over. Don’t be shy here; the seasoning helps build flavor from the beginning.
Step 2: Brown the Pork Shoulder
Heat olive oil in a large, heavy-bottomed Dutch oven over medium-high heat. Add the pork and brown it thoroughly on all sides—about 5 minutes per side. This step creates those golden crusty bits that deliver deep, rich flavor. Take your time and don’t rush it!
Step 3: Softened Onions & Garlic
Remove the browned pork and set it aside. Lower the heat to medium, then add sliced yellow onions to the pot. Cook for about 4 to 5 minutes, stirring often, until they soften and become sweet and translucent. Add the minced garlic and cook for 20 seconds—just until fragrant, no browning here.
Step 4: Deglaze and Season
Pour in the dry white wine to deglaze the pot. Be sure to scrape up all those little browned bits stuck to the bottom—they’re flavor gold. Stir in thyme, rosemary, and smoked paprika for that warm, herby aroma that lifts the whole dish.
Step 5: Bring It All Together
Return the pork to the pot and add the apple cider, chicken broth, and bay leaves. Bring the mixture to a boil on the stovetop, then cover it with a tight-fitting lid and pop it into your oven. Lower the temperature to 350˚F and let it braise slowly for 2 hours. The slow cooking tenderizes the meat to perfection.
Step 6: Add the Apples and Finish Cooking
After 2 hours, remove the lid and nestle the quartered Granny Smith apples around the pork. Cover and continue to cook for another 30 minutes, or until the pork reaches a tender 170˚F to 190˚F internally. This final stage allows the apples to soften without turning to mush, creating that fantastic sweet-savory contrast.
Step 7: Rest and Reduce
Take the pork out and transfer it to a cutting board to rest for 10 minutes. Meanwhile, bring the braising liquid back to a boil on the stove and cook it down until it thickens slightly—this intensifies the sauce into something you’ll want more of. If you like it smooth, feel free to strain out the onions and herbs.
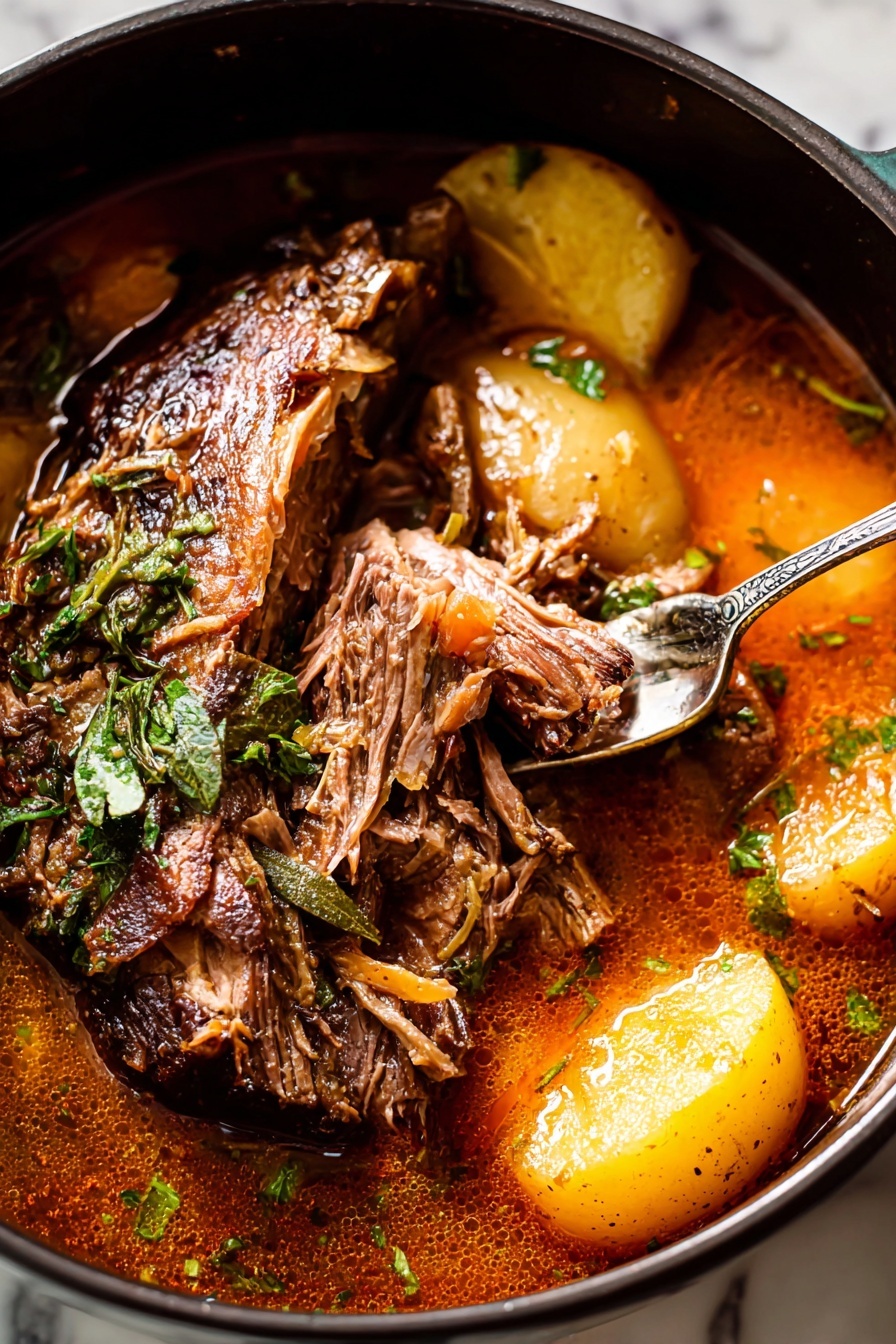
Step 8: Slice, Serve, and Enjoy
Slice the pork against the grain and serve it up ladled with that luscious sauce, onions, and tender apple wedges. It’s a beautiful plate that tastes like it took hours—except most of that time you’re hands-off, trusting the oven to do the magic.
Tips from My Kitchen
- Don’t Skip Drying the Pork: Ensuring the surface is dry before browning helps you get that perfect crust without steaming the meat.
- Use a Heavy Dutch Oven: It holds heat evenly making for better browning and gentle, consistent braising.
- Patience is Flavor: Give the pork time in the oven; rushed braises yield tougher meat.
- Test Internal Temperature: Check early, but if you want pull-apart pork, aim for the higher end (around 190˚F).
How to Serve Braised Pork Shoulder with Apples Recipe
Garnishes
I enjoy finishing this dish with a sprinkle of fresh chopped parsley or thyme to bring a fresh pop of color and mild herbaceousness. A few extra crackles of fresh black pepper on top never hurt either, especially if you like a bit of bite.
Side Dishes
For sides, creamy mashed potatoes or buttery egg noodles are my classic go-tos—they soak up that incredible sauce so well. Roasted root vegetables or a simple green salad add a nice balance and freshness to the plate.
Creative Ways to Present
For special occasions, I love plating this with a bed of creamy polenta, topped with the pork and apples. You can also serve it family-style straight from the Dutch oven on a wooden board for a rustic vibe that sparks conversation and warmth.
Make Ahead and Storage
Storing Leftovers
I usually let the leftovers cool completely, then store them in an airtight container in the fridge. The pork actually tastes even better the next day once the flavors have had time to meld. It keeps well for 3-4 days.
Freezing
This recipe freezes beautifully! I portion it out with plenty of sauce in freezer-safe containers. When you’re ready to enjoy, just thaw overnight in the fridge and reheat gently on the stovetop to keep meat moist.
Reheating
To reheat, I prefer warming it slowly over low heat on the stove with a splash of broth or water. This helps maintain the tender texture and prevents drying out. Avoid high heat or microwave reheating which can toughen the pork.
FAQs
-
Can I use a different cut of pork for this Braised Pork Shoulder with Apples Recipe?
While pork shoulder is ideal because of its marbling and fat content, you could technically use pork butt or even a pork picnic roast. Just keep in mind these cuts have different fat and connective tissue levels, which will affect cooking time and tenderness.
-
What kind of apples work best for this recipe?
I recommend tart, firm apples like Granny Smith—they don’t mush up during the braising process and provide a nice contrast to the pork’s richness. That said, Honeycrisp or Braeburn can work, but softer apples may cook down more into the sauce.
-
Can I make this recipe in a slow cooker?
Yes! Brown the pork and sauté onions and garlic on the stove as directed, then transfer everything to a slow cooker with liquids and herbs. Cook on low for 6-8 hours until the pork is tender. Add apples for the last 30 minutes of cooking.
-
Why is deglazing the pot an important step?
Deglazing lifts all those caramelized bits stuck to the bottom of the pot, which pack huge flavor. Skipping this step means losing out on the rich depth and complexity it adds to your sauce.
-
How do I know when the pork is done?
Use a meat thermometer. Pork shoulder should be cooked to at least 145˚F for safe eating, but for tender, shreddable meat, aim for 190˚F. The apples’ softness and sauce thickness are good visual clues too.
Final Thoughts
This Braised Pork Shoulder with Apples Recipe has become one of those meals I reach for when I want something that feels special but isn’t complicated. It’s a dish that fills your kitchen with warmth and your belly with happiness. I really hope you try it and find as much joy in making and eating it as I do—this one’s a total keeper!
Print
Braised Pork Shoulder with Apples Recipe
- Prep Time: 20 minutes
- Cook Time: 2 hours 30 minutes
- Total Time: 3 hours
- Yield: 6 servings
- Category: Main Course
- Method: Baking
- Cuisine: American
Description
This Braised Pork Shoulder recipe features tender, flavorful pork slow-cooked with aromatic herbs, garlic, apples, and a savory sauce made from apple cider and chicken broth. Perfect for a hearty family meal, it delivers rich taste and melt-in-your-mouth texture with minimal hands-on effort.
Ingredients
Pork and Seasonings
- 3 pounds pork shoulder roast
- Kosher salt and fresh ground black pepper, to taste
- 2 tablespoons olive oil
Vegetables and Aromatics
- 4 yellow onions, thinly sliced
- 6 cloves garlic, minced
Liquids and Flavorings
- ¼ cup dry white wine
- 1 tablespoon fresh thyme, or 1 teaspoon dried thyme
- 1 tablespoon fresh chopped rosemary leaves, or 1 teaspoon crushed dried rosemary
- 1 teaspoon smoked paprika
- 1½ cups apple cider (not apple cider vinegar)
- 1½ cups low sodium chicken broth
- 2 bay leaves
Fruit
- 2 granny smith apples, cored and quartered
Instructions
- Preheat Oven: Preheat your oven to 400˚F to prepare for searing and braising the pork shoulder.
- Season and Brown Pork: Pat the pork shoulder dry with paper towels and season all sides generously with kosher salt and fresh ground black pepper. Heat olive oil in a large oven-safe Dutch oven over medium-high heat. Add the pork and brown it on all sides, about 5 minutes per side, to develop flavor and color.
- Sauté Onions and Garlic: Remove the pork and set aside. Add the thinly sliced onions to the pot and cook over medium heat for 4 to 5 minutes, stirring frequently until softened. Stir in the minced garlic and cook for an additional 20 seconds until fragrant.
- Deglaze and Add Herbs: Pour in the dry white wine, scraping the bottom of the pot to lift all browned bits. Stir in the thyme, rosemary, and smoked paprika to infuse the sauce with herbal and smoky flavor.
- Add Liquids and Pork: Return the pork shoulder to the pot. Add apple cider, low sodium chicken broth, and bay leaves. Bring mixture to a boil over medium-high heat.
- Oven Braising: Cover the pot tightly with its lid and transfer it to the preheated oven. Reduce the oven temperature immediately to 350˚F and cook the pork for 2 hours until partially tender.
- Add Apples and Continue Cooking: Remove the lid, add the quartered granny smith apples to the pot, cover again, and braise in the oven for an additional 30 minutes. Cook until the pork reaches an internal temperature between 145˚F and 200˚F, preferably around 170˚F to 190˚F for optimal tenderness.
- Rest the Pork: Remove the pot from the oven and place it on the stovetop. Transfer the pork shoulder to a cutting board and let it rest for 10 minutes to allow juices to redistribute through the meat.
- Reduce Sauce: Meanwhile, bring the cooking liquid in the pot to a boil over high heat. Simmer for a few minutes until the sauce thickens slightly and intensifies in flavor.
- Serve: Slice or shred the rested pork shoulder and serve it topped with the reduced sauce, onions, and apples. This dish pairs wonderfully with creamy mashed potatoes or buttered egg noodles to soak up the delicious sauce.
Notes
- Choose a pork shoulder with good marbling for the best flavor and tenderness.
- Take your time browning the pork to develop a rich crust and deeper flavor.
- Scrape up all browned bits from the pot when deglazing with wine to maximize flavor.
- The pork is safe to eat at 145˚F, but cooking to 170˚F-190˚F produces more tender, juicy results ideal for slicing. For pulled pork texture, cook closer to 205˚F.
- Rest the pork after cooking to help retain its juices when slicing.
- If you prefer a smooth sauce, strain the liquid after reducing to remove onions and herbs.
- Try substituting sage or other herbs for an interesting flavor variation.
- Serve over creamy mashed potatoes or buttery noodles to enjoy every bit of the savory sauce.
Nutrition
- Serving Size: 1 serving
- Calories: 450 kcal
- Sugar: 10 g
- Sodium: 350 mg
- Fat: 25 g
- Saturated Fat: 7 g
- Unsaturated Fat: 15 g
- Trans Fat: 0 g
- Carbohydrates: 18 g
- Fiber: 3 g
- Protein: 35 g
- Cholesterol: 110 mg


