

Apple Slab Pie Recipe
If you’re anything like me, there’s something incredibly comforting about a good apple pie—but have you ever tried an Apple Slab Pie Recipe? It’s like a giant, buttery hug wrapped around scoops of warm, spiced apples. Trust me, this recipe doesn’t just taste amazing, it’s also a total crowd-pleaser and surprisingly simple for such an impressive dessert. Let me walk you through it step-by-step so you end up with a perfectly cozy slab pie you’ll want to make over and over again.
Why This Recipe Works
- Buttery Flaky Crust: The generous butter amount creates a rich, flaky crust that’s easy to work with and bakes up beautifully golden.
- Layered Spiced Filling: A blend of cinnamon, nutmeg, allspice, and cornstarch thickens the juicy apple chunks, giving you that classic spiced pie flavor with a perfect texture.
- Sheet Pan Convenience: The slab pie format serves lots of people easily and offers generous slices without the fuss of small ramekins or multiple pies.
- Chilling for Success: Chilling the dough before rolling helps prevent shrinking and keeps the butter cold, locking in that flaky texture you want.

Ingredients & Why They Work
This Apple Slab Pie Recipe uses simple, classic ingredients that work in harmony to give you that perfect balance of buttery crust and tender, spiced apples. I always recommend using a mix of sweet and tart apples for depth of flavor and texture, and cold butter for a tender crust you can actually flake.
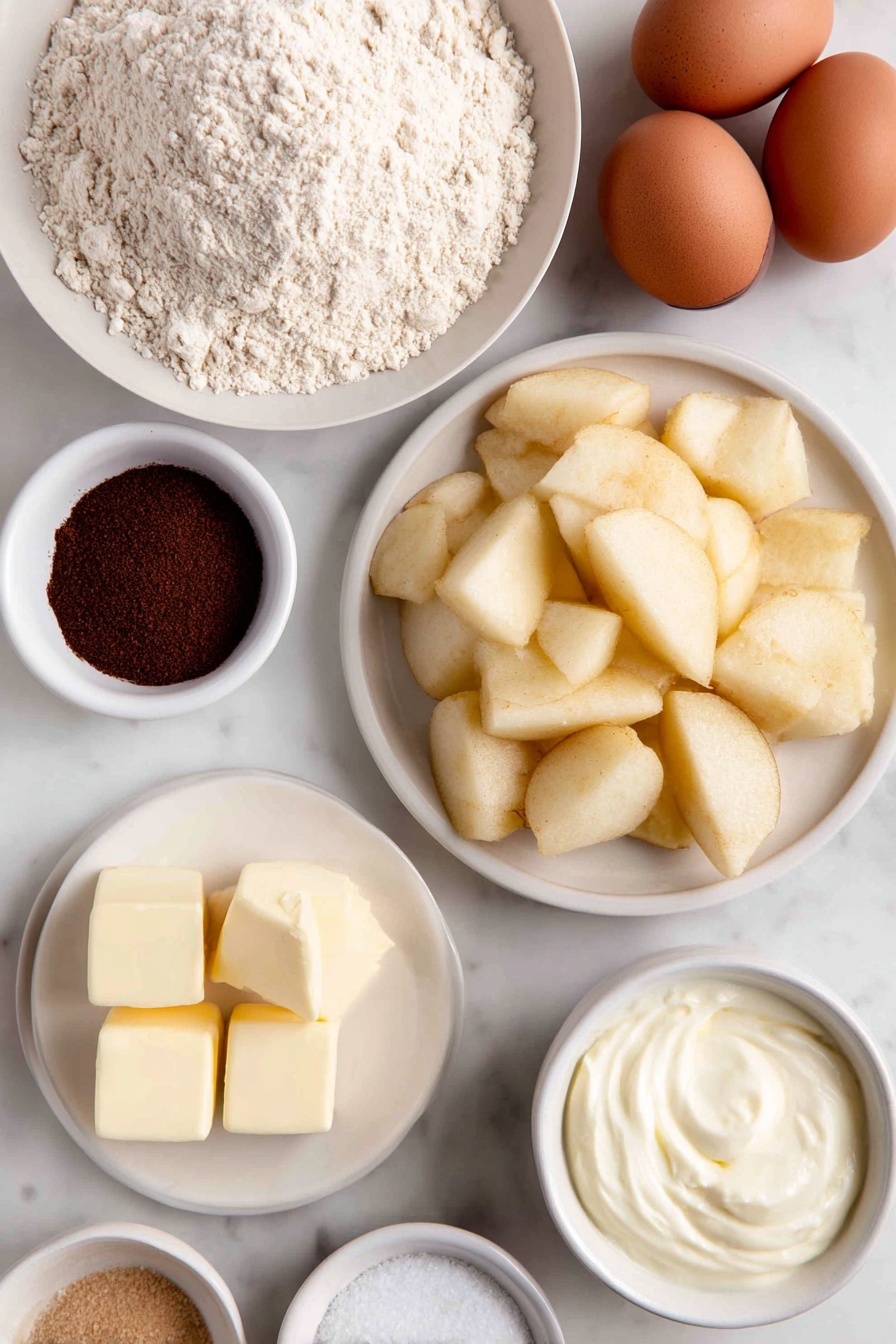
- All-purpose flour: The backbone for your crust; using regular flour keeps it tender but strong enough to hold the filling.
- Sugar: Sweetens both crust and filling, but watch the amounts in the filling depending on your apple sweetness.
- Table salt: Just the right pinch to enhance all the flavors without tasting salty.
- Unsalted butter: Cold and cubed butter is crucial for flaky crust; don’t substitute with margarine for that rich texture.
- Cold water: Keeps the dough workable without melting the butter—essential for a tender crust.
- Apples: Aim for firm apples like Granny Smith mixed with Gala or Honeycrisp for a nice balance of tart and sweet.
- Lemon juice: Stops the apples from browning and brightens their flavor.
- Cornstarch: Thickens the juicy filling so it’s not runny but still luscious.
- Ground cinnamon, nutmeg, allspice: Classic warm spices that give the filling its beloved apple pie aroma.
- Heavy cream or egg wash: Adds a beautiful golden color and slight shine to your crust.
Make It Your Way
I love that the Apple Slab Pie Recipe leaves room for you to make it your own. Whether you’re adding a personal touch with extra spices or tweaking the sweetness, it’s a flexible recipe that you can adapt with confidence.
- Variation: Sometimes I swap in a bit of ground ginger or cardamom for a subtle twist—it plays wonderfully with the apple spices!
- Dietary Modifications: For a dairy-free version, use a plant-based butter substitute and a flax egg for the wash, and it still bakes up nicely.
- Fruit Mix: You can mix pears in with your apples for a ripened flavor that adds extra moisture and sweetness.
Step-by-Step: How I Make Apple Slab Pie Recipe
Step 1: Crafting the Perfect Crust
Start by whisking flour, sugar, and salt in a large bowl. Toss in your cold, cubed butter and start mashing it gently with your fingers until you get pea-sized chunks. This technique gives you a flaky crust that’s delicate yet sturdy. Stir in cold water bit by bit, just until the dough forms a soft ball—don’t overwork it, or you’ll lose that tender texture. Divide your dough, shape into rectangles, wrap in plastic, and chill for at least two hours. I find this step essential to avoid a shrinking or tough crust, so don’t skip it!
Step 2: Preparing the Apple Filling
While the dough chills, toss your chopped apples with a splash of lemon juice to brighten their flavor and keep them looking fresh. In a separate bowl, mix the sugar, cornstarch, and spices, then toss this over the apples until well coated. This mixture thickens the filling perfectly as it bakes, so no soggy bottom but juicy, tender apples with just the right bite.
Step 3: Assemble the Slab Pie
Preheat your oven to 375°F and line a large sheet pan with parchment. Roll out your larger dough piece on a floured surface to about 18×13 inches and gently transfer it to the pan, draping the edges over. Pop the pan into the fridge or freezer to keep that cold crust intact while you roll out the top layer a little smaller. Pour the luscious apple filling onto the crust, then carefully cover with the second dough rectangle, tucking and sealing the edges tightly. Pro tip: Make plenty of 1-inch slits across the top so steam can escape, keeping your crust from getting soggy.
Step 4: Bake and Chill
Brush your pie with heavy cream or an egg wash for that dreamy golden finish. Bake for 40 to 45 minutes until your crust is beautifully browned and the filling bubbles happily through those slits. Patience is key here: let it cool for at least 45 minutes before slicing to help the filling set. I know the smell alone makes you want to dive right in, but trust me, waiting will save you from a gooey mess.
Tips from My Kitchen
- Keep Butter Ice-Cold: I keep my cubed butter in the freezer until just before mixing in. It really makes a flaky crust difference.
- Don’t Overwork the Dough: Press and fold gently to avoid a tough crust—crumbly is good, sticky is not.
- Use a Sheet Pan Underneath: Catch overflow and easy cleanup by placing your pie pan on a larger baking sheet—mess saver!
- Cool Before Slicing: I learned the hard way—cutting hot pie leads to runny disaster; give it time to set and slice cleanly.
How to Serve Apple Slab Pie Recipe
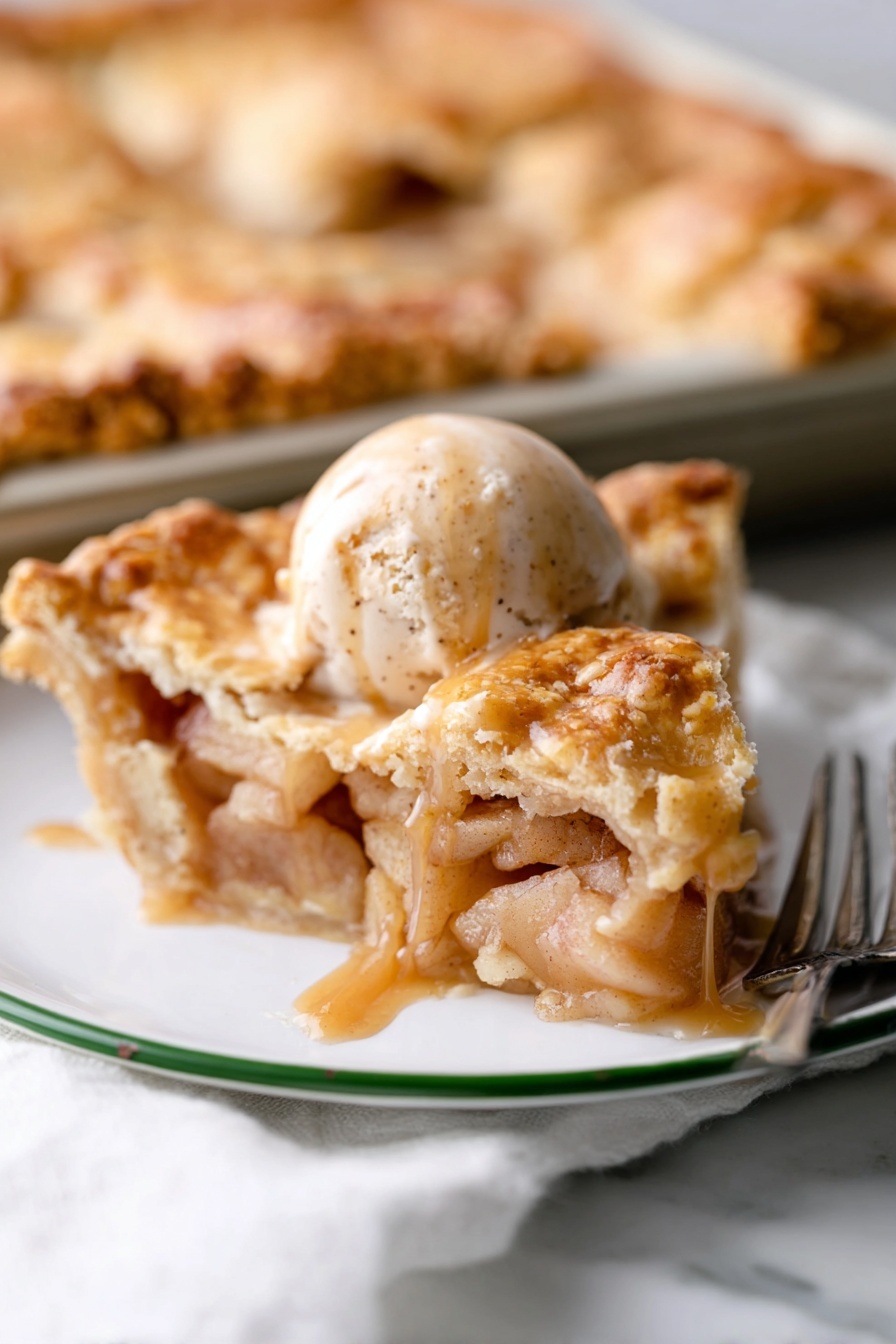
Garnishes
I’m a sucker for a scoop of vanilla ice cream on the side, but a dollop of whipped cream or even a drizzle of caramel sauce takes this apple slab pie over the top delicious. Sometimes I sprinkle chopped toasted pecans on top of the cream for a little crunch—because, why not?
Side Dishes
This pie pairs beautifully with a simple cup of coffee or hot tea for dessert. If you’re making it for brunch, it’s lovely alongside a sharp cheddar cheese platter and some crisp apple slices for a sweet-salty combo that always surprises guests.
Creative Ways to Present
For holidays or parties, I’ve served this pie on a rustic wooden board, garnished with fresh thyme sprigs and cinnamon sticks for a cozy vibe. You could also cut it into narrow bars for easy grab-and-go servings at casual gatherings. The slab shape really lends itself well to sharing—and looking impressive without stress.
Make Ahead and Storage
Storing Leftovers
After cooling completely, I keep leftover apple slab pie covered loosely with foil or plastic wrap at room temperature if I plan to eat it that day. For up to two days, storing it in the fridge works well to keep it fresh. Just remember to let it warm up a bit before serving for the best texture.
Freezing
I’ve had success freezing fully baked slab pie slices wrapped tightly in plastic and foil. Thaw overnight in the fridge, then warm gently in the oven. Freezing before baking is also an option—just assemble, wrap well, and bake straight from the freezer adding a few extra minutes.
Reheating
To reheat, I usually pop slices into a 300°F oven for 15-20 minutes until warm throughout. You can finish under the broiler for a minute or two to refresh that flaky top crust—just watch it carefully to avoid burning.
FAQs
-
Can I make the Apple Slab Pie Recipe ahead of time?
Absolutely! You can assemble the pie up to a day in advance and keep it refrigerated, then bake it fresh when you’re ready. Alternatively, bake fully and store covered at room temperature or in the fridge for a day, reheating before serving.
-
What types of apples work best?
Firm apples like Granny Smith, Honeycrisp, or Fuji hold their shape well and balance sweetness and tartness. Mixing tart and sweet varieties creates a more dynamic flavor and texture.
-
How do I prevent a soggy crust with this recipe?
Chilling your dough before baking and adding cornstarch to the filling helps keep moisture under control. Also, make sure to have steam vents on top so excess moisture can escape.
-
Can I use store-bought pie dough for this?
Sure, you can, but I recommend homemade dough for that buttery flakiness that really makes this slab pie stand out. If pressed for time, quality refrigerated dough can work in a pinch.
-
How long should I let the pie cool before serving?
Wait at least 45 minutes to an hour so the filling sets up nicely. It can be tough to resist, but the slice will hold together much better for clean serving.
Final Thoughts
This Apple Slab Pie Recipe has become one of my go-to desserts whenever I want to feed a crowd or just treat myself to something warm and comforting. The combination of flaky crust and perfectly spiced apples hits all those cozy notes we crave as the seasons turn cooler. I hope you give this recipe a try—it’s one of those reliably fantastic dishes that feels like a celebration no matter the occasion. If you’re ready to nail a classic but fuss-free apple pie, this slab pie is your new best friend in the kitchen.
Print
Apple Slab Pie Recipe
- Prep Time: 45 minutes
- Cook Time: 45 minutes
- Total Time: 4 hours 15 minutes
- Yield: 18 servings
- Category: Dessert
- Method: Baking
- Cuisine: American
- Diet: Vegetarian
Description
A classic American apple slab pie featuring a buttery, flaky crust and a cinnamon-spiced apple filling. This large, rectangular pie is perfect for serving a crowd and boasts a golden, crisp top crust with sweet, tender apples inside. Ideal for holiday gatherings or cozy dessert nights.
Ingredients
For the crust:
- 3 ¾ cups all-purpose flour (470 grams)
- 1 ½ tbsp sugar
- 1 ½ tsp table salt
- 3 sticks unsalted butter, cubed and very cold (12 oz or 340 grams)
- ¾ cup very cold water
For the apple filling:
- 4 pounds apples, peeled, cored and chopped into ½-inch chunks (about 10 cups)
- Squeeze of lemon juice
- ¾ cup sugar
- 3 tbsp cornstarch
- 1 rounded tsp ground cinnamon
- ¼ tsp ground nutmeg
- ¼ tsp ground allspice
- ⅛ tsp table salt
To finish:
- 2 tbsp heavy cream or 1 egg beaten with 1 tbsp water
Instructions
- Prepare the crust: In a large, wide bowl, whisk together the flour, sugar, and salt. Add the cold butter cubes and toss to coat with flour. Using your first three fingers on both hands, mash the butter into pieces slightly larger than peas. This can also be done with two knives or a pastry blender. Once the mixture is crumbly and butter is broken up, stir in ½ cup of very cold water with a rubber spatula until absorbed and dough begins to clump. Add remaining water 1 tablespoon at a time if dough is dry, until it starts to come together. Form dough into a soft, loose ball.
- Divide and chill dough: Divide the dough into two pieces, one slightly larger for the bottom crust. Shape each piece into a 1-inch thick rectangle using plastic wrap if needed. Wrap and chill in the refrigerator for at least 2 hours.
- Make the filling: In a very large bowl, toss apple chunks with a squeeze of lemon juice. In a separate medium bowl, mix sugar, cornstarch, cinnamon, nutmeg, allspice, and salt. Sprinkle this mixture over apples and toss well to coat evenly.
- Preheat oven and prepare pan: Preheat oven to 375 degrees Fahrenheit. Line a 10×15×1 inch baking sheet or jelly roll pan with parchment paper. If your pan is slightly smaller, the recipe still works with some dough leftover.
- Roll out bottom crust: On a well-floured surface, roll out the larger dough piece into an 18×13-inch rectangle. Transfer it to the lined pan, gently pushing it into the corners and draping edges over the sides. Chill the pan in the fridge or freezer while rolling out the second crust.
- Roll out top crust and assemble: Roll the smaller dough piece into a 16×11-inch rectangle. Remove the pan from the fridge/freezer and pour the apple filling plus juices over the bottom crust. Drape the top crust over the apples. Trim edges so both top and bottom crusts overhang about ¾ inch. Seal edges tightly by pinching with fingers.
- Apply wash and cut slits: Brush the top crust with heavy cream or egg wash. Using a sharp knife, cut multiple 1-inch slits in the top crust to allow steam to escape.
- Bake and cool: Place the baking sheet on a larger pan to catch any spillage. Bake for 45 minutes, until the crust is golden brown and filling is bubbling through slits. Cool on a wire rack for at least 45 minutes before cutting to allow filling to set.
Notes
- Allow the pie to cool almost completely before serving to avoid a sloppy mess, as the filling needs time to thicken.
- The pie is best served on the day it’s made but can be made a day ahead. Cover with foil and store at room temperature or in a cool place. Reheat at 300 degrees Fahrenheit for about 20 minutes before serving, optionally broiling briefly to crisp the top.
- You can assemble the pie up to one day in advance and refrigerate it until ready to bake.
Nutrition
- Serving Size: 1 slice (based on 18 servings)
- Calories: 350 kcal
- Sugar: 25 g
- Sodium: 150 mg
- Fat: 18 g
- Saturated Fat: 11 g
- Unsaturated Fat: 6 g
- Trans Fat: 0 g
- Carbohydrates: 45 g
- Fiber: 3 g
- Protein: 3 g
- Cholesterol: 40 mg


