

Apple Cider Caramels Recipe
If you’re looking for a fall treat that tastes like cozy autumn in every bite, you have to try this **Apple Cider Caramels Recipe**. I promise these soft, spiced caramels are worth every minute, and they bring that perfect balance of tangy apple cider and warm cinnamon that’ll fill your kitchen with the most inviting aroma. Stick with me, and I’ll walk you through how to nail these chewy delights without any stress or sticky messes.
Why This Recipe Works
- Balanced Flavors: The reduction of apple cider intensifies its natural sweetness and tang, blending beautifully with warm spices.
- Perfect Texture: Cooking the caramel to just the right temperature ensures that soft, chewy but not sticky bite that’s pure caramel bliss.
- Simple Ingredients: Using common pantry staples with a few well-chosen spices keeps this recipe approachable yet flavorful.
- Extra Touch: Sprinkling Maldon flake salt on top brings a sophisticated sweet-salty finish that’ll keep you reaching for more.

Ingredients & Why They Work
Every ingredient in this Apple Cider Caramels Recipe plays an important role in creating that perfect chewy texture and warm flavor profile. Here’s why I love each one, plus a few tips to get the best results.
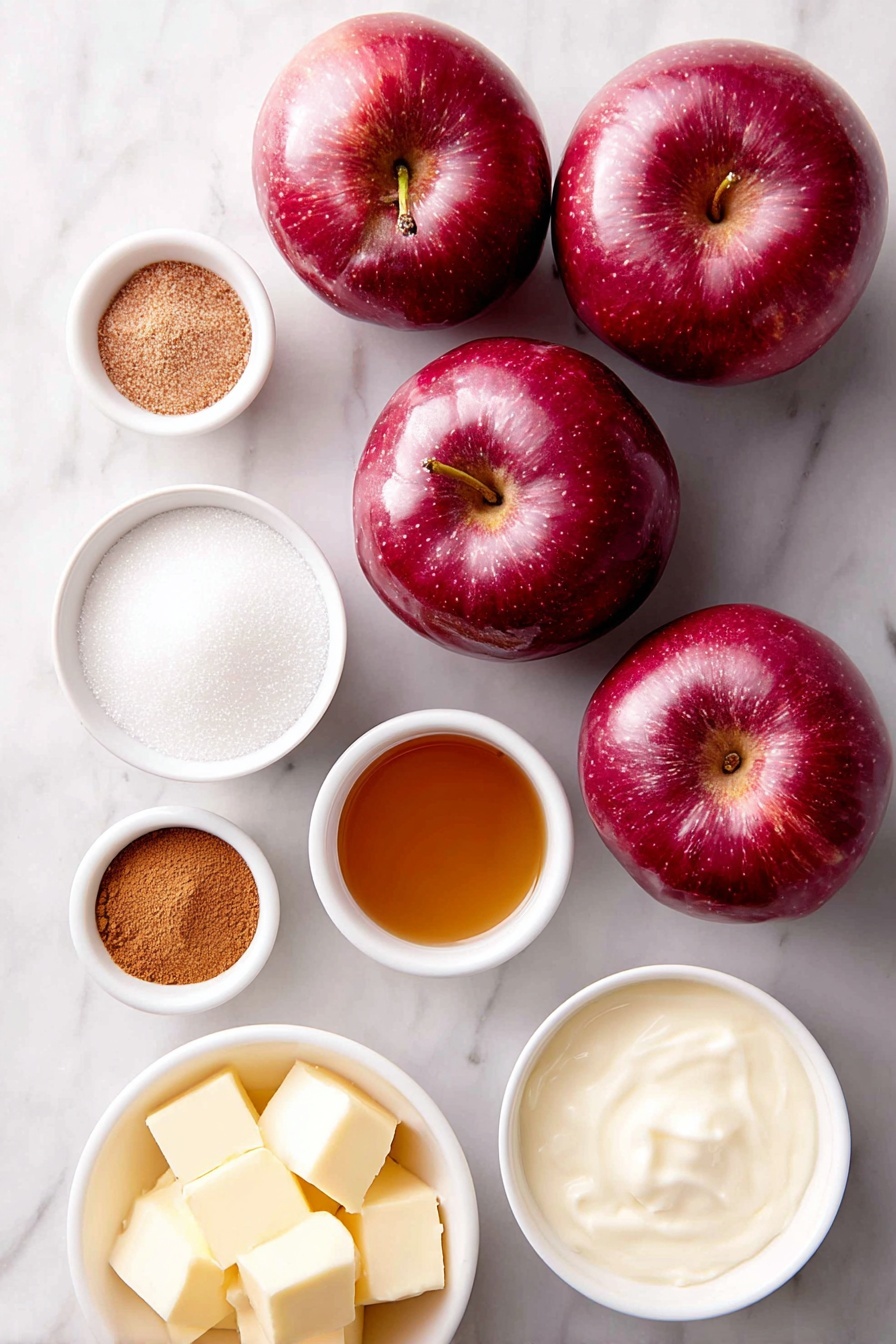
- Apple cider: Reducing the cider concentrates its flavor and sugars, giving the caramels that signature apple punch without adding extra liquid.
- Heavy whipping cream: Adds richness and creaminess to the caramel’s texture; split it between mixture and caramel base for balance.
- Ground cinnamon: Warming spice that complements the apple and adds depth—freshly ground will really make a difference.
- Nutmeg: Just a pinch adds a subtle sweet-earthy note that builds complexity without overpowering.
- Ground cloves: A tiny amount adds that lovely aromatic boost which makes the caramel truly cozy.
- Granulated sugar: The foundation of caramel—the key is dissolving it fully before boiling to avoid crystallization.
- Water: Helps dissolve the sugar and control the cooking process to prevent burning.
- Light corn syrup: Prevents the sugar from crystallizing so your caramels turn out smooth and pliable.
- Butter: Adds lusciousness and a buttery finish; cubed butter melts evenly into the hot caramel.
- Maldon flake salt (optional): Sprinkled on top, it adds a crunchy, salty contrast that makes each bite pop.
Make It Your Way
I love that this Apple Cider Caramels Recipe is super versatile. You can easily tweak the spices to suit your taste or dietary needs—and honestly, experimenting a little is part of the fun.
- Variation: I’ve swapped out part of the cream for coconut milk once, and it gave a subtle tropical undertone that was surprisingly delightful.
- Spice adjustments: Feel free to dial up the cinnamon or nutmeg if you want a bolder spice kick, or reduce cloves if you prefer it milder.
- Salt-free option: If you want to avoid salt, just skip the Maldon flakes—the caramels are perfect on their own too.
- Vegan alternative: Use coconut cream and vegan butter substitutes, but keep an eye on texture since natural variations affect cooking times.
Step-by-Step: How I Make Apple Cider Caramels Recipe
Step 1: Reduce the Cider Slowly
Start by pouring 2 cups of apple cider into a saucepan and bring it to a boil. Then, let it simmer gently for 20-30 minutes until it shrinks down to about 1/3 cup. This step deepens the sweetness and concentrates that apple flavor—don’t rush it by cranking the heat, or you risk burning those delicate sugars. Set it aside to cool while you prep the rest.
Step 2: Prepare Your Spice-Cream Mixture
While your cider cools, mix 2/3 cup of heavy cream with the reduced cider and spices: cinnamon, nutmeg, and a pinch of cloves. This blend is where all the cozy flavor lives, so mix it well and set it aside—this will soon join the caramel base for that magical fusion.
Step 3: Make the Caramel Base
Next, combine your granulated sugar, remaining 1/3 cup cream, water, and corn syrup in a heavy-bottomed saucepan. Cook it gently over low heat until the sugar completely dissolves—usually 5 to 10 minutes. Insert your candy thermometer now and watch as the liquid heats to 230°F (soft-ball stage). This patience here is essential—too hot and your caramel will be brittle, too cool and it won’t set right.
Step 4: Bring It All Together
Remove the pan from heat and whisk in your reduced cider and spice cream mixture. Add the cubed butter and stir until it melts in smoothly. Return the heat and bring the temperature up to 244°F, stirring often—that extra cooking ensures a rich, chewy caramel texture. Once you hit that temp, cook for 2 more minutes to get it just right, then take it off the heat.
Step 5: Cool and Cut
Pour your hot caramel into a buttered, parchment-lined 8×8 inch pan. Let it cool completely—either at room temperature or pop it in the fridge if you’re in a hurry. Once firm, cut into bite-sized squares or rectangles. Wrap each piece in wax paper to keep them from sticking and store in an airtight container.
Tips from My Kitchen
- Use a Candy Thermometer: This makes all the difference—guessing the temp by eye is risky and can lead to caramel disasters.
- Butter Your Parchment Paper: Helps the caramel release cleanly, which makes cutting and wrapping a breeze.
- Don’t Skip Corn Syrup: It prevents crystals from forming so your caramels stay silky smooth and chewy.
- Wrap Quickly: As soon as the caramel cools, cutting and wrapping individually prevents them from sticking together or drying out.
How to Serve Apple Cider Caramels Recipe

Garnishes
I love finishing these caramels with a sprinkle of Maldon flake salt just before the caramel fully sets—it adds a lovely crunch and highlights the sweet-and-spicy flavors perfectly. You can even try a dusting of cinnamon sugar for extra warmth if you’re feeling fancy.
Side Dishes
These caramels pair beautifully with a crisp autumn cocktail or just a hot cup of spiced apple cider or chai tea. If you’re serving a fall dessert spread, these are great alongside a warm apple pie or pumpkin bread for that ultra-cozy vibe.
Creative Ways to Present
For holidays or gift-giving, I like to stack wrapped caramels in small mason jars tied with twine and a cinnamon stick. It looks charming and makes a thoughtful, homemade gift that people rave about every year.
Make Ahead and Storage
Storing Leftovers
The best way I’ve found to store leftover caramels is in an airtight container, layered with parchment or wax paper between pieces, kept in the refrigerator. They stay soft and fresh for up to three weeks this way, no problem.
Freezing
If you want to freeze them, wrap each caramel tightly in wax paper and place all pieces in a freezer-safe bag. Thaw them in the fridge overnight before serving. Freezing might slightly change the texture, but I’ve found it still tastes amazing!
Reheating
If your caramels harden too much in the fridge, just let them come to room temperature or warm them for a few seconds in the microwave wrapped in parchment—to soften before enjoying that perfect chewiness.
FAQs
-
Can I use fresh apple juice instead of apple cider for this recipe?
Yes, you can use fresh apple juice, but make sure it’s not too watery or overly sweetened. The key is to reduce it down properly to concentrate the flavor and sugars, just as you would with cider, to get a similar depth in the caramel.
-
Do I really need a candy thermometer?
While it’s possible to gauge caramel doneness without one, I highly recommend using a candy thermometer. It helps you hit the exact temperature for chewy caramels, preventing undercooked or burnt batches.
-
How long do apple cider caramels last?
Stored properly in an airtight container in the fridge, they last up to 3 weeks. Keeping them cool preserves their chewy texture and flavor.
-
Can I make these caramels vegan?
Yes! Swap the butter for a vegan plant-based butter and the heavy cream for coconut cream or another non-dairy cream. Note that cooking times might vary slightly, so watch your thermometer closely.
Final Thoughts
Making this Apple Cider Caramels Recipe quickly became one of my favorite kitchen adventures—there’s something deeply satisfying about crafting candies at home, especially when they turn out this delicious. If you enjoy the warmth of fall flavors and crave that perfect chew, give this a try—you’ll end up with a batch to be proud of and maybe even a new crowd-pleaser for your autumn gatherings. Trust me, once you make these, you’ll want to keep them around all season long!
Print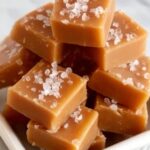
Apple Cider Caramels Recipe
- Prep Time: 15 minutes
- Cook Time: 40 minutes
- Total Time: 55 minutes
- Yield: 48 pieces
- Category: Dessert
- Method: Stovetop
- Cuisine: American
Description
Delicious homemade Apple Cider Caramels featuring a blend of reduced apple cider, warming spices, and creamy caramel cooked to perfection. These sweet treats are perfect for gifting or enjoying any time of the year.
Ingredients
Apple Cider Reduction
- 2 cups apple cider
Spiced Cream Mixture
- 2/3 cup heavy whipping cream
- 1 1/4 teaspoons ground cinnamon
- 1/4 teaspoon nutmeg
- pinch ground cloves
Caramel Base
- 1 1/2 cups granulated sugar
- 1/3 cup heavy whipping cream
- 3 tablespoons water
- 1/3 cup light corn syrup
- 1/2 cup butter, cubed
Optional
- Maldon flake salt, for sprinkling
Instructions
- Reduce Cider: In a saucepan, bring 2 cups of apple cider to a boil and simmer for 30 minutes until it reduces down to 1/3 cup. Remove from heat and set aside to cool.
- Prepare Spiced Cream Mixture: In a small bowl, combine 2/3 cup heavy whipping cream, ground cinnamon, nutmeg, ground cloves, and the cooled reduced apple cider. Mix well and set aside.
- Make Caramel Base: In a heavy-bottomed saucepan, combine granulated sugar, 1/3 cup heavy whipping cream, water, and light corn syrup. Cook over low heat stirring occasionally until sugar dissolves, about 10 minutes. Insert a candy thermometer and continue simmering until syrup reaches 230°F.
- Combine with Spiced Mixture and Butter: Remove pan from heat and quickly whisk in the spiced cream and apple cider mixture followed by cubed butter until fully incorporated.
- Cook to Final Temperature: Return pan to low heat, reinsert candy thermometer, and cook while stirring frequently until temperature reaches 244°F. Once reached, cook for an additional 2 minutes.
- Pour and Cool: Remove from heat and pour caramel into a buttered or greased 8×8 inch pan lined with parchment paper. Allow to cool completely at room temperature or in the refrigerator.
- Cut and Wrap: Once firm, cut caramel into 48 squares or rectangles and individually wrap each piece in wax paper. Store in an airtight container or refrigerated up to 3 weeks.
Notes
- Use a reliable candy thermometer for precise temperature control to ensure perfect caramel texture.
- If you prefer a saltier contrast, sprinkle Maldon flake salt on top of the caramels before cooling.
- Butter or cooking spray on parchment paper prevents sticking and eases caramel removal.
- Store caramels in a cool, dry place to maintain their chewy texture.
- For a dairy-free option, substitute heavy cream and butter with coconut cream and coconut oil respectively, but expect slight flavor differences.
Nutrition
- Serving Size: 1 piece
- Calories: 100 kcal
- Sugar: 12 g
- Sodium: 30 mg
- Fat: 5 g
- Saturated Fat: 3 g
- Unsaturated Fat: 1 g
- Trans Fat: 0 g
- Carbohydrates: 14 g
- Fiber: 0 g
- Protein: 0.5 g
- Cholesterol: 15 mg


