
Coffee Mousse Recipe
If you’re a coffee lover looking for a dessert that feels like a café treat but is actually super doable at home, you’re going to adore this Coffee Mousse Recipe. It’s smooth, silky, and packs just the right punch of coffee flavor — perfect for impressing friends or sneaking a little joy after dinner. Trust me, once you make this, it’ll become your go-to for a quick yet elegant dessert.
Why This Recipe Works
- Simple Ingredients: You only need a handful of pantry staples and coffee granules, no fancy equipment required.
- Perfect Texture: The gelatine sets the mousse just right — light and airy but still holds its shape beautifully.
- Balanced Flavor: The sweetness and coffee are in harmony, letting the coffee shine without being bitter or overwhelming.
- Versatile Presentation: Easy to dress up with chocolate shavings or cocoa powder for a special touch.

Ingredients & Why They Work
Each ingredient in this Coffee Mousse Recipe plays a vital role: the instant coffee delivers robust flavor, whipping cream adds luscious richness, and gelatine ensures the mousse sets with a delightfully light texture. Shopping tip? Always pick good-quality coffee granules because they’re the star here!

- Instant coffee granules: Provides bold, concentrated coffee flavor with no bitterness, essential for that classic mousse taste.
- Water: Dissolves the coffee and gelatine evenly to create the perfect syrup base.
- Sugar (caster or granulated): Sweetens without graininess; caster sugar dissolves quicker, which I usually prefer.
- Powdered gelatine: Stabilizes the mousse so it’s fluffy yet firm, not watery or runny.
- Vanilla extract: Adds subtle warmth and depth to balance the coffee’s bite.
- Whipping cream: Whips into those soft peaks that make the mousse creamy and dreamy.
- Cocoa or chocolate shavings: Optional garnish that brings an extra layer of chocolatey indulgence.
Make It Your Way
What I love most about this Coffee Mousse Recipe is how easy it is to tweak. Whether you want a stronger coffee kick or prefer it more subtle, it’s forgiving. I like to add a splash of coffee liqueur sometimes for a grown-up twist — but honestly, just the basic version is fantastic on its own.
- Stronger coffee flavor: I once bumped up the coffee granules to 6 teaspoons when I wanted a mocha effect, and it was a hit.
- Dairy-free version: Try coconut cream for whipping — it whips up beautifully and gives a tropical vibe.
- Sweetness level: Reduce sugar slightly if you want it less sweet, especially if topping with sweet chocolate.
- Serving size: Great in mini glasses for parties or a bigger bowl when it’s a cozy night in.
Step-by-Step: How I Make Coffee Mousse Recipe
Step 1: Dissolve Gelatine and Make the Coffee Syrup
Start by gently heating the water in a small saucepan — don’t let it boil! Sprinkle the powdered gelatine over the surface and stir constantly with a rubber spatula. This is a little trick I swear by: rubbing the gelatine against the pan’s side helps it dissolve completely, so no gritty bits sneak into your mousse. Once dissolved, add the coffee granules and sugar, stirring until the sugar melts. Keep the heat low and avoid boiling; we want a thick syrup, not caramelized sugar.
Step 2: Cool the Syrup to Below Room Temperature
Pour this hot syrup into a large bowl and pop it in the fridge for about 15-20 minutes. It’s ready when it’s cool to the touch but not set — think thick, pourable syrup. This cool down step is key so the whipped cream isn’t upset by heat and you get a lovely texture.
Step 3: Whip the Cream to Soft Peaks
While the syrup chills, beat your cold whipping cream in a clean bowl with an electric mixer. Aim for firm peaks — when you lift the whisk, the peaks should hold but still look smooth and glossy. Watch carefully here; overwhip it and the cream will become grainy, which you definitely want to avoid for this mousse.
Step 4: Combine the Coffee Syrup and Cream Gently
Stir vanilla extract into the coffee syrup. Then, add a quarter of the whipped cream to the syrup and stir it in to loosen the mixture. Next, fold in the remaining cream gently in batches. Folding means lifting from the bottom and gently flipping the mixture over so you keep all that lovely airiness without deflating the mousse. The final texture should feel light and fluffy, able to hold shapes without dripping.
Step 5: Chill and Garnish
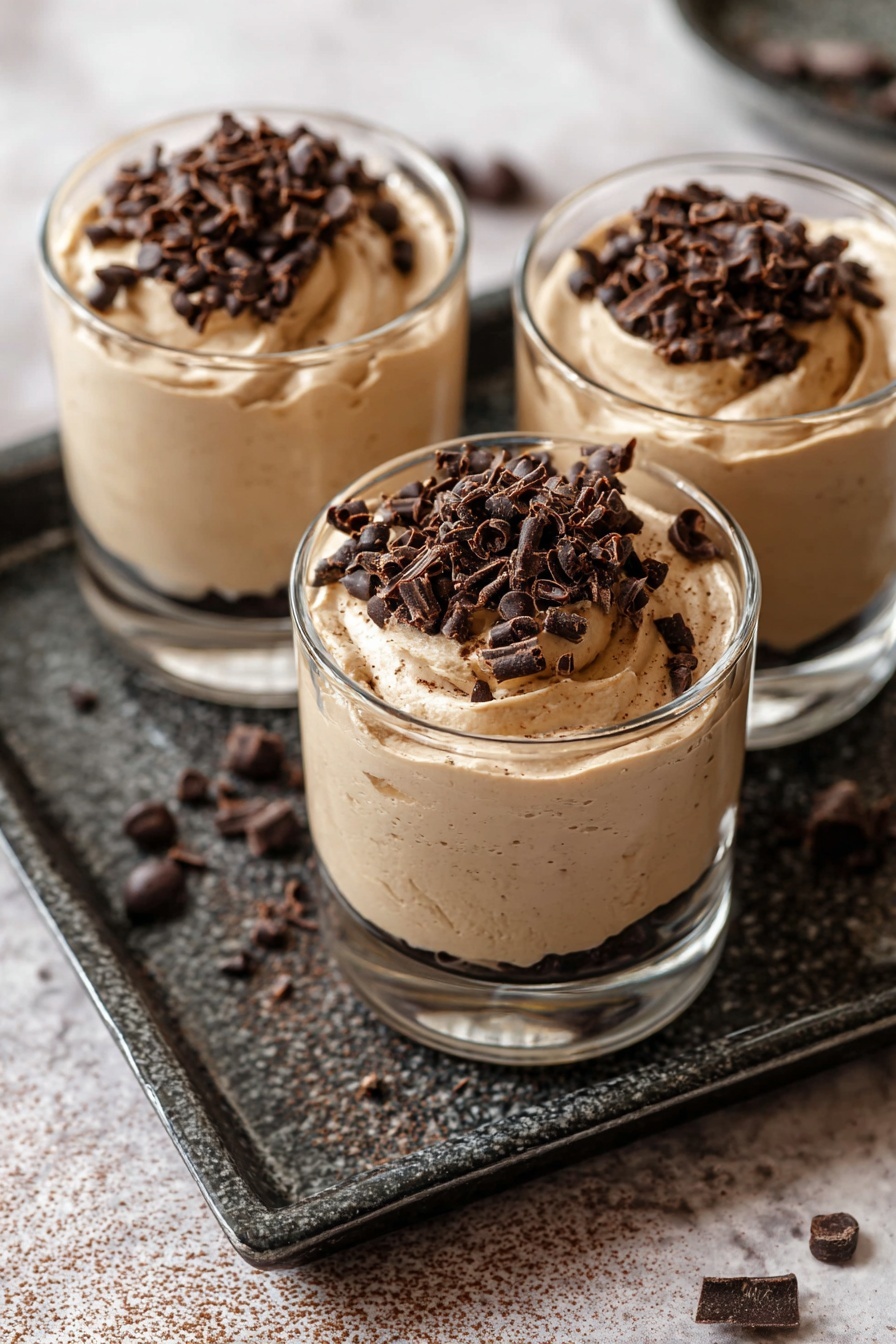
Divide your mousse evenly into small dessert glasses or bowls. Chill in the fridge for at least 2 hours, but overnight is even better for flavors to meld. Just before serving, dust with cocoa powder or sprinkle chocolate shavings on top — that finishing touch makes it feel totally indulgent.
Tips from My Kitchen
- Use Cold Cream: Always use cream straight from the fridge — it whips easier and holds peaks better.
- Be Gentle Folding: When folding, slow and patient beats fast and rough every time for a light mousse.
- Prevent Gelatine Clumps: Sprinkle gelatine over water evenly and stir without rushing to avoid lumps.
- Chill Time Matters: Don’t rush the chilling – it’s what sets the mousse nicely and enhances the flavor, so plan ahead.
How to Serve Coffee Mousse Recipe
Garnishes
For garnishes, I’m a huge fan of classic cocoa powder dusted on top for a simple yet elegant finish. Chocolate shavings add lovely texture and richness, but if you want to get creative, crushed biscotti or a light sprinkle of cinnamon can offer a surprising but delightful complement to the coffee flavor.
Side Dishes
This Coffee Mousse pairs beautifully with light, fresh fruit like raspberries or sliced oranges. Sometimes I serve it alongside a biscotti or shortbread cookie for a little crunch and contrast. It’s perfect as a stand-alone dessert but also plays nicely as part of a larger coffee-themed dessert spread.
Creative Ways to Present
For special occasions, I love presenting this mousse in little espresso cups or even layered in clear glasses with crushed amaretti cookies and a drizzle of caramel for texture. If you’re feeling fancy, top each serving with a small dollop of whipped cream and a single espresso bean for that café vibe.
Make Ahead and Storage
Storing Leftovers
If you have leftovers (and lucky you if you do!), keep the mousse covered in the fridge. It holds up well for 2 to 3 days, but you’ll find it’s best enjoyed fresh as the airy lightness slowly fades with time. I use airtight containers or wrap the glasses with cling film to prevent fridge odors sneaking in.
Freezing
Freezing coffee mousse isn’t my personal fave because the texture can change—gelatine doesn’t like freeze-thaw cycles. I’ve tried it, and the mousse becomes slightly grainy after thawing. So, I recommend keeping this dessert refrigerated rather than frozen.
Reheating
No reheating needed here! Coffee mousse is served cold, so just take it out of the fridge about 10 minutes before serving to soften slightly, and it’ll be at perfect, dreamy texture.
FAQs
-
Can I use regular brewed coffee instead of instant coffee granules?
You can, but it changes the recipe a bit. Instant granules dissolve and intensify flavor without adding liquid, which keeps the mousse’s texture perfect. If using brewed coffee, reduce or skip the water in the recipe and ensure the coffee is very strong so the flavor isn’t diluted.
-
How do I know when the gelatine is fully dissolved?
Gelatine dissolves when the mixture looks smooth and clear with no visible grains or lumps. Stirring gently over low heat and skimming the sides with a spatula helps. Do not let it boil, as that can ruin gelatine’s setting power.
-
Can I make this mousse ahead of time?
Definitely! This Coffee Mousse Recipe actually tastes better after chilling overnight as the flavors deepen. Just cover tightly and keep refrigerated until you’re ready to serve.
-
What’s the best way to fold the whipped cream?
Use a large spatula to gently scoop from the bottom of the bowl and fold over the top in a circular motion, turning the bowl as you go. The goal is to combine without losing the air that gives the mousse its light texture.
Final Thoughts
This Coffee Mousse Recipe holds a special place in my kitchen rotation because it brings that café magic right home, without the fuss. It’s one of those recipes that feels fancy, but honestly, it’s simple — which I love because sometimes life’s busy but you still want something delicious. I’m excited for you to give it a try and tweak it to your liking — once you nail this, you’ll have a signature dessert for every occasion. Brew yourself a cup, whip up this mousse, and enjoy some well-earned indulgence!
Print
Coffee Mousse Recipe
- Prep Time: 10 minutes
- Cook Time: 5 minutes
- Total Time: 2 hours 30 minutes
- Yield: 6 servings
- Category: Dessert
- Method: Stovetop
- Cuisine: International
- Diet: Vegetarian
Description
This Coffee Mousse recipe delivers a light and fluffy dessert with rich coffee flavor and a creamy texture. Made with instant coffee, whipped cream, and gelatine, it’s a simple yet elegant treat perfect for coffee lovers.
Ingredients
Coffee Mixture
- 1 tablespoon instant coffee granules (4 teaspoons)
- ¼ cup water
- ¾ cup caster sugar or white granulated sugar
- ½ teaspoon powdered gelatine
- 1 teaspoon vanilla extract
Cream
- 1 ½ cups whipping cream, cold
To Serve
- Cocoa or chocolate shavings
Instructions
- Dissolve Gelatine: Place the water into a medium saucepan over low heat and sprinkle the gelatine over the top. Stir constantly with a silicone or rubber spatula rubbing any bits against the pan sides until fully dissolved. Do not allow it to boil.
- Add Coffee and Sugar: Add the instant coffee granules and sugar to the gelatine mixture, stirring continuously until the sugar dissolves completely without boiling.
- Cool Coffee Syrup: Transfer the coffee mixture to a large mixing bowl and refrigerate for 15-20 minutes until it’s cooler than room temperature and thick syrup consistency but not set as jelly.
- Whip Cream: Pour the cold whipping cream into a separate large bowl and beat with an electric mixer until firm peaks form. Avoid overwhipping as it will become grainy; the peaks should just hold their shape firmly.
- Add Vanilla: Stir the vanilla extract into the cooled coffee syrup.
- Combine Cream and Coffee Syrup: Add one-quarter of the whipped cream to the coffee syrup and stir gently to loosen the mixture.
- Fold in Cream: Add another quarter of the whipped cream and gently fold by lifting from the bottom and folding over the top to not deflate the mixture. Repeat this folding process with the remaining cream in two additions until just combined and the mousse is light and fluffy.
- Chill Mousse: Divide the mousse evenly into small dessert glasses or bowls and chill in the refrigerator for at least 2 hours or overnight to set.
- Serve: Before serving, sprinkle the mousse with cocoa powder or chocolate shavings for garnish.
Notes
- Use a standard 20ml Australian tablespoon (4 teaspoons) for measuring coffee granules accurately.
- For stronger coffee flavor, increase coffee granules up to 5-6 teaspoons or substitute the water and coffee granules with ¼ cup of strong espresso.
- Ensure gelatine does not boil to maintain proper setting.
- Do not overwhip cream to avoid grainy texture.
- Nutrition information is approximate and may vary based on exact ingredients used.
Nutrition
- Serving Size: 1 serving
- Calories: 250 kcal
- Sugar: 25 g
- Sodium: 40 mg
- Fat: 16 g
- Saturated Fat: 10 g
- Unsaturated Fat: 5 g
- Trans Fat: 0 g
- Carbohydrates: 22 g
- Fiber: 1 g
- Protein: 3 g
- Cholesterol: 55 mg


