Vegan Garlic Herb Bread Recipe
Hey friend, if you love anything garlicky and packed with fresh herbs, you’re going to flip over this Vegan Garlic Herb Bread Recipe. It’s fluffy, aromatic, and perfect for everything from dipping in soups to making vegan bruschetta. Trust me, I’ve tried loads of garlic bread recipes, and this one hits all the right notes—it’s buttery without butter, herbaceous, and has the kind of golden crust that makes you want to tear into it immediately. Stick with me, and I’ll share every detail to help you nail it in your own kitchen!
Why This Recipe Works
- Perfect Dough Texture: Using strong bread flour gives that ideal chewy, fluffy crumb that’s not too dense.
- Herb and Garlic Punch: The mix of fresh and dried herbs with plenty of garlic creates a flavor explosion in every bite.
- Vegan Butter Substitute: The vegan butter blends seamlessly into the filling, keeping it rich without dairy.
- Beautiful Presentation: The twisted shape showing off the garlicky layers makes it as stunning as it is delicious.

Ingredients & Why They Work
Each ingredient in this Vegan Garlic Herb Bread Recipe plays a specific role to build the texture and flavor you’re craving. I always recommend using good quality fresh herbs and bread flour—trust me, you’ll notice the difference in the final loaf.
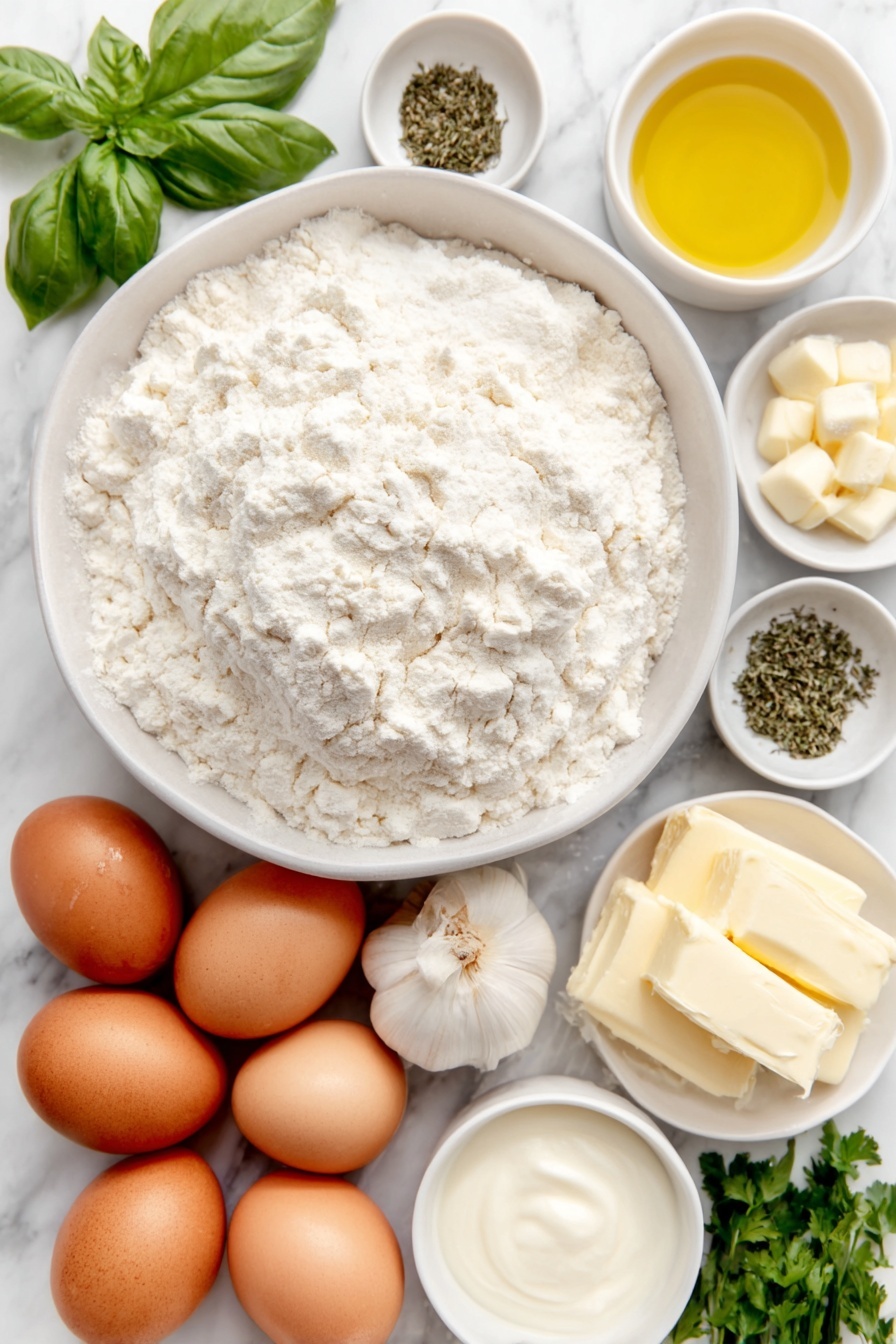
- Lukewarm water: Activates the yeast gently so your dough rises beautifully without killing the yeast.
- Instant yeast: Speeds up the rise and ensures a lovely fluffy texture in the bread.
- Olive oil (or light oil): Keeps the dough tender and adds a subtle richness.
- Strong white bread flour: Gives the dough strength and chewiness—plain flour just won’t do the same job.
- Salt: Enhances flavor and controls yeast activity; just make sure not to mix it directly with yeast before you begin.
- Unsweetened almond milk: Used for brushing to create a golden, glossy crust without dairy.
- Vegan butter: The heart of the filling, it gives creamy richness and holds the garlic and herbs together.
- Garlic cloves: Fresh and pungent, they give that classic garlic bread kick you want.
- Dried parsley and thyme: Add earthiness and balance to cut through the garlic intensity.
- Fresh coriander and basil: Bring fresh brightness and a hint of sweetness to the filling.
- Salt in filling: Heightens all those herbaceous flavors and ties everything together.
Make It Your Way
I love making this Vegan Garlic Herb Bread Recipe just as the recipe says, but feel free to tweak it to your heart’s content. Experimenting with herbs and spices is what makes this recipe exciting to me — and maybe you’ll discover your own signature twist!
- Variation: Sometimes I swap fresh coriander with rosemary or oregano depending on what I have on hand, and it’s just as amazing.
- Spicy kick: Adding a pinch of red pepper flakes to the filling gives you a soft, warm heat that balances the garlic beautifully.
- Oil swap: Using garlic-infused olive oil in the dough adds another layer of flavor if you’re feeling fancy.
- Gluten-free adaptation: Although I haven’t fully tested this with gluten-free flour, you can try a strong gluten-free blend—but expect a different texture.
Step-by-Step: How I Make Vegan Garlic Herb Bread Recipe
Step 1: Activate the Yeast Gently
Start by mixing your lukewarm water with instant yeast in a large bowl. This gets the yeast lively so your bread has that perfect rise. Lukewarm is key here—too hot and you kill the yeast, too cold and it won’t wake up properly. I usually test it with my finger; it should feel like a comfortable bath temp.
Step 2: Make and Knead the Dough
Add your olive oil and then the flour, sprinkling salt on top (not directly mixing with yeast). Stir until a rough dough forms, then turn it onto a floured board to knead for about 5-10 minutes. You want the dough to feel elastic and springy—when you poke it, it should bounce back. This step build strong gluten strands, so don’t rush it.
Step 3: First Rise and Prepare Filling
Pop that dough ball into an oiled bowl, cover it with a damp cloth, and set it somewhere warm to rise for about an hour until doubled in size. Meanwhile, whip up your garlic herb filling by blending vegan butter, garlic, dried and fresh herbs, and salt in a food processor. If you don’t have one, don’t sweat it—just finely chop the herbs and smash the garlic into the butter with a fork until combined.
Step 4: Shape, Fill, and Twist
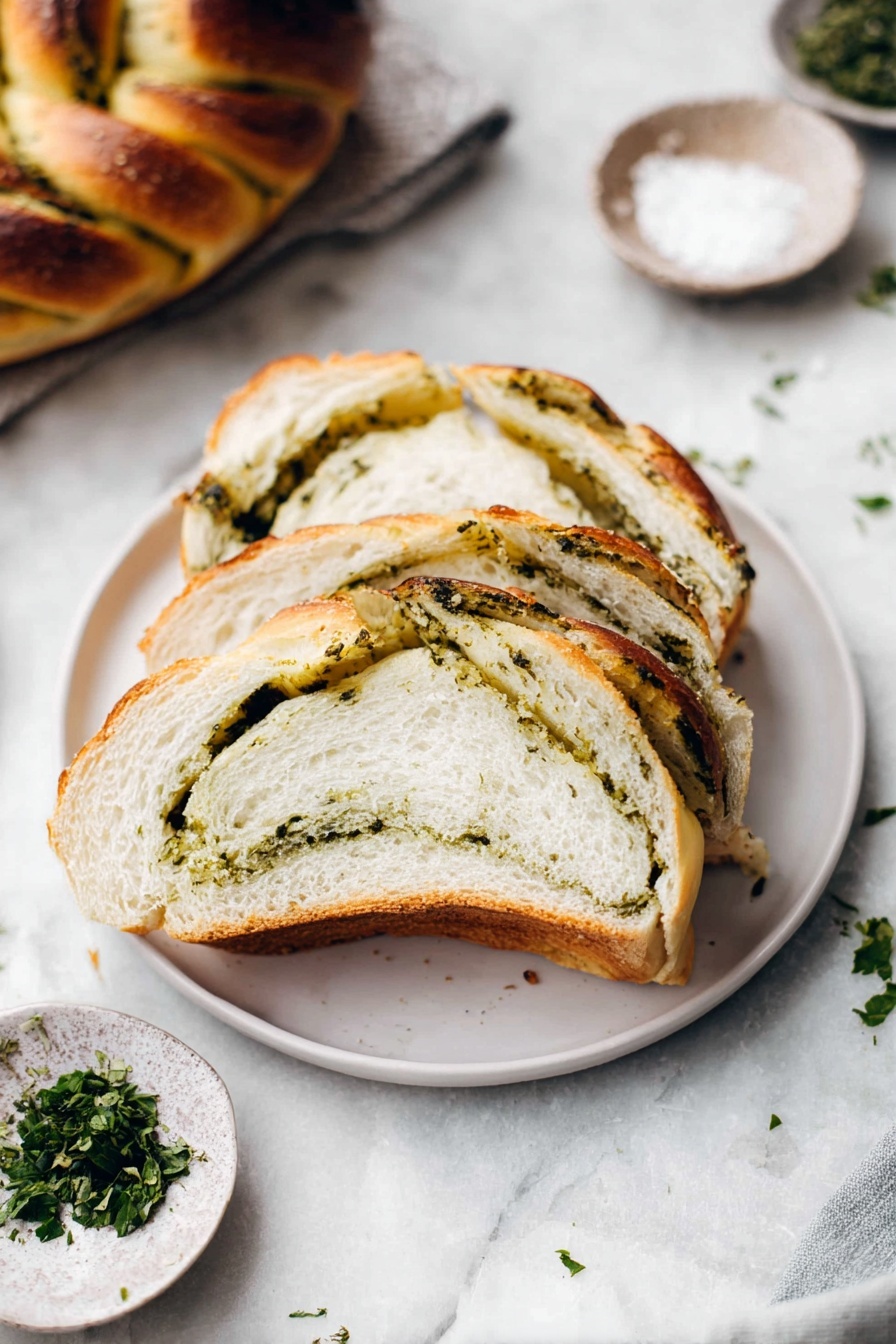
Once your dough is puffed and ready, punch it down gently to knock out the air. Roll it into a thin rectangle—aim for about half a centimeter thick and roughly 35×20 cm. Spread your garlicky herb butter evenly over the surface, then roll it up from a short side to create a thick roll. Cut down the middle lengthwise but leave the top intact, twist the two strands crossing them and pinching the ends tightly. Don’t rush this part—sealing the ends well keeps your filling inside and the lovely twist shape intact as it bakes.
Step 5: Final Proof and Bake
Place your twisted loaf on a baking tray to proof for another 45 minutes while your oven preheats to 190°C (fan). Before baking, brush the loaf with almond milk to get that golden, shiny crust. Bake for 30-35 minutes until it’s beautifully browned and crispy on top. Keep an eye near the end to avoid burning; every oven varies a touch!
Tips from My Kitchen
- Water Temperature: Always double-check that your water is lukewarm by feel, not just temperature—too hot and your yeast won’t do its job.
- Kneading Patience: If your dough’s too sticky, sprinkle flour little by little rather than dumping it in all at once to avoid a tough loaf.
- Pinch and Tuck: Make sure you pinch the ends of the twist tightly and tuck under; this prevents the bread from unraveling during baking.
- Proofing Spot: A warm (not hot!), draft-free spot speeds up rising—my trick is placing the bowl inside my oven with just the light on.
How to Serve Vegan Garlic Herb Bread Recipe
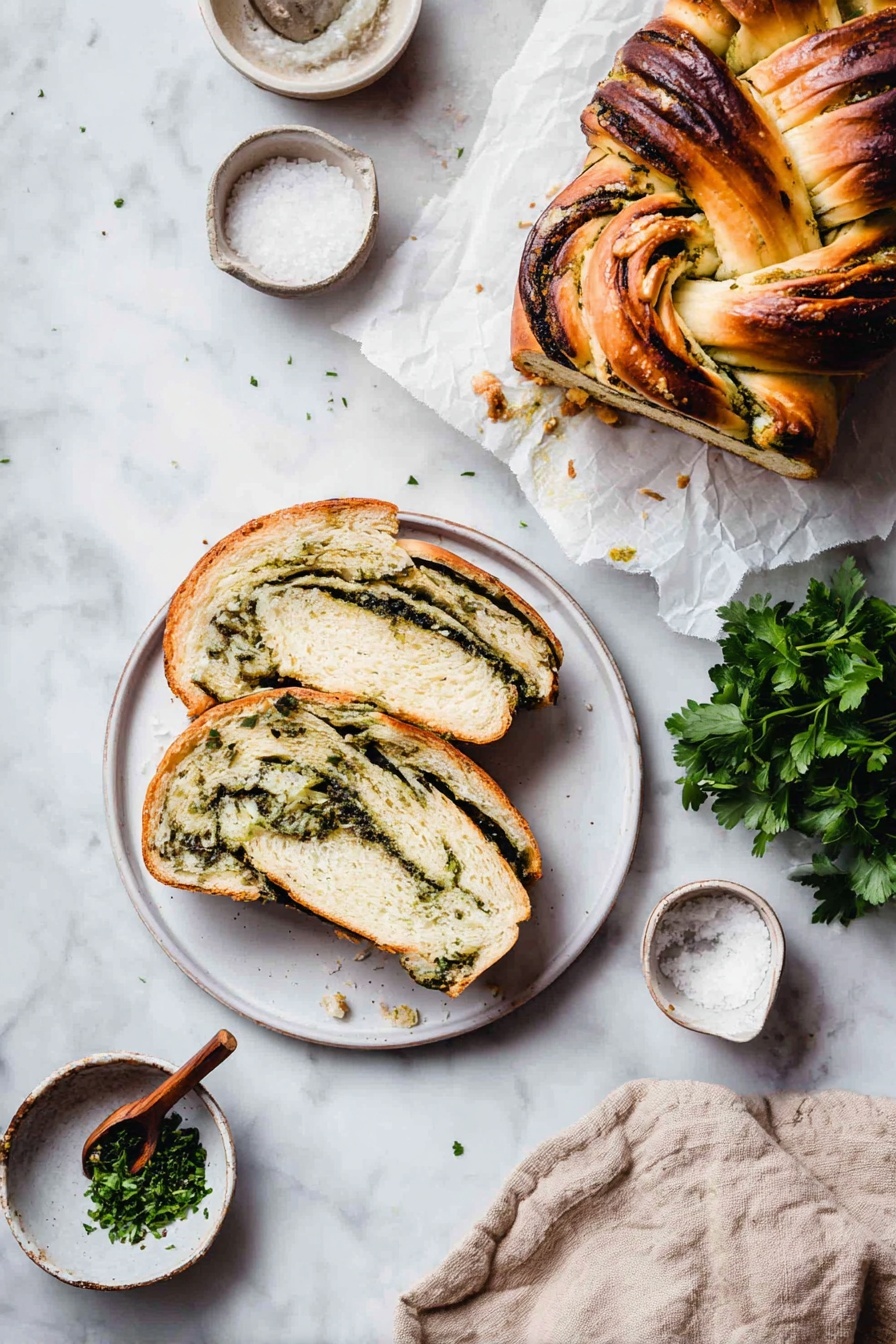
Garnishes
I like sprinkling a little flaky sea salt or freshly cracked black pepper on the bread right after it comes out of the oven to give it that extra touch. A few chopped fresh basil leaves on top make it look inviting and add a fresh pop.
Side Dishes
This bread is absolutely dreamy paired with vegan tomato soup, creamy mushroom stroganoff, or alongside a fresh garden salad. Whenever I serve it at dinner, it’s always the first thing to disappear from the table.
Creative Ways to Present
For gatherings, I love slicing this bread into individual twists, arranging them in a circular pattern on a rustic wooden board, and placing small bowls of dipping oil or vegan pesto in the center. It’s a showstopper and something I keep coming back to for holiday parties.
Make Ahead and Storage
Storing Leftovers
I usually wrap the leftover bread tightly in foil or place it in an airtight container and keep it on the counter for up to two days. The crust gets a bit softer, but the inside stays tasty and moist.
Freezing
If I know I won’t finish it soon, I slice the bread and freeze it in a ziplock bag with parchment between slices—makes it super easy to thaw just what I need. The bread bounces back nicely after freezing without losing too much freshness.
Reheating
To bring back that fresh-baked vibe, I pop slices in a toaster oven or under a grill for a few minutes until warm and crispy again. Adding a little vegan butter before warming amps up the indulgence factor.
FAQs
-
Can I use all-purpose flour instead of bread flour for this Vegan Garlic Herb Bread Recipe?
You can, but keep in mind that bread flour has more protein, which helps the dough develop gluten, giving you a better rise and chew. Using all-purpose flour might result in a denser loaf that tears more easily when twisted.
-
Is there a way to make this bread nut-free?
Absolutely! The only ingredient with potential nuts is the unsweetened almond milk used for brushing. Feel free to swap it with oat milk or soy milk to keep it nut-free without compromising the crust’s shine.
-
How do I know when the bread is properly baked?
Golden brown color and a crispy crust are good indicators. Also, when you tap the bottom of the bread, it should sound hollow. If you’re unsure, you can use a thermometer—internal temperature should be around 90-95°C (195-205°F).
-
Can I prepare the filling ahead of time?
Yes! The garlic herb filling can be made a day ahead and stored in an airtight container in the refrigerator. Just bring it to room temperature before spreading it over the dough for easier application.
-
What’s the best way to store leftover Vegan Garlic Herb Bread?
Wrap leftovers tightly in foil or place in an airtight container at room temperature for up to two days. For longer storage, freezing sliced portions with parchment paper in between works great.
Final Thoughts
This Vegan Garlic Herb Bread Recipe has become a real cozy staple in my kitchen. It’s one of those recipes I find myself making again and again—not only because it’s delicious but because it brings such warmth and comfort to the table. I hope you’ll enjoy making (and eating!) it as much as I do. Bring it out at your next meal or gathering, and be prepared for some seriously happy smiles around the table!
Print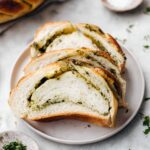
Vegan Garlic Herb Bread Recipe
- Prep Time: 15 minutes
- Cook Time: 35 minutes
- Total Time: 2 hours 30 minutes
- Yield: 10 slices
- Category: Side Dish
- Method: Baking
- Cuisine: Vegan
- Diet: Vegan
Description
This Vegan Garlic Herb Bread is a fluffy, flavorful side dish perfect for any meal. Made with strong white bread flour and a medley of fresh and dried herbs blended with vegan butter and garlic, it offers a crispy, golden crust and beautiful twisted layered appearance. Perfect for vegan and vegetarian diets, this bread uses simple ingredients with a straightforward baking method.
Ingredients
For the Bread
- 205 ml lukewarm water (¾ cup plus 2 tbsp)
- 3.5 g instant yeast (1 ⅛ teaspoon)
- 1 tablespoon olive oil or any other light oil
- 325 g strong white bread flour (2 ⅝ cups)
- 1 teaspoon salt
- 1 tablespoon unsweetened almond milk (for brushing only)
For the Filling
- 60 g vegan butter (¼ cup)
- 8 cloves garlic
- 1 teaspoon dried parsley
- 2 tablespoons dried thyme
- 6 tablespoons fresh coriander
- 7 tablespoons fresh basil
- ½ teaspoon salt
Instructions
- Prepare the Bread Dough: Combine the lukewarm water and instant yeast in a large bowl and let it activate. Add the olive oil, then flour, and finally sprinkle salt on top of the flour. Stir the mixture until it forms a rough dough.
- Knead the Dough: Turn the dough onto a floured surface and knead for 5-10 minutes until the dough springs back when pressed. Shape it into a ball.
- First Rise: Place the dough in an oiled bowl, cover with a damp cloth, and leave to rise for 1 hour or until doubled in size.
- Prepare the Filling: In the meantime, place vegan butter, garlic, dried parsley, dried thyme, fresh coriander, fresh basil, and salt into a food processor or blender. Blend until a rough paste forms. Alternatively, soften the butter by pressing with a fork and mix well with finely chopped herbs if no processor is available.
- Degas and Shape Dough: Once risen, turn dough out onto a floured surface and gently punch it for 5-10 seconds to knock the air out. Shape it into a rough rectangle, then roll out to about 0.5-1 cm thick and roughly 35 cm long by 20 cm wide (14×8 inches).
- Apply Filling and Roll: Spread the prepared filling evenly over the dough. Starting from one short side, roll the dough tightly into a thick, short roll.
- Create the Twist: Cut a slit down the middle of the roll lengthwise but leave the top part uncut. Turn the filling side out by folding the cut strands over each other, continuing the twist down until the bottom. Pinch the bread together at the bottom and tuck the pinched section underneath the loaf to secure.
- Second Rise (Proofing): Place the twisted loaf on a baking tray and let it proof for 45 minutes. Meanwhile, preheat the oven to 190°C (374°F) fan setting or 210°C (410°F) if not using a fan oven.
- Brush and Bake: Once proofed, brush the loaf with unsweetened almond milk. Bake for 30-35 minutes until the bread is golden brown and the crust is crispy.
Notes
- Use bread flour for better gluten development, resulting in a fluffy and well-shaped bread; plain flour may cause tearing.
- Keep salt and yeast separated initially as salt can inhibit yeast activity.
- Ensure water is lukewarm, not hot, as hot water kills yeast.
- Pinch and tuck the dough ends tightly after twisting to prevent the loaf from unraveling during baking.
Nutrition
- Serving Size: 1 slice
- Calories: 150 kcal
- Sugar: 1 g
- Sodium: 250 mg
- Fat: 6 g
- Saturated Fat: 1 g
- Unsaturated Fat: 5 g
- Trans Fat: 0 g
- Carbohydrates: 22 g
- Fiber: 2 g
- Protein: 4 g
- Cholesterol: 0 mg


