Halloween Red Velvet Cupcakes with Cream Cheese Frosting and Bloody Drizzle Recipe
If you’re looking for a show-stopping treat this season, you’re going to love this Halloween Red Velvet Cupcakes with Cream Cheese Frosting and Bloody Drizzle Recipe. Trust me, these cupcakes are as delicious as they are spooky, combining the perfect moist red velvet crumb with a tangy cream cheese frosting and a creepy red drizzle that screams Halloween fun. Whether you’re baking for a party or just to impress your family, this recipe has got your back. Keep reading—I’ll share all my tips and tricks to get them just right every single time!
Why This Recipe Works
- Perfect Texture: The combination of sour cream and butter keeps the cupcakes tender and moist without being dense.
- Classic Flavor Balance: The cocoa powder adds a hint of chocolate depth that contrasts beautifully with the tangy cream cheese frosting.
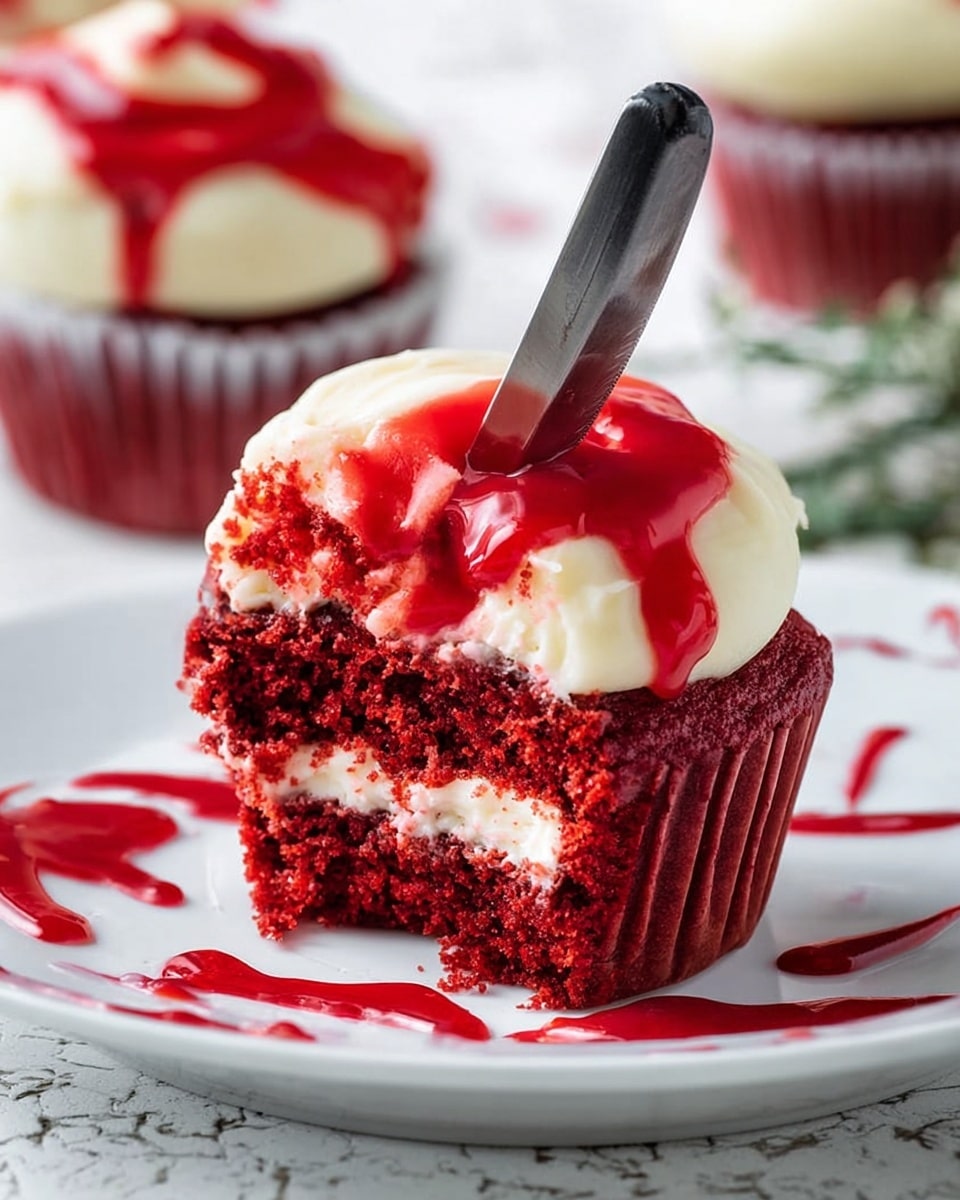
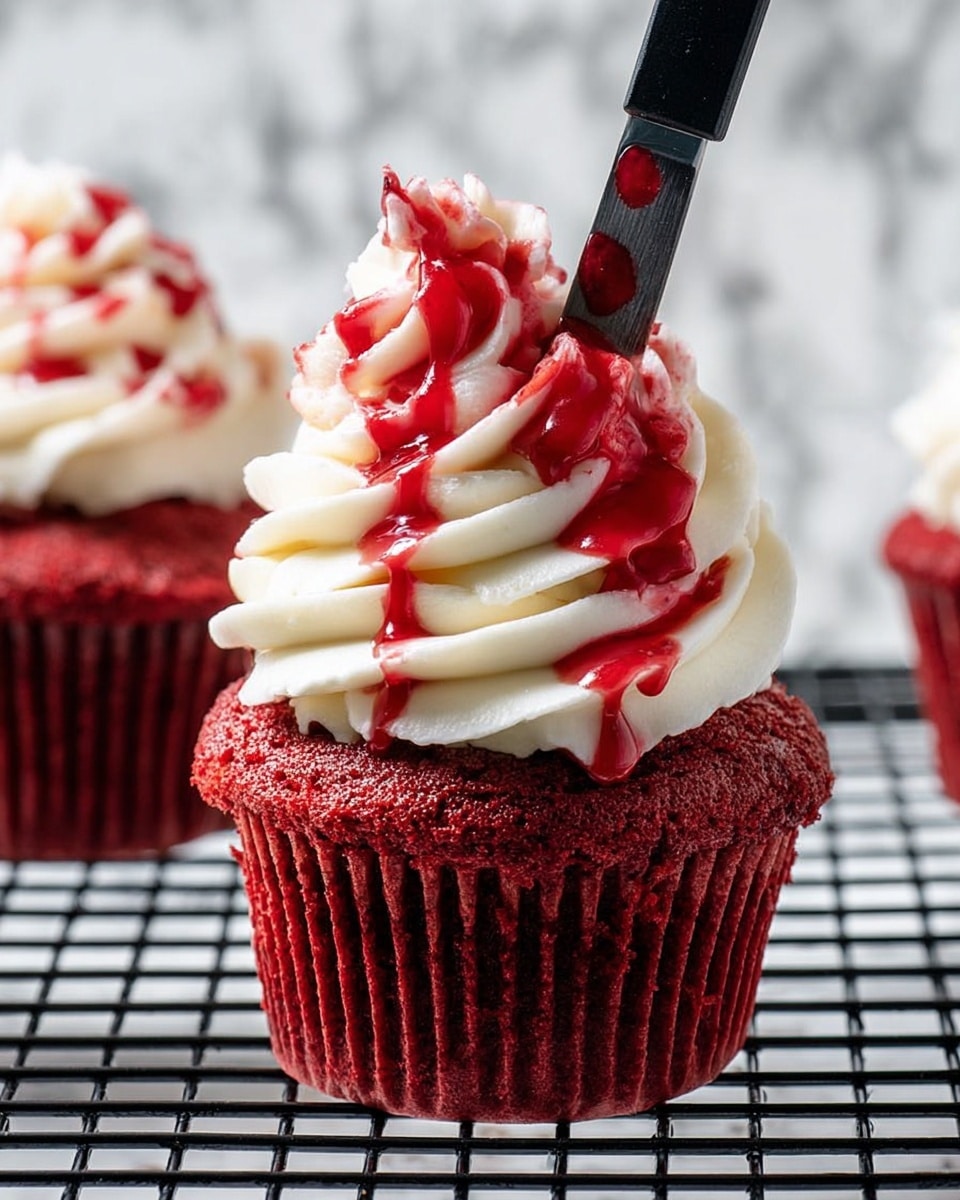
- Eye-Catching Visuals: The bright red food coloring paired with the “bloody” drizzle really makes these cupcakes stand out for Halloween.
- Easy Decorating: The simple knife decoration and drizzle technique make it accessible even if you’re not a pro at piping or fancy icing designs.
Ingredients & Why They Work
When it comes to these cupcakes, every ingredient plays a role. Red velvet’s signature flavor isn’t just from the food coloring; the cocoa powder, vanilla, and sour cream add complexity. For the frosting, cream cheese and butter balance creaminess with just enough firmness to hold that spooky drizzle. Here’s a quick rundown on the must-have ingredients and why I never skip any.
- All-purpose flour: Gives structure while keeping the crumb light.
- Cocoa powder: Unsweetened cocoa adds subtle chocolate notes and depth to the batter.
- Baking powder: Helps the cupcakes rise just right for a soft texture.
- Salt: Balances sweetness, enhancing all the flavors.
- Unsalted butter: Adds richness and ensures control over the salt content.
- Granulated sugar and brown sugar: Brown sugar brings warmth and moistness, granulated sugar adds sweetness and softness.
- Eggs: Bind the batter together and add moisture.
- Vanilla extract: Enhances the flavor and complements the cocoa.
- Sour cream: A secret weapon for moistness and tender crumb.
- Red food coloring: The key to that eye-catching red velvet hue; I recommend gel food color for vibrant, consistent color.
- Cream cheese: Classic frosting base – tangy and smooth.
- Icing sugar: For that silky, sweet frosting texture.
- Milk: Helps thin the bloody drizzle icing to just the right consistency.
- Halloween Knife Icing Decorations (optional): Fun for the final spooky touch without any fuss.
Make It Your Way
I love playing around with this Halloween Red Velvet Cupcakes with Cream Cheese Frosting and Bloody Drizzle Recipe to fit different occasions or dietary needs. Feel free to experiment with flavors, colors, and decorations to suit your style—and remember, it’s all about having fun in the kitchen!
- Variation: I’ve tried swapping sour cream for Greek yogurt when I ran out—it worked beautifully and gave a slightly tangier flavor.
- Dairy-Free Option: You can use non-dairy cream cheese and butter substitutes—just make sure they’re firm for easier frosting application.
- Color Play: Change up the food coloring for other themes—orange and black for a Halloween twist or even purple for a mysterious vibe.
- Difficulty Level: Even if you’re new to baking cupcakes, the straightforward steps and easy frosting technique make this recipe totally doable.
Step-by-Step: How I Make Halloween Red Velvet Cupcakes with Cream Cheese Frosting and Bloody Drizzle Recipe
Step 1: Prepping the Batter for That Perfect Red Velvet
First things first: preheat your oven to 350℉ and line your muffin tin with paper liners. I recommend spraying those liners lightly with cooking spray to make sure your cupcakes slide out cleanly—this little trick saved me from some frustrating stuck cupcakes last time! Then, whisk together your dry ingredients—flour, cocoa powder, baking powder, and salt—in a medium bowl. This helps distribute everything evenly, so you don’t get bitter pockets of cocoa or clumps of baking powder.
Step 2: Cream Butter and Sugars Until Light and Fluffy
In your mixer bowl, beat the softened butter with both sugars—granulated and brown—until the mixture lightens in color and looks fluffy, about 3-4 minutes on medium speed. This makes a huge difference in your cupcakes’ texture. Add the eggs one at a time, making sure each is fully incorporated before adding the next. Then mix in the vanilla and sour cream—this combo gives your batter that signature moistness and tang.
Step 3: Coloring and Combining the Batter
Here comes the fun part: the red food coloring! I usually add it teaspoon by teaspoon, mixing gently after each addition until the color pops to my liking—it took me about 3 teaspoons this time. Keep in mind that different brands vary, so start small, and build up. Add your dry ingredients slowly, mixing on low speed so the batter stays light and fluffy. Don’t overmix—stop as soon as the flour disappears.
Step 4: Baking and Cooling
Using an ice cream scoop to portion your batter means each cupcake will be about the same size, which helps them bake evenly. Fill each liner about ¾ full. Pop the tray in your preheated oven for 20 to 25 minutes. Yes, your kitchen is going to smell fantastic! Test doneness with a toothpick in the center—if it comes out clean, you’re golden. Let them sit in the pan for five minutes before transferring to a wire rack; this helps them settle and prevents breakage.
Step 5: Whipping Up the Cream Cheese Frosting
While the cupcakes cool, beat cream cheese and softened butter together until smooth—no lumps here! Add vanilla, a pinch of salt, then gradually sift in the icing sugar. Beat until fluffy and spreadable. No fancy piping? No worries. I often just spread it with a butter knife—it actually looks quite rustic and charming.
Step 6: Creating the Bloody Drizzle and Decorating
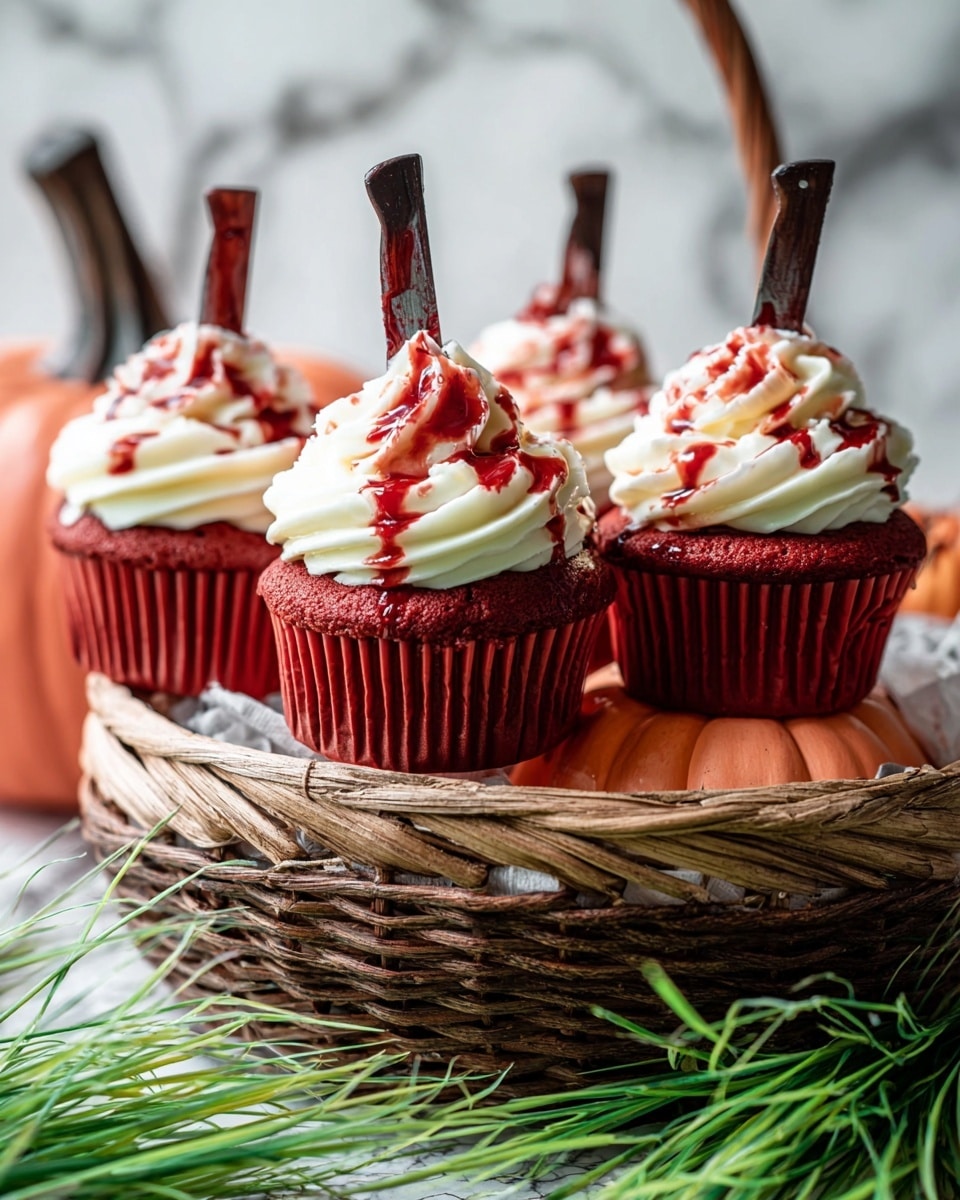
For that signature gory effect, combine icing sugar, milk, and red food color in a small bowl, whisking until smooth but thin enough to drizzle. Don’t be shy with the red coloring here—you want it dark and intense for the ‘blood’ look. Dip a small knife into the glaze and gently place it blade-down into the frosting atop each cupcake. Drizzle more icing over the top to mimic dripping blood. Add your Halloween knife decorations if you have them—so cool and perfect for impressing guests!
Tips from My Kitchen
- Color Control: Different red food colors vary widely—add it in small amounts and judge by natural light for true color.
- Frosting Texture: If your cream cheese frosting feels too thin, chill it for 15-20 minutes to firm up before frosting.
- Drizzle Consistency: Thin your drizzle icing with milk slowly—too thin and it’ll run off the cupcake, too thick and it won’t spread nicely.
- Avoid Overbaking: Cupcakes dry out fast—keep an eye on baking times and test early starting at 18 minutes.
How to Serve Halloween Red Velvet Cupcakes with Cream Cheese Frosting and Bloody Drizzle Recipe
Garnishes
I like to keep garnishes simple but thematic. The Halloween knife icing decorations are my go-to because they add that creepy, festive twist without extra effort. Sometimes I sprinkle a few red sanding sugars or edible glitter to give the cupcakes a little sparkle under dim party lights—so much fun!
Side Dishes
These cupcakes pair wonderfully with a cup of spiced apple cider or a rich hot chocolate—it’s like a hug on a chilly fall night. If you’re serving at a party, consider adding some popcorn or caramel apples alongside for an extra Halloween spread.
Creative Ways to Present
For a party, I like to arrange these cupcakes on a dark wooden tray with spooky props like fake cobwebs or mini pumpkins scattered around. Another idea? Serve them on a tiered stand wrapped with black lace or tied with orange and black ribbons. It really elevates the vibe and gets everyone excited to dig in!
Make Ahead and Storage
Storing Leftovers
These cupcakes keep beautifully in the fridge for up to 5 days in an airtight container. I recommend letting them sit out a bit before serving so the frosting softens back up—that cream cheese frosting tastes best at room temperature! If you notice the drizzle looks a bit dry, a quick brush of simple syrup can restore that shiny blood effect.
Freezing
Want to make these ahead of Halloween? No problem! You can freeze the baked cupcakes, but I suggest freezing them unfrosted for best results. Wrap each cupcake tightly in plastic wrap, then place them in an airtight container or freezer bag. They’ll keep up to a year this way. When ready, thaw fully at room temp and then frost and decorate. I’ve done this for parties, and people couldn’t tell they weren’t freshly made.
Reheating
If you want a warm cupcake, just remove the frosting (if you can), microwave the cupcake part for about 10-15 seconds, then add frosting again—or eat the frosting separately. For a quick fix, I sometimes zap the whole cupcake briefly, but be careful not to overheat or the cream cheese frosting can get oily.
FAQs
-
Can I make these cupcakes without red food coloring?
Absolutely! While red food coloring gives red velvet its iconic look, you can skip it and still have delicious chocolate cupcakes. If you want a natural alternative, beet juice is sometimes used, but it will change the flavor slightly. Remember, the frosting and drizzle will also give that Halloween vibe.
-
Why is sour cream important in this recipe?
Sour cream adds moisture and a subtle tang that balances the sweetness and enhances the cupcake’s tender crumb. It’s key to making red velvet cupcakes moist without being heavy or greasy. If you don’t have sour cream, Greek yogurt is a good substitute.
-
How do I ensure my frosting is thick enough for piping?
Use softened cream cheese and butter, and add icing sugar gradually while beating until fluffy. If the frosting feels too soft, chill it in the fridge for 20 minutes before piping. This makes a big difference for holding shapes and preventing sagging.
-
What’s the best way to prevent the bloody drizzle from running off?
Make sure the drizzle icing is thin but not watery. You want it to slowly drip but not slide off completely. Start with less milk and add more as needed. Drizzle just before serving for the freshest effect.
-
Can I use store-bought frosting?
You could, but the homemade cream cheese frosting here is simple, tangier, and balances the cupcake’s flavor perfectly. Store-bought frostings sometimes are too sweet or dense. I encourage you to try the homemade version—it’s easier than you think!
Final Thoughts
These Halloween Red Velvet Cupcakes with Cream Cheese Frosting and Bloody Drizzle Recipe have become my go-to for spooky celebrations—not just because they look incredible, but because every bite is pure comfort and joy. I love the way the tangy frosting cuts through the rich cupcake, and that ‘bloody’ drizzle just adds a playful, spooky touch. I can’t wait for you to try baking them and sharing them with your favorite people. Trust me, once you make these, Halloween parties might just become your favorite holiday! Happy baking, friend!
Print
Halloween Red Velvet Cupcakes with Cream Cheese Frosting and Bloody Drizzle Recipe
- Prep Time: 20 minutes
- Cook Time: 25 minutes
- Total Time: 45 minutes
- Yield: 12 servings
- Category: Dessert
- Method: Baking
- Cuisine: American
- Diet: Vegetarian
Description
Delicious Halloween Red Velvet Cupcakes topped with creamy cream cheese frosting and spooky red icing decorations, perfect for festive gatherings and celebrations.
Ingredients
For Red Velvet Cupcakes
- 1 ¼ cups all-purpose flour
- 1 tablespoon cocoa powder (unsweetened)
- ¾ teaspoon baking powder
- ¼ teaspoon salt
- ¾ cup butter (unsalted, softened)
- ½ cup sugar (granulated)
- ½ cup brown sugar (packed)
- 3 eggs
- 2 teaspoon vanilla extract
- ½ cup sour cream
- 2-3 teaspoon red food color
For Cream Cheese Frosting
- 8 ounce cream cheese
- 4 tablespoon butter (unsalted, softened)
- 2 teaspoon vanilla extract
- ⅛ teaspoon salt
- 2 cups icing sugar
For Decorations
- 12 Halloween Knife Icing Decorations (optional)
- ¼ cup icing sugar
- 3 tablespoon milk (or more)
- 2 teaspoon red food color
Instructions
- Preheat and Prepare: Preheat your oven to 350℉. Line a 12-cup standard muffin tin with paper liners and spray them with cooking spray to prevent sticking.
- Mix Dry Ingredients: In a medium bowl, combine the all-purpose flour, unsweetened cocoa powder, baking powder, and salt. Set aside.
- Cream Butter and Sugars: In another bowl or the mixer bowl, beat the softened butter, granulated sugar, and brown sugar together until light and fluffy.
- Add Eggs and Flavorings: Add eggs one at a time, beating well after each addition. Then mix in vanilla extract and sour cream.
- Add Food Coloring: Gradually add red food color starting with 1 teaspoon and increase up to 3 teaspoons until you achieve the desired vibrant red hue.
- Combine Batter: Add the flour mixture to the wet ingredients and mix on low speed until well incorporated, scraping down the sides as needed.
- Fill Muffin Tin: Use an ice cream scoop to portion the batter into the prepared muffin tin, filling each cup about ¾ full.
- Bake Cupcakes: Bake for 25 minutes or until a toothpick inserted in the center comes out clean. Allow cupcakes to cool in the tin for 5 minutes, then transfer to a wire rack to cool completely.
- Make Frosting: Beat the cream cheese and butter together until smooth. Add vanilla extract, salt, and icing sugar; continue mixing until the frosting is smooth and fluffy.
- Frost Cupcakes: Fill a piping bag with the cream cheese frosting and pipe onto the cooled cupcakes.
- Prepare Red Icing: In a small bowl, whisk together icing sugar, milk, and red food color until you achieve a thin, dark blood-like consistency suitable for drizzling.
- Decorate Cupcakes: Dip a knife blade into the red icing and insert it into each cupcake frosting. Drizzle extra red icing for a spooky blood effect. Add optional Halloween knife icing decorations for added flair.
Notes
- Do not use a star tip for frosting as the frosting is thin; alternatively, use a knife to spread the frosting.
- Store cupcakes in an airtight container in the fridge for up to 5 days.
- For longer storage, freeze cupcakes wrapped securely in plastic wrap inside an airtight container for up to one year. Thaw completely at room temperature before frosting.
Nutrition
- Serving Size: 1 cupcake
- Calories: 320 kcal
- Sugar: 28 g
- Sodium: 180 mg
- Fat: 18 g
- Saturated Fat: 10 g
- Unsaturated Fat: 6 g
- Trans Fat: 0 g
- Carbohydrates: 36 g
- Fiber: 1 g
- Protein: 4 g
- Cholesterol: 75 mg

