Halloween Ghost Brownies Recipe
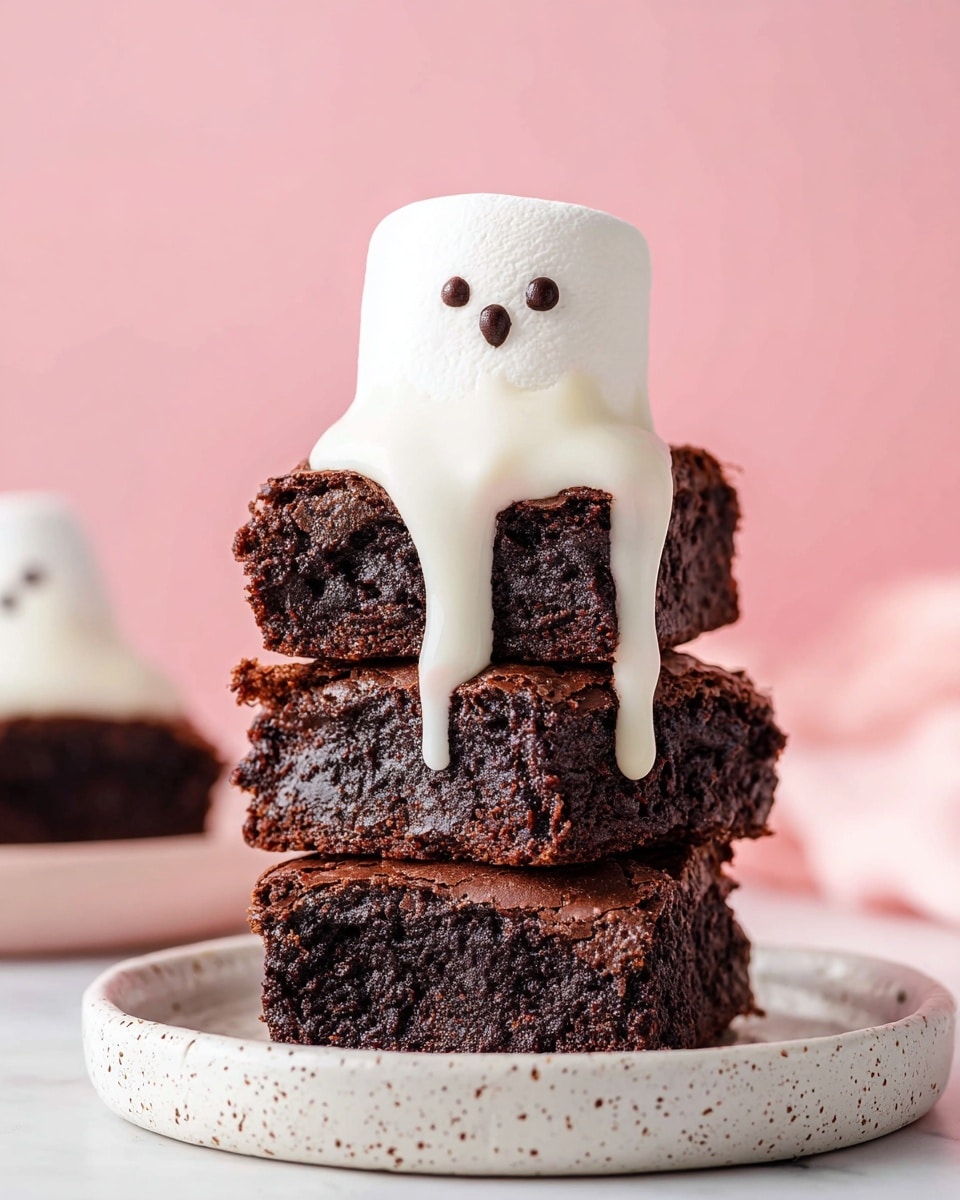
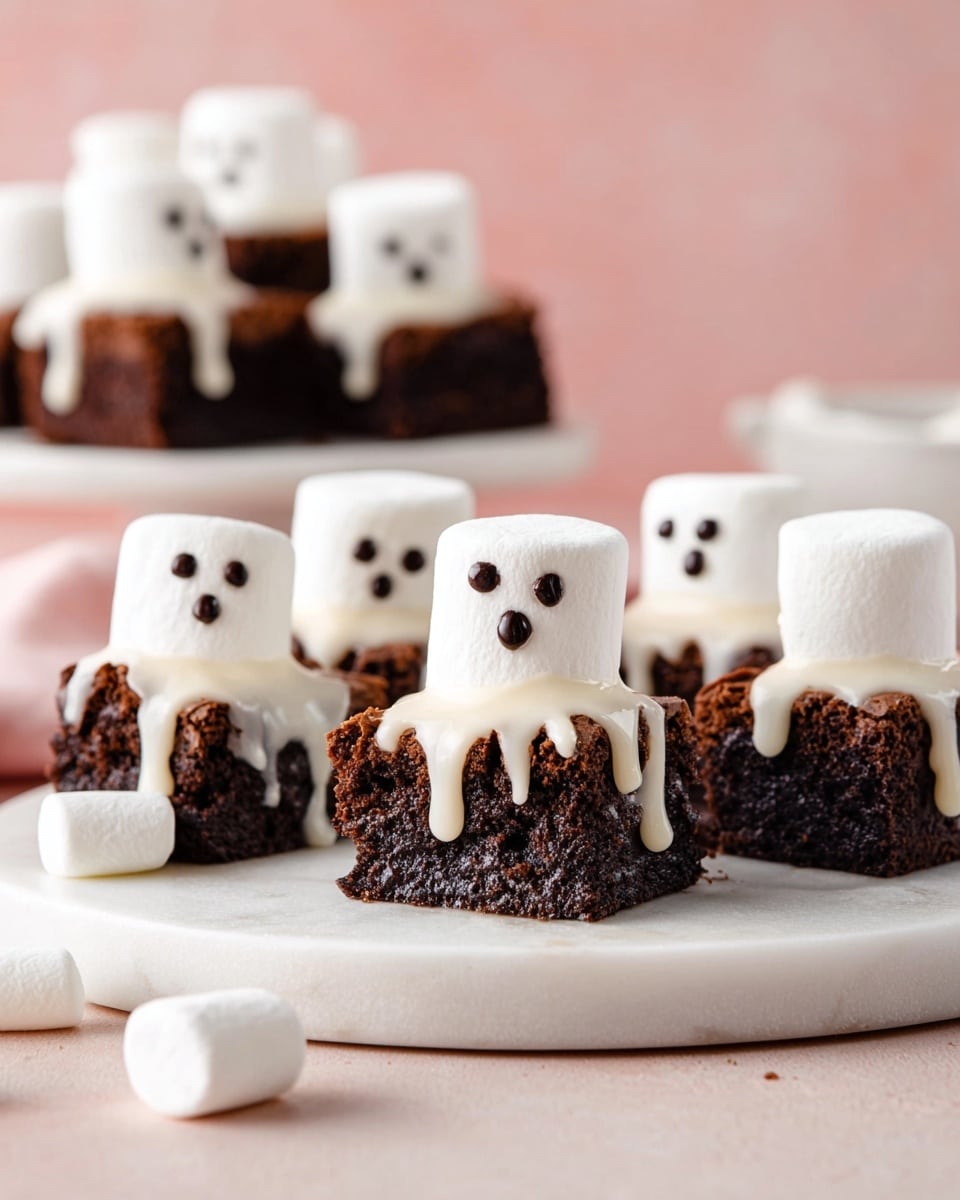
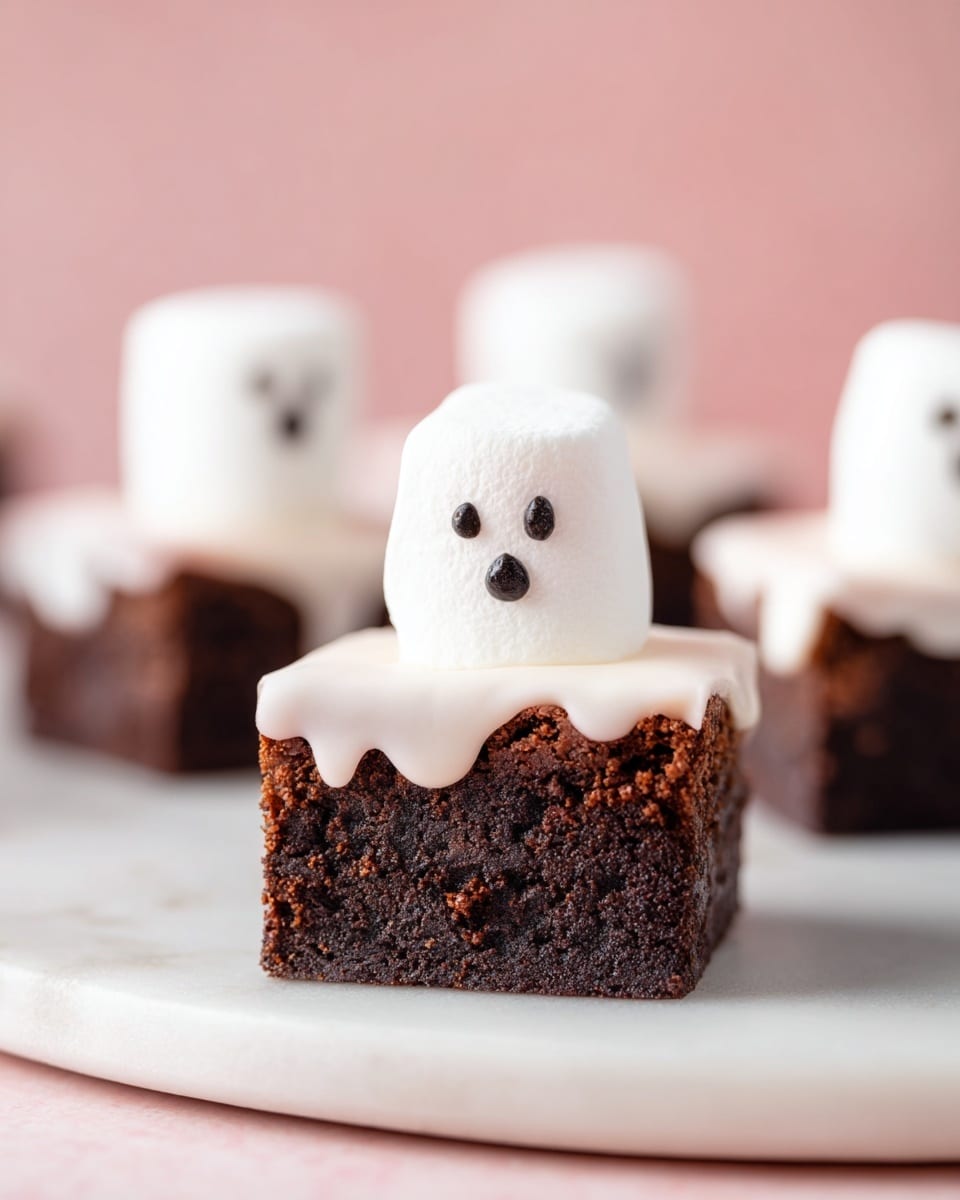
If you’re on the hunt for a spooky yet utterly delicious treat this season, you’ll absolutely adore my Halloween Ghost Brownies Recipe. It’s a fun twist on classic brownies that’s super easy to make, kids love helping out, and the end result? Swoon-worthy ghostly delights that disappear fast at any party or cozy night in. I can’t wait to show you how to turn simple ingredients into these enchanting, melt-in-your-mouth brownies covered in ghostly white chocolate and adorable little faces. Ready to make your Halloween baking unforgettable?
Why This Recipe Works
- Simplicity Meets Spookiness: Using a boxed brownie mix keeps this recipe quick and foolproof, perfect for busy days.
- Eye-Catching Presentation: Melted white chocolate over marshmallows creates the perfect ghostly shape that’s as fun to make as it is to eat.
- Kid-Friendly Fun: Decorating the brownies turns into a creative Halloween project for little helpers.
- Balanced Flavors and Textures: Fudgy brownies meet gooey marshmallows and smooth chocolate—every bite’s a delightful contrast.
Ingredients & Why They Work
Choosing your ingredients carefully makes all the difference—especially when you want the perfect texture and taste to shine through. I love how this Halloween Ghost Brownies Recipe mixes simplicity with just the right treats to turn ordinary brownies into Halloween magic.
- Brownie Mix: I recommend picking a box mix that’s fudgy and rich; it’s the ideal base for these ghostly treats and saves time.
- Eggs: Bringing them to room temperature helps your batter mix smoothly and bake evenly.
- Avocado Oil: It gives a subtle, neutral flavor and keeps brownies moist without overpowering.
- Water: Adds moisture for that fudgy brownie texture.
- Large Marshmallows: The star for ghosts—make sure to use large ones, or your ghosts won’t have that perfect fluffy body.
- White Chocolate Chips or Candy Melts: Melts beautifully over marshmallows for a smooth, ghostly coating.
- Black Candy Melts, Candy Eyes, or Mini Chocolate Chips: Perfect for adding spooky faces—choose whatever you have on hand or prefer for decorating.
Make It Your Way
I jazz up my Halloween Ghost Brownies Recipe in a few variations depending on the mood or what’s in my pantry. Feel free to tweak this recipe—this is what makes it such a crowd-pleaser and your own little masterpiece.
- Variation: Sometimes, I swap the avocado oil for melted butter just for that classic buttery brownie richness—both work beautifully.
- Dietary Modifications: You can use vegan brownie mix and dairy-free chocolate chips to make this recipe vegan-friendly without losing that ghostly charm.
- Seasonal Change: Adding a pinch of pumpkin spice to the batter gives a subtle fall vibe that pairs amazingly with the chocolate and marshmallows.
Step-by-Step: How I Make Halloween Ghost Brownies Recipe
Step 1: Bake the Brownie Base
First things first, prepare your brownie mix according to the package directions—using the room temperature eggs makes mixing easier and ensures even baking. Pour the batter into a greased 9×9-inch pan and bake as directed. What’s crucial here is letting the brownies cool completely. This step is a game-changer because if you try to add the marshmallow when it’s still warm, the topping will slide right off. I usually let mine rest for about 20 minutes on the counter, then pop them in the fridge to speed things up if I’m impatient.
Step 2: Add Your Marshmallow Ghosts
Once cooled and cut into squares, place one large marshmallow right in the center of each brownie square. Don’t rush this part—getting marshmallows properly centered makes a huge difference in how the ghosts look once assembled. Trust me, the kids in my life always get a kick out of carefully positioning these fluffy bodies.
Step 3: Melt and Drizzle the White Chocolate
Melt your white chocolate chips or candy melts in 30-second bursts in the microwave, stirring well each time, until smooth. If the chocolate looks thick, stir in a teaspoon of coconut oil to thin it out, which helps with that perfect drippy ghost shape. Carefully spoon the melted white chocolate over each marshmallow, letting it gently cascade down the sides. This gives the ghost its iconic flowing look. If it’s too stiff, the effect won’t be as dramatic.
Step 4: Get Ghostly with Faces
While the coating is still warm, melt your black candy melts in the same way. Use a toothpick to draw eyes and mouths right onto the white chocolate—it’s surprisingly easy and so cute! No candy melts? No problem. Press tiny candy eyes or mini chocolate chips onto the ghosts while the chocolate is still tacky, and they’ll stick perfectly. I find mini chocolate chips are a great fallback—they give just enough expression without melting away.
Step 5: Let Them Set
After decorating, allow your Halloween Ghost Brownies to set for about 20 to 30 minutes. If you want to speed this up, place them in the fridge for 10 to 15 minutes—the chocolate hardens nicely, giving you that perfect snap when you bite in. Just remember to serve them at room temperature for the best flavor and softness.
Tips from My Kitchen
- Cool Completely: Never decorate warm brownies—marshmallows slide and chocolate melts; cool and chill your brownies for best results.
- Smooth Chocolate: When melting white chocolate, stir constantly and add a bit of coconut oil if too thick for that perfect drizzle.
- Neat Cutting: Use a sharp knife dipped in warm water and wipe dry between cuts for clean brownie squares.
- Fast Setting: Chill your decorated brownies briefly in the fridge to speed hardening without drying them out.
How to Serve Halloween Ghost Brownies Recipe
Garnishes
I usually keep garnishes simple here—just a sprinkle of extra white chocolate shavings or a few festive colored sugar crystals can add a fun sparkle if you want a little extra flair. Sometimes I pop a few mini candy pumpkins or Halloween sprinkles around the plate for an added festive touch.
Side Dishes
These ghost brownies pair surprisingly well with a scoop of vanilla or pumpkin ice cream for an extra indulgent treat. For drinks, I like serving them alongside a cup of warm apple cider or a rich, creamy hot chocolate—both add to the cozy fall vibe!
Creative Ways to Present
For parties, arrange them on a platter lined with black or orange parchment paper, peppered with candy corns and small plastic spiders for that Halloween wow factor. And here’s a fun one: I’ve even made mini ghost brownie sandwiches by sandwiching frosting between two cooled brownies before decorating—the kids went nuts for those!
Make Ahead and Storage
Storing Leftovers
I store leftover Halloween Ghost Brownies in an airtight container at room temperature if I plan to eat them within three days. The brownies stay moist, and the decorations hold up well. If your kitchen’s warm, the fridge is a better option but let them come back to room temp before enjoying.
Freezing
I’ve had great success freezing these brownies, but I like to freeze them plain—just the brownies without marshmallows or chocolate—so the decorations stay perfect. When you’re ready, thaw completely, then add your marshmallow and chocolate decorations fresh. This keeps the ghost faces looking crisp and fun.
Reheating
If you want that fresh-from-the-oven warmth, I gently reheat brownies in the microwave for 10-15 seconds before decorating or serving, but I skip reheating once they have the marshmallow and chocolate ghosts on top to avoid melting them.
FAQs
-
Can I make Halloween Ghost Brownies Recipe from scratch instead of using a mix?
Absolutely! While I recommend the boxed brownie mix for convenience and consistency, you can swap in your favorite homemade brownie batter. Just make sure your brownies have a fudgy texture that holds up well under the marshmallow and chocolate toppings.
-
What if I don’t have candy eyes for the ghost faces?
No worries! Mini chocolate chips, small dots of melted black chocolate, or even black icing work perfectly to create spooky eyes and mouths. I’ve found mini chips often create the cutest expressions.
-
How do I prevent the marshmallows from sliding off the brownies?
The key is to make sure your brownies are completely cooled before placing marshmallows and adding melted chocolate. If the brownies are warm, the marshmallows won’t stick properly and tend to slide around.
-
Can I prepare the Halloween Ghost Brownies Recipe in advance?
You sure can! Bake and cut the brownies ahead, store them plain in an airtight container, then add marshmallows and decorate just before your party or serving time for the freshest look.
Final Thoughts
Honestly, this Halloween Ghost Brownies Recipe has become my go-to for festive baking—it’s quick, crowd-pleasing, and brings out smiles with every ghostly bite. Whether you’re baking with kids, preparing for a party, or just craving a treat with a spooky spin, this recipe hits all the marks. Give it a try—I promise you’ll love seeing those little marshmallow ghosts come to life, and your kitchen will smell like the coziest Halloween dream. Can’t wait to hear all about your brownie creations!
Print
Halloween Ghost Brownies Recipe
- Prep Time: 20 minutes
- Cook Time: 35 minutes
- Total Time: 1 hour 30 minutes
- Yield: 16 servings
- Category: Dessert
- Method: Baking
- Cuisine: American
Description
These Halloween Brownies feature rich, fudgy brownies topped with ghostly marshmallow figures coated in white chocolate and decorated with candy eyes or mini chocolate chips for a spooky, festive treat perfect for Halloween celebrations.
Ingredients
Brownie Base
- 1 box brownie mix
- 2 eggs at room temperature
- ½ cup avocado oil
- 3 tablespoon water
Ghost Topping
- 16 large marshmallows
- 1 cup white chocolate chips or white candy melts
- 1 tablespoon black candy melts or candy eyes or mini chocolate chips
Instructions
- Prepare Brownies: Follow the package directions to prepare and bake the brownies in a greased 9×9-inch pan. Once baked, allow them to cool completely before cutting into squares.
- Add Marshmallows: Place one large marshmallow in the center of each brownie square to form the base of the ghost topping.
- Melt White Chocolate: In a microwave-safe bowl, melt the white chocolate chips or candy melts in 30-second intervals, stirring after each interval until smooth and creamy.
- Coat Marshmallows: Spoon the melted white chocolate over each marshmallow, letting it drip down the sides to create a ghostly shape.
- Create Ghost Faces: While the white chocolate is still warm, melt the black candy melts in a microwave-safe bowl. Using a toothpick, draw eyes and a mouth on each ghost. Alternatively, press candy eyes or mini chocolate chips onto each to make the ghost faces.
- Set Chocolate: Allow the chocolate to set at room temperature for 20-30 minutes before serving to ensure the coating hardens properly.
Notes
- Using a box brownie mix keeps this recipe quick and reliable, but feel free to substitute with your favorite homemade brownie recipe.
- Ensure the brownies are completely cooled before adding marshmallows and chocolate to prevent toppings from sliding off.
- Use standard large marshmallows as mini marshmallows do not work as well for this decoration.
- If melted white chocolate is too thick, stir in 1 teaspoon of coconut oil or vegetable shortening to thin it for easier drizzling.
- If candy eyes are unavailable, mini chocolate chips, black icing, or dots of melted chocolate are excellent alternatives for decorating ghost faces.
- For neat brownie edges, use a sharp knife dipped in warm water and wiped dry between cuts.
- Placing the tray in the fridge for 10-15 minutes can help the chocolate harden faster.
- Store decorated brownies in an airtight container at room temperature for up to 3 days or in the fridge for up to 5 days to maintain freshness.
Nutrition
- Serving Size: 1 brownie
- Calories: 220 kcal
- Sugar: 18 g
- Sodium: 150 mg
- Fat: 12 g
- Saturated Fat: 4 g
- Unsaturated Fat: 7 g
- Trans Fat: 0 g
- Carbohydrates: 28 g
- Fiber: 2 g
- Protein: 2 g
- Cholesterol: 25 mg

