Halloween Ghost Milkshakes Recipe
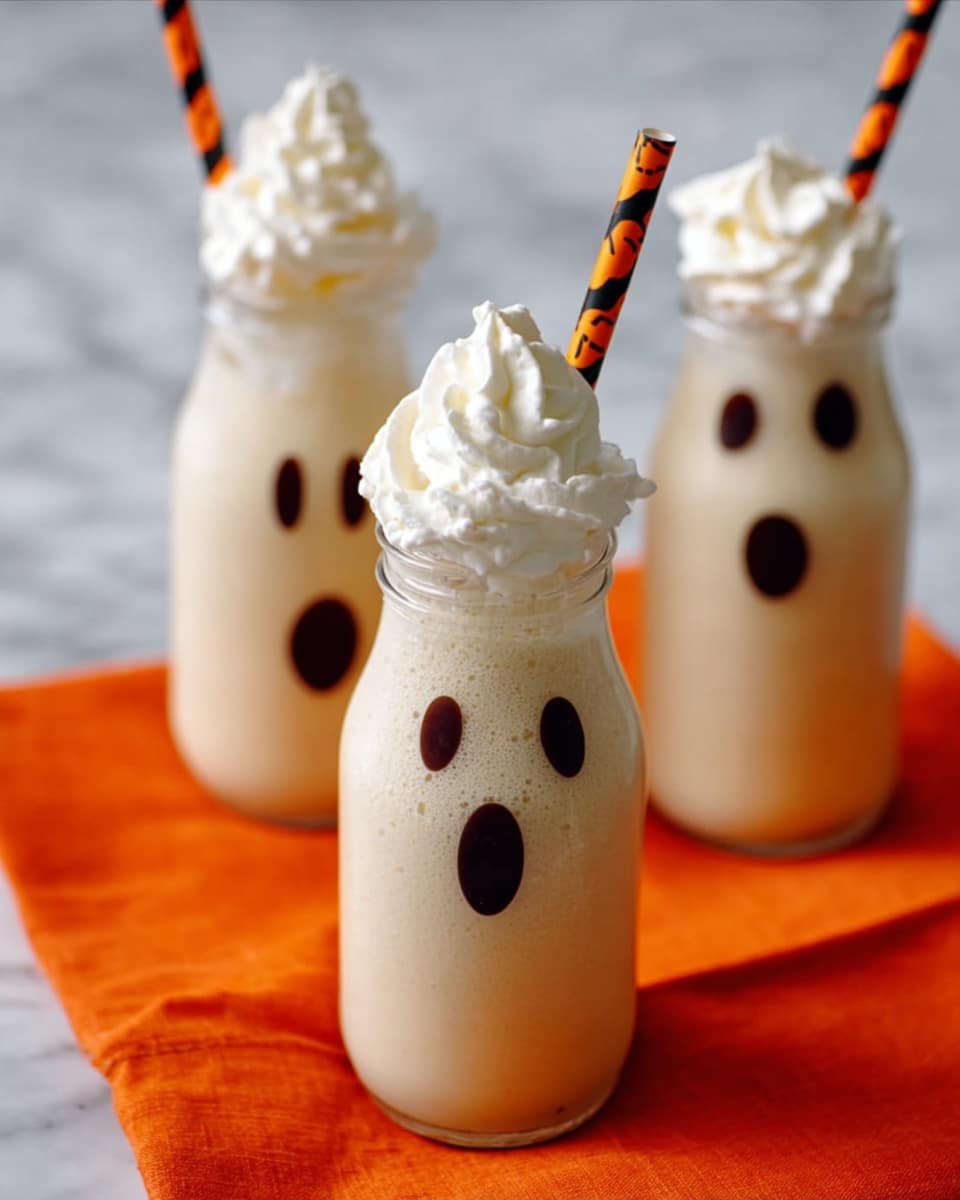
If you’re looking to wow your guests at your next spooky party or just want a fun, festive treat to enjoy this season, this Halloween Ghost Milkshakes Recipe is an absolute must-try. It’s playful, delicious, and surprisingly simple to put together—even if your decorating skills are more “fun attempt” than “Pinterest perfect.” Stick with me, and I’ll show you how I make these ghostly shakes come to life with just a few ingredients and a little creativity. Trust me, your family and friends will be asking for seconds!
Why This Recipe Works
- Easy and approachable: You don’t need fancy skills or ingredients to get this spooky look.
- Perfect balance of flavors: Classic vanilla milkshake sweetness contrasted with rich chocolate decoration.
- Highly customizable: You can tweak thickness and garnish to match your taste and party vibe.
- Great for all ages: Kids and adults alike adore these playful, festive drinks.
Ingredients & Why They Work
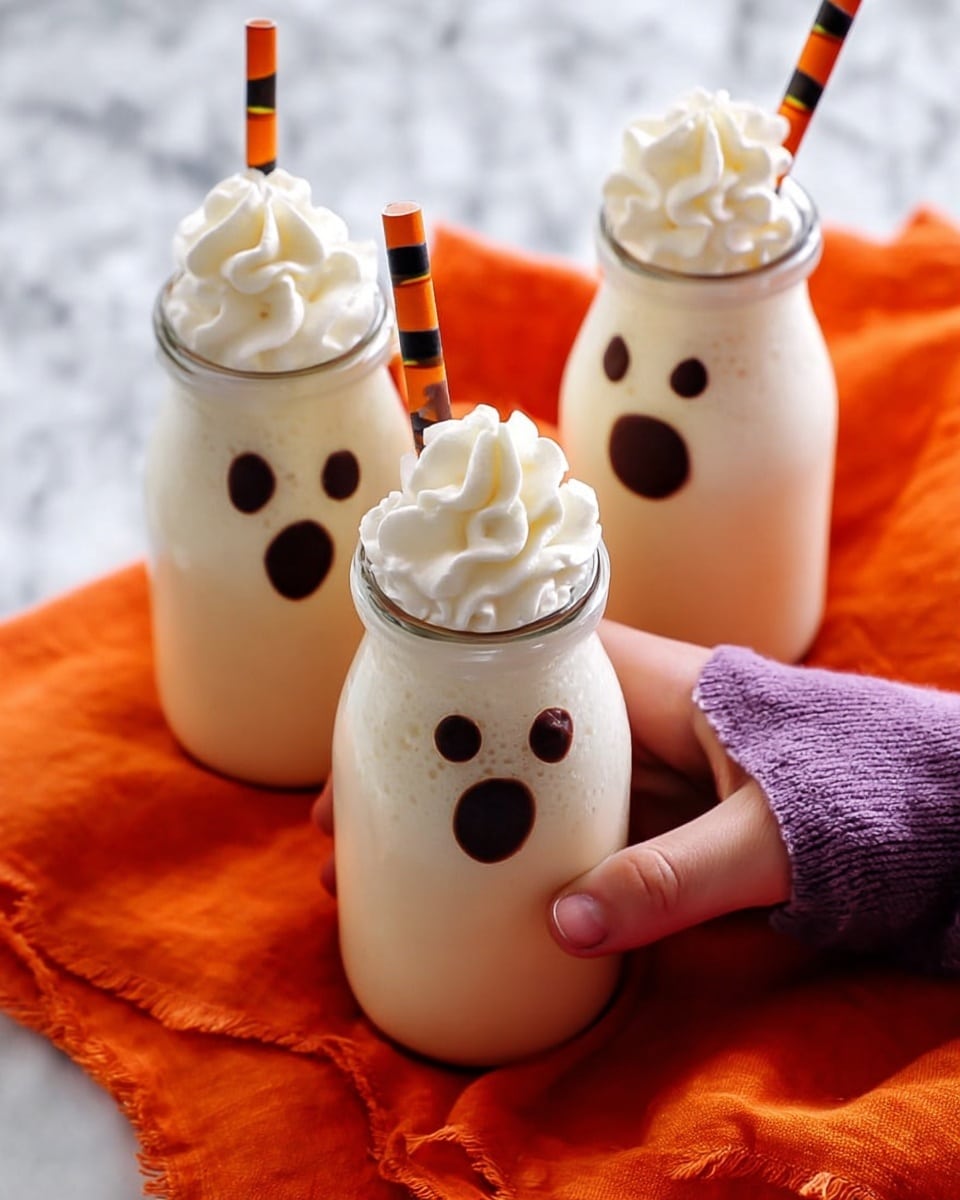
Getting the right ingredients is half the fun here. The vanilla ice cream and milk create that creamy milkshake base we all love, while the melted chocolate chips turn simple glasses into spooky ghost canvases with their faces. Plus, the whipped cream on top not only tastes heavenly but adds that perfect fluffy ghostly effect.
- Vanilla ice cream: Look for a creamy, full-flavored brand—this really sets your milkshake apart.
- Milk: Whole milk works best for creaminess, but you can use any milk you prefer.
- Semisweet chocolate chips: These melt nicely and provide contrast for the ghost faces.
- Whipped cream: I usually grab Reddi Whip for its convenience, but homemade whipped cream takes it up a notch.
Make It Your Way
I love how flexible this Halloween Ghost Milkshakes Recipe is—you can easily adjust it for different tastes or dietary needs. I personally enjoy adding a little vanilla extract to enhance the flavor or swapping out the milk for almond milk for a dairy-free twist.
- Variation: Once, I tried adding a tablespoon of pumpkin puree and a dash of cinnamon to make a “pumpkin ghost” version — it was a hit with guests and tastes like fall in a glass.
- Dairy-free: Use coconut milk ice cream and almond milk to keep it creamy yet vegan-friendly.
- Thicker or thinner: Play with milk and ice cream amounts until you get your perfect milkshake consistency.
Step-by-Step: How I Make Halloween Ghost Milkshakes Recipe
Step 1: Melt the Chocolate and Decorate the Glasses
This part is super fun and gives the milkshakes their spooky personality. I place about ¼ cup of semisweet chocolate chips in a microwave-safe dish. Heat them for 30 seconds, then stir. If they’re not fully melted, I nuke them in 15-second bursts, stirring each time, until the chocolate is smooth and glossy. Pro tip: don’t overheat or the chocolate will seize — if it does, add a tiny dab of coconut oil or butter to smooth it out.
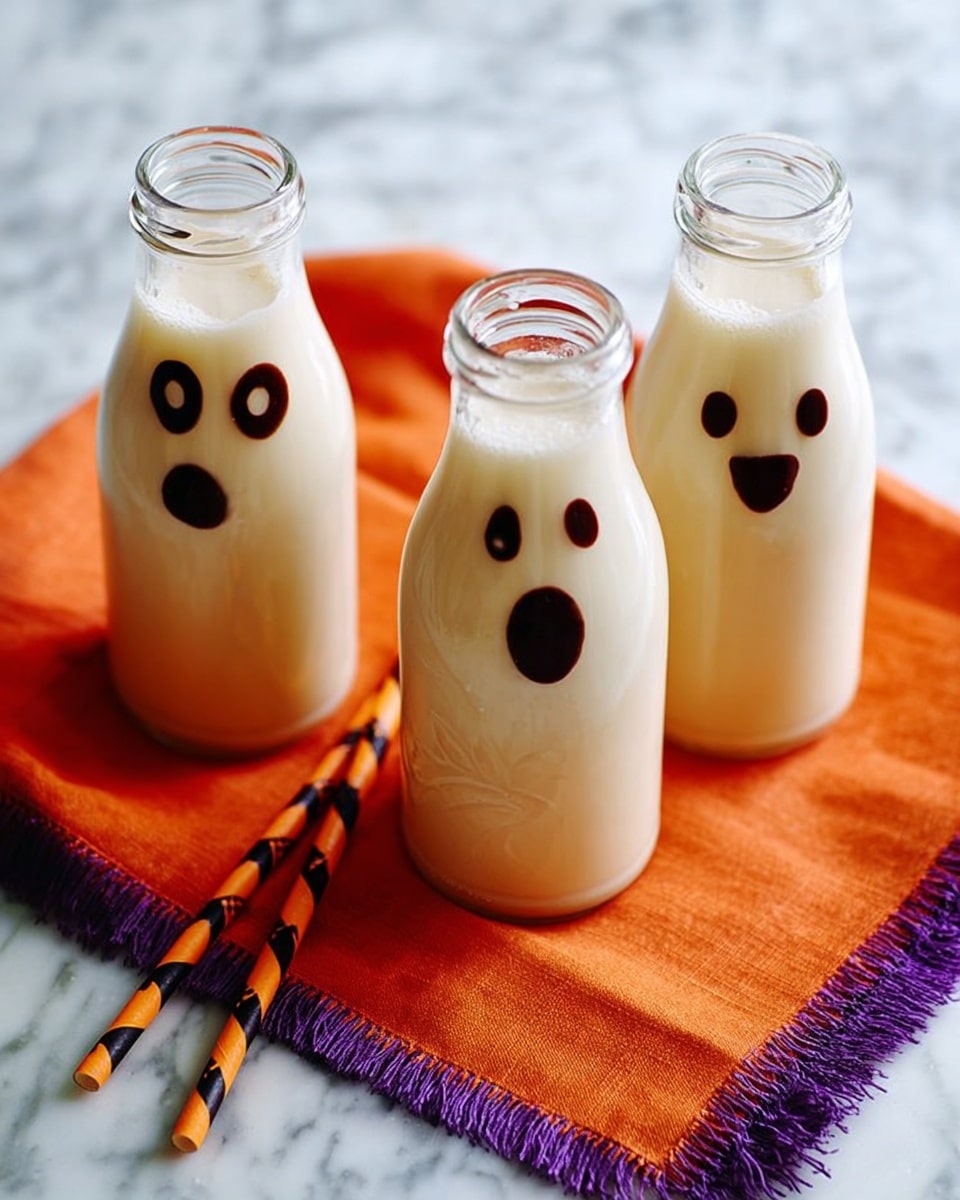
Using the back end of a spoon or a toothpick, dip it into the melted chocolate and carefully draw ghost faces — two eyes and a cute little mouth — inside each glass near the bottom. It doesn’t have to be perfect; the charm is in the handmade look. Then, pop them into the fridge for about 30 minutes to set solid before adding your milkshake.
Step 2: Blend the Milkshake Base
Next, scoop 3 cups of good-quality vanilla ice cream into a blender. Pour in 1¾ cups of milk and blend until smooth and creamy. If you like your milkshake thicker, start with less milk and add more only as needed. Same goes if you want it thinner—just add milk a tablespoon at a time to avoid watering it down.
Step 3: Assemble and Serve
Now for the fun part! Carefully pour the milkshake mixture into your chocolate-decorated glasses, leaving about an inch at the top for the whipped cream. I usually hold back on the whipped cream until everyone’s ready to drink because it can melt pretty quickly. Top with a generous swirl of whipped cream—this is your milkshake’s ghostly “hair.” Serve immediately with a straw and watch the smiles come out.
Tips from My Kitchen
- Use chilled glasses: Keeping glasses cold helps the milkshake stay chilly longer and helps the chocolate stick better.
- Less is more with chocolate faces: Adding too much melted chocolate can make a mess—small dots make the cutest ghost expressions.
- Work quickly after decorating: The chocolate sets fast in the fridge, so be ready with your milkshake to fill ’em up.
- Adjust thickness carefully: Add milk or ice cream slowly to prevent over-thinning or thickening your milkshake.
How to Serve Halloween Ghost Milkshakes Recipe
Garnishes
I love topping each milkshake with a fluffy cloud of whipped cream—the more, the better! Sometimes, I sprinkle crumbled Oreos or mini marshmallows on top for extra “ghostly eyes” or a bit of texture. A fun little candy eyeball or some edible glitter can take it over the spooky edge for parties.
Side Dishes
Since this milkshake is quite rich, I like pairing it with lighter Halloween-themed treats like pumpkin spice cookies or apple slices with cinnamon. It’s a nice contrast that keeps the sweet party going without overloading on sugar.
Creative Ways to Present
Once, I served these in mason jars tied with orange and black ribbons for a festive feel. I’ve also tried serving the milkshakes with a fake spider ring on the straw or chilling the glasses with dry ice for a smoky, eerie effect that got everyone talking.
Make Ahead and Storage
Storing Leftovers
I’ve found milkshakes are best enjoyed fresh, but if you have leftovers, pour them into airtight containers and store in the fridge for up to 24 hours. The texture changes a bit, so just give them a good stir or quick blender whirl before drinking.
Freezing
While you can freeze any leftover milkshake, I don’t recommend freezing the decorated glasses with chocolate faces—they might crack or lose their charm. Instead, freeze extra milkshake in separate containers for future quick treats.
Reheating
Milkshakes are best cold, so I usually just let leftovers thaw briefly in the fridge, then blend or stir to bring back some creaminess. Reheating like a beverage isn’t really needed here, since it’s a chilled treat.
FAQs
-
Can I make these Halloween Ghost Milkshakes ahead of time?
I recommend decorating the glasses and chilling the chocolate faces ahead of time, but fill them with milkshake and whipped cream right before serving for the best taste and appearance.
-
What if I don’t have a microwave to melt the chocolate?
No worries! You can melt chocolate chips on the stovetop using a double boiler method—just keep the heat low and stir frequently to avoid burning.
-
Can I use other flavors of ice cream for this Halloween Ghost Milkshakes Recipe?
Absolutely! Vanilla works best for the classic ghost look, but chocolate or pumpkin spice ice cream could add a fun twist if you’re feeling adventurous.
-
How do I make the milkshake thicker or thinner?
Simply adjust the milk or ice cream amounts when blending—add a little more milk for thinner shakes or more ice cream for a thick, spoonable treat.
Final Thoughts
This Halloween Ghost Milkshakes Recipe holds a special place in my heart because it always brings out the kid in everyone, no matter the age. It’s a playful way to celebrate the season that feels both nostalgic and new. I hope you enjoy making (and drinking!) these as much as I do—it’s one of those simple pleasures that make Halloween extra fun. Give it a try, and I promise you’ll be the favorite host in your crew!
Print
Halloween Ghost Milkshakes Recipe
- Prep Time: 30 minutes
- Cook Time: 0 minutes
- Total Time: 1 hour
- Yield: 4 servings
- Category: Beverage
- Method: Blending
- Cuisine: American
Description
Celebrate Halloween with these spooky and delicious Halloween Ghost Milkshakes. Creamy vanilla milkshakes are topped with whipped cream and decorated with cute ghost faces made from melted chocolate chips, perfect for a festive treat that’s both fun and easy to make.
Ingredients
For the Ghost Faces
- ¼ cup semisweet chocolate chips
For the Milkshake
- 3 cups vanilla ice cream
- 1 ¾ cups milk
- whipped cream (we use Reddi Whip)
Instructions
- Melt the Chocolate: Place the chocolate chips in a microwave-safe dish and heat on high for 30 seconds. Stir well, then heat in 15-second increments, stirring after each, until the chocolate is smooth and creamy.
- Create Ghost Faces: Using the end of a spoon handle, dip into the melted chocolate and carefully decorate eyes, nose, and mouth on the inside of your glasses. Use just a small amount of melted chocolate for each feature.
- Set the Chocolate: Place the decorated glasses in the refrigerator and let the chocolate set for about 30 minutes.
- Prepare the Milkshake: Add the vanilla ice cream and milk to a blender and blend until smooth and creamy.
- Assemble the Milkshake: Pour the milkshake into the decorated glasses, leaving about one inch of space at the top.
- Add Whipped Cream: Top each milkshake with a generous amount of whipped cream.
- Serve: Serve the ghost milkshakes immediately for the best taste and texture.
Notes
- If you prefer a thinner milkshake, add more milk a little at a time while blending until desired consistency is reached.
- For a thicker milkshake, add more ice cream gradually.
- The recipe makes about 4 ½ cups of milkshake; serving size depends on the size of your glasses.
- Use minimal melted chocolate to create the ghost faces for neat and defined features.
- Nutrition information is approximate and should be used as a general guideline.
Nutrition
- Serving Size: 1 cup
- Calories: 350 kcal
- Sugar: 30 g
- Sodium: 90 mg
- Fat: 15 g
- Saturated Fat: 9 g
- Unsaturated Fat: 4 g
- Trans Fat: 0 g
- Carbohydrates: 45 g
- Fiber: 1 g
- Protein: 6 g
- Cholesterol: 50 mg

