4th of July Cake Balls Recipe
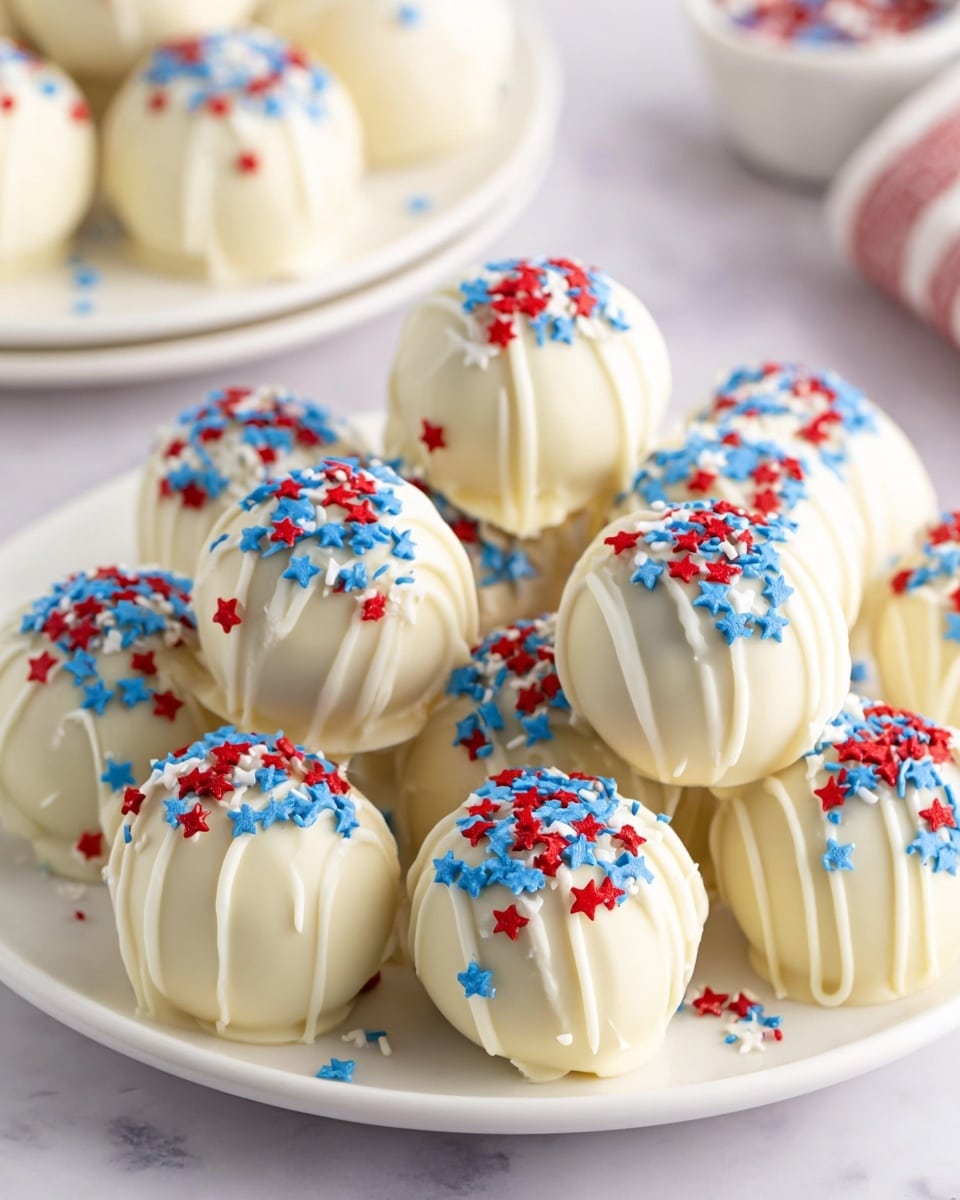
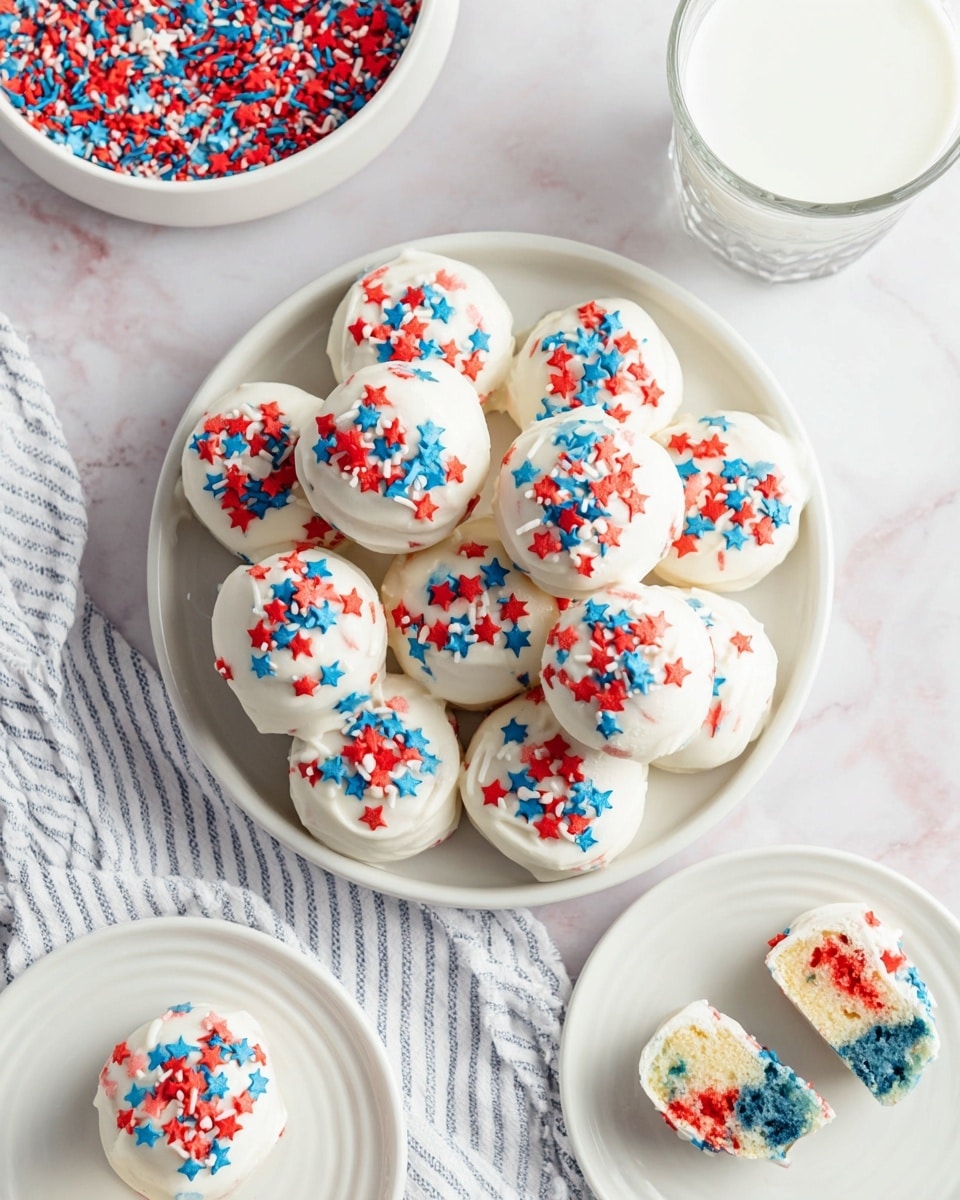
If you’re looking for a show-stopping, bite-sized dessert to bring to your Independence Day celebrations, you have got to try this 4th of July Cake Balls Recipe. These little beauties are bursting with patriotic colors, creamy texture, and a sweetness that feels just right without being overwhelming. Trust me, once you pop one in your mouth, you’ll be hooked—and your guests will be asking for the recipe, guaranteed!
Why This Recipe Works
- Perfect Texture: The cream cheese mixed into the crumbled cake makes these balls wonderfully moist and creamy, avoiding dryness common in cake pops.
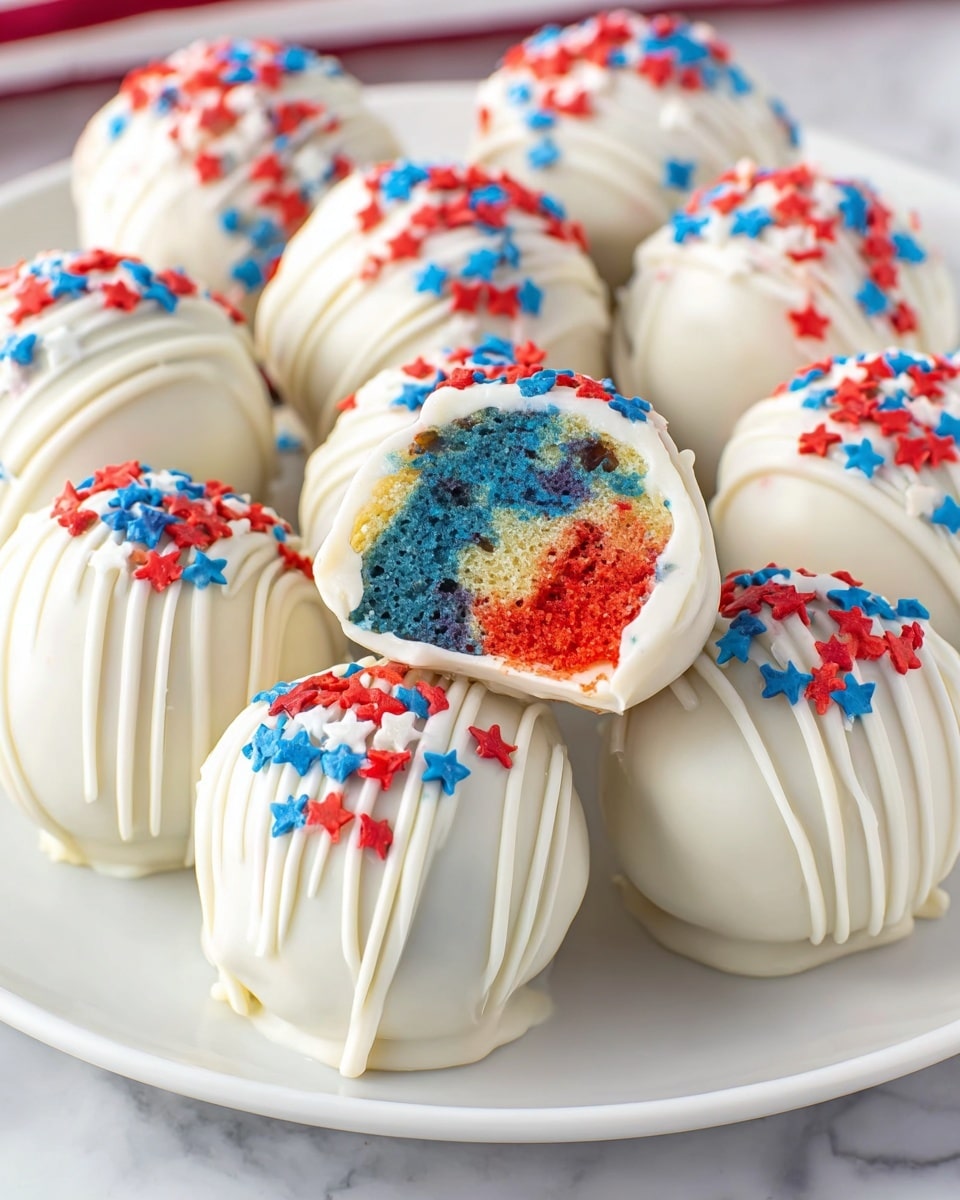
- Vibrant Colors: Separating the batter and tinting with red and blue food coloring allows you to get those festive patriotic layers in every bite.
- Easy to Make: You don’t need fancy equipment—just mixing bowls, a hand mixer, and some simple melting wafers for dipping.
- Customizable Decoration: Using a variety of sprinkles lets you personalize the look to match your 4th of July vibe perfectly.
Ingredients & Why They Work
This 4th of July Cake Balls Recipe calls for some simple ingredients that come together magically. Each one plays a role in taste, texture, or appearance, so I recommend getting good-quality basics—especially the cake mix and melting wafers—to ensure you get the best results every time.
- White Cake Mix: Using a white cake mix gives a lovely blank canvas, allowing the red and blue colors to pop beautifully.
- Red and Blue Food Coloring: Gel food colors work best here because they don’t thin out the batter like liquid colors do.
- Cream Cheese: This adds moisture and keeps the cake balls from crumbling apart—softened to room temperature for easy mixing.
- Vanilla Melting Wafers: Smooth and sweet, these wafers are perfect for dipping and solidify quickly for the crisp coating.
- Red and Blue Candy Melts: Adding candy melts adds extra color options and an irresistible flavor contrast with the white coating.
- Red, White, and Blue Sprinkles: To finish the look with a festive crunch and extra fun.
Make It Your Way
One of my favorite parts about the 4th of July Cake Balls Recipe is how easy it is to make it your own. Whether you want to tweak colors, add flavors, or change up your decorations, there are so many ways to put your personal stamp on these treats.
- Variation: I’ve tried swapping cream cheese for peanut butter for a nutty twist—super tasty if you love peanut butter and chocolate together.
- Dietary Mods: You can use gluten-free cake mix to make this dessert friendly for gluten-intolerant guests without sacrificing flavor.
- Flavor Boost: Adding a teaspoon of vanilla extract or almond extract to the cream cheese mixture really amps up the depth.
Step-by-Step: How I Make 4th of July Cake Balls Recipe
Step 1: Bake Your Colorful Cakes
Start by preheating your oven to 350°F (or whatever your cake mix box recommends). I like to lightly grease three 8×8 pans—one for each color—and set them aside. Next, prepare your cake batter using the box instructions, then divide it evenly into three bowls. Leave one bowl plain, then add red food coloring to the second and blue to the third—adding in drops bit by bit until you get the perfect shade. Remember to use separate spoons for each to keep those colors vibrant! Pour each batter into its own pan and bake for around 15 minutes, checking that a toothpick comes out clean. Once baked, cool completely on wire racks before moving to the next steps.
Step 2: Mix in Cream Cheese
After the cakes have cooled, crumble each colored cake into separate bowls. Using a hand mixer, whip the softened cream cheese until creamy and smooth. Divide the cream cheese into three parts and mix each portion into the corresponding bowl of crumbled cake—red cake with red cream cheese, and so on. This step is key for adding moisture and binding the cake crumbs so they roll easily without crumbling. Make sure to clean your mixer or spatula between colors to keep them distinct.
Step 3: Roll Into Patriotic Cake Balls
Once combined, break off small chunks from each colored cake mixture—about one inch each—and roll them together gently with your hands to create colorful balls that show red, white, and blue swirls. Place each ball on parchment-lined baking trays. This was always my favorite part when I first made these—seeing the little pops of color come together felt so festive and fun! Chill the balls in the fridge for 1-2 hours so they hold their shape perfectly during chocolate dipping.
Step 4: Dip and Decorate Your Cake Balls
When chilled, it’s time for the magic coat—melt your white vanilla wafers gently using a double boiler or in the microwave on a low setting, stirring every 30 seconds till smooth. Dip each cake ball into the melted candy, tapping off excess gently so the coating isn’t too thick. Before the coating sets, sprinkle your festive red, white, and blue sprinkles on top to add that perfect crunch and classic 4th of July vibe. Pop them back in the fridge for at least 15 minutes to set. Enjoy the anticipation as they chill—you’ll love how gorgeous and delicious they look!
Tips from My Kitchen
- Don’t Overmix the Batter: When tinting, mix just enough to blend in the color—overmixing can affect the cake’s texture once baked.
- Chill Well Before Dipping: The more firm your cake balls, the easier they are to dip and the smoother your chocolatier coating will look.
- Use Parchment Paper: Lining baking trays with parchment prevents sticking and makes cleanup a breeze.
- Avoid Overheating Candy Melts: Heat slowly and stir frequently to keep candy smooth and prevent it from burning or seizing up.
How to Serve 4th of July Cake Balls Recipe
Garnishes
I usually top mine with a mix of red, white, and blue sprinkles—tiny stars and round nonpareils add that classic festive crunch I adore. Sometimes, I’ll throw on edible glitter for a little sparkle when hosting evening parties—it’s subtle but makes a big impression!
Side Dishes
These cake balls pair perfectly with other picnic-friendly desserts like fresh berries, flag-themed fruit salad, or a bowl of creamy vanilla ice cream for an indulgent summer spread.
Creative Ways to Present
For parties, I like to arrange these cake balls on a tiered platter, alternating colors for a beautiful display. Another fun idea is to place them in red, white, and blue cupcake liners arranged in the shape of the American flag—a total crowd-pleaser and super festive!
Make Ahead and Storage
Storing Leftovers
I keep leftover cake balls in an airtight container in the fridge, which keeps them fresh and moist for up to 5 days. Just bring them to room temperature before serving for the best taste and texture.
Freezing
Freeze leftover cake balls by placing them on a sheet tray first until firm, then transferring to a freezer-safe container or bag. They freeze beautifully for up to 3 months and thaw quickly in the fridge overnight.
Reheating
Since cake balls are best enjoyed chilled or at room temperature, I recommend thawing them in the fridge and letting them come to room temp. Resist microwaving—they lose their texture and coating can soften.
FAQs
-
Can I make the 4th of July Cake Balls Recipe ahead of time?
Absolutely! You can prepare the cake balls and dip them up to two days in advance. Just store them in an airtight container in the refrigerator to keep them fresh. For longer storage, freeze them as mentioned above.
-
What if I don’t have red or blue food coloring?
You could skip the coloring and simply make white cake balls, or use natural colorings like beet juice for red and blueberry juice for blue, but keep in mind these might affect batter consistency slightly.
-
Can I use other types of candy melts for the coating?
Yes! You can use any colors or flavors of candy melts you like. Just be sure to melt them gently and stir often to keep a smooth texture for dipping.
-
What is the best cake mix to use?
I recommend a simple white cake mix without any added flavors so the colors remain vibrant and the taste stays classic—plus, it pairs deliciously with cream cheese.
Final Thoughts
This 4th of July Cake Balls Recipe reminds me of summers with my family, sitting on the porch, enjoying sweet treats while watching fireworks. It’s simple yet festive, comforting yet exciting—perfect for sharing with friends and family. If you want a dessert that’s fun to make, beautiful to serve, and absolutely delicious, give these cake balls a try. I promise you’ll love how these little bites capture the spirit of the holiday in every single mouthful!
Print
4th of July Cake Balls Recipe
- Prep Time: 1 hour
- Cook Time: 16 minutes
- Total Time: 3 hours
- Yield: 30 cake balls
- Category: Dessert
- Method: Baking
- Cuisine: American
Description
Celebrate the 4th of July with these festive 4th of July Cake Balls, featuring vibrant red, white, and blue layers of moist cake mixed with creamy cream cheese and coated in smooth vanilla melting wafers. Perfect for parties and patriotic gatherings, these bite-sized treats are fun to make and even more fun to eat.
Ingredients
Cake Mix and Coloring
- 15.25 ounce white cake mix, plus ingredients on box needed to make it
- Red food coloring
- Blue food coloring
Filling and Coating
- 8 ounce block cream cheese, softened to room temperature
- 10 oz bag Ghirardelli vanilla melting wafers
- ½ cup red candy melts
- ½ cup blue candy melts
- Red, white, and blue sprinkles
Instructions
- Preheat oven: Preheat the oven to 350°F or follow the temperature on the cake mix package. Lightly grease three 8×8 inch baking pans and set aside.
- Prepare cake batter: In a large bowl, combine the cake mix with the ingredients called for on the box and whisk until smooth batter forms.
- Color batter: Divide batter evenly into three bowls. Leave one plain, mix red food coloring into the second bowl and blue food coloring into the third. Add coloring 5 drops at a time mixing until desired hues are reached, using separate spoons for each.
- Bake cakes: Pour each colored batter into its own greased pan. Bake for 16 minutes or until a toothpick inserted comes out clean and tops look set.
- Cool cakes: Remove pans from oven and let cool completely on wire racks.
- Crumble cake: Once cooled, crumble each cake into separate bowls.
- Beat cream cheese: Using a hand mixer on medium-high speed, beat cream cheese until smooth and creamy.
- Mix cream cheese with cake: Divide cream cheese into three portions. Add one portion to each crumbled cake and mix until fully incorporated, cleaning the mixer or spatula between colors.
- Form cake balls: Line two baking trays with parchment paper. Take one-inch chunks from each color and roll together with hands to form multi-colored balls. Place balls on prepared trays.
- Chill cake balls: Refrigerate cake balls for 1-2 hours until firm to maintain shape for dipping.
- Melt coating: Using a double boiler or microwave on low/defrost, melt white melting wafers until smooth, stirring every 30 seconds.
- Dip cake balls: Place a cake ball on a fork, dip into melted coating, tap to remove excess and thin coats, then place back on tray. Immediately top with red, white, and blue sprinkles. Repeat with all balls.
- Set coating: Chill dipped cake balls in refrigerator for 15 minutes to allow coating to firm up.
- Serve: Keep cake balls refrigerated until ready to serve and enjoy your festive treat!
Notes
- Refrigerate leftovers in an airtight container for up to 5 days to maintain freshness.
- Use separate utensils for mixing colored batter to avoid color bleed.
- Chilling the cake balls thoroughly before dipping ensures better shape retention and coating finish.
- If white melting wafers are unavailable, white chocolate chips can be substituted but may need careful melting to avoid burning.
- Store cake balls in a single layer to prevent sticking together.
Nutrition
- Serving Size: 1 cake ball
- Calories: 150 kcal
- Sugar: 12 g
- Sodium: 110 mg
- Fat: 8 g
- Saturated Fat: 4 g
- Unsaturated Fat: 3 g
- Trans Fat: 0 g
- Carbohydrates: 18 g
- Fiber: 0.5 g
- Protein: 2 g
- Cholesterol: 25 mg

