Peanut Butter Spider Cookies Recipe
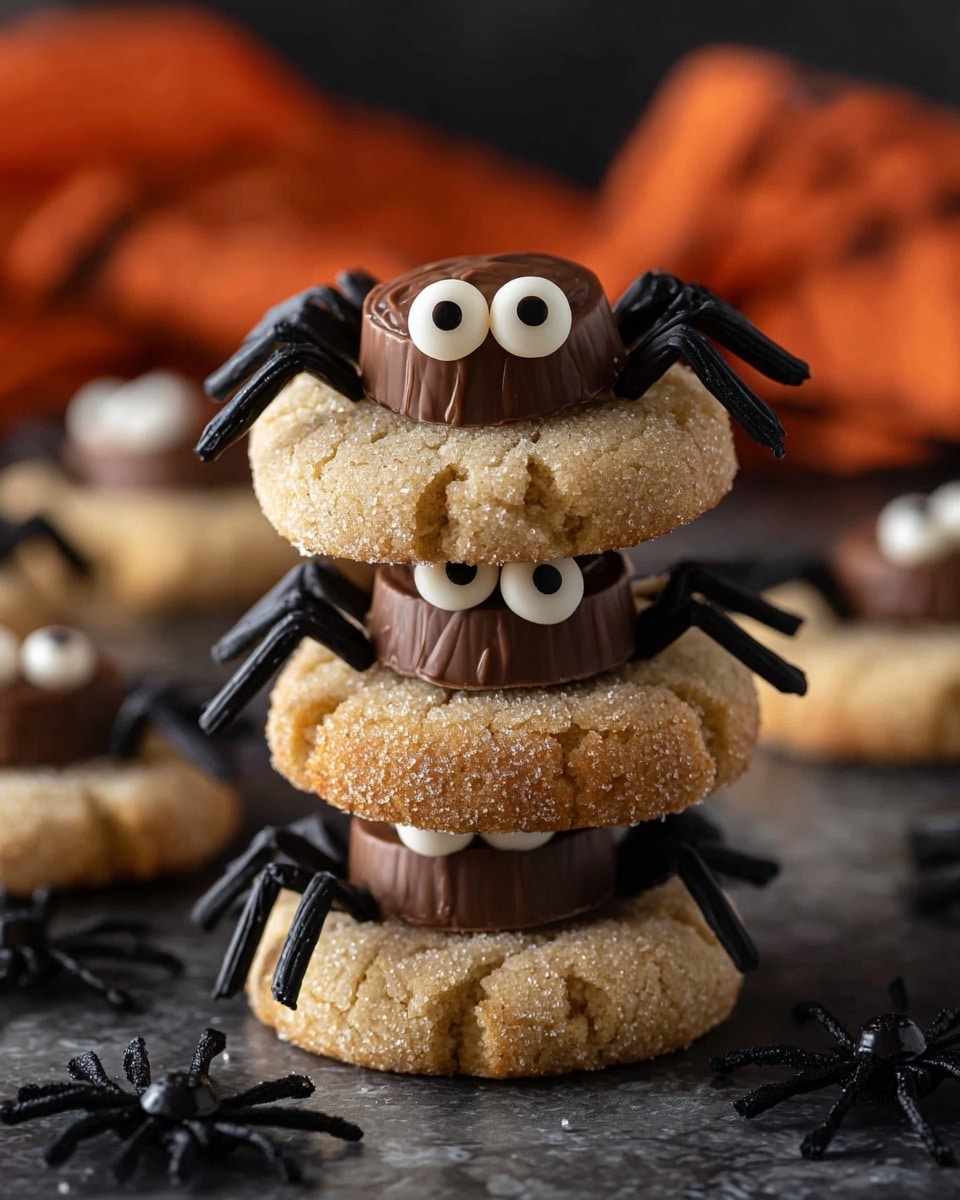
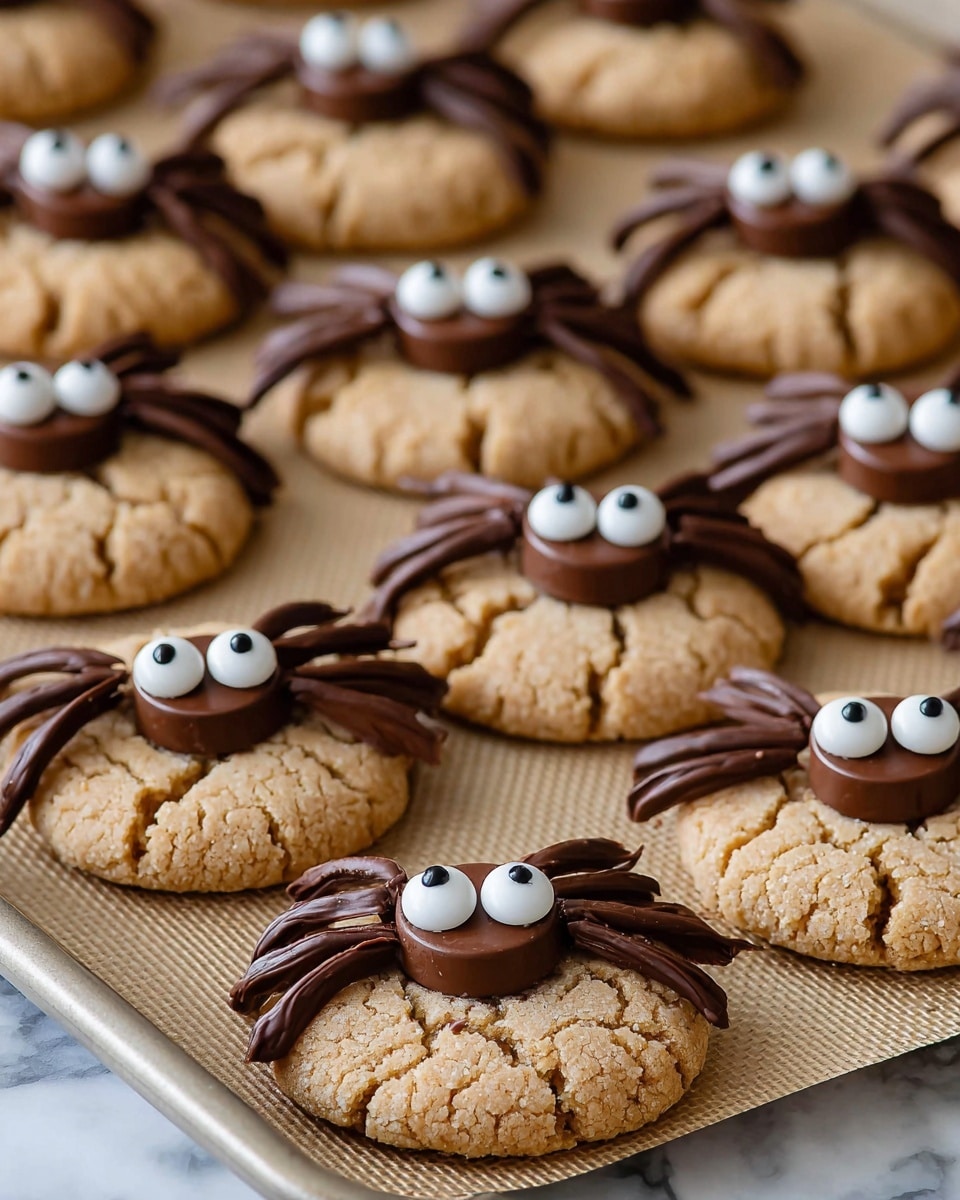
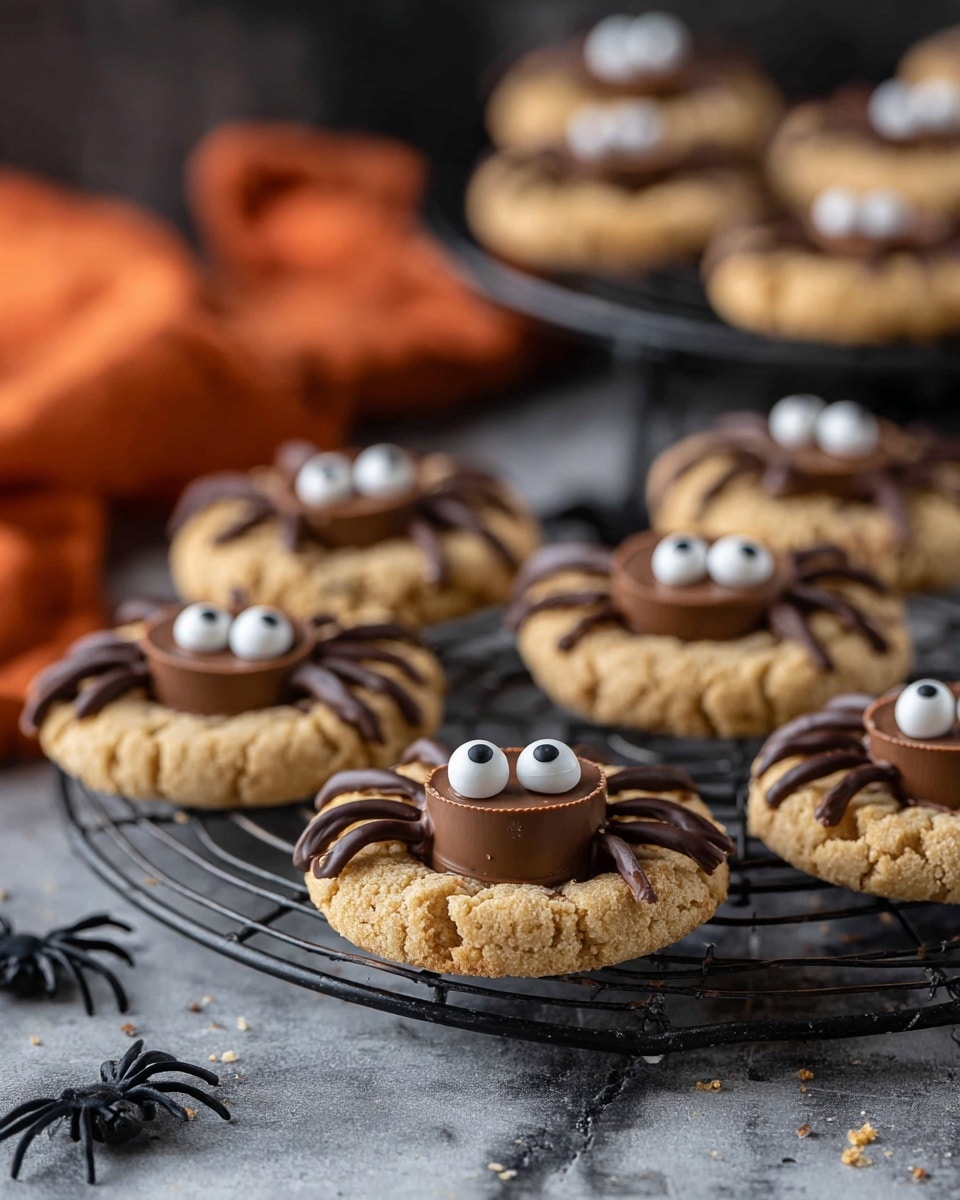
If you love peanut butter cookies with a fun, spooky twist, then you’re going to flip over this Peanut Butter Spider Cookies Recipe. Picture chewy, rich peanut butter cookies topped with mini Reese’s peanut butter cups, then decorated to look like adorable little spiders with chocolate legs and candy eyes. It’s the perfect sweet treat for Halloween, parties, or anytime you want a cookie that’s as playful as it is delicious. I’m excited to walk you through every step so your cookies come out spectacular every time!
Why This Recipe Works
- Perfect Texture: The combination of creamy peanut butter and sugars creates chewy, tender cookies that hold their shape beautifully.
- Cute & Fun Design: Using mini Reese’s cups with candy eyes and chocolate legs transforms a simple cookie into an eye-catching party favorite.
- Easy to Make: The recipe uses straightforward ingredients and simple steps, making it approachable for bakers of all levels.
- Flavor Balance: Slightly salty peanut butter paired with sweet chocolate and sugar coating keeps your taste buds happy with every bite.
Ingredients & Why They Work
Let’s chat about the ingredients that bring these Peanut Butter Spider Cookies to life. Each plays a role in nailing the perfect texture, flavor, and appearance—plus, I’ll sprinkle in some tips on picking the best versions to make your cookies shine.
- Unsalted butter: Room temperature butter ensures even creaminess when mixed with sugar, creating that tender crumb we love.
- Brown sugar: Adds moisture and rich molasses flavor, keeping the cookies soft and chewy.
- Granulated sugar: Gives a bit of crunch and helps the cookies crisp up just right around the edges.
- Creamy peanut butter: Opt for creamy, not natural peanut butter to get that perfect smooth texture without too much oil separation.
- Egg: Binds ingredients and adds lift, making the dough easy to handle and the cookies light yet chewy.
- Vanilla extract: Enhances the peanut butter flavor and adds warmth to the cookies.
- All-purpose flour: The foundation that holds everything together without making the cookie tough.
- Baking soda & baking powder: Helps the cookies rise just a bit and develop lovely cracks on top.
- Salt: A must-have for balancing sweetness and highlighting peanut butter’s natural flavor.
- Granulated sugar (for rolling): Adds a fun sugar crust that’s slightly crunchy and beautiful for holding the shape.
- Mini Reese’s Peanut Butter Cups: The star decorations that create the spider’s body while contributing extra peanut butter goodness.
- Semi-sweet chocolate chips: Melted down to craft the spider legs and attach the candy eyes.
- Candy eyeballs: They bring these adorable spiders to life, giving them personality and a touch of whimsy.
Make It Your Way
I always encourage you to play around with recipes like this one. Once you get the hang of making Peanut Butter Spider Cookies, it’s fun to customize them your way —whether it’s tweaking the decorations or playing with flavors. Here’s how you might do that.
- Variation: I’ve swapped the mini Reese’s cups for peanut butter-filled chocolates when I couldn’t find the minis, and it worked great—just give them a quick freeze so they hold up.
- Dietary tweak: Use gluten-free all-purpose flour instead of regular flour for a gluten-friendly recipe without sacrificing taste or texture.
- Seasonal idea: Around Christmas, try red and green candy eyeballs or mini M&Ms for the spider decorations to match the festive vibe.
- Chocolate option: For a richer spider, use dark chocolate chips instead of semi-sweet to create the legs and eyes attachments.
Step-by-Step: How I Make Peanut Butter Spider Cookies Recipe
Step 1: Chill the Mini Reese’s Cups
First things first, unwrap about 24 mini Reese’s Peanut Butter Cups and pop them into a bowl in the freezer. This trick is key! It helps the cups keep their shape when you press them into the warm cookies, so they don’t melt into a puddle. I always remind myself not to skip this—it makes a big difference in how cute the final spider looks.
Step 2: Cream the Butter and Sugars
In a mixing bowl, combine the softened butter, brown sugar, and granulated sugar. Using your electric mixer, beat everything together for about a minute until the mixture is smooth and fluffy. This step is so satisfying because you really see your cookie base coming together. Make sure the butter is softened—not melted—to get that perfect texture.
Step 3: Add Peanut Butter, Egg, and Vanilla
Next, add the creamy peanut butter, egg, and vanilla extract to the bowl. Beat again for less than a minute until everything is fully combined. The dough will start smelling amazing right now, so you’ll know you’re on the right track. Don’t overbeat here—just enough to combine.
Step 4: Mix in the Dry Ingredients
In a separate bowl, whisk together the flour, baking soda, baking powder, and salt. Slowly add this to the wet mixture, and stir either on low speed or with a spatula just until combined. It’s important not to overmix, or your cookies can get tough instead of tender, which no one wants!
Step 5: Shape and Bake
Use a small cookie scoop or a tablespoon to grab dough and roll it into uniform balls. Then roll each ball in granulated sugar to give a lightly crunchy coating that makes these cookies extra special. Space the cookies out 2-3 inches on a lined baking sheet, then bake at 350ºF for 8–11 minutes, watching for golden cracks along the edges. That cracking is a hallmark that these cookies are just right.
Step 6: Add the Peanut Butter Cups and Cool
When the cookies come out of the oven, immediately press one mini Reese’s cup into the center of each while the cookie is still warm. Then let the cookies cool for 15–20 minutes before moving them to a cooling rack. Trust me on this—moving them too soon causes the cups to sink, messing up the spider’s body shape. Patience here pays off big time!
Step 7: Melt Chocolate and Decorate
Melt your semi-sweet chocolate chips in the microwave at 50% power, stirring each minute until smooth. Transfer the melted chocolate into a squeeze bottle or a zip-top bag with a corner cut off for easy piping. Draw 4 spider legs on each side of the cookie, extending out from the Reese’s body. Then, using a dab of melted chocolate on the back of your candy eyeballs, attach two eyes onto each peanut butter cup. Let the chocolate set completely—then you’re ready to enjoy your creepy-cute creations!
Tips from My Kitchen
- Chill the Reese’s Cups: Always freeze the mini peanut butter cups before adding to the cookies to keep them intact without melting.
- Handle Dough Gently: Mixing just until combined helps keep your cookies tender and prevents tough edges.
- Watch Baking Time: Keep an eye on the cookies around 8 minutes to avoid overbaking; you want soft centers and crackly edges.
- Let Decorations Set: Patience is key—give the chocolate legs and candy eyes plenty of time to harden before serving to avoid smudging.
How to Serve Peanut Butter Spider Cookies Recipe
Garnishes
I like to keep the garnishes simple—those candy eyeballs are enough to give the cookies character. Sometimes, I dust a tiny bit of powdered sugar over the platter for a ‘spooky web’ effect. If you want extra flair, a drizzle of white chocolate over the top can mimic spider silk beautifully.
Side Dishes
These Peanut Butter Spider Cookies pair perfectly with a cold glass of milk or a warm cup of coffee or hot chocolate. I’ve also served them alongside simple sugar cookies or pumpkin muffins for a Halloween-themed dessert spread that everyone loved.
Creative Ways to Present
For parties, try arranging the cookies on a platter lined with plastic spider webs and sprinkle some edible glitter on top for extra sparkle. I once made a spooky dessert tray with these cookies, cupcakes with “spiderweb” icing, and gummy worms crawling around—it was a huge hit with the kids and adults alike!
Make Ahead and Storage
Storing Leftovers
I store leftover Peanut Butter Spider Cookies in an airtight container at room temperature. They stay chewy and fresh for about 4-5 days. Keeping the cookies separate from other moist foods avoids any change in texture.
Freezing
If you want to freeze them, I recommend freezing the unbaked cookie dough balls first—rolled in sugar and on a baking sheet—then transfer the frozen dough balls to a freezer bag. When you want cookies, just bake them straight from frozen, adding a minute or two to the baking time. Freezing the decorated cookies is tricky because the peanut butter cups and candy eyes might come off.
Reheating
To warm leftover cookies, I pop them in the microwave for about 10 seconds or place them in a 300ºF oven for 5 minutes wrapped loosely in foil. This softens the cookie without melting the decorations too much, bringing back that fresh-baked feeling.
FAQs
-
Can I use natural peanut butter for the Peanut Butter Spider Cookies Recipe?
Natural peanut butter tends to separate oil and can make the dough greasy and harder to manage. For best results, use creamy peanut butter that’s smooth and stable, as the recipe intends.
-
Why do I need to freeze the mini Reese’s cups before baking?
Freezing the mini Reese’s cups helps them hold their shape when placed onto the warm cookies. Without freezing, they can melt and lose their cute spider body look.
-
Can I make the dough ahead of time?
Yes! You can refrigerate the dough for up to 2 days before baking. Just roll and sugar the cookies fresh before baking for the best texture and appearance.
-
How do I prevent the candy eyes from falling off?
Using a dab of melted chocolate on the back of each candy eye acts like glue. Let the chocolate set fully before moving or serving to keep them securely in place.
Final Thoughts
This Peanut Butter Spider Cookies Recipe is one of my absolute favorites to make whenever I want something playful and delicious. The balance of peanut butter flavor, chewy texture, and whimsical presentation always brings smiles to the table. Plus, it’s such a fun project if you’re baking with kids or looking to impress guests with something a little out of the ordinary. Really, give it a whirl—I have a feeling this recipe will become one of your go-to favorites too!
Print
Peanut Butter Spider Cookies Recipe
- Prep Time: 15 minutes
- Cook Time: 11 minutes
- Total Time: 26 minutes
- Yield: 24 cookies
- Category: Dessert
- Method: Baking
- Cuisine: American
Description
These Peanut Butter Spider Cookies are a fun and festive treat perfect for Halloween or any spooky occasion. Soft and chewy peanut butter cookies are topped with mini Reese’s Peanut Butter Cups, decorated with candy eyeballs, and finished with melted chocolate legs to create adorable edible spiders.
Ingredients
Cookie Dough
- ½ cup (113g) unsalted butter, 1 stick, room temperature
- ½ cup (107g) brown sugar
- ⅓ cup (66g) granulated sugar
- ¾ cup (201g) creamy peanut butter, not natural
- 1 large egg
- 1 tsp vanilla extract
- 1 ½ cups (180g) all purpose flour
- 1 tsp baking soda
- ½ tsp baking powder
- ½ tsp salt
Rolling and Topping
- Granulated sugar, for rolling the cookies
- 24 mini Reese’s Peanut Butter Cups
- ½ cup (85g) semi-sweet chocolate chips, for melting
- Candy eyeballs
Instructions
- Freeze Reese’s Cups: Unwrap about 24 mini Reese’s Peanut Butter Cups and place them in a bowl in the freezer. This will help them maintain their shape when added to the hot cookies.
- Preheat Oven: Preheat your oven to 350ºF (175ºC) for baking the cookies.
- Make Dough Base: In a mixing bowl, combine the unsalted butter, brown sugar, and granulated sugar. Beat with an electric mixer for 1 minute until the mixture is smooth and fluffy.
- Add Wet Ingredients: Mix in the creamy peanut butter, egg, and vanilla extract. Beat again for less than 1 minute until combined.
- Add Dry Ingredients: Add the all-purpose flour, baking soda, baking powder, and salt. Mix on low speed or fold in with a spatula just until the dough comes together. Be careful not to overmix to keep cookies tender.
- Form Cookie Balls: Use a small cookie scoop or tablespoon to form tablespoon-sized balls of dough. Roll each ball between your hands to make it uniform, then roll in granulated sugar to coat.
- Arrange and Bake: Place cookies 2-3 inches apart on a silicone-lined baking sheet. Bake in the oven for 11 minutes or until the edges begin to crack and turn golden brown.
- Add Reese’s Cups: Remove the cookies from the oven and immediately press one mini Reese’s Peanut Butter Cup into the center of each warm cookie. Let cookies cool on the baking sheet for 15-20 minutes before transferring to a cooling rack to prevent the cups from sinking.
- Melt Chocolate: Place semi-sweet chocolate chips in a microwave-safe bowl. Microwave on 50% power for 3 minutes, stirring after each minute, until fully melted.
- Decorate Cookies: Transfer melted chocolate to a squeeze bottle or plastic sandwich bag with the tip cut off. Draw 4 spider legs on each side of the Reese’s Cup on the cookies.
- Add Eyes: Use a small dab of melted chocolate on the back of candy eyeballs to attach them to the Reese’s Cups. Let the chocolate set before serving.
Notes
- Freezing the Reese’s Cups before adding them to the cookies helps maintain their shape and prevents melting into the dough.
- Rolling the cookie dough balls in granulated sugar gives the cookies a nice crunchy exterior once baked.
- Be careful not to overmix the dough after adding the dry ingredients to keep the cookies soft and tender.
- Allow the cookies to cool on the baking sheet before moving to avoid the peanut butter cups from sinking and losing shape.
- Melt the chocolate slowly at 50% power in the microwave to prevent burning and achieve a smooth drizzle for decoration.
- If candy eyeballs aren’t available, small chocolate chips or edible markers can be used as an alternative.
Nutrition
- Serving Size: 1 cookie
- Calories: 180 kcal
- Sugar: 14 g
- Sodium: 120 mg
- Fat: 10 g
- Saturated Fat: 3 g
- Unsaturated Fat: 6 g
- Trans Fat: 0 g
- Carbohydrates: 18 g
- Fiber: 1 g
- Protein: 4 g
- Cholesterol: 25 mg

